
Did you know that you can customize PracticeMaster’s Document Management so that all documents automatically use the same folder and naming strategy? When PracticeMaster is set up to Automatically assign document folder and file names and Document Management records are set to Automatically Manage Document, you can specify not only where documents are saved, but also how they are named.
To Automatically assign document folder and file names
- From the Utilities menu, select Customization.
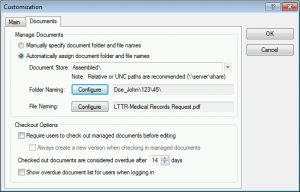
- From the Documents tab, select the Automatically assign document folder and file names option.
- Click the Configure button to the right of Folder Naming.
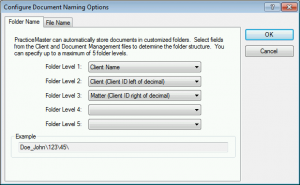
- Select the desired values for Folder Level 1 – 5.
- Click OK.
- Click the Configure button to the right of File Naming.
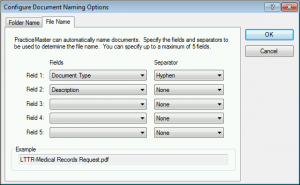
- Select the desired Fields and Separator for Field 1 – 5.
- Click OK.
- Select any other options as desired.
- Click OK.
For example, let’s say you use the values in the following screenshots:
 |
|
 |
 |
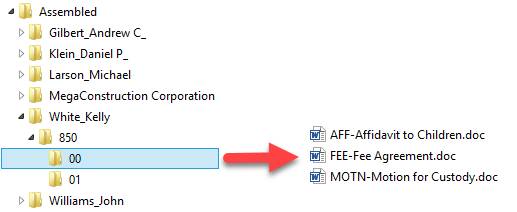
When using the values in the above screenshots, the Document Store (Assembled in our example), folder, and files would be organized as follows:
Make sure your documents can easily be found. Let PracticeMaster automate the organization of your documents!
For more information on all of the great Document Management features, check Knowledge Base Article R11572, “Document Management Guide.”

As you know, one of the greatest features of our online newsletter format is that you can search our entire newsletter archive for quick tips, Q&As, and other helpful articles.
If your results are not what you expected, then try our top five tips for getting the most out of your search:
- Use quotation marks for exact phrases
- If you want more specific results for a certain phrase, then enter that phrase in quotes so the results will only include articles with the same words in the same order. For example, searching for practice management could return 19 results, while searching for “practice management” could return 2 results.
- Do not use common words and punctuation
- Try not to use common words (e.g., a, and) and contractions (e.g., do not instead of don’t, cannot instead of can’t) as they can limit your search results.
- Do not worry about capitalization
- Search engines disregard capitalization, so whether you search for print, Print, or PRINT, they will all return the same results.
- Drop the suffixes
- It’s best to enter the base word so that you don’t exclude relative pages. For example, client and not clients, vendor and not vendors.
- Use keywords strategically
- Search engines do not read sentences the way people do. Asking questions in the search, such as “How do I print statements,” will not receive great results, whereas searching for “print statements” will provide better and more relevant hits.
If you can’t find what you’re searching for, send us an e-mail at newsletter@tabs3.com to submit your idea for a future article!

We have a client who is supposed to be billed $0.12 for copies rather than our usual $0.15. However, there are many costs that have been entered with the wrong rate. Is there a way we can easily change all of them at once?
Although Tabs3 Billing has the option to change fee rates via the Change WIP Transactions program, cost rates cannot be changed using this program. As a work-around, you can accomplish the cost rate change by creating a user activated WorkFlow in PracticeMaster. This type of WorkFlow runs only when initiated by a user, which means you can choose to run it for only the costs you want to change. The WorkFlow will change the Rate of the selected costs, recalculate the amount, and then automatically save the costs.
Tip: Once the WorkFlow has been created, it can easily be changed for future scenarios. For example, if you need to adjust cost records to a different rate, simply edit the existing WorkFlow for the new scenario.
To create a WorkFlow in PracticeMaster to change the rate of existing costs
- From the Maintenance menu, select WorkFlows.
- Expand the Common Client Related section, select Cost, and then click the New button.
- Enter a Name for the WorkFlow (e.g., “$0.12 Costs”).
- In the Event section, select the User Activated check box.
- In the Actions section, click New.
- Select Change Record, and then click Next.
- Select Source Record, and then click Define Template.
- Click on the set button next to the Rate field.
- In the Template Expression Editor window, click the Value button, and then enter the desired rate. For our example, enter “0.120”.
- Click OK on the Value window, and then click OK in the Template Expression Editor window.
- Click on the set button next to the Amount field.
- Click the Value button and enter the desired rate, and then click OK. For our example, enter “0.12”.
- Click the Operator button, select Multiplication, and then click Insert.
- Click the Field button, select Units from the Field ID column, and then click Insert.
- The following will now be displayed: “0.12 * @SrcRec:Units”. Click OK on the Template Expression Editor window.
- Press Ctrl+S.
- Click Finish.
- Click Save, and then close the WorkFlows window.
To run the WorkFlow, simply open the Cost file, select the desired cost records, and then select the WorkFlow from the WorkFlows group of the Quick Clicks pane. All of the selected costs will be updated with the new rate and recalculated amount.
This was the first month of Working with WorkFlows! Did you find this article helpful? Have any article suggestions? Leave us a comment below!

Are you using Matter Manager? If you’re not, you may not realize its potential. The Matter Manager is your client activity dashboard. Not only can you see client and contact information, but you can also view fees, calendar entries, document management and journal records, a billing summary, reports, and more! Matter Manager is also customizable. Want to learn how Matter Manager can enhance your practice?
View this six-minute video here:
Training Videos can be accessed 24 hours a day, 7 days a week, at Tabs3.com/videos. You can also access Training Videos while in the software by selecting Help | Documentation and then clicking the See also link for Tabs3 and PracticeMaster Training Videos.
Did you know that when adding, changing, or deleting a calendar record, PracticeMaster can be set up to generate an e-mail with the record’s details in the body and the applicable users in the To field? This makes it easy to notify users of calendar additions and changes.
To enable the Auto E-mail Notification feature, from the Calendar menu, select Auto E-mail Notification. A ![]() to the left of the menu option indicates that this feature is enabled. Keep in mind that each user who wants to have an e-mail auto-generated must enable this feature.
to the left of the menu option indicates that this feature is enabled. Keep in mind that each user who wants to have an e-mail auto-generated must enable this feature.
Once the e-mail has been generated, make any additional changes as desired and click Send. It’s that easy!


