
When setting up the software for the first time, the Key Type defaults to Numeric with 2 Decimal Places. However, some firms prefer to include letters in the Client ID or require additional decimal places. Both the Key Type and Decimal Places can be changed after the initial setup is complete, but there are a few things to keep in mind when considering making a change.
Key Types
- Numeric Key Type is the most commonly used and consists of only numerals. With a Numeric Key Type, you can automatically assign new Client IDs and matters.
- Mixed Key Type consists of alphanumeric characters to the left of the decimal and numeric characters after the decimal. With a Mixed Key Type, you cannot automatically assign new Client IDs, but you can automatically assign new matter numbers.
- Alpha Key Type consists of alphanumeric characters both to the left and the right of the decimal. With an Alpha Key Type, you cannot automatically assign new Client IDs or matters.
Note: Keep in mind that Mixed and Alpha Key Types do not integrate with select legacy cost recovery software programs. Contact Support at (402) 419-2210 for more information regarding legacy cost recovery software.
Changing the Key Type
Prior to changing the Key Type, take into consideration that all existing Client IDs must match the format of the new Key Type. For example, if you are currently set to the Alpha Key Type and you have alpha characters in your Client IDs, then all applicable Client IDs must be renumbered (Maintenance | Renumber | Client) to remove any alpha characters before changing the Key Type to Numeric.
To change the Key Type
- From the Maintenance menu, point to Renumber and select Change Key Type.
- In the Key Type section, select the desired New Type.
- Click OK.
Decimal Places
A Client ID consists of 11 characters and the decimal place for a total of 12 places. Typically, the portion to the left of the decimal is used to represent the Client, whereas the portion to the right is used to represent the matter. The most common reason to change the number of decimal places is when one or more clients have more matters than decimal places. For example, if you are set up to use 2 decimal places, then your clients will cap out at 99 matters. Although 99 matters may seem like a lot, for certain client types, such as insurance clients, you may reach that number quicker than you think. In our example, when you reach 99 matters, you have two options: start a new client or increase the Decimal Places.
Changing Decimal Places
You can either increase or decrease the Decimal Places. When increasing Decimal Places, you have the option to insert zeros at the Beginning or End of the decimal digits. For example, when selecting Beginning, client 152.82 would become 152.082. When selecting End, client 152.82 would become 152.820.
To change the number of decimals used
- From the Maintenance menu, point to Renumber and select Change Key Type.
- In the Decimal Places, enter the desired New Decimal.
- In the Insert Zeros section, select Beginning or End.
- Click OK.
For more information on changing the Key Type, including a list of things to consider prior to making a change, see Knowledge Base Article R11049, “Changing the Key Type or Decimal Places.”

When I’m creating WorkFlows, I’ve noticed the Prompt Before Running and Automatically save and close check boxes. When should I use these options?
The Prompt Before Running and Automatically save and close check boxes may be desirable to use as a permanent setting depending on the purpose of the WorkFlow. However, we recommend using these check boxes to test the WorkFlow before considering it complete. It is important to test your WorkFlows as part of the creation process to make sure they work as expected. If you make modifications, test the WorkFlow again.
Prompt Before Running
The Prompt Before Running check box is located in the WorkFlow Definition window. If the  Prompt Before Running check box is cleared, then the WorkFlow will run automatically when it’s triggered. When this check box is selected, a message will be displayed ask ing the user if they want to run the WorkFlow. Selecting this check box can be helpful when you are testing WorkFlows because you can see right away if the WorkFlow is triggered when you expect it to be triggered.
Automatically Save and Close
The Automatically save and close check box is located in the WorkFlow Action Wizard 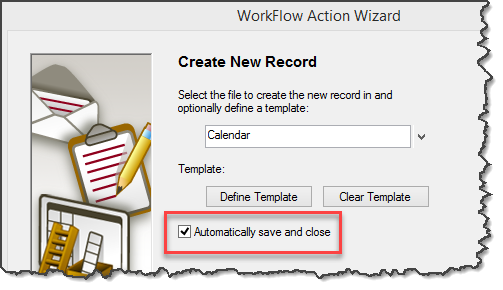 window when you select the Create New Record or Change Record action. If the Automatically Save and Close check box is selected, then new records and changes to records will be saved and closed without seeing the changes. If this check box is cleared, then the new or changed record will be left open for review with changes in green. Clearing this check box can be helpful by leaving the record open after the WorkFlow has run so that you can verify the correct additions or changes were made. If this check box is selected, you would have to find the record and open it to verify the WorkFlow worked as expected.
For more information on WorkFlows, refer to our new PracticeMaster WorkFlows Guide at Tabs3.com/support/docs.html or Knowledge Base Article R11307, “All About WorkFlows.”

You just accepted a client who requires that you start using Task Codes. What needs to be set up, and how does Task Based Billing work? Throw in Taskbill, which may be required if a third party will process the bills, and you may not know where to begin or how it all fits together.
The Task Based Billing and Taskbill Training Video walks you through setting up a client for Task Based Billing, setting up Task Budgets, entering fees and costs, and an example of what a statement may look like. Additionally, this video walks you through the process of using Taskbill, including configuration and exporting.
Get a jump start on Task Based Billing. Watch this 10-minute video here:

Training Videos can be accessed 24 hours a day, 7 days a week, at Tabs3.com/videos. You can also access Training Videos while in the software by selecting Help | Documentation and then clicking the See also link for Tabs3 and PracticeMaster Training Videos.

Did you know that you can print a Memo line on Accounts Payable Software (APS) checks? Although you can enter text in the Memo field of your invoices, you must be using Check Layout L1572 with the option to print the Memo field selected in order for memos to be printed on your checks.
To specify the check layout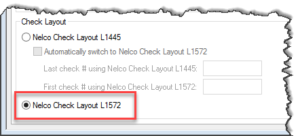
- From the File menu, point to Open and select Miscellaneous.
- From the Bank Account tab:
- Select the Bank Account.
- In the Check Layout section, select Nelco Check Layout L1572.
- Press Ctrl+S.
To specify that the Memo field be printed
- From the File menu, select Print Setup.
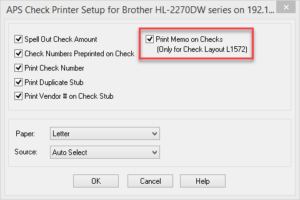
- Click the Check Setup button.
- Select the Print Memo on Checks (Only for Check Layout L1572) check box.
- Click OK on the APS Check Printer Setup window.
- Click OK on the Printer Setup window.


