
We are pleased to inform you that we now provide e-mail support to firms with a current maintenance plan! If you have a question for support, but prefer to reach us by e-mail, send us your questions.
To request e-mail support
- Go to Tabs3.com/support in your browser (e.g., Firefox, Edge, Internet Explorer, etc.).
- Click the Submit Support Inquiry button.
- In the e-mail window that is opened, enter the requested information (your name, firm name, the software product and serial number you are requesting support for, and your question) and then click Send.
An auto response will be sent to you confirming that we received your request. Our goal is to reply to e-mails within one business day. However, please keep in mind that time-sensitive inquiries or complex issues should be handled by phone.

I entered a calendar record in Outlook for myself and another attorney. When I checked PracticeMaster, it was on my calendar but not on the other attorney’s calendar. Why would it show on one but not the other?
The way that calendar records synchronize between PracticeMaster and Outlook depends on whether you are using Microsoft Exchange, and how System Configuration is configured.
If you are not using Microsoft Exchange, or you are but do not have System Configuration set up to take advantage of Microsoft Exchange, then the following synchronization rules apply:
- If you enter a record for yourself in PracticeMaster or Outlook, it will synchronize immediately if both programs are open.
- If you enter a record for another user in PracticeMaster, the record will synchronize to the other user’s Outlook calendar when their next Periodic Sync runs. Likewise, when you enter a record for another user in Outlook, the record will synchronize to the other user’s PracticeMaster calendar when their next Periodic Sync runs.
If you have Microsoft Exchange, there are two settings in System Configuration that can be used to immediately synchronize calendar records for other users. The first option, Use Microsoft Exchange to synchronize PracticeMaster and Outlook, is available in both the Platinum and non-Platinum software. The second option, Enable the Platinum Exchange Connector, is available only in the Platinum software.
Non-Platinum
If you do not have the Platinum version of the software, and the option to Use Microsoft Exchange to synchronize PracticeMaster and Outlook is selected, the following synchronization rules apply:
- If you enter a record for yourself in PracticeMaster or Outlook, it will synchronize immediately if both programs are open.
- If you enter a record for another user in PracticeMaster, and you have permissions set up in Microsoft Exchange to add records to the other user’s Outlook calendar, the record will synchronize to the other user’s Outlook calendar.
- If you enter a record for another user in Outlook, the record will synchronize to the other user’s PracticeMaster calendar when their next Periodic Sync runs.
Platinum
If you have the Platinum version of the software, and the options to Use Microsoft Exchange to synchronize PracticeMaster and Outlook and Enable the PracticeMaster Exchange Connector are selected, the following synchronization rules apply:
- If you enter a record for yourself in PracticeMaster or Outlook, it will synchronize immediately to the other program if PracticeMaster is open on at least one workstation.
- If you enter a record for another user in PracticeMaster or Outlook, it will synchronize immediately to the other program if PracticeMaster is open on at least one workstation.
Note: In order for synchronization to occur with other users, both users must have Outlook calendar integration and automatic synchronization enabled in PracticeMaster. For example, if Mary is creating events in Susan’s PracticeMaster calendar, and Mary is not set up to automatically integrate calendar records with Outlook, the events Mary enters will not be synchronized to Susan’s Outlook calendar until the next periodic or manual synchronization occurs for Susan.
For information on setting up and troubleshooting integration with Microsoft Exchange, see Knowledge Base articles R11373, “Microsoft Exchange Server Overview,” R11596, “Configuring the PracticeMaster Platinum Exchange Connector,” and R11597, “Troubleshooting the PracticeMaster Platinum Exchange Connector.”

Do you need a report that shows one or more clients’ billing histories, as well as a way to track the client’s balances due? Look no further than the Client Ledger Report!
The Client Ledger Report shows the amount of payments, fees, expenses, and advances. You can optionally include finance charge, fee sales tax, expense sales tax, advance sales tax, the balance due for each statement, and more. Detailed billed information that shows amounts billed by timekeeper and Cost Type can also be included on the detail reports.
Check out the Client Ledger training video to see how the options in this report can be used to maximize output, as well as see what the end result looks like.
Watch this four-and-a-half-minute video here:

Training Videos can be accessed 24 hours a day, 7 days a week, at Tabs3.com/videos. You can also access Training Videos while in the software by selecting Help | Documentation and then clicking the See also link for Tabs3 and PracticeMaster Training Videos.

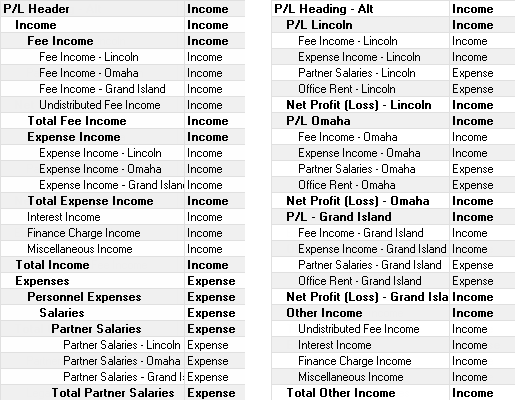
Did you know that you can set up your General Ledger Software (GLS) accounts in an alternate order for reporting purposes? This can be particularly useful when you need to subtotal accounts in more than one way.
In the example below, you can see how the alternate account order can be used for profit centers. The chart of accounts on the left represents accounts broken down by type (i.e., fee income, expense income, etc.), whereas the chart of accounts on the right represents accounts broken down by profit centers (i.e., Lincoln, Omaha, Grand Island, etc.).
To print reports using an alternate account order, you must enable the use of an alternate account order, and then specify the order in the Chart of Accounts.
To enable the use of an alternate account order
- From the Utilities menu, select Edit GLS Client.
- Select the desired Client Number.
- In the Options section, select the Allow an alternate account order to be defined in the Chart of Accounts check box.
- Press Ctrl+S.
To set up an alternate account order, right-click in the Chart of Accounts (File | Open | Chart of Accounts) and select View Alternate Account Order. You can now drag and drop accounts to their desired position. Once defined, reports can be run using the alternate account order by selecting the Use Alternate Account Order check box on the Account tab of any report that has an Account tab.


