
Taskbill is used to export Tabs3 Billing information for electronic submission. Many companies require firms to submit billed fees and costs in a specific format for online electronic billing. Taskbill makes this simple by exporting your existing Tabs3 Billing data into over 100 different predetermined file formats and subformats including LEDES 1998B, Legalgard Parsed Format, LitigationAdvisor, and TyMetrix.
Taskbill also provides flexibility! Information required by some electronic formats is not found in normal Tabs3 Billing fields. You can, however, set up Taskbill to use general text fields such as Custom Fields, Client Notes, and Miscellaneous Lines that are already in Tabs3 Billing to store this information. Exporting the data is as easy as selecting the format you have set up, selecting a client or range of clients, and selecting the statement date. The exported file can then be sent electronically!
To see if Taskbill will work for you, or to purchase a license for your firm, contact your local consultant, or call our Sales Department at (402) 419-2200. Information about Taskbill is also provided in Knowledge Base Article R10435, “Tabs3 Taskbill Product Information.”
Tabs3 Trust Accounting (Trust) is designed to help your firm keep track of the trust accounts you manage.
- Trust tracks an unlimited number of client trust accounts, and can warn you when an account goes below a minimum balance.
- You can print checks, record manual checks, record electronic funds transfers (EFTs), record deposits, reconcile your bank account in the software, and track your trust transactions through a variety of reports.
- The 3-Way Reconciliation Report helps you stay compliant when balancing your accounts. Not only that, but Tabs3 Trust Accounting has a wide range of reports that can be customized to fit your needs.
- Using the Tabs3 Trust Accounting Dashboard, you can easily stay on top of your Trust Account bank balances and quickly monitor any recent activity at a glance.
- Trust Accounting includes a Positive Pay Export program that allows you to export a list of all approved checks that can then be uploaded to your bank or financial institution’s fraud prevention program.
- The best way to accept credit card deposits for your firm is with Tabs3Pay. Securely make credit card or ACH deposits directly through Trust.
Trust provides seamless integration with Tabs3 Billing, PracticeMaster, Tabs3 Accounts Payable (AP), and Tabs3 General Ledger (GL).
- In Tabs3 Billing, trust balances can be shown in the Matter Manager and on work-in-process reports, trust transactions or balances can be shown on billing statements, and payments made to your firm from a client’s trust account can automatically generate a payment.
- Firms using Tabs3Pay can email a request to replenish the Trust balances at any time, giving clients a link to replenish their funds right away.
- In PracticeMaster, trust balances are shown as part of Matter Manager’s Billing Summary.
- In the Platinum edition, check requests can be created in PracticeMaster and sent to Trust.
- You can upload 1099 information to Nelco’s portal to make producing and sending 1099s a snap. Alternatively, IRS 1099 Forms (1099-MISC or 1099-NEC) information can be printed in Trust or be combined with AP 1099 information.
- Payments to the firm from Trust can create journal entries in GL. Additionally, accrual entries for Trust bank balances can optionally be posted in GL.
Trust accounting regulations require strict adherence. Tabs3 Trust Accounting provides peace of mind with the tools to help your firm manage your trust accounts. For more information, contact your local consultant, or contact our Sales Department at sales@tabs3.com.
Your clients use credit cards, and accepting payments from them has never been easier for your law practice. With Tabs3Pay features such as easy invoicing, next day funding, scheduled payments, surcharging*, and more, all within Tabs3 Software, you can make payments effortless for your clients and get paid faster. Tabs3Pay setup is quick and hassle-free. And because credit card processing fees can impact your firm’s profitability, we offer surcharging as a cost-saving solution.
With Tabs3Pay you can:
- Accept credit cards and electronic checks within Tabs3 Software.
- Reduce credit card expenses with optional surcharging – process unlimited credit cards for as low as $50.
- Manage separate trust and operating accounts from Tabs3 Software.
- Securely store payment information for future use.
- Email an invoice with a secure payment link.
- Schedule future and recurring Tabs3Pay payments.
- Request Trust replenishment.
Other Benefits Include:
- Get paid faster.
- Eliminate manual errors.
- Save time and collection hassles.
- Certified PCI compliant and secure.
To sign up for Tabs3Pay
- In the Tabs3 Billing or Trust Quick Launch, search for and select “Tabs3Pay Web Portal.”
- Click the Let’s Get Started button.
For more information on signing up for and configuring Tabs3Pay, see Knowledge Base Article R11869, “Configuring Tabs3Pay.”
*Surcharging laws vary by state and are subject to change. Always check with your local bar association for the most updated information.
Did you know that you can run your accounts receivable (A/R) reports for historical data? The Platinum edition of Tabs3 Billing provides the ability to print A/R balances as of a specific date. This option calculates the A/R based on records present in Tabs3 Billing, effectively showing what the A/R would have been on the given date.
To run a historic Accounts Receivable Report
- In the Quick Launch, search for and select “Detail A/R Report” or “Summary A/R Report.”
- On the Client tab, select the desired Client ID range.
- On the Options tab, in the A/R Period section:
- Select the Print Historic A/R (Platinum Only) option.
- In the Show A/R as of field, enter the date for which you want to see A/R information.
- Select any other desired options.
- Click OK.
Note: Although the calculated A/R will be correct based on records currently in the software, it is possible that it may not match an A/R report run on the original date if any transactions have since been deleted, statements unbilled, payments reversed, or any write offs reversed.
For more information about Platinum features, see Knowledge Base Article R11379, “Platinum Overview.” If you have any questions regarding Platinum features, contact your local consultant, or contact Technical Support at (402) 419-2210.
From your staffing choices to your office design and décor, you’ve done your best to make your clients feel at ease from the moment they walk through the door of your law firm. But do you offer them the same carefully considered experience online?
First impressions matter, and for many clients, they happen on the web. To convey the message that your firm is capable, professional, and trustworthy, you need a website that’s as informative and engaging as your legal arguments.
According to an American Bar Association survey, it’s estimated that 94% of law firms have a website. So although many legal professionals are attempting to meet this expectation, some law firms fall short, and there’s no doubt as to why.
Carving out the time and funds it takes to create a site that’s compliant, secure, and up-to-date can be difficult when you have a lot on your plate. And alternatives like outsourcing can be costly, time-consuming, and unreliable.
As a result, many managing partners decide that having an underwhelming website is better than not having one at all.
The problem is that a poorly designed or inconvenient website damages your credibility in the eyes of potential clients. In other words, a bare-bones site that lacks the features, security, and polished aesthetic your clients seek doesn’t just lead to a bad experience. It’s bad for your bottom line.
If your law firm’s website is lackluster, a reputable, client-oriented website that’s affordable and easy to manage is now within reach with Tabs3 Websites.
Seven things your firm and your clients will love about Tabs3 Websites:
- Compliant and confidential.
- Simple to search.
- Easy to use and eye catching.
- Made to meet your clients’ needs.
- Content worth reading.
- Ready in weeks, not months.
- Competitive pricing.
If you want to ensure you’re doing all you can to maximize your web presence while maintaining compliance and security, you want a legal-specific website solution.
That’s where Tabs3 Websites comes in. This exciting addition to the Tabs3 product line can help impress your clients, convert leads, and improve your firm’s profitability.
Check out this video on Tabs3 Websites and schedule your free demo of Tabs3 Websites today.
Tax time is stressful for everyone, but especially for businesses. Tabs3 Software has partnered with Nelco® to provide Tabs3 E-file, a complete solution to filing your 1099-MISC, 1099-NEC, and 1096 forms. You don’t need to deal with the forms, envelopes and postage, or configuring your printer at your office; instead, simply upload your data to the Tabs3 E-file portal and they can be electronically filed, printed and mailed, or emailed on your behalf, saving you time and manpower every year.
To transmit Form 1099-Misc and Form 1099-NEC to the Tabs3 E-file portal
- From the Accounts Payable Quick Launch, search for and select “Tabs3 1099 E-file.”
- Optionally enter a Minimum YTD Amount other than 600.
- In the Trust Transactions section, optionally select Merge transactions where Firm is the payer and/or Include transactions where Trust Account is the payer. (Note: Tabs3 E-file can also be started from Tabs3 Trust Accounting, with similar options.)
- Click Transmit.
- Log in with your Tabs3 E-file account information.
- In the Forms in Progress section, select the desired options and click Next.
- Verify your information is correct and click Next.
- Enter your payment information and click the Pay & Submit button.
Prefer not to use the Tabs3 E-file portal? No problem!
Tabs3 Accounts Payable (AP) and Tabs3 Trust Accounting (Trust) allow you to view 1099 information on reports, print Form 1099-MISC or Form 1099-NEC for filing, or create a 1099 Disk File which can be used to electronically file with the IRS. Using both AP and Trust together allows you to create a combined file by merging your Trust data into AP to run one set of 1099 forms or create a single electronic file.
Continuous 1099 Forms can be ordered directly from the IRS. However, for laser printer forms, we recommend ordering 1099 forms from Nelco. These forms are guaranteed to be 100% compatible with AP and Trust. Likewise, you can order W-2 Wage and Tax Statement laser forms from Nelco. Now is a good time to take inventory of your 1099 forms, AP checks, and Trust checks so you can order them all at the same time! Nelco has over 50 years of experience in the business forms industry. Order today by calling 1-800-266-4669 or visiting nelcosolutions.com/Tabs3.
Besides the many reports included in Tabs3 Software, you have several options for creating your own custom reports.
PracticeMaster
PracticeMaster comes with several built-in reports that will provide insight into the details of your clients, appointments, to-do lists, and pending assignments (e.g., calendar reports, client reports, and task lists). One of PracticeMaster’s most powerful features is a comprehensive Report Writer with the ability to create customized reports based on any information stored in PracticeMaster. You can create basic or complex reports using the Report Wizard or the Report Writer Editor. Furthermore, PracticeMaster comes with a collection of pre-defined reports that can be customized as needed.
Haven’t purchased a license of PracticeMaster yet? Not a problem! You can access the Report Writer using the free license of PracticeMaster that comes with Tabs3 Billing.
For more information on PracticeMaster Report Writer, refer to Knowledge Base Article R11446, “Working with PracticeMaster Report Writer,” or the PracticeMaster Report Writer Guide.
Output to Excel
Information from Tabs3 Software can be copied or printed to Microsoft® Excel. This allows you to rearrange columns as needed or compile data from several areas into one workbook.
- Copy from a list – When selecting items from any list, you can copy the selected item(s) to the Windows clipboard using Ctrl+C. You can also use the Copy All feature to copy all items from any list to the Windows clipboard using Ctrl+Alt+C. You can then paste the list into Excel.
- Print to File – When printing reports, in the Print Dialog Box, you can select File and then save the report as an Excel file. Although any report can be output to an Excel format, many reports have been specially optimized for Excel output.
For more information on Output to Excel, including a list of reports optimized for Excel output, refer to Knowledge Base Article R11280, “All About Outputting Tabs3 Software Data to Excel.”
Tabs3 Billing Report Writer
Right out of the box, Tabs3 Billing is equipped with more than 50 reports. However, if you need a report that is not already available in Tabs3 Billing, consider purchasing a license of Tabs3 Billing Custom Report Writer. The Tabs3 Billing Report Writer allows users of Tabs3 Billing to define and print reports and forms based on information in Tabs3 Billing. Reports can be saved in a report format or various file formats including fixed or variable length field format, Microsoft Word mail-merge format, WordPerfect merge format, and more. The Forms Writer portion of the software is ideal for printing mailing labels, client file labels, and much more.
For more information on Tabs3 Billing Report Writer, refer to Knowledge Base Article R10394, “Tabs3 Billing Custom Report Writer Product Information.”
GLS Report Writer
Tabs3 General Ledger (GL) automatically includes necessary financial reports such as General Ledger, Trial Balance, Balance Sheet, Income Statement, Statement of Cash Flows, Budget Report, and more. However, if you need a report that is not already in GL, consider purchasing a license of General Ledger Custom Report Writer. General Ledger Custom Report Writer is an application that interfaces with GL. It allows users of GL to define and print customized reports based on user defined formulas. Easily create and modify reports such as Current Ratio, Working Capital, Return on Owner’s Equity Ratio, Current Liability, and more. Balances from any balance sheet account (both detail and total accounts) can be used in formulas. Budget Figures, as well as Month-to-Date, Quarter-to-Date, and Year-to-Date balances from income statement accounts (both detail and total accounts) can also be used.
For more information on General Ledger Report Writer, refer to Knowledge Base Article R10395, “Tabs3 General Ledger Custom Report Writer Product Information.”
ODBC Driver
Data files for the Tabs3 Software are ODBC capable. Purchasing a license of the ODBC Driver lets you export data from Tabs3 Billing, PracticeMaster, and Tabs3 Financial software using various third-party ODBC compliant applications such as Crystal Reports Pro Report Writer, Microsoft Access, Microsoft Excel, and Microsoft Query. The ODBC driver is written by FairCom Corporation, the manufacturer of the c-tree file storage method used by Tabs3 Software.
For accelerated server-side ODBC performance, consider upgrading to the Platinum SQL edition of Tabs3 Software. Platinum SQL provides detailed access rights for ODBC users and a license of the ODBC driver for each user. For example, one user can have rights to the Tabs3 Billing data files without having access rights to the Tabs3 General Ledger data files. Both 32-bit and 64-bit versions of the SQL ODBC driver are included with the Platinum SQL software.
For more information on ODBC, refer to Knowledge Base Article R10017, “Working with ODBC,” or R11397, “Working with Platinum SQL ODBC Drivers.”
More Info
For more information or to purchase a license of PracticeMaster, Tabs3 Report Writer, General Ledger Report Writer, or an ODBC driver, contact your consultant or Sales at (402) 419-2200.
Want a quick and easy way to review your clients’ statements, and take action if necessary? Check out the Statement Manager!
The Statement Manager allows you to see a list of statements to determine what has been billed and paid. This makes it easy to quickly locate statements that have been final billed and updated. You can work with statements here using the actions in the Quick Clicks pane, or drill down to the Statement Information window for additional information. A Search box is available to quickly locate information anywhere in the list, such as finding a specific statement number when you receive a check.
Using the Quick Clicks on the right-hand side, you can:
- Take Action on one or more selected statement(s), such as reprinting a statement, making payments, writing off balances, or undoing updated statements.
- Utilize a QuickView, which combines a Filter, Column Layout, and default sort into a customized view that you can easily switch to at any time.
- Create a Filter to narrow down which records are displayed. Save filters for the whole firm to use, or just for your own use.
- Change the Column Layout used, which modifies the columns shown in the statement list.
- Customize your List Preferences to change how the list is displayed, and Manage Quick Clicks to customize the contents of the Quick Clicks pane. Customization is saved for each user.
Click here to view the “Using the Statement Manager” training video.
Firm information can change for many reasons, such as when you move, add partners, or the firm splits. Updating the software with your new information is important so that your firm is accurately represented on statements, checks, and more. Informing Tabs3 Software is also important so that information regarding changes to the software reaches you in a timely manner.
The main changes to firm information are made in System Configuration; however, other changes may also be necessary depending on your use of the software and are outlined below.
System Configuration
You can change your firm’s name, address, phone, website, and Federal ID # in System Configuration’s Firm Information window (File | Open | Firm). Changes to the firm’s name, address, Federal ID #, or phone will prompt you to print and send us a form with the changes. This is so that we can update our records.
Making changes to the Firm Information will automatically change the following information in the software:
- Heading of all reports in Tabs3 Billing, PracticeMaster, Trust Accounting (Trust), and Accounts Payable (AP).
- Firm name displayed on Trust and AP 1099 Forms.
- Firm name printed on Trust checks to your firm.
- Statement Designer layouts that use a variable for any of the fields that have changed.
- Document Assembly templates and report definitions that use any of the fields that have changed.
Note: When a change to the firm name is made in the Platinum edition, all users must exit the Tabs3 Software before the change will apply to the Tabs3 Software report headings or Trust checks to your firm.
Tabs3 Billing
The following changes to statement information may need to be made in Tabs3 Billing for changes to your firm’s information.
- If your firm uses the Headings tab in Statement Customization (In the Quick Launch, search for and select “Statement Customization”) to enter up to nine lines to be printed as a heading on each statement, these lines may need to be updated.
- If your firm uses Statement Designer layouts that provide firm information manually entered, instead of using variables, these layouts may need to be updated.
- If your firm uses bitmaps on statements that include the changed firm information, the bitmaps will need to be recreated.
General Ledger (GL)
In GL, the Client Name field in the Edit GLS Client utility (In the Quick Launch, search for and select “Edit GLS Client”) prints as a heading on all GL reports.
Tabs3 Remote
In Tabs3 Remote, the firm name is saved in Customization (Utilities | Customization) and is printed as a heading on all Tabs3 Remote reports.
If your firm information changes, make sure you update all of the necessary areas to help make the transition smooth.
Did you know that you can quickly and easily change certain fields for a range of transactions that have not been billed yet? Change WIP Transactions (In the Quick Launch, search for and select “Change WIP Transactions”) provides the ability to make changes to many transactions at once instead of spending hours making changes transaction by transaction.
Change WIP Transactions can be run for all of the same ranges you can run reports and statements; the Client and Transactions tabs are the same. This helps narrow down the range of transactions you want to change. The following options can be changed using this process:
- Set Status (Print or Hold)
- Date
- Convert Tcode to Task Code
- Phase/Task, Activity/Expense
- Sales Tax
- Bill Code
- Fee Category
- Rate
Some of the most common reasons for using Change WIP Transactions include when a timekeeper has changed their rates and transactions were entered with the old rate, changing transactions from a print to hold status (or vice versa), and converting tcodes to task codes when an existing client becomes a task based billing client.
The next time you find yourself needing to change a large number of transactions, stay on schedule by using Change WIP Transactions.
Tip: Due to the number of records that could be changed using this process, we highly recommend backing up your data before running Change WIP Transactions.
What are indexes, and how can they help your firm? The indexes in PracticeMaster control the order in which records are displayed on the List tab of each file. There are two types of indexes: temporary and permanent.
- Permanent indexes are set up in File Maintenance, are available to everyone, are not removed when
 closing files, and can be used for more than just column sorting, such as helping make filters faster. Additionally, you can select up to four sorts for each permanent index. For example, in the Client file you could create an index that will first sort by State, then City, then Area of Practice, and then Client ID.
 - Temporary indexes are created “on the fly” whenever you click on a column heading on the List tab, if that field does not already have a permanent index. Temporary indexes are available only to the user who created them and are removed as soon as the file is closed.
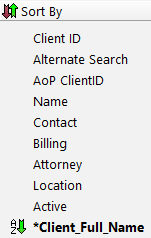
Although both indexes are shown in the Sort By group of the Quick Clicks pane, temporary indexes are indicated by an asterisk (*).
Why use permanent indexes?
- When creating a temporary index, PracticeMaster must look at all of the records and then sort them accordingly. Permanent indexes are already created, and thus are pre-sorted. Clicking on columns that have permanent indexes takes significantly less time for the records to refresh than when sorting using a temporary index.
- Once a permanent index is created, everyone can use it to quickly sort their records.
- Permanent indexes can be used in QuickViews. When creating a QuickView, both the Default Sort (which field/column to sort on) and Show Smart tabs by settings use permanent indexes in order to sort your records.
- Using a filter to target which records are displayed can be faster if the field you are filtering on is indexed.
- Report Writer reports can be faster when using a Primary Index.
Adding a permanent index
- In the Quick Launch, search for and select “File Maintenance.”
- Select the file for which you want to add a permanent index.
- From the Index tab, click the (New) button.
- Enter an Index ID for the new index.
- Enter a Description.
- Select the desired Sort Order(s).
- Click Done.
- Close the File Maintenance window.
If users are frequently using temporary indexes, create permanent indexes to help save time when sorting columns. For more in-depth information on indexes, visit Knowledge Base Article R11487, “Working with Indexes, Filters, and QuickViews.”
Dashboards are an easy way to get a quick overview of important data. Dashboards can be accessed via the Dashboard tab of the Home Page and provide the following information:
Tabs3 Billing Dashboard – Displays Accounts Receivable and Work-in-Process for each aging period, as well as a Cash Receipts and a Billing History billing widget to compare figures for the past two years. The dashboard can optionally be filtered in Platinum edition applications for one or more timekeepers, categories, or locations.
PracticeMaster Dashboard – Displays the current month’s Calendar, a list of upcoming events, a My Task list that allows you to easily check off completed items, and a Recap of Hours graph. Additionally, buttons to Add Event, Add Task, and Add Fee are included.
Trust Accounting Dashboard – Displays a summary of your firm’s active Bank Accounts and a list of Recent Trust Transactions. Additionally, buttons to Import Bank Transactions, Print Checks, and Add Transactions are included.
Accounts Payable Dashboard – Displays a list of Unpaid Invoices. Additionally, buttons to quickly Print Checks, Post Checks, print a Check Register, and Add Invoices are included.
General Ledger Dashboard – Displays a summary of your firm’s Bank Accounts and a list of Recent Bank Transactions. Additionally, buttons to Import Bank Transactions and Add Journal Entries are included.
Do you have multiple AP checks and/or GL journal entries that need to be entered each month? Use recurring entries instead of manually entering them every time!
Accounts Payable Software (AP)
Recurring entries can be set up in AP and then added (posted) to the invoice file in a monthly batch. Rent, leases, parking, and mortgage payments are examples of recurring entries.
To add a recurring entry in AP
- In the Quick Launch, search for and select “Recurring Entry.”
- From the Recurring Entry tab, press Ctrl+N.
- Enter the desired information for the recurring entry.
- Press Ctrl+S.
Once recurring entries have been added to AP, they can quickly be posted using Post Recurring Entries. All recurring entries are posted to the invoice file unless the recurring entry is on “hold”. The word “AUTO” (automatic) is posted to the Voucher field for each invoice created from a recurring entry.
To post recurring entries in AP
- In the Quick Launch, search for and select “Post Recurring Entries.”
- Click OK.
General Ledger Software (GL)
Recurring entries can be set up in GL and then added (posted) to the journal file in a monthly batch. Examples of recurring entries include depreciation, amortization, notes payable, fixed investment income, rent, monthly lease payments, etc.
To add a recurring entry in GL
- In the Quick Launch, search for and select “Recurring Entry.”
- Press Ctrl+N.
- Enter the desired information for the recurring entry.
- Press Ctrl+S.
Once recurring entries have been added to GL, they can quickly be posted using Post Recurring Entries. Post Recurring Entries adds a batch of journal entries to the journal entry data file based on the information in the recurring entry file.
To post recurring entries in GL
- In the Quick Launch, search for and select “Post Recurring Entries.”
- Optionally remove the check from any items you do not want to post this month.
- Click OK.
Save time by posting all of your recurring entries at once instead of reentering the same information every month!
When PracticeMaster performs a conflict of interest search, contact search, or document search, it searches the applicable index files for valid matches. Search Settings (In the Quick Launch, search for and select “Search Settings”) provide the ability to specify how and if indexes are updated, to rebuild indexes, and to specify words to be excluded from a search.
When accessing Search Settings, there are three tabs: Index Properties, Rebuild Index, and Exclude List.
Index Properties
To be included in a search, a field/file must be “indexed.” On the Index Properties tab, you have the option of selecting how to handle updating the Conflict/Contact Index, Email Attachments Index, and the Linked Documents Index.
- Select Automatic to update the index whenever records are added or changed.
- Select Manual to only update the index when the Rebuild Index program is run.
- Select Disable to disable search capabilities for that index.
The accuracy of PracticeMaster’s search options is dependent on the accuracy of the index files. We recommend using the Automatic setting to help ensure you have the most accurate index files, and therefore the most accurate search results.
Note: Changes made to a linked document are not automatically incorporated into the Linked Documents Index, even if it is set to Automatic. To incorporate changes to linked documents, you can update the index by manually rebuilding the Linked Documents Index, or by using a special startup option to manually rebuild the linked documents index file after hours (recommended). Alternatively, any changes made to the document management record itself, such as a change to a field, will automatically update the index.
When selecting Manual, it is recommended that you schedule times to rebuild the indexes.
Rebuild Index
Rebuilding an index updates Manual indexes, optimizes Automatic indexes, and optionally removes deleted records from the indexes. If you want to rebuild indexes, select the desired indexes and click the Rebuild Now button.
Although rebuilding the Conflict/Contact Index requires Exclusive access to the software in order to run, the Email Attachments and Linked Documents indexes can be rebuilt while users are working. For more information on rebuilding indexes via a startup option, see Knowledge Base Article R11659, “Rebuilding the PracticeMaster Search Index Files.”
Exclude List
The Exclude List tab provides a list of words that are excluded from all searches. For example, if the words a, of, and the are in the Exclude List, running a search with those words in it will display a message that the words will be excluded from the search and the search will ignore the words as it runs. This list can be edited via the Add Word and Delete Word buttons.
Make sure to take a moment and review your Search Settings to ensure your conflict of interest, contact, and document searches are optimized for your firm.
Typos happen, and sometimes they happen on a larger scale. When you need to change text in multiple records at once, what can you do? Use PracticeMaster’s Find and Replace! Find and Replace can be used to find text in one or more fields and/or records and optionally replace it – all at once.
You can access the Find and Replace window from any List tab via Edit | Find and Replace, by pressing Ctrl+F, or by selecting Find and Replace from the Take Action group in the Quick Clicks pane. If you want to see which records contain the text you want to find, from the Find and Replace window simply enter the desired text in the Search For field and click Find. The Search Results will list all records in which the text is found as well as the field where the text is located.
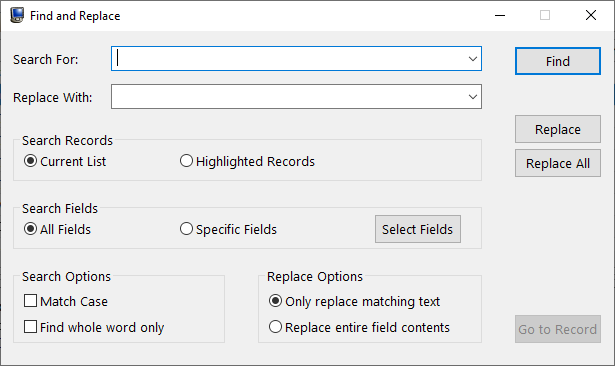
To replace text, enter the desired replacement text in the Replace With field. You can then replace each instance individually by clicking the Replace button, or you can replace all instances in the Search Results section by clicking the Replace All button.
Note: Because Find and Replace may not be easily undone, we recommend backing up your data prior to using the Replace All option due to the number of records that may be changed.
The following options in the Find and Replace window can be used to be more precise when searching:
Search Records
In the Search Records section, you can select to search the Current List or Highlighted Records. When selecting Current List, all records on the List tab of the file will be searched. This option takes into account any filters that have been applied to the file. Selecting Highlighted Records will only search those records that are currently highlighted on the List tab.
Search Fields
In the Search Fields section, you can select to search All Fields or Specific Fields. Selecting Specific Fields can help when you only want to find and/or replace text if it is included in certain fields, such as Description or Notes.
Search Options
In the Search Options section, you can select Match Case and/or Find whole word only. Selecting the Match Case check box will only return results that match the case of the text entered in the Search For field. For example, if the Search For field contains “Harry Henderson,” then any instances of “harry henderson,” “Harry henderson,” or “harry Henderson” will not be included in the Search Results section.
Selecting the Find whole word only check box will only return results that match the text in the Search For field exactly. If the check box is cleared, then it will return all words that contain the text in the Search For field. For example, let’s say that “Phil” is entered in the Search For field. If the Find whole word only check box is selected, the Search Results will not contain records with “Phillip,” “Phillips,” “philosophy,” etc. If the check box is cleared, then these words would be included in the Search Results.
Replace Options
In the Replace Options section, you can select Only replace matching text or Replace entire field contents. When selecting the Only replace matching text option, only the text that matches the Search For field will be replaced within the field. Conversely, when selecting the Replace entire field contents option, the entire field’s contents will be replaced by the Replace with text.
Find and Replace is a powerful feature that can find text and/or make changes in hundreds of records at once. Try it out the next time you need to make the same change in multiple records and see how much time you can save.
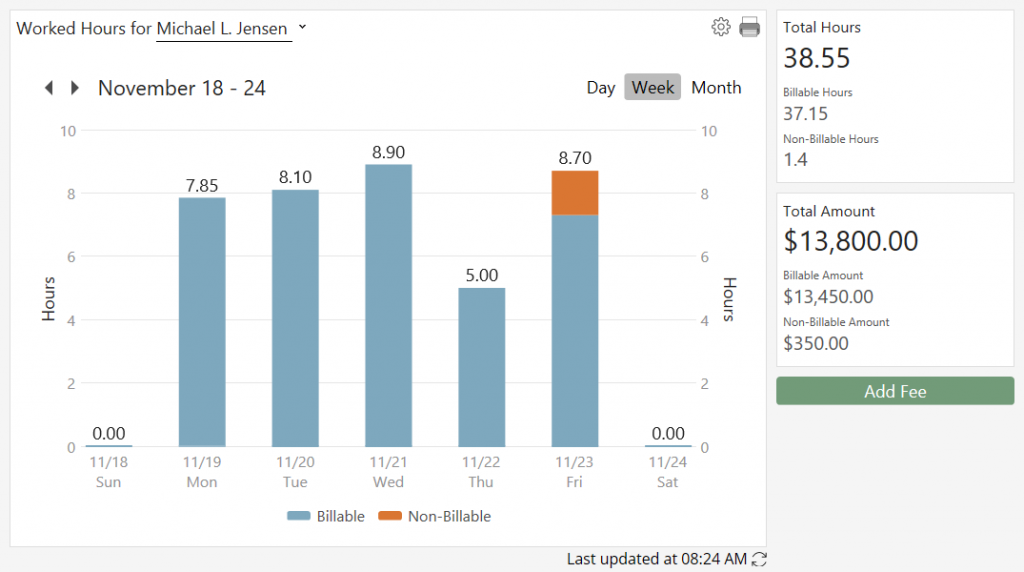
In Tabs3 Billing, PracticeMaster, and Tabs3 Connect, the Recap of Hours contains a graph that provides billable and non-billable hours and amounts at-a-glance, with the added ability to also see unprocessed time in PracticeMaster. By default, the bar graph will display the current week, and you can scroll forward and backward in time using the arrows at the top of the graph. Want to review and/or edit fees for a certain day? Simply click on the billable or non-billable time to open the Fee Recap Lookup window, where you can view the fee records or add new records on the fly! In PracticeMaster, click on the unprocessed time to open the Process Timer Records window so you can convert that time into billable fees.
The Recap of Hours can be accessed several ways.
- In Tabs3 Billing, the Recap of Hours can be accessed via the Quick Launch by searching for and selecting “Recap of Hours” or by clicking the
 button in the Fee Entry window. Additionally, you can run the Recap of Hours Report via the Quick Launch by searching for and selecting “Recap of Hours Report.”
 - In PracticeMaster, you can access the Recap of Hours on the Dashboard or via the Quick Launch by searching for and selecting “Recap of Hours.”
- In Tabs3 Connect, you can access the Recap of Hours by clicking on the
 icon.
icon.
To specify the Default Timekeeper, include a daily target comparison line, and, in PracticeMaster, to include unprocessed timer records, click the ![]() icon in the Recap of Hours window.
icon in the Recap of Hours window.
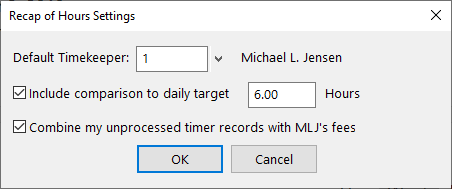
Although the Recap of Hours will always open to the Default Timekeeper selected, you can also select a different timekeeper for the current session.
Reviewing your time has never been easier!
Did you know that you can reprint client statements whenever needed? It’s easy to reprint statements when you’re required to provide them by the client or the court. You can reprint a single statement for a single client as well as multiple statements at one time. When printing multiple statements, you can print a range of clients, statement dates, and more.
To reprint a single updated statement
- In the Quick Launch, search for and select “Matter Manager.”
- Select the desired Client ID.
- In the List Content section, select the Statements heading.
- Click the statement you want to reprint to open a preview.
- Click the Print button.
Note: You can also reprint statements via the Quick Launch by searching for and selecting “Reprint Single Updated Statement.”
To reprint multiple updated statements
- In the Quick Launch, search for and select “Reprint Multiple Updated Statements.”
- Select the desired Statement Criteria (e.g., Statement Date, Client ID, etc.).
- Select the desired Reprint Options.
- Click OK.
Tip: Alternatively, you can run a Transaction File List (In the Quick Launch, search for and select “Transaction File List”) to show all transactions or a range of transactions for a client. Because the report uses a list format, printing a Transaction File List can significantly save paper depending on how many statements the client has had.
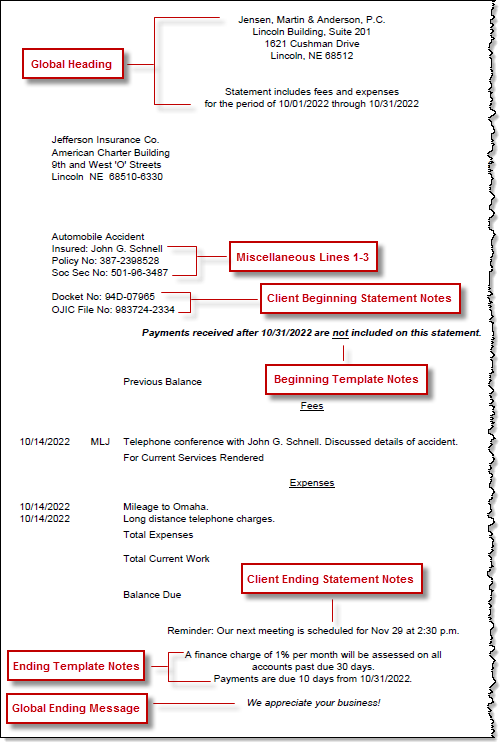
Are there additional notes that you want to add to statements for one or more clients? There are multiple areas in Tabs3 Billing to enter notes that can then be shown on statements for a single client, a group of clients, or all clients. A graphic is provided at the end of this article that represents each of the following elements.
Statement Notes for a Single Client
If you want to add notes to a single client’s statement, this can be set up in the Client file using the Beginning and Ending Statement Notes fields, located on the Statement Options tab, or the Miscellaneous lines 1-3, located on the Custom Fields tab.
Beginning and Ending Statement Notes
The Beginning Statement Notes will print following the Work Description and Miscellaneous Lines 1-3. The Ending Statement Notes will print at the end of the statement, but before any statement notes included in a statement template or ending text defined on the Headings tab of Statement Customization. Each of these fields has a maximum of 250 characters.
You can optionally select to Change Notes to blank after Statement updated if you want the note to only be included on the next statement.
Tip: You can optionally use Change Client Options (in the Quick Launch, search for and select “Change Client Options”) to set Beginning and Ending Statement Notes for multiple clients.
Miscellaneous Lines 1-3
The Miscellaneous Lines 1-3 will print following the Work Description. Each of these fields has a maximum of 255 characters.
Statement Notes for a Group of Clients
To add notes to multiple clients’ statements, you can use Statement Notes (in the Quick Launch, search for and select “Statement Notes”). Statement Notes can be up to 511 characters. Once Statement Notes have been created, they can be assigned to a statement template (in the Quick Launch, search for and select “Statement Templates”).
Statement templates provide the ability to include a Beginning Note that is shown below the Client’s Beginning Statement Notes, and an Ending Note that is shown below the Client’s Ending Statement Notes. Statement templates are assigned to each client via the Statement Options tab in the Client file.
Statement Notes for All Clients
If you want to show the same note on every statement for every client, then you can use Statement Customization (in the Quick Launch, search for and select “Statement Customization”). On the Headings tab, you can add up to 9 lines of text to the top of the statement (60 characters each), or 250 characters of text at the bottom. When adding Lines of text to be printed as a heading on the first page of each billing statement, this text will be the first text shown on the statement. When adding Lines of text to be printed as a message at the end of each billing statement, this text will be the last text shown on the statement.
A virtual field is a field that links to another field in a lookup file. Creating virtual fields provides a way to easily access information included in a lookup file from any other file, such as the Client file, Contact file, etc., which can help minimize double entry in the software. Additionally, virtual fields pull information from the lookup file, but cannot be edited. Virtual fields are read-only. This means that the information will be consistent everywhere the virtual fields are used. Examples of virtual fields include contact information. When you open the Client file, the address, Web Page, phone number, and Email fields are all virtual fields that pull from the Contact lookup file.
Let’s say you have created a lookup file for courts, and you want to display several fields from this lookup file in the Client file. This can be accomplished by using virtual fields. First, you must add a Lookup field to the Client File that will designate which record in the lookup file will be associated with the client. Then you can add one or more virtual fields.
To add a Lookup field to the Client File
- In the Quick Launch, search for and select “File Maintenance.”
- In the System Files group, select Client and click OK.
- From the Field tab, click (New).
- Enter the desired Field ID.
- Select a Field Type of Lookup.
- In the User Defined Lookup File field, select the lookup you created (e.g., the courts file).
To add a virtual field to the same file
- Click (New).
- Enter the desired Field ID.
- Select a Field Type of Virtual.
- Select the Lookup Field you created previously.
- Select the desired Field to Copy From.
- Repeat steps 1-5 for each virtual field you want to add.
- Click Done.
You can now use the Form Designer to add the new Lookup and Virtual fields to the Client file. Now, let’s say that down the road you also decide you want some of the information from the lookup file to appear in the Journal, Calendar, or Document Management files. Simply follow the instructions above for the desired file. Each virtual field will pull the information from the lookup file, so the information will always be the same regardless of which file you are accessing.
Once virtual fields have been added to a file, they can also be used in the Report Writer and in filtering data. Take a few minutes to review lookup files you have added to the software, and where the information from these files might be useful. Haven’t added any lookup files yet? Now might be the time to take a look at how your data is set up, and to see how much time lookup files and virtual fields might save you!
With a 72-year record of providing smart, creative, and effective legal guidance to their Washington community, the time was right for the firm’s billing and payment processing solution to evolve once more.
Hanson Baker wanted to create an effortless billing experience for clients by emailing invoices to clients and accepting online credit card payments. Finding a processor with transparent rates that integrated easily with their current software and workflows proved challenging, so the firm turned to Tabs3 Software.
As long-time Tabs3 Software users, they enjoyed Tabs3’s excellent software support and the many features available to them through PracticeMaster, such as the matter manager and dashboard. With affordable fees, transparent pricing, and the ability to attach payment links directly to their emailed invoices, Tabs3Pay was a natural choice.
To help with implementation, Hanson Baker worked with software consultant Christina Cline of C.R. Cline and Company. As a certified Tabs3 consultant, Cline was able to guide Hanson Baker through the implementation process and address potential hang-ups. With her oversight, adopting Tabs3Pay went off without a hitch.
Now, Hanson Baker’s clients enjoy a modernized, reliable payment process – and the firm saves time with smoother invoicing workflows. Not only has Hanson Baker seen improved cash flow due to shorter payment processing times with Tabs3Pay, but the need for collections has also declined.
Hanson Baker appreciates Tabs3Pay’s straightforward pricing and low processing fees, as well as usability features like the ability to print receipts after the fact. They’ve also benefited from Tabs3Pay’s integration with Tabs3 Software, reducing errors from manual input and wasted time from double data entry.
Cline reports that Tabs3 Software’s long record of excellent service is another reason Tabs3Pay was the right choice for Hanson Baker. “Tabs3 has been around for a long time,” Cline says, “Their support is in Lincoln, NE. You’re going to have your problem resolved. When you purchase Tabs3 and get it up and running, you’re not left to flounder.”
If you’re a current Tabs3 Software user and want to improve your firm’s billing and payment workflows, Tabs3Pay could be the solution. Tabs3Pay is designed to offer streamlined, trust accounting-compliant payment processing for law firms while integrating seamlessly with other Tabs3 Software applications. For more information, call (402) 419-2200, email sales@tabs3.com, or visit Tabs3.com.
Tabs3 Billing includes the flexibility to create rules that designate how payments are allocated to various timekeepers and to the firm. With Fee Compensation Rules, you have the ability to allocate payments for fees to the firm as well as to multiple originating, primary, and secondary timekeepers. Additionally, reporting features in Tabs3 Billing let you see allocations based on your pre-defined compensation rules.
- When creating Fee Compensation Rules, rules can be based on a percentage of receipts from:
- All working timekeepers
- Selected working timekeepers
- All working timekeepers assigned to a specific timekeeper level (i.e., partners, paralegals, etc.)
- Statements within a specified date range
- Accumulated receipts within an amount range
Once a payment has been allocated based on the defined rules, any remainder is distributed amongst the working timekeepers on a pro-rated basis.
Each matter can have a unique Fee Compensation Rules Table or can share a table with other matters. A shared table makes it easier to update multiple matters that all use the same allocation rules.
The Receipt Allocation Report and the Allocated Payments Report can include fee compensation information. Additionally, the Top Client Report can optionally use fee compensation amounts for fees paid.
To learn more about how Fee Compensation Rules can improve your receipt allocation reporting, open the Tabs3 Billing Help (press F1) and enter “Fee Compensation” on the Index tab.
When was the last time you backed up your Tabs3 Software data and tested the viability of your backup? If your firm was required to restore from a backup right now, how much data would be lost?
Regular backups are critical to the safety of your data. Tabs3 Software automatically prompts you to run a backup when a function cannot be easily reversed or when interruption of a process can cause errors in the data. When prompted to make a backup, review the date and time of the last backup shown on the prompt, and ask yourself how much data will need to be reentered if a restore is required. If you are not comfortable with the amount of work required after restoring, then you should back up your data before going any further. If you regularly find yourself skipping backups because it’s difficult to get every user to exit the software, consider the Platinum edition of Tabs3 Software. The HotBackup feature allows you to make backups while other users are still working in the software and Tabs3 Platinum Software can automatically recover from interruptions to many functions, including Update Statements.
Tabs3 Software provides the ability to back up and restore data from within the software. If you are using the non-Platinum edition of the software, you can keep up to three internal backups with a size limit of 2GB each. If you are using the Platinum edition of the software, backups are practically unlimited! You can keep up to 198 user-defined HotBackups, each limited in size only by the available hard drive space.
But is that enough? Backups made via the Tabs3 Software are considered temporary backups and only include your data files. These backups do not include executable files to run the programs, nor is every file in the Tabs3 Current Working Directory included. We recommend making regular backups of the entire Tabs3 Current Working Directory via a third-party backup program for purposes of recovering from a catastrophic failure, such as flood, theft, server hard drive failure, etc. If you already have a third-party backup in place, make sure that it is periodically tested to verify it is working correctly.
Now may be the perfect time to take a closer look at your current backup strategy and to verify the procedures you have in place. If you cannot take the time to review procedures now, add a reminder to your calendar to review them as soon as possible. Don’t be lulled into a false sense of security; backups that don’t restore correctly, or not having a backup, can cost you a great deal in both time and data loss.
For a list of resources on backing your data up and restoring, visit Knowledge Base Article R11524, “Backup/Restore Information Resources.”
Do you need to make a change that affects multiple clients or matters? Do you want to save time by changing clients all at once instead of one at a time? Use the Change Client Options utility! The Change Client Options utility allows you to change options in the Client file for a range of clients.
You can change options for client setup, rates, billing, and statements. This includes changing the timekeepers assigned to a case, client status, payment settings, fee and cost rate table information, billing status, sales tax and finance charges, statement delivery options, statement format settings, statement notes, and more!
For example, let’s say you have created a new Email Template, and you want to change all clients with a specific primary timekeeper to use this new template. You could edit each client to make the change, but with Change Client Options, you can change all clients at once!
To change all clients with a specific primary timekeeper at once
- In the Quick Launch, search for and select “Change Client Options.”
- On the Client tab, specify the Primary Timekeeper of the clients for which you want to add the new template.
- For the Client ID range, clear the Client ID Thru field. This field intentionally defaults to 0.00.
- From the Billing tab, click the Select button.
- Select Email Template from the list and click OK.
- Select the Email Template to use.
- Click OK.
The Change Client Options utility provides several features to help minimize errors. First, you are prompted to back up your data prior to running the program. If you inadvertently change a setting for the wrong clients, or you change the wrong settings, you can restore the backup to undo the changes. Second, the Client ID Thru field is automatically set to 0.00. This prevents an accidental change to all clients across the board. And third, you must click the Select button to specify the exact field(s) to which you want to make changes. Only the fields you select will be available to change; therefore, other fields and settings do not get changed.
The Change Client Options utility simplifies global changes, which means you will have more time for your regular tasks!
Did you know that you can quickly print a single check in Accounts Payable (AP) and Trust Accounting (Trust) without opening the Print Checks program? This can be accomplished via the Invoice/Manual Check Entry (AP) and Trust Transactions (Trust) windows.
To print a single check in AP via the Invoice/Manual Checks window
- In the Quick Launch, search for and select “Invoice/Manual Check Entry.”
- Select the desired Vendor.
- Select the invoice you want to print, or enter a new one.
- Click the
 (Print Check) button.
To print a single check in AP via the Dashboard
- On the Home tab, select Dashboard.
- In the Unpaid Invoices section, click Print Check next to the invoice you want to print.
To print a single check in Trust Accounting
- In the Quick Launch, search for and select “Trust Transaction Entry.”
- Select the desired Trust ID.
- Select the transaction you want to print, or enter a new one.
- Click the
 (Print Check/Receipt) button.
These methods allows you to quickly print a check when you need it, saving you time when you don’t want to print a batch of checks.
Although you are more than likely using alarms on your calendar records, you may not be aware of the 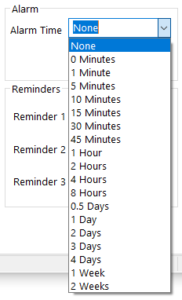 scope of how alarms can be set and snoozed.
When creating a calendar entry, you can select a preset value for an alarm, enter the desired alarm value, or use natural language, such as “tomorrow 3pm,” “next week,” “next month,” or “Monday.” Optionally select None if you do not want an alarm to be displayed.
Once an alarm becomes due, the PracticeMaster Alarm Notification window is displayed. From this window, you can mark tasks as completed, clear alarms, and snooze alarms. All alarms are displayed in this window, eliminating multiple alarm windows upon opening PracticeMaster. You can elect to snooze one of the alarms, some of the alarms, or all of the alarms at one time.
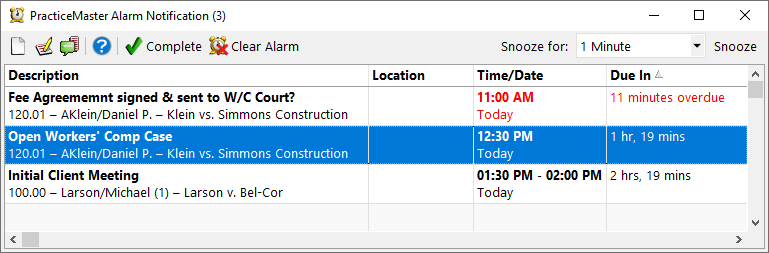
When snoozing, the PracticeMaster Alarm Notification window includes the same preset intervals as the Calendar record, but also includes “15 Minutes Before,” “10 Minutes Before,” “5 Minutes Before,” “2 Minutes Before,” and “1 Minute Before,” provided the interval does not exceed the amount of time until the record’s Start Time. Snoozed alarms are remembered – this means that once an alarm is snoozed, the alarm will not be displayed again until the snooze time indicated, including when you close and reopen PracticeMaster.
Make sure you don’t miss out on something important by taking advantage of PracticeMaster alarms.
Do you make manual adjustments for flat fee clients when you’re ready to bill them? If so, you may be making billing more difficult than it needs to be. Tabs3 Billing provides a way to streamline billing for flat fee clients.
To set a client up to be billed a flat amount, specify that they are a flat fee billing client and assign them to a statement template that does not bill fees. You can then enter your time normally. Once you are ready to bill the client for the flat amount, run the Adjust Flat Fee Clients utility, and then bill them using a statement template that does bill fees.
To set up a client for Flat Fee Billing
- In the Quick Launch, search for and select “Client Information.”
- Select the desired Client ID.
- From the Rates tab, select a Billing Rate Code of 0 – Flat Fee Amount.
- Enter the desired Flat Amount. This is the amount that will be billed to the client when you run the Adjust Flat Fee Clients utility.
- From the Statement Options tab, in the Statement Format section, select a Final Template that has a Fee Format of No Fees or Info Only. Optionally select a Draft Template that uses the same setting.
- Press Ctrl+S.
If desired, you can bill interim statements to show the client progress on the matter. Using a Final Template with a Fee Format of Info Only will show the fees, but not bill for them.
To process a final bill for the flat fee amount
- In the Quick Launch, search for and select “Adjust Flat Fee Clients.”
- Select the desired Client ID.
- Click OK.
- In the Client file, change the Final Template (step 5 above) to a statement template that has a Fee Format of Standard. (As an alternative, you can select the statement template via Generate Statements.)
- Generate a statement for your client.
Note: Due to the number of transactions that may be changed, we recommend making a backup of your data prior to running the Adjust Flat Fee Clients utility.
When the Adjust Flat Fee Clients utility is run, all of the client’s fees are automatically adjusted to equal the client’s specified Flat Amount, making billing a breeze and leaving you time to work on other projects.
Do you ever wonder how figures on reports are calculated? Report Packs take the mystery out of reporting. Sample reports are available for every Tabs3 application and each report is broken down field by field to explain exactly how the information is represented.
Each report consists of three sections: a sample report, the description of the report, and field definitions.
Sample Reports
At least one example is provided for each report so you can see how the report looks. More than one example is shown if there are significant differences in the formatting when different options are selected.
Description
An overview of each report briefly explains the purpose of the report and provides a summary of available options. You can use the overview to help determine if the report suits your current reporting needs.
Definitions
The Definitions section for each report provides a detailed breakdown of every field available on the report. This may be as simple as a Report Date field on a report representing “The date the report was printed,” or a calculation based on multiple fields. For example, on the Client Analysis Report, the Effective Rate field shows that it is calculated as “Hourly billing rate based on original hours. (Fees Billed minus Fee Write Offs) divided by Original Hours.”
To access the Report Packs
- Open the report for which you want to view the Report Pack.
- Press F1.
- Click the
 icon at the top of the Help topic (Report pack in PDF format).
When this icon is clicked, the Report Pack is opened. Alternatively, the Tabs3 Report Packs can be accessed from the Quick Launch by searching for and selecting “Documentation,” or Tabs3.com/docs.
The Form 1099-NEC has changed for Tax Year 2021. Don’t want to deal with forms this year? Try Tabs3 1099 E-file!
1099-NEC Changes for Tax Year 2021
The IRS changed the requirements for Form 1099-NEC submissions for tax year 2021. The following is a brief overview of these changes:
- The format of Form 1099-NEC has been updated for tax year 2021.
- The height of the form has been reduced so it can accommodate three-per-page forms.
- Only one address line is printed for the recipient’s street address.
As a result of these IRS changes, we have made changes to Trust and AP in Version 2021. You must update Trust and AP to Version 2021 (Build 20.6.6) or later before printing Form 1099-NEC for tax year 2021; these changes will not be added to Version 2020 or prior. To update, in the Quick Launch, search for and select Check for Updates. For more information on changes to tax year 2021, see Knowledge Base Article R11893, “IRS 1099-NEC Changes for Tax Year 2021.”
Tabs3 1099 E-file
Tabs3 has partnered with Nelco to provide Tabs3 E-file, a complete solution to filing your Forms 1099-MISC, 1099-NEC, and 1096. You don’t need to deal with the forms, envelopes or postage, or configuring your printer at your office; instead, simply upload your data to the Tabs3 E-file portal and they can be electronically filed, printed and mailed, or emailed on your behalf, saving you time and manpower every year.
To transmit forms to the Tabs3 E-file portal
- In the AP Quick Launch, search for and select “Tabs3 1099 E-file.”
- Optionally enter a Minimum YTD Amount other than 600.
- In the Trust Transactions section, optionally select Merge transactions where Firm is the payer and/or Include transactions where Trust Account is the payer. (Note: Tabs3 E-file can also be started from Trust, with similar options.)
- Click Transmit.
- Log in with your Tabs3 E-file account information.
- In the Forms in Progress section, select the desired options and click Next.
- Verify your information is correct and click Next.
- Enter your payment information and click the Pay & Submit button.
Prior to running final statements, each timekeeper typically reviews pre-bills for accuracy. Tabs3 Billing’s Pre-Bill Tracking (in the Quick Launch, search for and select Pre-Bill Tracking) can be used to track whether a pre-bill is on hold, has been reviewed, is ready to be printed as a final statement, or has already been printed as a final statement. This feature makes it easy to always know where a bill is at and what steps must be taken in order to complete the current billing cycle.
Using the Pre-Bill Tracking program to track the billing status of statements is quite simple. Pre-Bill Tracking records are added to the Pre-Bill Tracking window when a draft statement or a Detail Work-In-Process Report is run for a client (provided the Update Pre-Bill Tracking check box is selected on the Options tab). Once the records are displayed in the Pre-Bill Tracking window, you can track the status of each pre-bill.
![]()
When the reviewing timekeeper returns pre-bills to you, individual statements can be marked as “Reviewed” or on “Hold.” Once statement records are marked as reviewed, final statements can be printed directly from the Pre-Bill Tracking window by clicking the Final Statements button (provided they are not on hold and a final statement has not already been run). The records in the Pre-Bill Tracking window can easily be sorted by Client ID, Client Name, Description, Timekeeper, Pre-Bill Date, Hold Status, Reviewed Status, Final Date, or Batch by clicking the applicable column heading.
Click the Options button to select whether to view clients that are on hold or not on hold, clients that have been reviewed or not reviewed, clients that have had a final statement processed, or a combination of these selections. Additionally, you can select to view pre-bills for specific timekeepers, or a specific batch.
If you haven’t been using Pre-Bill Tracking, try it out the next time you run your pre-bills.
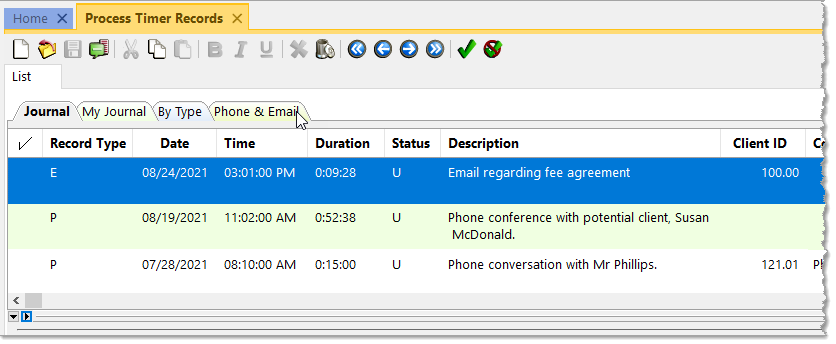
With PracticeMaster, you can use timers to track the time you spend on research, planning, correspondence, and more. However, if you don’t turn timers into fees, you may be missing out on valuable time that can be billed to your clients.
Process Timer Records (from the Quick Launch, search for and select “Process Timer Records”) provides the ability to convert your timer and other journal records into fees. You can optionally process records into individual fees or combine multiple timer records into a single fee, provided the records are for the same client.
To select a record in the Process Timer Records window, click in the ![]() column or click the
column or click the ![]() to place a check mark next to the record. If you want to remove the check mark from a record, click in the
to place a check mark next to the record. If you want to remove the check mark from a record, click in the ![]() column again or click the
column again or click the ![]() . Once one or more records have been selected:
. Once one or more records have been selected:
- Click the Combine to Fee button to combine all selected records into a single fee.
- Click the Convert to Fee button to create individual fees for each selected record.
- Click the Mark as Hidden button to remove the selected record(s) from the Process Timer Records window. (Note: Removing a record from the Process Timer Records window will not remove it from the Journal file.)
When clicking the Combine to Fee or Convert to Fee buttons, a Convert to Fee window will be opened, allowing you to edit the Fee before saving. Default Fee values for each record type (Email, Phone, Research, Timer, and more) can be specified via the Convert to Fee Settings utility (from the Quick Launch, search for and select “Convert to Fee Settings”). Specifying default values such as the tcode, timekeeper, description, and minimum time to bill can help streamline your Process Timer Records routine.
If you’re not already using the Process Timer Records feature, consider adding it to your process to help make sure you’re getting paid for your time.
Did you know that Tabs3 Billing provides several ways to customize your statements?
Statement Designer
Statement Designer lets you create customized layouts for your Tabs3 Billing statements. You can control the placement of various fields from the Tabs3 Client data file, and add customized text, images and other layout elements to the statement. Once a page layout has been designed, it can be applied to one or more statement templates. In the Quick Launch, search for and select “Statement Designer.”
Statement Customization
Statement Customization allows you to define terminology and formatting options used for all billing statements. Optionally enter heading information that can be printed at the top of the first page of the statement (the statement heading) or at the end of the statement. Optionally adjust terminology, such as column headings. Changes made to statement customization affect all clients. In the Quick Launch, search for and select “Statement Customization.”
Statement Templates
The Statement Templates window allows you to define statement templates. A statement template consists of the many formatting options used for a particular style of statement. The same statement template can be used for multiple clients. Changes made to a statement template affect all clients who use that template. There is no limit to the number of statement templates that can be defined. In the Quick Launch, search for and select “Statement Templates.”
Statement Notes
The Statement Notes program is used to create messages that can print on a client’s statement, cover statement or both. Statement notes created in the statement notes file can be designated as a beginning statement note or an ending statement note in a statement template. Each note can be used by any number of statement templates. In the Quick Launch, search for and select “Statement Notes.”
For detailed information on customizing your statements, check out the Statement Formatting Guide.
If you need to report on fees, costs, or payments, the Transaction File List or Task Code Billing Report is your answer. Both reports have great flexibility and options. The Transaction File List and Task Code Billing Report have similar options. The Task Code Billing Report includes task based billing clients only. However, the Transaction File List includes both task based transactions and non-task based transactions.
The following are examples of when you may want to run a Transaction File List or Task Based Billing Report:
- The court needs a copy of all work done on a case thus far. Run the report for only the one client, for fees only, and select both Work-In-Process and Archived.
- The case is closed and you want a list of all costs that were billed. Run the report for only the one client, for costs only, and select Archived.
- You want a list of all billed transactions using a particular transaction code or task code for the current quarter. Run the report for the desired transaction code or task code, enter the desired date range, and select Archived.
- You need to find a payment that was entered for the wrong client. Run the report for payments only, select the desired date range, and then use the Search function in the Preview window to look for the payment amount.
- You want a list of everything that was billed last month by a particular timekeeper. Run the report for the one fee timekeeper, enter the desired date range, select Archived, and use a Date Selection of Statement.
For a closer look at the Transaction File List, including detailed examples and report setup, as well as a comparison to the Task Based Billing Report, visit Knowledge Base Article R11039, “How the Tabs3 Transaction File List Can Work for You.”
Do you use the PracticeMaster Matter Manager? Matter Manager presents client and contact information in one easy-to-read window. Emails, phone calls, client notes, documents, and more are organized so that you can see exactly what has been done for the matter and when.
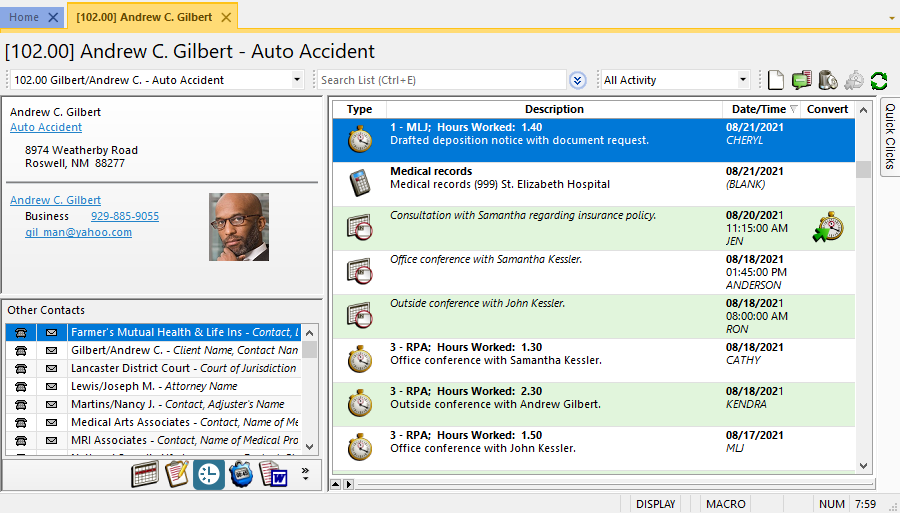
View All Activity for the current matter, or select a specific file from the Record Type Selector such as the matter’s calendar, contacts, documents, fees, journal, or Area of Practice information. If integrated with Tabs3 Billing, you can even view a Billing Summary that includes trust account balances, the current amount due, and the last payment date. Use the Billing Summary to quickly determine the financial value of the case, and convert activities to fees using the ![]() (Convert to Fee) button so that nothing gets missed on the client’s monthly statement.
(Convert to Fee) button so that nothing gets missed on the client’s monthly statement.
Get the most out of Matter Manager by adding or removing buttons from the Custom Taskbar so that it launches features and reports you use the most.
You will soon find that almost everything you do for a matter in PracticeMaster can be started from Matter Manager. If you want to automatically launch Matter Manager every time you open PracticeMaster, right-click the PracticeMaster desktop icon you use to start the software, select Properties, then add “ /manager” to the end of the Target field.
Matter Manager is a powerful way to track your clients. If you’re not already using it, take a look!
Resetting users incorrectly can be a costly practice in terms of lost time and productivity. It is important to realize the risks involved when users reset other users.
If you are using the Platinum edition of Tabs3 Software, performing any exclusive function when other users are in the software is easy. Use the Log Off Users function to safely close any Tabs3 programs that other users have open, even when users are away from their desks, without worrying about data loss. However, performing those same exclusive tasks in the non-Platinum edition with active users in the software requires that you ask each person to close the software because resetting a user who is in the software can have consequences.
Why is resetting a user not recommended? When the software is used, files are opened, saved, and closed by the server as they are requested by the workstation. When a user exits the software improperly, either by an unexpected computer shutdown, or being reset by another user, files that were opened by the server are not closed. Therefore, errors can occur when another user tries to access the same files. Users should always exit the software properly, and the resetting of users should only be performed for specific scenarios.
When is it ok to reset a user?
- Once you have confirmed that the user is not currently logged into the software on any computer.
- In some situations, such as if the computer shuts down unexpectedly, a “Duplicate User IDs were found. Would you like to reset the User ID?” message is displayed. In this scenario, because the User ID is locked in the software, you must reset the user.
When resetting a user, a Reset Confirmation window will be displayed. You must select each check box before the 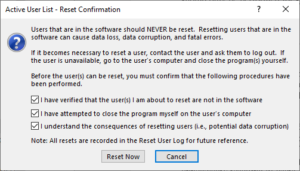 Reset Now button is available. This is intentionally designed to help prevent unnecessary resetting of users.
Manager access rights are required in order to reset other users. Users who are not managers can reset themselves, but cannot reset other users.
If you suspect that users are being reset at your firm without first verifying that they are out of the software, there is an easy way to check. Each time a user is reset, an entry is made to the Reset Log (View | Log Files | Reset Log). We strongly recommend that you periodically review the Reset Log to help ensure best practices are being implemented.
For more information on resetting users, check out Knowledge Base Article R10789, “Resetting Users.”
Taking the time to be prepared and educating your employees about resetting users and how to properly exit the software can prevent future problems and save you time and money.
Did you know that the Tabs3 Billing software comes with a one-user “Try Before You Buy” basic license of PracticeMaster that is free to use? If you don’t already use PracticeMaster, this basic license provides the ability to try out PracticeMaster and see how much practice management software will benefit your firm. Think you don’t need dedicated practice management software? If you’re relying on programs not designed for law firms, you’re missing out.
The Try Before You Buy basic license includes:
- Seamless integration with Tabs3 Billing clients.
- A PracticeMaster Matter Manager that lets you quickly see client information at a glance – check out related contacts, calendar entries, a billing summary, emails, and more. PracticeMaster allows you to link clients and contacts to any file, making it easier for everyone to find the information they need.
- A firm-wide calendar that ensures everyone in the firm can see upcoming meetings and client appointments. Additionally, you can integrate calendar records and contacts with Outlook, ensuring that everyone in the firm has access to contacts and matter information saved by anyone in the firm.
- Integration with third-party programs such as Microsoft® Outlook®, Word, Excel®, PowerPoint®, Adobe® Reader or Acrobat®, ScanSnap™, WordPerfect®, and more. Integration with these programs provides the ability to save your client and matter related documents to PracticeMaster’s document management program, journal emails to PracticeMaster, create fees, save research, and more.
- A Conflict of Interest Search used to quickly find information in the Client, Contact, Journal, Calendar, Document Management, Fee, and/or Cost files. Conflict of Interest searches help ensure that ethical walls in a firm are maintained.
- Timers to track your time on different projects and matters and make sure you’re billing for the work you perform.
- Customization. Add, edit, delete, and rearrange fields in any file. Want to see information in a different order, or only see certain fields? Use filters and QuickViews to show only the records that are pertinent to what you’re working on, in the order you want to see them.
Give PracticeMaster a chance to change the way your law firm runs by saving time and money using the free one-user “Try Before You Buy” basic license. You’ve got nothing to lose.
For more information about PracticeMaster features included in the “Try Before You Buy” license, also known as PracticeMaster Basic, see Knowledge Base Article R11548, “PracticeMaster Feature Comparison.” If you have any questions regarding PracticeMaster features, contact your local consultant, or contact Technical Support at (402) 419-2210.
When was the last time you reviewed the fields set up for history tracking in PracticeMaster? History tracking is an optional feature that can be used to maintain a detailed audit trail of all additions and changes to specific fields in a file.
When history tracking is turned on, you can access the Record History window for a particular record one of three ways:
- From the Edit menu, point to Action and select Display History.
- From the Quick Clicks pane, expand the Take Action group and select Display History.
- From the right-click menu, point to Action and select Display History.
The Record History window shows a list of all changes to the record and can be resized as needed. You can sort records in Field or Date Order, select changes for a specific user, and select changes for a specific field.
Double-click a line item to open the View Field History window. This window shows both the Old Value and the New Value of the field.
Perhaps not all pertinent PracticeMaster fields have been configured for history tracking. You can determine which fields have been set up to track history by printing a File Definition report. From this list, you can identify which fields should be changed. Once you have a list of fields for which you want history to be tracked, you can make the desired changes in File Maintenance.
To print a File Definition report
- From the Reports menu, select File Definition Report.
- Select the desired file and click OK.
To enable history tracking on a field
- From the Maintenance menu, select File Maintenance.
- Select the file you want to review, such as Client, and click OK.
- From the Field tab, select the Field ID for which you want to enable history tracking.
- Select the Track History check box.
- Repeat steps 3 and 4 for each field for which you want to track history.
- Click Done and select Yes to save changes.
- Close File Maintenance.
For more information on history tracking, including history file size, things to keep in mind when enabling this feature, and fields for which history tracking cannot be enabled, press F1 from any PracticeMaster window, and on the Index tab enter the keywords “history tracking”.
Drill-down capabilities provide the ability to quickly access data while previewing reports. Additionally, drilldown is available in entry lists (WIP only), the Tabs3 Billing Matter Manager, PracticeMaster Matter Manager, and Tabs3 Billing Recap of Hours.
- Reports – While previewing a report, when you mouse over a drill-down field, the field will be highlighted in yellow. Clicking the field will open an information page or a data entry window allowing you to view or edit the record. If an edit is made to a record, clicking the Refresh button (or pressing F5) in the Preview window will update the report to reflect the change made.
- Tabs3 Billing Matter Manager – Drill down to the client or contact as well as fees, costs, payments, client funds, statements, write offs, and Trust entries.
- PracticeMaster Matter Manager – Drill down to the client or contact as well as fee, cost, calendar, journal, and document records.
- Tabs3 Recap of Hours – Click on a day to display transactions for the selected timekeeper, and then double-click the transaction to open it.
For a complete list of reports and features with drill-down capabilities, refer to Knowledge Base Article R10646, “Drill-Down Features in the Software.”
Often, the most common source of unbilled costs are the everyday tasks done in your office. Photocopies, faxes, phone calls, and many other tasks can easily be overlooked when entering costs for a client. Simple cost recovery methods can reclaim these expenses as needed. Many manufacturers offer devices that collect information and create an export file, which can be used in Tabs3 Billing.
The Tabs3 Device Interface software takes the export files from most collection devices and converts them into costs that can be imported to Tabs3 Billing. Additionally, it allows you to customize import settings so any standard text file can be converted, even if it is not already configured in the conversion program. This means it is very likely that you can import your task information, regardless of the device’s manufacturer.
To see if the Tabs3 Device Interface will work for you, or to order a license of the Tabs3 Device Interface for your firm, contact your local consultant or call our Sales Department at (402) 419-2200. Information about the Tabs3 Device Interface can also be found in our Knowledge Base Article R10737, “Tabs3 Device Interface Product Information,” and in R11684, “Tabs3 Device Interface Instructions.”
Have you started using the great new navigation features, or are you still using Task Folders? If you’re using Quick Launch, All Actions, and My Actions, then you already know that we provide several customizable ways to access the features you need whether they’re tasks you perform every day, only once a year, or somewhere in the middle.
Theme Settings
The following options for navigating the software can be turned on or off via View | Theme Settings.
When selected, the Quick Launch can be used to search for a feature, pin frequently accessed actions and matters, or quickly access a recent action or matter.
When selected, the Home Page adds options for quickly accessing features and information:
- The All Actions tab provides a way to access every feature in the application, grouped by like action. For example, client and contact related features are located in the People group.
- The My Actions tab provides the ability to customize your experience. This tab can be used to add frequently accessed features or create your own groups, such as frequently used reports, month-end, and more. (Tip: If you’re still using Task Folders, you’re missing out on customization that can help streamline your processes!)
Other Navigation
The menus in each application provide access to all of the features in the application.
Many keyboard shortcuts are included in the software for power users. Keyboard shortcuts can help save time by keeping your hands on the keyboard more, instead of repeatedly moving to and from the mouse.
For more information on these navigation features and more, check out the Navigating Through Tabs3 Software Video. If you’re not using these navigation features, you’re missing out!
Want to know who backed up the data last and when, or who restored it? You can easily confirm who performed these actions and many more.
The Support Log (View | Log Files | Support Log) can help you determine which processes were run at what time by which user. This log is present for each application, including System Configuration. When running a Support Log, you can optionally specify a date range and/or select specific users. Manager users can access support logs for all applications at the same time via System Configuration (View | Support Log).
Every application includes the options to see when Back Up Data, Data File Integrity Check, and Reindex Files were run, in addition to when data was last restored and updates were last installed, and more. Each application also has information logged that is specific to the application, and although information included can vary, each feature includes who ran it and when it was run. The following are some of the features that are tracked in the Support Log:
Tabs3 Billing
- Customization
- Transfer Transactions
- Update Statements
- Undo Updated Statements
- …and more
PracticeMaster
- File Maintenance
- Form Designer
- Import Data
- …and more.
Trust Accounting
- Finalize Reconciliation
- Positive Pay Export
- Undo Reconciliation
- …and more
Accounts Payable
- Positive Pay Export
- Vendor Changes
General Ledger
- Edit GLS Client
- Finalize Reconciliation
- Undo Reconciliation
- …and more
With these tools in place, it is easy to quickly assess the various software events that occurred while you were out. This allows you to remain up to speed, even after a well-deserved vacation. More information regarding the Support Log is provided in Knowledge Base Article R11288, “Support Log Information,” and in each program’s “Support Log” Help topic.
Beginning with Version 2020, you can now quickly access statement information via the Tabs3 Billing Matter Manager (File | Matter Manager). Simply click on a Statement from the Matter Manager to display a Statement Information window for that statement. The Statement Information window includes the following:
The Statement Information section shows matter information, the Statement Date, Statement #, the total Billed on the statement, and the total Amount still Due.
The Statement Preview displays a reprint of the statement, using the same functionality as the Reprint Updated Statements program. Like any preview window, you can search, zoom, and print directly from this preview.
The Take Action pane allows you to perform tasks related to the statement, such as reprinting or undoing the statement, adding a payment, or writing off the balance.
Note: This feature is available in Tabs3 Version 2020 beginning in Version 20.2.6.
Tabs3 Financial Software is the best accounting solution for your law firm because it is specifically designed to meet the accounting requirements of law firms. With minimal setup and zero workarounds to satisfy most bar associations, you can print financial statements, write checks, reconcile bank statements, and manage client trust accounts in one easy-to-use and fully integrated software package. Additionally, because Tabs3 Financials is designed to work with Tabs3 Billing, you only need to call one support phone number if you ever have questions.
General Ledger Software (GLS) provides insight into your firm’s business with detail and summary financial statements. The following features are highlights of what GLS has to offer:
- Reports – Create Balance Sheet, Income Statement, Trial Balance, Journal Reports, and Advanced Client Cost Reports for you and your accountant. The General Ledger Report shows the opening balance, all journal entries, total debits and credits, and the closing balance for each account that is printed. Financial statements for your firm can be created for individual departments and locations.
- Chart of Accounts – GLS provides a chart of accounts that your firm can use as-is, or modify to fit your current account structure. You can also create budgets for each expense account. GLS allows multiple sets of books with unique charts of accounts and fiscal year-ends. Easily reconcile bank statements to cash accounts.
- Journal Entries – Add or adjust journal entries for prior months. Import transactions downloaded from your bank’s website to make reconciliation easy.
- Dashboard – The Home Page in General Ledger features a Dashboard that includes an easy to use graphical view of the firm’s financial standing. The Bank Accounts widget provides a summary of your active bank and credit card accounts. The Recent Bank Transaction widget shows the most recent journal entries and deposit slips made to bank and credit card accounts.
Accounts Payable Software (APS) makes bill paying easier. The following features are highlights of what APS has to offer:
- Write Checks – Print a batch of checks or use the Print Check feature to print a single check. Record handwritten checks. Print memos on checks. Enter invoices and let APS calculate the vendor discount. Use the partial payment feature to control how much you want to pay and how often. Put invoices on hold to prevent them from being paid until you want them to be paid. Combine multiple invoices from the same vendor on a single check.
- Integration – Categorize expenses for General Ledger Software when you enter invoices and checks. Include other Tabs3 information on reports such as the cost information if a cost was assigned through Tabs3 Billing, or which General Ledger account was used for the transaction. Post unpaid invoices to General Ledger to provide an accrual financial statement snapshot.
- Dashboard – The Home Page in Accounts Payable features a Dashboard that includes an easy to use graphical view of your payables, all on one screen. The Unpaid Invoices, Unposted Checks/EFTs, Paid this Month, and Unpaid Invoices widgets show summaries of outstanding invoices, printed and manual checks, and EFTs.
- Create 1099 Forms – Electronically file or print 1099 forms and combine amounts paid to vendors and Trust Accounting payees to meet IRS thresholds.
- Recurring Transactions – Automatically enter recurring transactions and summarize vendor payments. See all of your checks in one easy-to-use check register.
- Positive Pay – Accounts Payable includes a Positive Pay Export program that allows you to export a list of approved checks that can then be uploaded to your bank or financial institution’s fraud prevention program.
Trust Accounting Software (TAS) manages trust accounts for your clients accurately and easily. The following features are highlights of what TAS has to offer:
- Integration – Tabs3 Trust Accounting Software provides seamless integration with Tabs3 Billing Software, Tabs3 Accounts Payable Software, and Tabs3 General Ledger Software, with the same look and feel as Tabs3 Billing Software.
- Ease of Use – Track an unlimited number of trust accounts and manage up to 99 different bank accounts. The software warns you when an account goes below a minimum balance, and helps you easily reconcile your bank statements.
- Easily Manage Your Trust Accounts – Electronically file or print checks, ledgers for individual trust accounts and bank accounts, and IRS 1099 forms. You can also process client deposits via credit card (merchant account required, click here for more details).
- Dashboard – The Home Page in Trust Accounting features a Dashboard that includes an easy to use graphical view of the firm’s trust account standing. The Bank Accounts widget provides a summary of your firm’s active trust bank accounts. You can easily start a reconciliation or bank transaction import right from the Home Page. The Recent Trust Transactions widget shows the most recent trust transactions and combined trust transactions.
- Positive Pay – Trust Accounting includes a new Positive Pay Export program that allows you to export a list of approved checks that can then be uploaded to your bank or financial institution’s fraud prevention program.
What is the Client Inactivity Report, and why should you use it? The Client Inactivity Report can be used to identify clients and matters with no activity in a specified time frame, which can help keep clients from slipping through the cracks. This report allows you to do the following:
- Report on which clients have not had any activity in the last year so you can mark applicable matters as closed.
- Determine which clients you have not received a payment from this month so that you can send a reminder statement or write off amounts.
- Provide each Primary Timekeeper with a report of all active matters with no fees in a certain time frame, such as the last two weeks.
- Plus much more!
A Client Inactivity Report can be run in both Tabs3 Billing and PracticeMaster; however, each program provides unique options to run the report.
- In Tabs3 Billing, you can search for activity in fees, costs, statements, payments, payment adjustments, write offs, and client funds.
- In PracticeMaster, you can search for activity in the Calendar, Journal, Document Management, Fee, Cost, Additional Common Client Related, and Area of Practice Files.
To run a Client Inactivity Report
- In Tabs3 Billing, from the Reports menu, point to Client and select Client Inactivity Report.
…or…
In PracticeMaster, from the Reports menu, select Client Inactivity Report. - On the Client tab, select the desired client range.
- On the Options tab:
- In the No activity in the last field, enter the desired time frame.
- Under Items to Search/Files to Search, select the desired check boxes.
- On the Sort tab, select the desired Primary and/or Secondary Order.
- Click OK.
Note: By default, the Client Inactivity Report is set to only include clients that are currently active and do not have a Date Closed specified. However, this setting can be changed. From the Client tab, click the Select Status button and select the desired option(s).
In Version 2020, we added the ability to link an electronic copy of a statement or receipt to an invoice, manual check, or EFT transaction in Accounts Payable Software (APS)!
When attaching a file to an invoice, a copy of the file is saved to the APS Invoice folder in the Current Working Directory. Files can be viewed by clicking the link in the Invoice/Manual Check Entry window, or the attachment icon in the Unpaid Invoices List on the Dashboard.
To attach a file to an invoice
- From the Dashboard, in the Unpaid Invoices section, click the desired invoice.
- Click the Attach File button on the toolbar, or the Add Attachment link below the Description field.
- Select the desired file and click Open.
- Enter any other information for the invoice as needed.
- Press Ctrl+S.
This feature was added in Version 20.1.8.804.
Did you know that you can add tabs to the Client, Contact, and Journal files that are specific to an Area of Practice, Contact Category, or Journal Type?
These tabs are called category pages. Category pages are a special type of page that is only shown in the Editor window when the selected client or record is associated with that category. You can use the Form Designer to customize how the pages will look.
- Client category pages are configured for individual Areas of Practice (e.g., Personal Injury, Family Law, Workers’ Compensation, etc.). These pages will only be shown when a client belonging to that Area of Practice is selected.
- Contact category pages are configured for individual contact categories (e.g., Attorney, Prospect, Insurance Adjuster, Witness, etc.). These pages will only be shown when a contact assigned to that contact category is selected.
- Journal category pages are configured for individual journal record types (e.g., Email, Phone Task, Research Task, etc.). These pages will only be shown when a journal record of that record type is selected.
Setting up a category page provides a way of showing only those fields that are relevant to the selected “category,” thus reducing the number of visible pages.
In order to create a category page, you must first add any fields specific to the category page to the associated file using File Maintenance (e.g., add the desired fields to the Contact file). Once the fields have been added, the category page and fields must be added to the data entry window using the Form Designer.
To create a category page
- From the List tab of the Client, Contact, or Journal file, select Edit | Form Designer.
- To add a category page, click the
 (Add Category Page) button.
 - Select the appropriate Area of Practice, Contact Category, or Journal Type with which the category page will be associated and click OK.
- A new page will be displayed. To rename the page, double-click the category page tab, specify a name for the page, and click OK.
- Add fields, group boxes, and labels until the category page is complete.
- Close the Form Designer and save the changes made to the form layout.
Additional information regarding category pages can be found in Knowledge Base Article R10566, “Category Pages in PracticeMaster.”
Beginning in Version 2020, you can now select whether you want the Newsletter Reminder window to pop up each month or not! Once you have updated to Version 20.1.5 or later, the Newsletter Delivery Options window will be displayed when logging in. You can select to either subscribe to the Email Newsletter, or to have the Newsletter Reminder window continue to open after the 14th of each month.
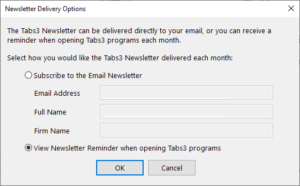
You can always change your mind later. Newsletter Delivery Options can be accessed via the Delivery Options button on the Newsletter Reminder window as well as via the Help | Internet Resources | Newsletter Delivery Options menu.
Every time you open a new matter, what other tasks do you need accomplished? Many items on your to-do list are likely predictable and repetitive. There are people to email, documents to collect, records to update, and the list goes on. Although PracticeMaster can’t do everything on your to-do list, WorkFlows automate many tasks so that you can spend more of your time on the things that need your personal attention.
PracticeMaster WorkFlows react to tasks or activities and start a chain of events that you define in advance. For example, every time you schedule a client meeting, you can use a WorkFlow to assemble an email to the client with meeting details and directions to your office.
You can use WorkFlows to help make sure your office procedures are always followed. For example, if it is your policy that internal meetings are not billed to a client, set up a WorkFlow that will display a popup message when an employee converts an internal meeting to a fee: “You have billed for an internal meeting. Please confirm this is correct.”
WorkFlows can help you keep clients and colleagues informed. When an important milestone in a matter is reached, such as a deposition or court date is set, a WorkFlow can make sure you email all staff and clients involved to let them know. It can also schedule the next calendar milestone, update fields in a file, such as date last contacted or a change to the status, and more. If you use PracticeMaster Platinum, WorkFlows can also send eNotes (with linked PracticeMaster records) around the office to keep everyone on the same page.
WorkFlows are highly customizable and nearly limitless. Each WorkFlow can launch up to 10 activities, including adding or changing records, processing calendar plan templates, running reports, starting a backup, and more. WorkFlows can also create the scenario(s) that will launch additional WorkFlows. WorkFlows can be automatic, with or without confirming that the WorkFlow will launch. You also have the option to set up a user activated WorkFlow that launches when you manually activate it.
Other examples of WorkFlows:
- Update the last contact date for a client every time you add information to their journal.
- Assemble a client welcome letter when a new client is added.
- Launch a conflict of interest search every time you add a contact.
- Generate CalendarRules – new in Version 2020!
For more information and ideas on WorkFlows that you can use in your office (including instructions for setting them up), check out article R11307, “All About WorkFlows,” in our Knowledge Base.
If you haven’t updated to Version 2020 yet, you are missing out on some great new features! The following features are only some of the enhancements we made for this version:
LawPay
- Tabs3 Billing – LawPay integration adds a new option for processing electronic payments and client funds deposits.
- Trust Accounting Software (TAS) – LawPay integration adds a new option for processing electronic Trust deposits.
New Dashboards
- Tabs3 Billing – displays Aged Accounts Receivable, Unbilled work, and graphs comparing the last two years of Cash Receipts and Billing History.
- Accounts Payable Software (APS) – displays Unpaid Invoices, Unposted Checks and EFTs, and the total Paid this Month with shortcuts to Print Checks, Post Checks, and the Check Register report.
- General Ledger Software (GLS) – displays an overview of your Bank Accounts and a list of Recent Bank Transactions.
- Trust Accounting Software (TAS) – displays an overview of your Bank Accounts and a list of Recent Trust Transactions.
Positive Pay
- Positive Pay export from APS and TAS helps provide fraud protection.
APS Bank Balances
- The GLS Account balance is now displayed when adding invoices and printing checks. Additionally, you will now be alerted if the check or EFT you are entering could result in an overdraft.
Updated Help
- The Help files for each program are now opened in your default browser, and have a new look. Find what you’re looking for more quickly using the improved Search and Index features.
For in-depth information on all of the new Version 2020 features, including screenshots, refer to Knowledge Base Article R11812, “Version 2020 Introduction to New Features.” A list with links to all Version 2020 information can be found in R11814, “Version 2020 Information and Resources.”
To download Version 2020, select Check for Updates from the Help menu, visit Tabs3.com/update, or contact your local consultant.
If you have any questions about the update, please contact your consultant, or contact Technical Support at (402) 419-2210.
Trust Accounting Software (TAS) and Accounts Payable Software (APS) now support Positive Pay!
Positive Pay Export utility (Checks | Positive Pay Export) allows you to export a list of approved checks that can then be uploaded to your bank or financial institution’s fraud prevention program (commonly known as Positive Pay). The export file is customized separately for each TAS or APS bank account, allowing you to provide the specific information your bank requires.
When you configure a new bank account for Positive Pay, the software walks you through the process of configuring your export file and exporting your first batch of checks. Once you have exported your initial batch of checks, the software tracks which checks have been printed, so you don’t need to specify a date range for future exports.
For more information on this great new feature, check out R11833, “Exporting Checks Using Positive Pay!”
Version 2020 has been released, and there are many great new features! The following features are only some of the enhancements we made for this version:
LawPay
- Tabs3 Billing – LawPay integration adds a new option for processing electronic payments and client funds deposits.
- Trust Accounting Software (TAS) – LawPay integration adds a new option for processing electronic Trust deposits.
New Dashboards
- Tabs3 Billing – displays Aged Accounts Receivable, Unbilled work, and graphs comparing the last two years of Cash Receipts and Billing History.
- Accounts Payable Software (APS) – displays Unpaid Invoices, Unposted Checks and EFTs, and the total Paid this Month with shortcuts to Print Checks, Post Checks, and the Check Register report.
- General Ledger Software (GLS) – displays an overview of your Bank Accounts and a list of Recent Bank Transactions.
- Trust Accounting Software (TAS) – displays an overview of your Bank Accounts and a list of Recent Trust Transactions.
Positive Pay
- Positive Pay export from APS and TAS helps provide fraud protection.
APS Bank Balances
- The GLS Account balance is now displayed when adding invoices and printing checks. Additionally, you will now be alerted if the check or EFT you are entering could result in an overdraft.
Updated Help
- The Help files for each program are now opened in your default browser, and have a new look. Find what you’re looking for more quickly using the improved Search and Index features.
For in-depth information on all of the new Version 2020 features, including screenshots, refer to Knowledge Base Article R11812, “Version 2020 Introduction to New Features.” A list with links to all Version 2020 information can be found in R11814, “Version 2020 Information and Resources.”
To download Version 2020, select Check for Updates from the Help menu, visit Tabs3.com/update, or contact your local consultant.
If you have any questions about the update, please contact your consultant, or contact Technical Support at (402) 419-2210.
The Statement of Cash Flows Report (Reports | Statement of Cash Flows) in GLS shows how the firm’s cash position has changed over a period of time. It shows the amount of cash earned from profit, where you received additional cash, and where your cash was spent. The report shows how much cash was provided or used by the following types of activities:
- Operating Activities – Shows how much cash was provided by profit-making activities, such as the sale of goods and services.
- Investing Activities – Shows how much cash was invested in assets such as equipment and furniture.
- Financing Activities – Shows how much cash was provided by long-term liabilities and equity. These financing activities often include loans and investments by the owner. They also include any reductions in equity due to owner draws.
Accounts can be classified into the three sections via Account Setup. All Detail Balance Sheet Accounts, except for ones marked as a Bank Account and the Retained Earnings account, can be configured to display in one of the three designated sections. Bank Accounts are excluded because the purpose of this report is to calculate the cash amounts based on the other information. The Retained Earnings account is also excluded because the Net Income (the net change in Retained Earnings) displays at the beginning of the report as a starting point.
To classify accounts as operating, investing, or financing
- From the File menu, point to Open and select Chart of Accounts.
- Double-click the desired account.
- From the Report Options tab, in the Statement of Cash Flows Classification section, select the desired classification.
- Click Save.
- Repeat steps 2-4 for each account as needed.
Transferring and replicating fees and costs just got easier in Tabs3 Billing! With the release of Version 19.1.11, two new buttons have been added to the Fee and Cost Entry windows, allowing you to quickly transfer or replicate an entry.
Transfer Fees and Costs
The ability to transfer fees and costs has long been available using the Transfer Transactions program. However, you can now transfer fee and cost transactions to a different matter directly from the Fee and Cost Entry windows using the new Transfer button. Any fees and costs that have not been final billed and/or updated can be transferred to another client. When transferring a fee or cost, you can optionally select to update the rate to use the new client’s rate, and then recalculate the amount.
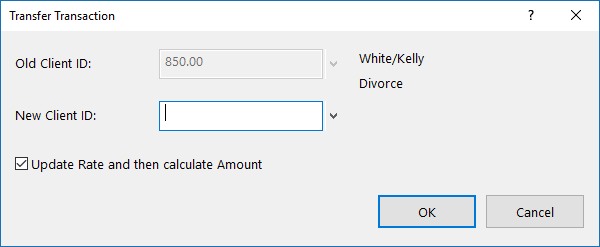
Replicate Fees and Costs
In addition to the Transfer option, you can now replicate fees and costs using the Replicate button in the Fee and Cost Entry windows. Replicating fees and costs makes a copy of the transaction and saves it to the desired Client ID. Like the Transfer feature, when replicating a fee or cost, you can optionally select to update the rate to use the new client’s rate, and then recalculate the amount.
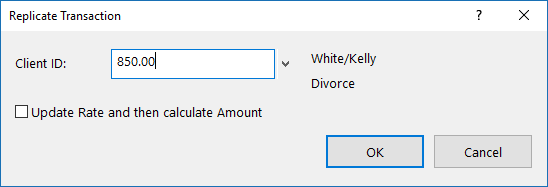
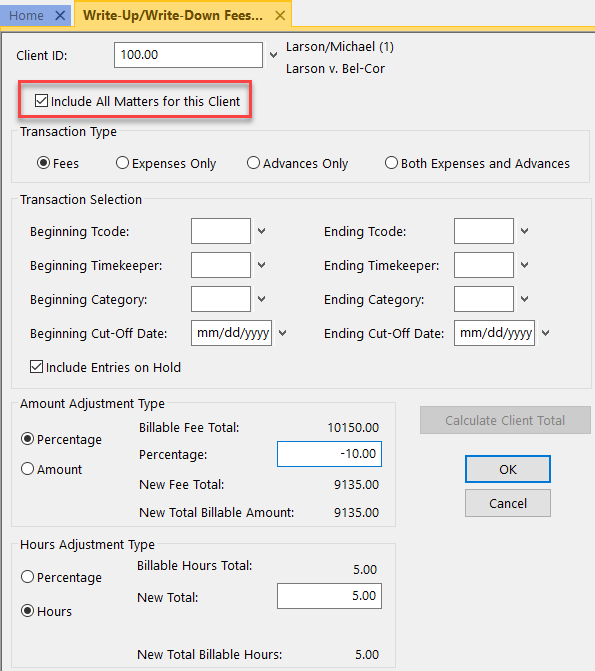 Did you know that you can write all matters for a client up or down at the same time?
As of Version 19, when using the Write-Up/Write-Down Fees and Costs program (Statements | Statement Preparation | Write-Up/Write-Down Fees and Costs), an Include All Matters for this Client check box is now available.
Prior to billing, you can use the Write-Up/Write-Down program to write-down unbilled fees, costs, or hours for a client using a range of timekeepers, transaction codes, categories, and/or dates. When writing multiple transactions up or down, each affected transaction’s amount and/or hours is adjusted by an amount proportional to the total adjustment.
When this option is selected, the Write-Up or Write-Down will include transactions for all matters for the specified Client ID. All matters that begin with the same value left of the decimal with work-in-process will be included in the calculated client total based on the criteria selected in the Transaction Selection section.
Statement comments provide the ability to add internal notes to fee, cost, client funds, and payment transactions that will be shown on draft statements, but not on final statements. Additionally, statement comments are included on the Fee and Cost Verification Lists, Detail Work-in-Process Report, and optionally on the Transaction File List and Task Code Billing Report (new for Version 19.1.10.1180).
Statement comments entered for individual fee, cost, payment, or client funds transactions are shown in red. When printing reports or draft statements, statement comments will print with a strike-through character (e.g., “Send statement by the 2nd”).
To create a Statement Comment
- Open the desired transaction entry window, such as the Fee file (File | Open | Fee).
- In the Description field, select Statement Comment from the right-click menu. The text that you enter next will display in red, which means it is a statement comment.
- When you are done with the comment, select Statement Comment from the right-click menu again. The text that you enter now will be normal.
Note: Alternatively, you can enter all desired text, highlight the portion you want to have shown as a statement comment, and then select Statement Comment from the right-click menu.
A new look, faster processing time, and better reporting – Data File Integrity Check (DFIC) has been updated for Version 19!
New Look
The Data File Integrity Check window has been updated to include information on the last completed integrity check and provides a link to the last report with errors. You can optionally run a Full Scan or a Limited Scan (previously Read Only). The Full Scan requires exclusive access to the program, providing a complete check of your data and automatically fixing certain errors. The Limited Scan can be run while other users are in the software; however, it is typically slower to complete, may not report all errors, and cannot automatically correct any issues that it identifies.

Faster Processing Time
In the Platinum version of the software, the Tabs3 Billing and PracticeMaster DFIC is now processed at the server using the Platinum accelerators. This reduces network traffic as well as the time it takes to complete.
Better Reporting
When errors are encountered, a PDF of the Data File Integrity Check Error Report is automatically created and stored in the Current Working Directory. The software will maintain the last five reports for each program. The latest report can be accessed from the Data File Integrity Check window, and all five can be accessed from the Support Log (View | Log Files | Support Log). The DFIC Report has been enhanced to be easier to read, and includes information about how long the report took to complete and what options were used. See KB Article R11796, “Data File Integrity Check Error Reports” for additional information about what is included on these updated reports.
Are you taking full advantage of the PracticeMaster Quick Clicks Pane? The Quick Clicks pane provides single-click access to a variety of features that will help you navigate your data files, including many of your common activities. For example, if you want to quickly convert a few timer records into fees, you can select the desired records in the List tab of the Journal file, and then click Convert to Fee in the Take Action group of the Quick Clicks pane.
The Quick Clicks pane is available in all PracticeMaster data files and Matter Manager, and is organized into the following groups:
Note: The image to the right shows the Quick Clicks pane for the Client file.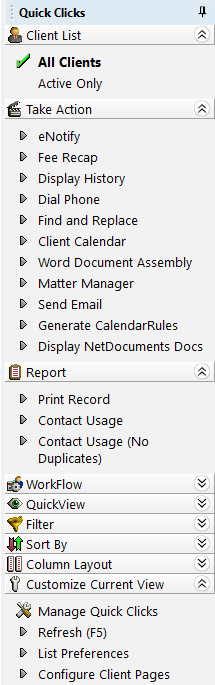
- eNote: The eNote group (not shown) contains various filter options available for the eNote List. eNote is a Platinum feature.
- Client List/Contact List/Timekeeper List: The Client List, Contact List, and Timekeeper List groups contain the options to show all records for the file or only records that have not been marked Inactive. Each group is only available in its respective file (e.g., Client List is only available in the Client file, etc.).
- Take Action: The Take Action group contains various action-oriented options available for a file.
- Report: The Report group contains various reports available for a file.
- WorkFlow: The WorkFlow group contains all User Activated WorkFlows for a file.
- Client WorkFlow: The Client WorkFlow group (not shown) contains all User Activated WorkFlows for the Client file. The Client WorkFlow group is only available in the Matter Manager.
- QuickView: The QuickView group contains all defined QuickViews for a file. The QuickView group is only available in the Matter Manager and when the List tab is selected in an Editor window.
- Filter: The Filter group contains filtering information. The Filter group is only available in the Matter Manager and when the List tab is selected in an Editor window.
- Sort By: The Sort By group contains sorting (indexing) information. The Sort By group is only available in the Matter Manager and when the List tab is selected in an Editor window.
- Column Layout: The Column Layout group contains information for column layouts. The Column Layout group is only available in the Matter Manager and when the List tab is selected in an Editor window.
- Customize Current View: The Customize Current View group contains options for configuring the current window. The Customize Current View group is only available in the Matter Manager and when the List tab is selected in an Editor window.
The Quick Clicks pane is also customizable via Manage Quick Clicks. Add, edit, or delete QuickViews, Filters, and Column Layouts; create folders; move items around within each group; and determine which items are shown or hidden! The Manage Quick Clicks window can be accessed via the ![]() (Manage) icon in the WorkFlow, Filter, Column Layout, and Customize Current View sections of the Quick Clicks Pane.
(Manage) icon in the WorkFlow, Filter, Column Layout, and Customize Current View sections of the Quick Clicks Pane.
The ability to access features and information that you can organize is key, and the Quick Clicks pane helps make it quick and easy to find what you need, without scrolling through what you don’t need.
People rely on their credit cards more and more to pay for things like clothes, medical procedures, and legal services.
Two reasons law firms decide to accept credit cards are because clients pay faster, which allows firms to spend less time collecting on past due bills and clients are more likely to pay their bill in full, which allows firms to reduce the amount they write off.
If you accept credit cards, there is no better way than with Tabs3. Credit card payments can be entered directly into Tabs3, or a link can be emailed to a client for them to pay online. When a client pays online, their payment information can be imported into Tabs3 so there is no double entry. When a credit card payment is entered directly into Tabs3, it is automatically processed and the funds are deposited into your existing bank account.
If you use Tabs3 Trust Accounting Software, you can have trust account payments deposited into a separate account from where processing fees are deducted. This integration takes the guesswork out of bank account reconciliation and helps you comply with many state bars’ rules regarding commingling funds.
We are partnered with ProPay, a TSYS company, to provide you with credit card processing that is better than ever.
- No more waiting days to start accepting credit cards. With ProPay, you can start accepting credit cards within minutes.
- No more confusing price structures or price negotiations. With ProPay, rates are low and easy to understand.
- No more lengthy SAQ questionnaires to complete. With ProPay, you only have to complete a simplified annual SAQ questionnaire to achieve PCI compliance.
If you’re interested in accepting credit cards, you can sign up in minutes at Tabs3.com/ProPay. If you have any questions regarding processing credit cards in Tabs3, contact your local consultant, or contact Technical Support at (402) 419-2210.
Fees can occasionally be entered in an order that may be confusing on a statement. For example, when the statement is printed out, it might look like you reviewed a document before writing the first draft! In Version 19, you can use the Reorder Fees utility to change the order in which fees with the same date are displayed on a single statement.
The order in which fee transactions are printed on a statement is based on three levels:
- First, transactions are sorted by the Subtotal selected on the Fee Format tab of the Statement Template being used (i.e., No Subtotal, Timekeeper, Transaction Code, Category, or Date).
- Next, transactions are sorted by the Date of the transaction.
- Finally, transactions with the same date are sorted by the Reference number of the transaction. This is the order that can be modified using the Reorder Fees utility.
The Reorder Fees utility (Statements | Statement Preparation | Reorder Fees) lists all work-in-process fees for the selected client. Fees can be moved using the Move Up and Move Down buttons. Moving fees up and down changes the reference number of the fee immediately.
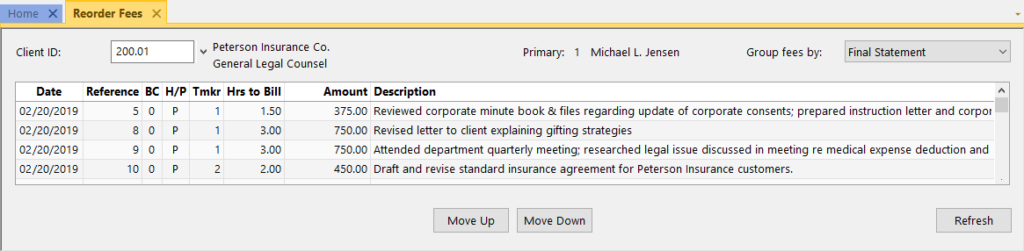
However, keep in mind that fees can only be moved up or down within the same date. For example, if there are three fees dated 2/15, and one fee dated 2/16, only the fees dated 2/15 can be moved.
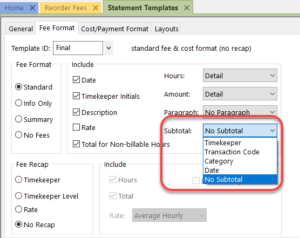
You can use the Group fees by drop-down option to see what order fees would be listed on a client’s statement based on the Subtotal selected in the Statement Template. When selecting Draft or Final, the fees will be grouped as specified in the Subtotal field of the selected client’s Draft or Final Statement Template.
Take a look at how fees are shown on your clients’ statements, and see how the Reorder Fees utility can help you. Your clients will appreciate the order, and you might get paid faster!
If you’ve updated to Version 19, then you’re familiar with the new look. But did you know that you can customize it? We introduced several updates to the look of Tabs3 including a new font, larger text size, a tabbed interface, Home page, Quick Launch, and more. Many of these options can be changed via Theme Settings (View | Theme Settings). Let’s take a look at all of the options in the Theme Settings window.
General Settings tab
The General Settings tab of the Theme Settings window allows you to configure what features of the application are shown when you start the software. Theme settings are saved for each user.
The following Navigation options can individually be shown or hidden:
- Quick Launch –The Quick Launch is used to find any program or report quickly and easily via the Search Actions box, as well as to see recently used programs and reports, and pin those you use frequently for easy access.
- Home Page – Much like the Task Folders in previous versions of the software, the Home Page contains groups of icons used to access the various programs and reports within each application.
- Task Folders – Task Folders were used for navigation in Version 18 and prior.
- Application Toolbar – A moveable Application Toolbar is shown. Keep in mind that regardless of this setting, the application icons are always shown at the bottom of the Quick Launch.
- PracticeMaster Task Bar – The PracticeMaster Task Bar provides the ability to start commonly used PracticeMaster programs and tasks. This option is only available in PracticeMaster.
The following Interface options are available
- Tabbed – Select this option to display the various windows in the current system’s main application window as maximized, with tabs across the top to easily switch between active windows.
- Windowed – Select this option to display the various windows in the current system’s main application window in separate windows that can be positioned as desired.
- Open Maximized – Select this option if you always want windows opened in a maximized state. Open Maximized is only available when Windowed is selected.
- Minimize PracticeMaster to Tray – When this option is selected and PracticeMaster is minimized, the PracticeMaster taskbar button is removed. A PracticeMaster icon is displayed in, and can be opened via, the Windows system tray. This option is only available in PracticeMaster.
- Set to Standard Theme – Clicking the Set to Standard Theme button will select only the Quick Launch, Home Page, and Tabbed options.
- Set to Classic Theme – Clicking the Set to Classic Theme button will select only the Task Folders, Application Toolbar, PracticeMaster Task Bar, and Windowed options.
Text Size tab
- The Text Size tab of the Theme Settings window allows you to configure how large the text is displayed throughout the software. Theme settings are saved for each user.
- Large – Select this option to use a 10pt font size.
- Medium – Select this option to use a 9pt font size.
- Small – Select this option to use an 8pt font size. This matches the font size used in prior versions of the software (i.e., Version 18 and earlier).
- Note: Depending on your operating system, screen resolution, and scaling options, one of the Text Size options will be noted as Recommended.
Did you know that you can see who is currently logged into the software? The Active User List shows you who’s in, and which programs they are currently accessing. This can be helpful when you want to get everyone out of the software for maintenance. By accessing the Active User List via View | Active User List, you can see who you need to have close the software.
When opening the Active User List, a window is displayed with all users who are in the currently open software (e.g., if you open the Active User List from PracticeMaster, users in PracticeMaster will be displayed). Additionally, you can see which computer they are logged into, and which file they are accessing in the software. Manager users will also have an All Systems check box and a Reset button. When the All Systems check box is selected, all users in all programs will be listed. The Reset button allows managers to reset a user, which closes the software on that user’s computer. (Note: Resetting users is not recommended in most situations, and should only be used when the user in question is not in the software.)
Manager users can always access the Active User List, but other users can be given access rights, or have access rights removed for this feature.
To add or remove rights to the Active User List
- From the System Configuration File menu, point to Open and select Access Profile.
- From the System Activity tab, select the desired Access ID.
- In the System Options section, select the Display Active User List check box.
- Press Ctrl+S.
The next time you want to see who is currently in the software, check out the Active User List!
Did you know that you can write off all or a portion of a client’s accounts receivable balance? When a write off is performed using the Write Off Client program, a special write off record is created and stored in the client ledger file for audit trail purposes and adjustments are made to receipt allocation records. Write offs can also be shown on the next statement (provided a description-only transaction is entered when the write off is 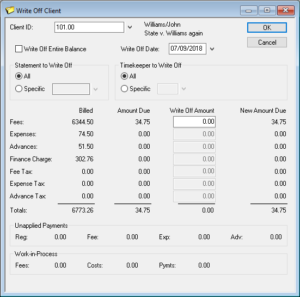 performed).
The Write Off Client program is used to write off all or a portion of a client’s accounts receivable balance. If you select to write off an individual statement, you have the option of writing off the entire statement or selecting which portion of the statement you want to write off. You also have the option of writing off the balance for all timekeepers or a specific timekeeper for all statements or an individual statement.
To perform a write off
- From the Maintenance menu, point to Client Related and select Write Off Client.
- Enter the Client ID.
- Select the desired options.
- Click OK.
- Click Yes to continue. You will be prompted to enter a description-only transaction to indicate why the write off occurred.
- If you want a transaction to be saved to the Fee file, enter a Description and click OK.
- If you do not want a transaction saved to the Fee file, click Cancel.
Additionally, you have the option of reversing a write off if you find the write off was in error, or you want to change the way the write off was performed.
To reverse a write off
- From the Maintenance menu, point to Client Related and select Reverse Write Off.
- Select the Client ID.
- Select the Reference Number of the write off you want to reverse.
- Click OK.
Creating report definitions for each of the reports your firm runs can help save considerable time, and taking advantage of Report Suites in Tabs3 saves even more time. When your firm prints the same set of reports every year, quarter, month, week, or semi-regularly, report suites offer a one-step option to printing out a predefined set of reports using the report definitions you already have set up.
Multiple suites for different departments or individuals can be created. This allows personalized report suites to be saved and printed for a range of needs including monthly, quarterly, and yearly reports, as well as suites designed specifically for billing, collections, and individual attorneys.
Report suites are easy to set up and even easier to run. To create a new suite of reports, click the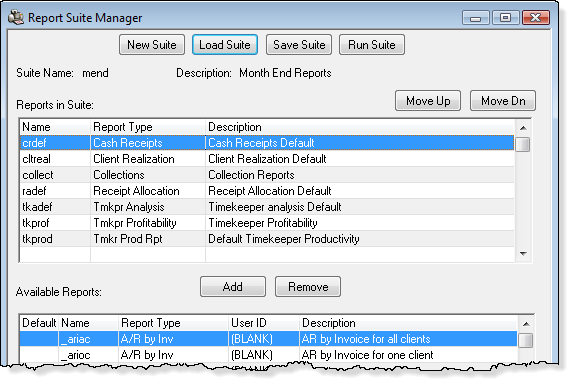 Reports menu, point to Report Suite, and select Report Suite Manager. Click New Suite, select a report you want to include from the Available Reports list, and click Add for each report you are including. Available Reports will include any reports with a report definition already set up. Once you have made your report selections, click Save Suite and enter a File Name and Description for the new suite.
When you are ready to run a suite, click the Reports menu, point to Report Suite, and select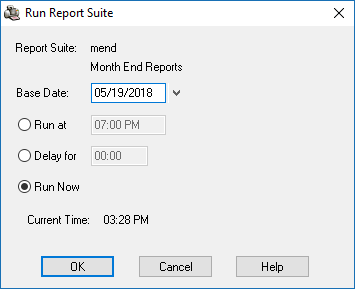 Run Report Suite. Select the suite you would like to run and click OK. The Run Report Suite window allows you to specify a Base Date and when you want to run the report suite. Report suites can be run at a specific time, after a specific period of time has elapsed, or immediately. This window can also be accessed by clicking the Run Suite button in the Report Suite Manager.
Once the report suite begins processing, each report definition is launched immediately. When you have several reports to run, this can save a great deal of time compared to launching each report individually, selecting a report definition, and then printing. If you have not already taken advantage of Report Suites, try it out and see how much time your firm will save!
Did you know that there are multiple calendar reports that can be printed in PracticeMaster? Different reports provide different ways to view your calendar entries and print them.
Daily Report
The Daily Report can include events, tasks, and/or reminders for the selected users and date range. You can select whether entries are listed by type and then by date, or vice versa, and specify what is appended to the description. This report automatically begins each selected user on a different page.
- View this report here: Daily_Report.pdf
The Daily Report can be accessed via Reports | Daily Report.
Graphical Calendar Report
The Graphical Calendar Report mimics the look of the Daily/Weekly/Monthly Calendar. There are four ways to print the Graphical Calendar Report. Common settings include font, whether to include color, which users to include on the report, and the date range. Additionally, when the Graphical Calendar Report is accessed from the Daily/Weekly/Monthly Calendar, you can select to print a filtered calendar based on the filter selected at the time of printing.
The following selections provide additional options:
- Daily – Additional options include how many days to include per page, start and end time, and time interval.
- View this report here: Graphical_Cal_Report_Daily.pdf
- Weekly – Additional options include the option to use the Daily Style.
- View this report here: Graphical_Cal_Report_Weekly.pdf
- Monthly – Additional options include showing exactly one month per page or to specify how many weeks to include per page, and whether or not to include weekends.
- View this report here: Graphical_Cal_Report_Monthly.pdf
- Agenda – Additional options include whether to limit the report to working hours and whether or not to include weekends.
- View this report here: Graphical_Cal_Report_Agenda.pdf
The Graphical Calendar Report can be accessed via Reports | Graphical Calendar Report or the (Print) icon in the Daily/Weekly/Monthly Calendar.
Graphical Task List Report
The Graphical Calendar Task List mimics the look of the Task List and includes the columns selected on the Task List tab of the Calendar Properties (Calendar | Calendar Properties). Options that can be selected include color and which User IDs to include. Additionally, a date range can be specified if Incomplete Tasks for Selected Day is selected on the Task List tab of the Calendar Properties.
- View this report here: Graphical_Task_List_Report.pdf
The Graphical Task List can be accessed via Reports | Graphical Task List or the (Print) icon in the Task List.
Report Writer
In addition to the ability to create your own reports, Report Writer comes with many pre-defined reports that can be edited, copied, and/or deleted. The following calendar reports are among the reports included.
- Calendar by Due Date (_caldue) – Provides a list of calendar entries sorted by date and includes the time, User ID, type, completion status, description, Client ID, and area of practice. Ranges can be selected for the Client ID, due date, and User ID. The type and whether to print incomplete entries only can also be specified.
- View this report here: Cal_by_Due_Date.pdf
- Calendar by User (_caluser) – Provides a list of calendar entries sorted by User ID and includes the day of the week, date, time, type, description, Client ID, and area of practice. Ranges can be selected for the Client ID, date, and User ID. The type can also be specified.
- View this report here: Cal_by_User.pdf
- Client Calendar (_clntcal) – Provides a list of calendar entries sorted by Client ID and includes the date, time, User ID, and description, area of practice, and primary timekeeper. Ranges can be selected for the Client ID, due date, and User ID. The type and whether to print incomplete entries only can also be specified.
- View this report here: Client_Cal.pdf
- Blank Client ID Calendar Records (_blankid) – Provides a list of calendar entries without an assigned Client ID. This report can be generated for a specified range of due dates.
- View this report here: Blank_Client_ID_Cal_Records.pdf
- To Do List (Todo_lst) – Provides a list of calendar entries sorted by type and date. You can specify a range of Client IDs, reminder/due dates, and user IDs as well as which calendar types to include on the report.
- View this report here: To_Do_List.pdf
Report Writer can be accessed via Reports | Report Writer.
For examples of each of these reports, take a look at the PracticeMaster Report Pack.
Occasionally, transactions may accidentally be entered for the wrong client. If there are only a couple, it’s easy to just delete them and reenter them for the correct client. However, when there are many transactions, what can you do? Use the Transfer A/R and Transactions utility in Tabs3!
The Transfer Transactions program can be used to transfer unbilled fees, costs, and/or payments between clients. When selecting to transfer fees, costs, and/or payments, you can select a range of transactions based on tcode, timekeeper, category, date, and/or reference number. This can help make sure that you are only transferring the transactions that you want to transfer.
Additionally, if a time comes when you want to transfer one client’s full accounts receivable balance, ledger, archived transactions, and client funds to another client, the Transfer A/R and Transactions utility can also be used. This function will transfer ALL of the client’s ledger records and billing history to another client. It is not possible to only transfer a client’s current A/R without also transferring everything else.
Note: When using the Transfer A/R and Transactions utility, keep in mind that once the transfer has been performed, the only way to undo it is by restoring from a backup.
To transfer transactions between clients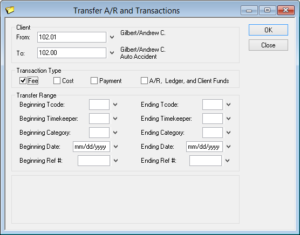
- From the Maintenance menu, select Transfer A/R and Transactions.
- Select the clients you want to transfer From and To.
- Select the desired Transaction Type(s).
- Optionally select a Transfer Range.
- Click OK.
Keep this utility in mind the next time transactions need to be transferred from one client to another client. It can save you significant time.
When working in General Ledger Software (GLS), your accounts do not typically change much once they have been established. Because of this, it’s easy to forget the ins and outs of making changes to the chart of accounts.
Here are some quick instructions to add a new account or make adjustments to existing accounts when the time comes.
To add a new account
- From the File menu, point to Open and select Chart of Accounts.
- Select the account directly above where you want the new account to appear in the Chart of Accounts.
- Press Ctrl+N.
- The New Account window will be displayed. Select the desired option and click OK.
- The Account Setup window will be displayed. Enter the remaining information for the account and click Save.
- If you are adding a heading or total account, the Create Paired Account window will be displayed, allowing you to select the account number for the paired account.
- Select the desired option for the paired account’s account number and click OK.
- The Account Setup window is displayed. Enter the remaining information for the account and click Save.
- If you are adding a heading or total account, the Create Paired Account window will be displayed, allowing you to select the account number for the paired account.
Changing and moving accounts
When you want to make changes to an account, there are different types of changes you can make:
- Edit the settings for the existing account by double-clicking the account and then making the desired changes.
- Drag and drop the account to a different location in the chart of accounts to adjust the location of the accounts on reports:
- Select the account you want to move.
- Grab the
 icon by clicking on it; the pointer will become a
  .
. - Drag the selected account to the desired position and release the mouse button.
- Change the Account # by using the Renumber Account utility (Maintenance | Renumber | Account).
Now, when you need to make changes to your Chart of Accounts, you’ll be ready!
Do you want a way to scroll through each file and quickly see the key contents of each record? The SnapShot provides a concise picture of the data contained in individual records using an easy to view format in a single location. When you are viewing a list of records such as a List tab in PracticeMaster or the Client Lookup and Contact Lookup windows in Tabs3, simply click on a single record from the list. All of the key information from the record will be shown in the SnapShot panel.
As you select different records on the list, the SnapShot refreshes with information from each new record. This makes it easy to see the information without actually opening the record. Hyperlinks are provided for phone numbers, e-mail addresses, in both Tabs3 and PracticeMaster, as well as file type fields in PracticeMaster. These fields can open a Send E-mail window, the Phone Dialer window, a Web Browser window, and a file or file location.
SnapShot makes it easy to grab information for a client or contact. After selecting the desired record, you can highlight the name and address block of information and use Ctrl+C to copy the information to the Windows clipboard. You can then paste that information into a document, spreadsheet, e-mail, or any other program that accepts text. If you want to print the SnapShot, simply right-click in the SnapShot panel and select Print.
The position of the SnapShot panel can be changed by right-clicking the SnapShot panel, pointing to the SnapShot menu option and selecting the Right or Bottom menu option. The SnapShot panel can also be resized by moving your cursor over the edge of the panel until your mouse changes to a line with arrows on both ends, clicking the edge of the panel, and dragging the edge to the new size. The size and position of SnapShot panels are stored separately for each User ID.
If you haven’t had an opportunity to work with the SnapShot feature yet, take a closer look. Additional information about the SnapShot feature can be found in Knowledge Base Article R11005, “SnapShot Overview.”
Did you know that you can customize your Statement Templates to define how fees, costs, and payments are displayed on your statement and to determine whether billing history, transaction recaps, and more are included? Statement Templates can be saved and assigned to clients or created at the time a statement is generated. There is no limit to the number of Statement Templates you can create and save so you can maintain Statement Templates for every client need.
Defining Statement Templates
Statement Templates can be defined via Statements | Statement Setup | Statement Templates.
- The General tab is used to specify invoice or statement formatting, billing history options, past due messages, and statement notes.
- The Fee Format tab is used to determine whether fees print and, if so, whether timekeeper initials, dates, hours, hourly rates, and amounts are included. Subtotaling of fees is defined here. An optional fee recap by timekeeper, timekeeper level, or rate can also be set up. The recap can include hours, timekeeper levels, rates, and a total amount.
- The Cost/Payment Format tab is used to specify whether expenses and advances print and, if so, the format used on the statement. You can also indicate whether payments will be shown in detail, be subtotaled by date, or show totals only.
- The Layouts tab is optional and is used to designate which custom Page Layouts created in Statement Designer will be used when statements are printed for clients that are assigned to this template.
Assigning Statement Templates
Statement Templates can be assigned to clients individually, multiple clients at one time, or at the time a statement is generated as a one-off.
- Statement Templates can be individually assigned to clients in the Client file (File | Open | Client) by selecting the desired Draft Template and Final Template on the Statement Options tab.
- Statement Templates can be assigned to multiple clients at once by using the Change Client Options utility (Maintenance | Client Related | Change Client Options) by selecting a range of Client IDs, and then selecting the desired Draft Template and Final Template on the Statements tab.
- Statement Template settings can be applied at the time a statement is generated (Statements | Generate Statements) by clicking the Statement Template button on the Options tab, selecting the desired settings, and then clicking OK.
For more information on Statement Templates, see the Statement Formatting Guide or refer to the Help files for Tabs3 Billing.
When setting up the software for the first time, the Key Type defaults to Numeric with 2 Decimal Places. However, some firms prefer to include letters in the Client ID or require additional decimal places. Both the Key Type and Decimal Places can be changed after the initial setup is complete, but there are a few things to keep in mind when considering making a change.
Key Types
- Numeric Key Type is the most commonly used and consists of only numerals. With a Numeric Key Type, you can automatically assign new Client IDs and matters.
- Mixed Key Type consists of alphanumeric characters to the left of the decimal and numeric characters after the decimal. With a Mixed Key Type, you cannot automatically assign new Client IDs, but you can automatically assign new matter numbers.
- Alpha Key Type consists of alphanumeric characters both to the left and the right of the decimal. With an Alpha Key Type, you cannot automatically assign new Client IDs or matters.
Note: Keep in mind that Mixed and Alpha Key Types do not integrate with select legacy cost recovery software programs. Contact Support at (402) 419-2210 for more information regarding legacy cost recovery software.
Changing the Key Type
Prior to changing the Key Type, take into consideration that all existing Client IDs must match the format of the new Key Type. For example, if you are currently set to the Alpha Key Type and you have alpha characters in your Client IDs, then all applicable Client IDs must be renumbered (Maintenance | Renumber | Client) to remove any alpha characters before changing the Key Type to Numeric.
To change the Key Type
- From the Maintenance menu, point to Renumber and select Change Key Type.
- In the Key Type section, select the desired New Type.
- Click OK.
Decimal Places
A Client ID consists of 11 characters and the decimal place for a total of 12 places. Typically, the portion to the left of the decimal is used to represent the Client, whereas the portion to the right is used to represent the matter. The most common reason to change the number of decimal places is when one or more clients have more matters than decimal places. For example, if you are set up to use 2 decimal places, then your clients will cap out at 99 matters. Although 99 matters may seem like a lot, for certain client types, such as insurance clients, you may reach that number quicker than you think. In our example, when you reach 99 matters, you have two options: start a new client or increase the Decimal Places.
Changing Decimal Places
You can either increase or decrease the Decimal Places. When increasing Decimal Places, you have the option to insert zeros at the Beginning or End of the decimal digits. For example, when selecting Beginning, client 152.82 would become 152.082. When selecting End, client 152.82 would become 152.820.
To change the number of decimals used
- From the Maintenance menu, point to Renumber and select Change Key Type.
- In the Decimal Places, enter the desired New Decimal.
- In the Insert Zeros section, select Beginning or End.
- Click OK.
For more information on changing the Key Type, including a list of things to consider prior to making a change, see Knowledge Base Article R11049, “Changing the Key Type or Decimal Places.”
Do you want a way to streamline trust payments to Tabs3 Billing? Trust Accounting Software (TAS) provides the ability to automatically draw funds from a trust account when final statements are generated in Tabs3.
You will no longer need to enter payments to Firm from TAS; simply enter your transactions in Tabs3, and then bill like normal. As final statements are generated in Tabs3, the software will automatically create trust transactions and Tabs3 payment records based on the client’s due amounts. This feature can be enabled or disabled on a global level, at the bank account level, and at the trust account level. You can specify whether to pay work-in-process, accounts receivable, or both; whether to pay fees, expenses, or advances from these amounts; and whether to create check or EFT transactions in TAS for these amounts.
Note: We recommend consulting your local Bar Association before enabling Automatic Trust Transactions to ensure that you are complying with local trust regulations.
To implement Automatic Trust Payments, you will need to enable TAS Integration in Tabs3 and then configure TAS Customization, the desired TAS Bank account(s), and the desired Trust Account(s). For complete step-by-step instructions on setting up Automatic Trust Payments, refer to the Integration Guide or the Automatic Trust Payments Overview topic in the TAS Help.
We recently reached out to local firms and encountered instances where hours were being spent on tasks that could have been accomplished in a matter of minutes. Because there are many features in the software that can streamline your tasks, a quick conversation with Tech Support could save you time! For example, did you know that multiple transactions can be edited at the same time in Tabs3 Billing, or that you can save documents to the Document Management file in PracticeMaster from Word? Tech Support is here to help, so reach out to us. Here are some examples of items we regularly assist our clients with:
- Are you new to the software and need guidance? We can help!
- Want to update to the most recent version of the software? We can help!
- Not sure how to do a procedure? We can help!
- Receiving a message you’re not sure of? We can help!
- Want to start using a new feature in the software, such as keeping track of client communications within PracticeMaster? We can help!
We can also show you how to find answers on your own by using the wide variety of written resources available including the Help files, Knowledge Base, and more! Phone support is available Monday through Friday, 8:00 a.m. to 5:00 p.m. (Central Time) at (402) 419-2210. And don’t forget! Tech Support is included with your maintenance plan at no additional cost – so give us a call!
Everyone can view your public calendar records, but did you know that you can control who has rights to edit your public calendar records and who has rights to browse or edit your private records?
Calendar rights are assigned via the User Configuration program in System Configuration. Although any user can view public calendar entries, rights must be explicitly given to edit public entries, view private entries, and edit private entries. Although this may sound complicated, it’s easy to specify who has rights to whose calendars.
To specify calendar rights for a user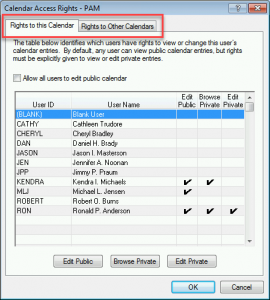
- From the System Configuration File menu, point to Open and select Users.
- Select the desired User ID.
- In the Options section, click the Calendar Rights button.
- On the Rights to this Calendar tab, select the users who need rights to this user’s calendar, and then click the Edit Public, Browse Private, and/or Edit Private buttons. Optionally select the Allow all users to edit public calendar check box.
- On the Rights to Other Calendars tab, select the users that this user has rights to, and then click the Edit Public, Browse Private, and/or Edit Private buttons.
- Click OK.
- Press Ctrl+S.
Configuring access for one user will automatically update the corresponding values in the Calendar Access Rights window for any other users affected by the change. For example, let’s say you currently have Cathy’s user profile open, and you specify that Robert has rights to edit Cathy’s public calendar records. Now opening Robert’s user profile will also show that he has rights to edit Cathy’s public calendar records.
Note: Keep in mind that while you can specify which users have rights to edit your public records, browse your private records, and edit your private records, only managers can specify what rights you have to other users’ calendars. Additionally, in order to browse, add, change, and/or delete calendar records, your User ID must be part of an Access Profile with those rights.
Did you know that you can customize PracticeMaster’s Document Management so that all documents automatically use the same folder and naming strategy? When PracticeMaster is set up to Automatically assign document folder and file names and Document Management records are set to Automatically Manage Document, you can specify not only where documents are saved, but also how they are named.
To Automatically assign document folder and file names
- From the Utilities menu, select Customization.
- From the Documents tab, select the Automatically assign document folder and file names option.
- Click the Configure button to the right of Folder Naming.
- Select the desired values for Folder Level 1 – 5.
- Click OK.
- Click the Configure button to the right of File Naming.
- Select the desired Fields and Separator for Field 1 – 5.
- Click OK.
- Select any other options as desired.
- Click OK.
For example, let’s say you use the values in the following screenshots:
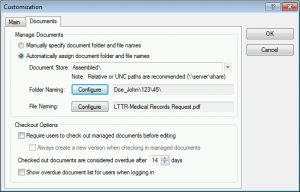 |
|
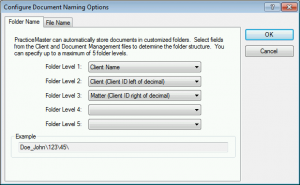 |
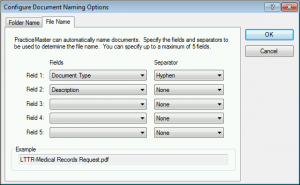 |
When using the values in the above screenshots, the Document Store (Assembled in our example), folder, and files would be organized as follows:
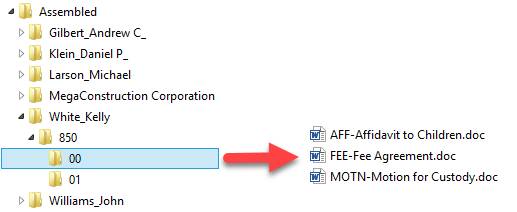
Make sure your documents can easily be found. Let PracticeMaster automate the organization of your documents!
For more information on all of the great Document Management features, check Knowledge Base Article R11572, “Document Management Guide.”
You’ve probably seen the announcements that CompuLaw will no longer update or support CompuLaw Court Rules that integrate with PracticeMaster after December 31, 2016, and that we are now integrating with CalendarRules. But if you’re not yet familiar with CalendarRules, keep reading to see what all it’s all about!
What is CalendarRules?
CalendarRules offers general civil litigation-related court and agency Rule Sets for State, Federal, Appellate, and Bankruptcy courts across the United States. Currently, rules are available in all 50 states, with additional courts being added every month.
Why subscribe to CalendarRules?
- CalendarRules works through an online connection via PracticeMaster. No additional software is required.
- Updates are automatic so you will always have the most current rules.
- Licenses are not based on the number of users. Purchase a license for the desired rule set(s), and everyone can use it through PracticeMaster.
- E-mail notifications can be set up to e-mail specified users when rules have been updated.
You can contact CalendarRules at CalendarRules.com to subscribe. Make sure to let them know you use PracticeMaster.
How is CalendarRules Set Up?
After purchasing a license from CalendarRules, integration is set up entirely through PracticeMaster.
To set up CalendarRules Integration
- From the Maintenance menu, point to Integration and select CalendarRules Integration.
- Enter the Login Token provided by CalendarRules.
- Click the Test Login button to verify the Login Token is accepted.
- Optionally select the desired Record Types to display in the All-Day Events area of the Daily/Weekly/Monthly Calendars.
- Optionally select to Enable CalendarRules Update E-mail Notification, including the To, Subject, and Body fields.
- Click the Test E-mail button, enter the From Address, and click Send to verify e-mails can be successfully sent from PracticeMaster.
- Click OK.
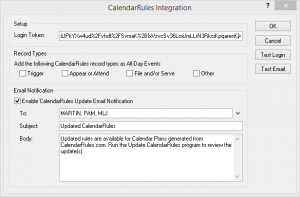
How are Calendar Plans Generated?
CalendarRules’ calendar plans are easy to generate.
To generate a CalendarRules plan
- From the Calendar menu, select Generate CalendarRules.
- Enter the desired Client ID and, optionally, Contact.
- Select the appropriate Jurisdiction, Trigger, Date, Time, and Service Type (if applicable).
- Select the User/Group.
- Optionally select the Prepend Notes to Comments check box, and then enter any desired Notes.
- Click Preview.

You can now preview the calendar plan.
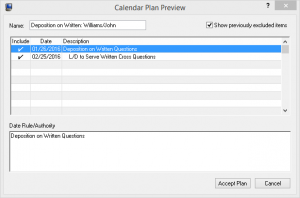
Once you have clicked the Accept Plan button, the PracticeMaster View Calendar Plans window will be opened. Plans that have been generated via CalendarRules can be reviewed at any time via the PracticeMaster View Calendar Plans window.
For more information on CalendarRules, see Knowledge Base Article R11713, “CalendarRules Integration Overview.”
Do you want to take advantage of all the features of Platinum, while also taking full advantage of your server’s memory? If you have a 64-bit server, such as Windows Server 2012, you can improve the performance of accelerated reports and filtering with Platinum SQL! The standard multi-user and Platinum versions of Tabs3 and PracticeMaster are 32-bit programs. That means they can only allocate 2GB of available memory, regardless of whether they run on a 32-bit or 64-bit operating system. The Platinum SQL software can be configured to allocate additional memory beyond the 2GB limit for caching, and larger firms will often require more than 2GB of memory allocation to cache their commonly used data and index files. Since Platinum SQL is a 64-bit program, it can access memory on the 64-bit server beyond the 2GB limit, which means it can cache more of your data, thus improving the performance of accelerated reports and filtering! Utilities for monitoring server usage and performance are included with the software, allowing you to determine the effectiveness of your cache settings.
Get maximum data security with Platinum SQL! Platinum SQL allows you to encrypt the Tabs3 and PracticeMaster data, providing your data with an extra layer of security. Platinum SQL software uses the 256-bit Advanced Encryption Standard (AES) to encrypt data. Once data files are encrypted, they can only be read by the Tabs3 and PracticeMaster Platinum SQL software.
Platinum SQL also includes the Platinum SQL Server, which maintains a set of SQL tables linked to your Tabs3 and PracticeMaster data. To allow access to these SQL tables, Platinum SQL includes 32-bit and 64-bit SQL ODBC drivers, which allow you to write custom reports in both 64-bit and 32-bit programs (e.g., Crystal Reports and Microsoft Excel 2010 64-bit Edition) as well as OLE DB compatible software (e.g., Microsoft SQL Server) using SQL queries. Furthermore, these queries are processed directly at the server, which improves performance and reduces network traffic. Not only is the SQL ODBC driver included in the Platinum SQL package, but you also receive a firm-wide license for it! This allows multiple users to access SQL ODBC without having to purchase additional licenses. Manager-level SQL access rights can be assigned for each system in System Configuration, allowing you to grant SQL access to only those who need it.
With faster speeds, data encryption, enhanced ODBC capabilities, and the added ability to run SQL queries, Platinum SQL is the ideal solution for any firm that wants to enhance their performance, security, and/or take customized reporting to the next level.
To order the Platinum SQL software for your firm, contact your local reseller and consultant, or call our Sales Department at (402) 419-2200. An overview of the Platinum SQL software is also provided in our Knowledge Base at support.Tabs3.com in KB Article R11417, “Platinum SQL Overview.”
Microsoft® Outlook® can help manage your e-mail, your contacts, and your calendar records, but PracticeMaster manages your entire practice – for your entire firm.
PracticeMaster provides more complete client information – Outlook provides contact fields for personal information, but PracticeMaster automatically provides client and contact fields pertinent to the needs of a law firm, such as opposing attorney, judge, jurisdiction information, and more. Furthermore, PracticeMaster is easily customizable while customizing Outlook can be expensive.
PracticeMaster maintains complete matter information – Outlook provides client, contact, and calendar organization. PracticeMaster provides all this, plus more. All matter information can be saved in PracticeMaster. Save client and research notes, manage your firm’s documents, add fees and costs, and more. Use the Outlook Toolbar plug-in to journal e-mails and attachments to PracticeMaster to complete your case management.
PracticeMaster users can have access to all client and matter information – Outlook requires Microsoft Exchange to share users’ contacts and calendars. Not so with PracticeMaster. Not only are clients, contacts, and calendars available to all users in PracticeMaster, but all matter information can be quickly and easily accessed by those who need it now, including e-mails and attachments that have been journaled by any user.
Clients can optionally be marked as secure so that only the assigned users can access their information. If a user does not have access to a secure client, the client does not appear on any reports that the user runs, and that user cannot add or access records that are associated with the client.
PracticeMaster provides conflict searching for all files – When searching in Outlook, only information on your computer is found. Once all case information is saved to PracticeMaster, use the Conflict of Interest Search to find anything in any file in PracticeMaster and find it fast. Search for words, phrases, partial words, and even phonetically. Clients, contacts, calendar records, linked documents, journaled e-mails, attachments, and all other files for all users can be searched from one window to provide a comprehensive list of hits.
PracticeMaster converts activities into fees – Outlook e-mails can be added to PracticeMaster as records as well as be used to create journals, calendar records, and fees. This provides the ability to easily bill your client for appointments and other events, as well as time spent on e-mails, research, and more.
PracticeMaster provides automation – Recurring entries can be created in Outlook; however, not only can you create recurring entries in PracticeMaster, but PracticeMaster can also automatically create a series of appointments and tasks that you can reuse over and over via the Calendar Plan Templates program. When generating a Calendar Plan from a Calendar Plan Template, a plan name and a start date must be specified. This date is then used to calculate the dates for dependent events and tasks. Once the Calendar Plan is generated, the Calendar Plan can either be accepted or rejected in its entirety. If accepted, all of the generated calendar records will be added to the Calendar file. With calendar plans, if a beginning date gets changed, all dependent events and tasks can automatically be adjusted. For example, if the date of a trial is rescheduled, all dependent items can optionally be rescheduled at one time.
Outlook and Word can integrate through “mail merge” functionality, which uses standard fields in Outlook to create a letter. However, PracticeMaster’s Word Document Assembly has the ability to create documents based on any field in PracticeMaster, including non-standard fields that you have added. Specially coded document templates in Word can be used to merge information from your PracticeMaster data files to create draft documents. If the information required is not in the data files, document assembly will pause allowing you to enter the required information. This information is then saved to the document and written to the PracticeMaster data files.
PracticeMaster also provides the ability to set up WorkFlows. WorkFlows are macros that help you automate common tasks. WorkFlows allow you to automatically start tasks on demand or when certain events occur in PracticeMaster. For example, you might use a WorkFlow to create a new Calendar record based on changes made in the Client file, or to have a new fee agreement created using Document Assembly when creating a new Client record.
Tabs3 Connect provides access to complete case information away from the office – You can access Outlook on your Smartphone or other device while away from the office, but you can’t access all of your client’s files. Tabs3 Connect, a Platinum feature, lets you securely view all client, contact, and matter information on the go. You can even add fees and costs when you need to, instead of making a note to add them later.
If you’ve been thinking you don’t need PracticeMaster because you have Outlook, take another look. Thousands of law firms use PracticeMaster and Outlook side-by-side and reap the many, many benefits of using both software products at the same time.
Did you know the majority of Americans used a credit card in the past month? Americans rely on their credit cards more and more to pay for things like clothes, medical procedures, and now, legal services.
Here are the top three reasons law firms decide to accept credit cards:
- Clients pay faster, which allows firms to spend less time collecting on past due bills.
- Clients are more likely to pay their bill in full, which allows firms to reduce the amount they write off.
- Processing integrated credit card payments through Tabs3 Billing or Trust Accounting Software reduces the likelihood of human error, and saves firms time.
Remember: The easier it is to pay, the faster you get paid. The faster you get paid, the fewer collection calls you need to make, and the fewer write offs you need to process.
If you accept credit cards, there is no better way than with Tabs3. When a credit card payment is entered into Tabs3, it is automatically processed and the funds are deposited into your existing bank account. You do not need to change your existing banking relationships to process credit cards. If you use Tabs3 Trust Accounting Software, you can have trust account payments deposited into a separate account from where processing fees are deducted. This integration takes the guesswork out of bank account reconciliation and helps you comply with many state bars’ rules regarding commingling funds.
With the release of Version 18, we partnered with ProPay, a TSYS company, to provide you with credit card processing that is better than ever.
- No more waiting days to start accepting credit cards. With ProPay, you can start accepting credit cards within minutes.
- No more confusing price structures or price negotiations. With ProPay, rates are low and easy to understand.
- No more lengthy SAQ questionnaires to complete. With ProPay, you only have to complete a simplified annual SAQ questionnaire to achieve PCI compliance.
ProPay also has the ability to add future enhancements and newer technology to Tabs3 software, such as chip card readers. If you’re interested in accepting credit cards, you can sign up in minutes at Tabs3.com/ProPay. If you have any questions regarding processing credit cards in Tabs3, contact your local reseller and consultant, or contact Technical Support at (402) 419-2210.
The end of the year can be a busy time for any firm. One of the areas that firms will need to address in the coming months is the filing of IRS 1099-MISC forms. Tabs3 Accounts Payable Software (APS) and Trust Accounting Software (TAS) are designed to help ease the burden of year-end by making it easy to assemble the 1099 reporting information you need. APS and TAS allow you to view 1099 information on reports, print out 1099-MISC forms for filing, or create a 1099 Disk File which can be used to electronically file with the IRS. Using both APS and TAS together allows you to create a combined file by merging your TAS data into APS to run one set of 1099 forms or create a single electronic file.
Continuous 1099 forms can be ordered directly from the IRS. However, for laser printer forms, we recommend ordering 1099 forms from Nelco®. These forms are guaranteed 100% compatible with the APS and TAS software. Likewise, you can order W-2 Wage and Tax Statement laser forms from Nelco. Nelco is a leading expert on W-2 and 1099 reporting compliance rules and regulations. So when you work with Nelco, you won’t have to worry about keeping up to date with all the yearly reporting changes.
Contact Nelco if you have any questions regarding your W-2 and 1099 filing, or to order your forms.
Web: nelcosolutions.com/Tabs3
E-mail: Nelco@NelcoSolutions.com
Phone: (800) 266-4669
For more information about using the 1099 features of APS and TAS, refer to the “1099” Help topics for each program, which include checklists for generating 1099 information.
The Tabs3 Accounts Payable Software (APS) makes paying bills easier. You can print checks, track vendors, generate 1099-MISC forms, run reports and check registers, and more!
APS lets you write checks to saved vendors as well as vendors that are not individually tracked in the software. For monthly payments, set up recurring entries to create multiple invoices in one step. Writing a check by hand? Enter a manual check that will show up in your check register.
Tracking vendors is a snap. In addition to name and address, you can save information for frequently used vendors such as the Federal ID number, 1099-MISC information, vendor discount information, and more! Month-to-date, year-to-date, and to date paid figures for each vendor are also tracked for easy reference.
APS integrates with Tabs3 Billing and Tabs3 General Ledger Software (GLS) to bring things together. Costs can integrate with Tabs3 when adding, changing, or deleting an invoice or manual check. When integrating with GLS, journal entries are automatically created when checks are posted, and voided checks will create reversing journal entries.
APS also offers many reports that can be run to determine activity in the software, including a Check Register, Pre-Check Register, Cash Requirements Report, Aged Unpaid Invoice Report, Vendor Analysis, and lists for vendors, bank accounts, recurring entries, and voided checks.
If you are not currently using APS, try it out! You can install APS Trial Software using the Tabs3 CD, or download a free trial. Contact your Tabs3 reseller or consultant, or our Sales Department at (402) 419-2200 for pricing and information.
Note: Tabs3 works exclusively with Nelco to provide you with checks guaranteed to work with Tabs3 software.
Tabs3 General Ledger Software (GLS) is a general ledger accounting program that is based on a double-entry accounting system. Chart of accounts and financial statement formats can be defined, allowing you to use your current chart of accounts. The availability of multiple departments allows you to create reports based on certain departments or the firm as a whole. Journal entries track debits and credits. Optionally create budgets for each expense account, and compare budget and actual amounts from year to year.
GLS offers bank and credit card reconciliation, printable deposit slips, summarized or detailed reports to help track your financial data, and more. If you have journal entries that must be made monthly, you can set up recurring entries to easily post a batch of entries once a month in a single process.
GLS can be used as a stand-alone ledger program for any business, or it can be combined with other Tabs3 software for full integration. Journal entries can be submitted to GLS through Tabs3 Billing, Accounts Payable, Trust Accounting, and also Peninsula Software’s PenSoft® Payroll software. Additionally, a standard input format is included, providing the ability to import journal entries from other software.
For more information regarding Tabs3 General Ledger Software, contact your local reseller or our Sales Department at (402) 419-2200.


