
If you need to find data in PracticeMaster based on just a word or phrase, we have you covered! There are several ways to search in PracticeMaster to find what you need.
Search Box
The search box, which is available on the List tab for 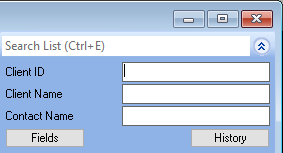 all files, the Matter Manager, and the Graphical Calendar, can be used to quickly search for all records that contain a specific string of text in any of the fields included in the currently selected column layout. You can optionally search for different text in multiple fields at one time. You can enter text directly in the Search List field, or click the
 ![]() button to show a list of fields for more specific searching. If the desired field is not shown, click the Fields button for a list of all fields in the current column layout.
button to show a list of fields for more specific searching. If the desired field is not shown, click the Fields button for a list of all fields in the current column layout.
Conflict of Interest
PracticeMaster’s Conflict of Interest Search (Search | Conflict of Interest Search) provides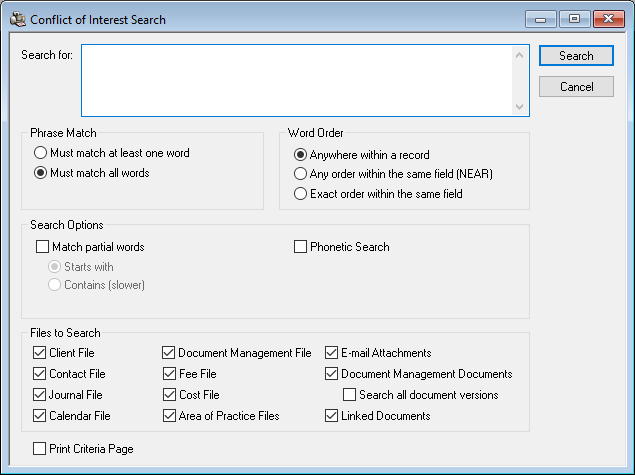 robust searching capabilities including whole word or partial word searching and word order, phonetic searching, and record drill-down capabilities on reports.
Files searched in PracticeMaster include the Client file, Contact file, fee transactions, cost transactions, Calendar, Journal, Document Management, and Area of Practice files, which include e-mail records, call logs, research tasks, and phone timer records. If PracticeMaster is integrated with Tabs3, all fields in PracticeMaster that exist in both programs (such as Miscellaneous Lines in the client file), will contain information from Tabs3 in addition to existing information in PracticeMaster.
Note: A field must be marked as Include in Conflict Search in File Maintenance (Maintenance | File Maintenance) in order to be included in the Conflict of Interest Search.
Document Search
The Document Search program (Search | Document Search) is a powerful program used to 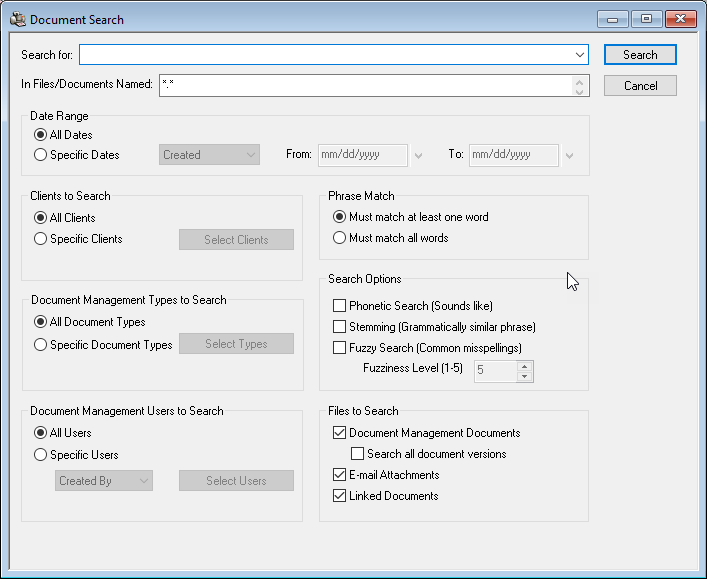 search the contents of Document Management documents, e-mail attachments, and linked documents associated with PracticeMaster records.
Searching capabilities including whole word or partial word searching; phonetic, stemming, and fuzzy searching; and record drill-down capabilities on reports. Additionally, you can narrow your search to specific dates, clients, document types, and/or users.
Contact Search
The Contact Search (Search | Contact Search) lets you quickly find a single contact so that 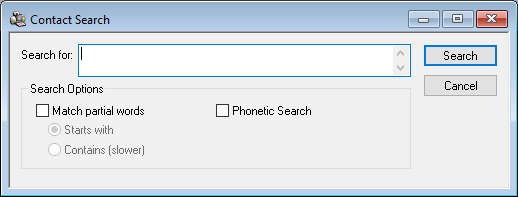 you can drill down to a phone number or other information for the contact. Searching capabilities including partial word searching, phonetic searching, and record drill-down capabilities on reports.
Note: A field must be marked as Include in Contact Search in File Maintenance (Maintenance | File Maintenance) in order to be included in the Contact Search.
Find and Replace
On any List tab, the Find and Replace program (Edit | Find and Replace) can be used to 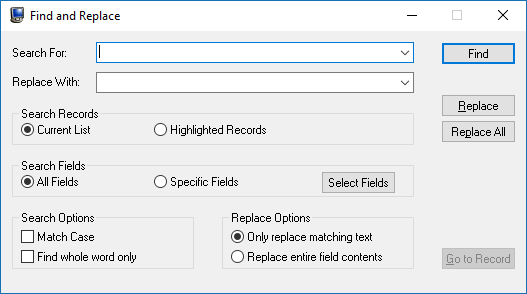 find one or more records containing specific text, and optionally replace the text with a new value. You can search the current list or just highlighted records, all fields or specific fields.
Find and Replace is a quick and easy alternative to updating multiple records with the same information one by one.
Data can always be found using the various search options in PracticeMaster. Learn more about the various PracticeMaster search features in the PracticeMaster Search Guide.

A majority of errors and problems that firms encounter result from a failure in their network software or hardware. So how can you tell if it’s a network error, and how do you stop these errors from occurring?
Fatal errors reported by the software can be shown with either three or four segments. For example, you may receive an error 1020-1-53 (three segments) or a 1400-0-36-64 (four segments). We can tell what most network errors are by looking at the last segment of the error. Network connectivity problems are typically reported with a last segment of 6, 53, 55, 59, 64, 121, 1231, or 10054. However, other errors can also signify an issue with the network connection. The examples used above are network connectivity errors because the last segments are 53 and 64.
There are many things to look at when diagnosing where a network problem resides. Since many network problems are intermittent, occur only under heavy workload, and may not be reproducible on demand, it can be difficult to determine and diagnose the problem. Any communication problems with the file server can cause errors.
Knowledge Base Article R10184, “Network Troubleshooting Guide,” provides ideas and tools to help you and your IT professional troubleshoot network issues. This article includes information on understanding errors, identifying the scope of the issue, and network troubleshooting suggestions.
Our Knowledge Base can be accessed 24 hours a day, 7 days a week, at support.Tabs3.com. You can also access our Knowledge Base while in the software by selecting Help | Internet Resources | Knowledge Base.

Creating report definitions for each of the reports your firm runs can help save considerable time, and taking advantage of Report Suites in Tabs3 saves even more time. When your firm prints the same set of reports every year, quarter, month, week, or semi-regularly, report suites offer a one-step option to printing out a predefined set of reports using the report definitions you already have set up.
Multiple suites for different departments or individuals can be created. This allows personalized report suites to be saved and printed for a range of needs including monthly, quarterly, and yearly reports, as well as suites designed specifically for billing, collections, and individual attorneys.
Report suites are easy to set up and even easier to run. To create a new suite of reports, click the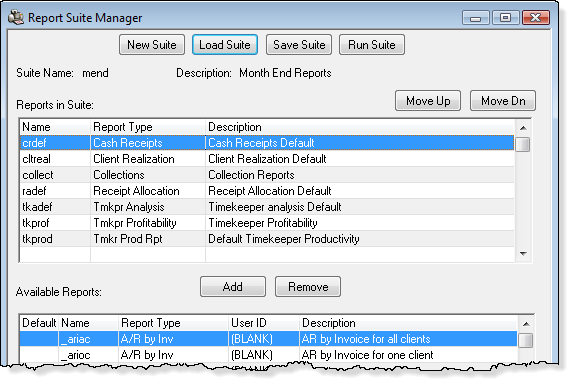 Reports menu, point to Report Suite, and select Report Suite Manager. Click New Suite, select a report you want to include from the Available Reports list, and click Add for each report you are including. Available Reports will include any reports with a report definition already set up. Once you have made your report selections, click Save Suite and enter a File Name and Description for the new suite.
When you are ready to run a suite, click the Reports menu, point to Report Suite, and select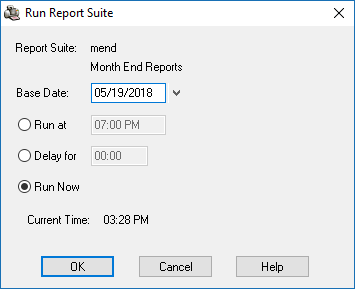 Run Report Suite. Select the suite you would like to run and click OK. The Run Report Suite window allows you to specify a Base Date and when you want to run the report suite. Report suites can be run at a specific time, after a specific period of time has elapsed, or immediately. This window can also be accessed by clicking the Run Suite button in the Report Suite Manager.
Once the report suite begins processing, each report definition is launched immediately. When you have several reports to run, this can save a great deal of time compared to launching each report individually, selecting a report definition, and then printing. If you have not already taken advantage of Report Suites, try it out and see how much time your firm will save!

Want to know if Platinum is right for your firm? Try out the Tabs3 and PracticeMaster Platinum software risk free for 30 days! This offer allows you to use all of the Platinum features with your own data for 30 days before determining whether Platinum will be a permanent upgrade.
Key features in the Platinum software include:
- Tabs3 Connect – Tabs3 Connect provides secure access to Tabs3 Billing and PracticeMaster anywhere you can connect to the Internet using smartphones, tablets, and computers away from the office. Enter fees and costs, browse client and contact information, see calendar events, receive eNotes and alarm notifications, and more!
- HotBackup – With HotBackup, you can back up your data while others are actively using the software, and maintain up to 198 backups in the location of your choosing. You can schedule data to be backed up automatically for the days and times of your choosing, and designate one or more e-mail addresses to be notified of successful and/or failed HotBackups.
- Transaction Processing and Auto-Recovery – Transaction Processing ensures that database transactions complete successfully, guaranteeing that the database remains in a consistent, reliable state. If an interruption in the network occurs, Auto-Recovery “rolls back” the database to its previous state before the database transaction began, saving you from an entire system restore.
- Tabs3 Billing and PracticeMaster Accelerators – Accelerators run on the server, helping to minimize both the amount of data transferred across the network and the amount of data processed on the workstation. This means that the performance of generating reports and statements is dramatically improved.
- Accelerated Filtering and Column Sorting – PracticeMaster filters and column sorting are processed at the server, similar to the PracticeMaster accelerator, which improves the speed at which lists are displayed.
- eNote – PracticeMaster eNote provides an intra-office way to quickly communicate by blending the best features of instant messaging and e-mail. Send a quick message, or attach a PracticeMaster file such as a calendar or journal record for review. If you don’t want to be bothered, you can even set your status to “Do Not Disturb.”
- Exchange Connector – If your firm uses Microsoft® Exchange, the PracticeMaster Exchange Connector can provide a direct link between the Platinum Server and the Exchange Server. Set up a single administrative user with rights to all calendars and contacts, and information can be synchronized between servers instead of users.
- Lockout Notification/Log Off Users – The Conflicting Activities window includes two buttons: a Notify button and a Log Off Users button. The Notify button informs logged in users that a lockout has been initiated, requesting they save their work and log off. The Log Off Users button is a way to safely log users out of the software. This button informs users that they will be logged out of the software after a specified amount of time, and provides the reason why they are being logged off.
- Accounts Receivable by Timekeeper Report – The Accounts Receivable by Timekeeper Report prints a list of clients with fees due for each working timekeeper, making it easy for individual timekeepers to see which clients owe money for work they performed. This report is different from other receivable reports because it allows you to filter clients by including only those clients that the timekeeper worked on, a particularly nice feature for larger firms.
- Enhanced Detail Accounts Receivable Report – The Detail Accounts Receivable Report offers the option to include a breakdown of fees by timekeeper, and costs by cost type. When this option is enabled, each timekeeper with outstanding fees is displayed on a separate row with an aging breakdown, and outstanding costs are grouped by cost type with an aging breakdown.
For more information on the 30 day trial offer, visit Knowledge Base Article R11261, “Platinum Version Net 30 Trial Plan,” and then contact your local consultant or contact our Sales Department at 402-419-2200 to take advantage of this great offer!

I synchronize PracticeMaster with Outlook, and I occasionally see the message “Outlook Synchronization Suspended” in the status bar. Why would this message be displayed?
There are a few reasons the “Outlook Synchronization Suspended” message can be displayed in the PracticeMaster status bar.
![]()
The specified confirmation threshold has been exceeded.
The Outlook Synchronization confirmation threshold is used to specify the minimum number of records that will require confirmation before synchronization can proceed. The purpose of this setting is to ensure that you are alerted when an unusual number of records are being synchronized (as this can indicate a problem with your synchronization settings), without interrupting more typical synchronizations. Therefore, the ideal value will vary depending on the user.
To change the threshold
- From the Maintenance menu, point to Integration and select Outlook Synchronization.
- From the Synchronization Options tab, in the Synchronization Options section, change the Require confirmation when at least xx records will be synchronized number or clear the check box.
- Click OK.
A critical Outlook Synchronization setting has been changed and therefore a critical synchronization is required.
In order to ensure the accuracy of synchronized information, a critical synchronization must be performed before any synchronization can occur after changing the settings. All other synchronization for the user will be suspended until this synchronization is performed.
A synchronization exception has occurred.
A synchronization exception is a synchronization issue that PracticeMaster cannot resolve without user intervention. Exceptions are uncommon. Refer to the “Synchronization Exceptions” section of Knowledge Base Article R11368, “Troubleshooting Outlook Calendar & Contact Integration Issues,” for more information.
Resolution
To resolve the suspended synchronization, click the “Outlook Synchronization Suspended” message in the PracticeMaster status bar. You will then be prompted to perform the required action.
For more information on PracticeMaster’s Outlook integration, refer to our Outlook Integration Guide.

Do you manually add every calendar record individually for events that repeat on a regular basis? Save time by using PracticeMaster’s Recurring Dates feature!
PracticeMaster’s Recurring Dates feature allows you to quickly add multiple calendar records with the same information for different dates. This feature is quite useful for creating dates for repetitive tasks such as client review, filing deadlines, etc. You can even link a series of dates, making it easy to change or delete all records in the same series.
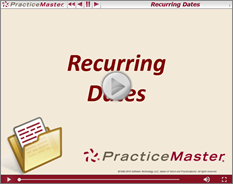
The Recurring Dates video walks you through adding calendar records for a meeting with a monthly recurring date. For this scenario, the video shows you how to create records on the third Thursday of every month for the next two years. The video then shows you how easy it is to change the date for all of the newly created meeting records to the third Friday of every month, instead.
Using PracticeMaster’s Recurring Dates feature makes it easy to create multiple linked calendar entries for a task or event that occurs on a regular basis.
Watch this three-and-a-half-minute video here:
Training Videos can be accessed 24 hours a day, 7 days a week, at Tabs3.com/videos. You can also access Training Videos while in the software by selecting Help | Documentation and then clicking the See also link for Tabs3 and PracticeMaster Training Videos.

When you need to send a statement to two different parties, what do you do? With Tabs3 Billing, you can automatically generate a duplicate statement by adding an Additional Bill To Address. This option makes it easy to send an additional statement to a third party, such as an insurance company. When adding an Additional Bill To Address, you can select who it goes to and whether they receive a mailed statement, an e-mail statement, or both.
To create an Additional Bill To Address
- From the File menu, point to Open and select Client.
- Select the desired Client ID.
- From the Billing Preferences tab, in the Statement Delivery Options section, click the Add button.
- In the Bill To Record window, enter the desired information and select the desired options.
- Click OK.
- Press Ctrl+S.
Keep in mind that only one Additional Bill To Address can be added.
Tip: If you need to send a statement to more parties and you are e-mailing statements, consider adding additional recipients to the Cc or Bcc fields.
