
Did you know that PracticeMaster has a new dashboard in Version 19? The dashboard makes it easy to see your calendar for the day, your upcoming tasks, and a quick recap of the time you entered.
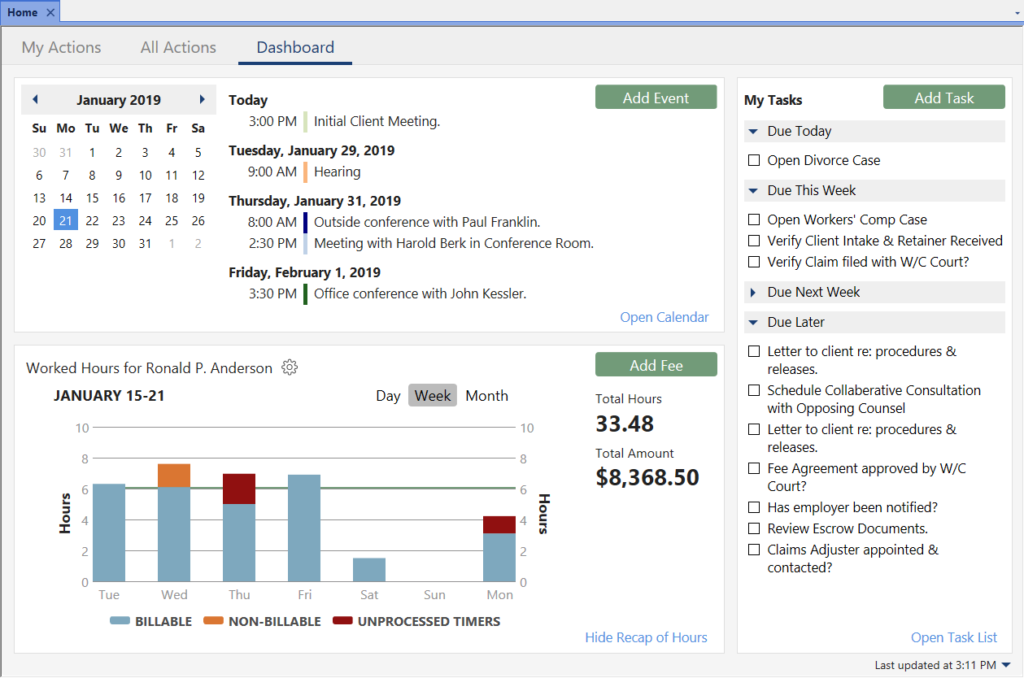
My Calendar
The Calendar widget shows a list of your upcoming events, along with a calendar that can be used to pick a different date. Mouse over an upcoming event to see more details, or click it to open the calendar record for editing. You can quickly add an item and open the full calendar.
- Click Add Event to add an event on the fly.
- Use the Date Selector to view calendar events on future days.
- Click the event’s description to open the record.
- Hover over an event’s description to view the event’s Description, Date, Time, Alarm, Location, Users, Client, and Comments.
- Click Open Calendar to open the Daily, Weekly, or Monthly Calendar depending on the view last used.
My Tasks
The My Tasks widget shows all of your incomplete tasks broken up into sections by due date. This makes it easy to see what needs to be done first.
- Click the Add Task button to add a task on the fly.
- Click the task’s description to open the record.
- Hover over a task’s description to view the task’s Description, Date, Alarm, Client, and Comments.
- Click the check box to the left of the task to mark it complete.
- Click Open Task List to open and view your Task List.
Recap of Hours
The Recap of Hours widget shows your hours worked compared to your daily target hours. This makes it easy to see the status of your worked hours, including any unprocessed timer records.
- Click Day, Week, or Month to set the range you want to see.
- Hover over the Recap of Hours widget to access the left and right arrows, allowing you to change which day, week, or month is viewed.
- Click the billable or non-billable time to open the Fee Recap list, which shows the detail that makes up the amount.
- Click the
 to change the timekeeper, select to compare the hours with a specified daily target, or select to show unprocessed timer records.
 - Click the Add Fee button to add a fee on the fly.
- Click Hide Recap of Hours if you do not want to see this information.
Note: The Home page must be selected in the PracticeMaster Theme Settings (View | Theme Settings | Home Page) to view the dashboard.

Did you know that if you use ProPay to process credit cards in Tabs3, you can now send a link to your clients so they can make a payment without you needing to get their credit card information? Once the payment is made by your client, you can then import those payment records into Tabs3 Billing.
This works by configuring your Email Statement template to automatically generate a personalized link to the ProPay website. The link can be used by your clients to pay their bills directly via credit/debit card or electronic check. Those payments can then be imported into Tabs3 using the new Import Online Payments feature.
Note: Each time an email is generated via the Email Statements program, a new and unique link is also generated specific to that client.
Knowledge Base Article R11767, “Using the Tabs3 Payment Link,” provides more information on how the Tabs3 Payment Link and Import Online Payments features work. Check out this article to learn how to modify your email template, process and email your statements, import online payments, and read frequently asked questions.
Our Knowledge Base can be accessed 24 hours a day, 7 days a week, at support.Tabs3.com. You can also access our Knowledge Base while in the software by selecting Help | Internet Resources | Knowledge Base.

Fees can occasionally be entered in an order that may be confusing on a statement. For example, when the statement is printed out, it might look like you reviewed a document before writing the first draft! In Version 19, you can use the Reorder Fees utility to change the order in which fees with the same date are displayed on a single statement.
The order in which fee transactions are printed on a statement is based on three levels:
- First, transactions are sorted by the Subtotal selected on the Fee Format tab of the Statement Template being used (i.e., No Subtotal, Timekeeper, Transaction Code, Category, or Date).
- Next, transactions are sorted by the Date of the transaction.
- Finally, transactions with the same date are sorted by the Reference number of the transaction. This is the order that can be modified using the Reorder Fees utility.
The Reorder Fees utility (Statements | Statement Preparation | Reorder Fees) lists all work-in-process fees for the selected client. Fees can be moved using the Move Up and Move Down buttons. Moving fees up and down changes the reference number of the fee immediately.
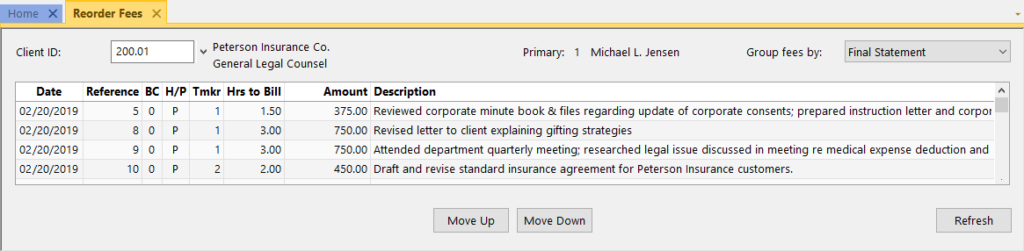
However, keep in mind that fees can only be moved up or down within the same date. For example, if there are three fees dated 2/15, and one fee dated 2/16, only the fees dated 2/15 can be moved.
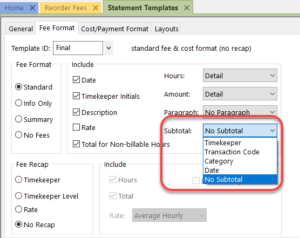
You can use the Group fees by drop-down option to see what order fees would be listed on a client’s statement based on the Subtotal selected in the Statement Template. When selecting Draft or Final, the fees will be grouped as specified in the Subtotal field of the selected client’s Draft or Final Statement Template.
Take a look at how fees are shown on your clients’ statements, and see how the Reorder Fees utility can help you. Your clients will appreciate the order, and you might get paid faster!

I use Word Document Assembly to assemble forms for my business clients. After I save the forms to PracticeMaster as documents, I always create a fee for certain hours and amount values based on the template I’m assembling (defined by Document Type) and write an email to the client. Is there a way for PracticeMaster to automate some of this for me?
This can be accomplished by creating a WorkFlow that prompts the user if they’d like it to run when a Document Management record is created with a particular Document Type (e.g., “Form” or “Proposal”). Fee and email values will be entered automatically.
Once the WorkFlow completes, the document can easily be attached to the email.
To automatically create a fee and start an email every time Document Management records are added with certain Document Types
- From the Maintenance menu, select WorkFlows.
- Under Common Client Related Files, select Document Management, and then click the New button.
- Enter a Name for the WorkFlow (e.g., “Create Fee and Email”).
- In the Source section:
- Select the Filtered Records option and click the Filter button.
- Click the New Row button and select the Document Type field (Doc_Type).
- Select a Test Condition of “equal to”.
- In the Test Value field, select the desired Document Type (e.g., Form).
- Click the Save button.
- In the Event section, select Record Added.
- In the Actions section, click the New button.
- Select Create New Record and click Next.
- Under Common Client Related Files, select Fee and click OK.
- Click the Define Template button.
- Click the set button next to the Client ID field.
- In the Template Expression Editor window, click the Field button, select “Client_ID”, and then click Insert.
- Click OK.
- Click the set button next to the Hours Worked field.
- In the Template Expression Editor window, click the Value button, enter the desired number of hours worked (e.g., “0.50”), and then click OK.
- Click OK.
- Click the (Save) button.
- Click the set button next to the Client ID field.
- Click Finish.
- In the Actions section, click the New button.
- Select Start Email and click Next.
- Click in the To field.
- In the WorkFlow Expression Editor window, click the Field button, select “Client_ID”, and then click Insert.
- At the end of the expression, enter “:Email_Address”, and then click OK.
- Click in the Subject field.
- In the WorkFlow Expression Editor window, click the Value button, enter the applicable text for the subject (e.g., “A document has been created.”), and then click OK.
- Click OK.
- Click in the Body field.
- In the WorkFlow Expression Editor window, click the Value button, enter the applicable text (e.g., “The requested document has been created and attached.”), and then click OK.
- Click OK.
- Clear the Include event information checkbox.
- Click Finish.
- Click Save.
When run, this WorkFlow will start an email to which the document can be attached. To attach the document to the email, select the PracticeMaster tab of the email, click Attach PM Document, and then select the new Document Management record from the list.
Note: This WorkFlow can be created for each Document Type, as needed.
For more information on WorkFlows, refer to our PracticeMaster WorkFlows Guide at Tabs3.com/support/docs.html or Knowledge Base Article R11307, “All About WorkFlows.”

Did you know that you can create separate tab groups in the Tabs3 software? Tab groups provide the ability to show two or more Tabs3 windows at the same time. This is especially handy when it’s necessary to compare data.
The Tabbed Mode Splitscreen training video shows you how to turn on the Tabbed Interface and then walks you through creating new horizontal and vertical tab groups by dragging and dropping tabs or via the Windows menu. You’ll also learn how you can move tabs between tab groups or reorder tabs within the same group.
Watch this two-minute video here:
Training Videos can be accessed 24 hours a day, 7 days a week, at Tabs3.com/videos. You can also access Training Videos while in the software by selecting Help | Training Videos.

Did you know that you can set a timekeeper’s rate to change as of a specific date? This means that the software will automatically apply the correct rate based on the fee’s date, allowing you to continue entering time like normal. For example, let’s say you want to change a timekeeper’s rate from $250 to $275, effective on March 1st. In this scenario, any time entered with a date prior to March 1st will automatically use the $250 rate, and any time entered with a date of March 1st or later will automatically use the $275 rate. This helps make it easy to change rates and have them billed correctly.
To set the effective date for new timekeeper rates
- From the File menu, point to Open and select Miscellaneous.
- From the Timekeeper tab, select the Timekeeper whose rate will be changing.
- In the Effective Date of New Rates field, enter the date on which the new rate will take effect.
- In the New Rate fields, enter the desired rates.
- Press Ctrl+S.
Note: New rates can also be configured in Rate Tables by editing each table.
