
PracticeMaster’s Document Management feature is easily configured to automatically name and store linked documents in a centralized location. Document management can play a major role in your everyday workflow by streamlining the process of storing new documents and making it easy to access those documents via Tabs3 Connect, the Client File, Matter Manager, Conflict of Interest Search, and Document Search.
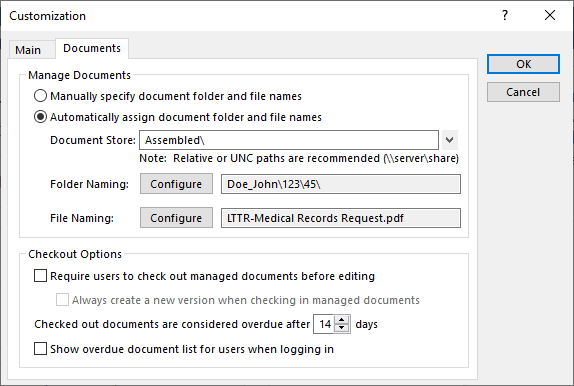
In Customization (Utilities | Customization | Documents tab), you can define how you want your documents to be managed and where the documents are stored. You can create a folder structure up to five folders deep to classify and store your documents. Then you can define how the documents are to be named based on fields in the Client and Document Management files.
When adding Document Management records, they will automatically be named and saved as specified in Customization settings, saving you time and ensuring all documents are saved to the correct location. Document Management records can be created several ways:
- Using Ctrl+N, the New Record right-click menu, or the button on the toolbar of the Document Management Editor window.
- Via the Quick Clicks Create Document Record menu option for email record attachments in the Journal file.
- Via the Send To PracticeMaster option of the Windows Explorer toolbar plug-in.
- Via the PM Save option of the toolbar plug-ins for Microsoft® Word, Excel®, PowerPoint®, Adobe® Acrobat®, Adobe Reader®, Corel® WordPerfect®, and more.
- Via the PracticeMaster icon in the ScanSnap Quick Menu software for Fujitsu® ScanSnap™ scanners.
- Following the Word Document Assembly process by using the Create Document Record option.
Help take your document storage to the next level by using PracticeMaster’s built-in Document Management!

The Knowledge Base is a great resource for more in-depth information on a subject, including overviews, best practices, strategies, troubleshooting, frequently asked questions, and more. To help streamline your research, we have several articles that contain a list of articles related to a particular area of interest. This makes it easy to determine which articles you want to review, and provides a place you can come back to so you can quickly pick up where you left off.
The following articles contain a list of articles on the given subject:
- R11194 – Help Resources
Provides information regarding the various help resources available for using Tabs3 Software including Help, Knowledge Base, Guides, and more. - R11861 – Version 2021 Information & Resources
Includes information about the Version 2021 update and includes a list of information that has been added to the Knowledge Base regarding Version 2021 including What’s New in Version 2021, Version 2021 Introduction to New Features, and more. - R11567 – Frequently Asked Questions for All Products
Includes a list of resources with frequently asked questions, both general and feature-specific, regarding the software. - R11524 – Backup/Restore Information Resources
Includes a list of resources with information regarding backing up and restoring your data including having a good backup strategy, troubleshooting, testing your backup, and more. - R11582 – Statements Information Resources
Includes a list of resources with information regarding Tabs3 Billing statements including printing, emailing statements, customization, and general information. - R11482 – Resources for Integrating PracticeMaster with Outlook
Includes a list of resources with information regarding Microsoft Outlook and its integration with PracticeMaster including Outlook synchronization, the Platinum Exchange Connector, and the Outlook Toolbar Plug-in. - R11715 – Tabs3 Financial Software Resources (Trust, AP, GL)
Includes a list of resources with information regarding Tabs3 Financials including general articles, integration articles, reconciliation articles, and more. - R11638 – Document Management Resource List
Includes a list of resources with information regarding PracticeMaster’s Document Management feature including training videos, the Document Management Guide, a quick reference, troubleshooting, and more. - R11645 – Resources for Filtering Data
Includes a list of resources with information on filtering data in PracticeMaster and Tabs3 Billing including information on indexes, filters, QuickViews, Report Writer, WorkFlows, and more. - R11406 – Tabs3 Platinum/Platinum SQL Resources
Includes a list of resources with information regarding Platinum software and Platinum Server including guides, Platinum information, Platinum SQL information, troubleshooting, and more. - R11506 – Resources for Importing Data into Tabs3 Software
Includes a list of resources with information regarding programs that can be used to import data into Tabs3 Billing, PracticeMaster, and Tabs3 Financials.
When looking for additional information on these subjects, save yourself some time – skip the searching and check out one of the resource lists above.
Our Knowledge Base can be accessed at support.Tabs3.com. You can also access our Knowledge Base while in the software by selecting Help | Internet Resources | Knowledge Base.

When was the last time you reviewed the fields set up for history tracking in PracticeMaster? History tracking is an optional feature that can be used to maintain a detailed audit trail of all additions and changes to specific fields in a file.
When history tracking is turned on, you can access the Record History window for a particular record one of three ways:
- From the Edit menu, point to Action and select Display History.
- From the Quick Clicks pane, expand the Take Action group and select Display History.
- From the right-click menu, point to Action and select Display History.
The Record History window shows a list of all changes to the record and can be resized as needed. You can sort records in Field or Date Order, select changes for a specific user, and select changes for a specific field.
Double-click a line item to open the View Field History window. This window shows both the Old Value and the New Value of the field.
Perhaps not all pertinent PracticeMaster fields have been configured for history tracking. You can determine which fields have been set up to track history by printing a File Definition report. From this list, you can identify which fields should be changed. Once you have a list of fields for which you want history to be tracked, you can make the desired changes in File Maintenance.
To print a File Definition report
- From the Reports menu, select File Definition Report.
- Select the desired file and click OK.
To enable history tracking on a field
- From the Maintenance menu, select File Maintenance.
- Select the file you want to review, such as Client, and click OK.
- From the Field tab, select the Field ID for which you want to enable history tracking.
- Select the Track History check box.
- Repeat steps 3 and 4 for each field for which you want to track history.
- Click Done and select Yes to save changes.
- Close File Maintenance.
For more information on history tracking, including history file size, things to keep in mind when enabling this feature, and fields for which history tracking cannot be enabled, press F1 from any PracticeMaster window, and on the Index tab enter the keywords “history tracking”.

When it comes to maximizing your billable hours, it’s important to have a reliable timer feature that allows you to easily convert your time into fees.
The Using Timers in PracticeMaster video shows how easy it is to record time spent in meetings, on phone calls, and doing other work, as well as how to quickly convert and process your timer records.
Watch this four-minute video here:
Training Videos can be accessed at Tabs3.com/videos. You can also access the videos while in the software by selecting Help | Training Videos.

When previewing reports, you always get the best formatted view of the information for reading. However, when saving a report to an .html or .txt file, you may see different formatting or missing text. So how do you get better output? By using the Optimize for Print to File setting.
When selecting to Optimize for Print to File, the software will make adjustments that help with formatting and eliminate clipping problems. This can help significantly when printing to .html or .txt format.
To Optimize for Print to File
- From the File menu, select Print Setup.
- Select the desired Printer.
- Click the Advanced Printing Features button.
- Select the Optimize for Print to File check box.
- Click OK on the Advanced Printing Features window.
- Click OK on the Printer Setup window.
The next time you print a report to a file, try selecting Optimize for Print to File and see the difference it makes.
Note: We do not recommend selecting this option for your normal printing jobs because of adjustments made to avoid clipping problems. When saving output to a file, the best solution is to configure a special printer for print-to-file output.
