
The difference between Timekeepers and Users is often confused. So what exactly is the distinction between how timekeepers and users are used in the software?
Users represent anyone who uses the software, or a resource that needs to be scheduled, such as a conference room. Timekeepers represent any person whose time is entered or billed, such as attorneys and paralegals.
You work with timekeepers and users every day, possibly in ways you don’t even realize. Let’s take a look at some different ways timekeepers and users are used in the software below.
Timekeepers can be used to:
- Track time
- Assign billing rates
- Specify which timekeeper is primary, secondary, and originating for a matter
- Track billing and productivity
- Specify reporting ranges
- Specify fee compensation rules (Tabs3 Billing only)
- …and more
Users can be used to:
- Log in to the software
- Specify access rights
- Track who enters data in Tabs3 Billing, PracticeMaster, Trust Accounting (Trust), Accounts Payable (AP), and General Ledger (GL)
- Add to groups to make entering calendar records easier
- …and more
Because there are such different uses for timekeepers and users, when, how, and why you should add or delete them vary. When adding or deleting timekeepers and users, keep the following in mind:
- You can only add as many timekeepers as your license allows. Because of this, it may be necessary to renumber or delete timekeepers or add timekeepers to your license.
- There is no limit to the number of users you can add; you are instead limited by how many users can be logged in to the software at the same time. Because of this, there is never a need to delete users. In fact, deleting users can cause Data File Integrity Check Errors.
It is important to note that Tabs3 Billing and Trust are licensed by Timekeeper whereas PracticeMaster, AP, and GL are licensed by User. For more information on timekeeper and user limits, refer to Knowledge Base Article R10788, “Active User Limits.”
Not sure what your timekeeper or user login limits are? These can be found in the About window (in the Quick Launch, search for and select “About”). The About window displays the Active User Limit in each of the applications. In Tabs3 Billing, you can also see the Maximum Timekeeper Limit, and in Trust you can see the Maximum Attorney Limit. For more information about what is contained in the About window, refer to Knowledge Base Article R11865, “Information in the About Window.”
For more information on deleting timekeepers and users, refer to Knowledge Base Articles R10969, “Renumbering vs. Deleting Inactive Timekeepers,” and R10840, “Deleting User IDs.”
Knowing the difference between timekeepers and users can help you know which settings may need to be changed when necessary, as well as when you should add or delete them, or update your license. For more information on timekeeper and users, refer to the Help by pressing F1 from any window.

Ethics are an integral part of any business, but in the field of law they are especially important. Tabs3 Software works to ensure that your firm has the tools to maintain ethical walls in order to protect your clients and cases.
Knowledge Base Article R11459, “Ethical Walls in Tabs3 Software,” discusses how to use Tabs3 Software to create ethical walls in your firm. The Tabs3 Software provides Conflict of Interest searching, the option to make clients secure and accessible by only certain users, the ability to control who sees work by assigning timekeepers, and the ability to set up access profiles to control who can access specific functions of the software.
Our Knowledge Base can be accessed at support.Tabs3.com. You can also access our Knowledge Base in the Quick Launch by searching for and selecting “Knowledge Base.”

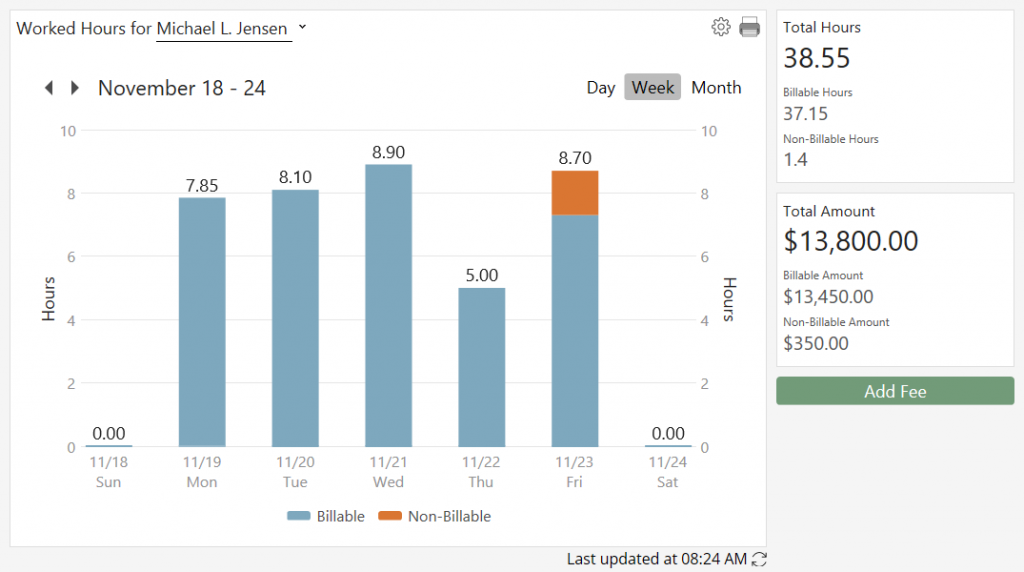
In Tabs3 Billing, PracticeMaster, and Tabs3 Connect, the Recap of Hours contains a graph that provides billable and non-billable hours and amounts at-a-glance, with the added ability to also see unprocessed time in PracticeMaster. By default, the bar graph will display the current week, and you can scroll forward and backward in time using the arrows at the top of the graph. Want to review and/or edit fees for a certain day? Simply click on the billable or non-billable time to open the Fee Recap Lookup window, where you can view the fee records or add new records on the fly! In PracticeMaster, click on the unprocessed time to open the Process Timer Records window so you can convert that time into billable fees.
The Recap of Hours can be accessed several ways.
- In Tabs3 Billing, the Recap of Hours can be accessed via the Quick Launch by searching for and selecting “Recap of Hours” or by clicking the
 button in the Fee Entry window. Additionally, you can run the Recap of Hours Report via the Quick Launch by searching for and selecting “Recap of Hours Report.”
 - In PracticeMaster, you can access the Recap of Hours on the Dashboard or via the Quick Launch by searching for and selecting “Recap of Hours.”
- In Tabs3 Connect, you can access the Recap of Hours by clicking on the
 icon.
icon.
To specify the Default Timekeeper, include a daily target comparison line, and, in PracticeMaster, to include unprocessed timer records, click the ![]() icon in the Recap of Hours window.
icon in the Recap of Hours window.
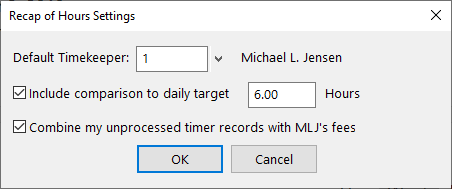
Although the Recap of Hours will always open to the Default Timekeeper selected, you can also select a different timekeeper for the current session.
Reviewing your time has never been easier!

Do you want to keep track of who is logging in and out of Tabs3 Connect, who is getting locked out due to failed login attempts, or who is downloading documents and attachments? The Tabs3 Connect Access Log in System Configuration (View | Log Files | Tabs3 Connect Access Log) contains all of this information! Each Log In, Log Out, Lock Out, and Download entry contains the date and time of the logged item, the User ID of the user who performed the action, and the IP address of the device where the action was performed. Additionally, the download path for documents and attachments is included.
For more information on Tabs3 Connect, contact your Tabs3 Software consultant, call Support at (402) 419-2210, or visit Knowledge Base Article R11480, “All About Tabs3 Connect.”

Skip the hassle of collections this year by scheduling your matter’s one-time and recurring payments with Tabs3Pay!
The Scheduling Payments with Tabs3Pay video walks you through how to schedule a future-dated payment or series of payments, right from the Tabs3 Billing Matter Manager. This feature makes it easy to provide payment plans for your clients and allows you to get paid on a specific date, even when you’re not in the office.
Watch this three-minute video here:
Training Videos can be accessed at Tabs3.com/videos. You can also access the videos in the Quick Launch by searching for and selecting “Training Videos.”

With the ability for everyone to create their own QuickViews, filters, column layouts, and WorkFlows, these sections in the Quick Clicks pane can start to appear cluttered with other users’ additions, making it harder to find what you need.
There are several ways you can organize items in the Quick Clicks pane. You can drag items around to rearrange the order in which they appear, hide items you don’t use, and create folders into which you can then drag Quick Clicks items. Each of these options are user-specific and will not affect other users.
To rearrange Quick Clicks items
- Open the desired file (e.g., the Client file).
- In the Customize Current View group of the Quick Clicks pane, click Manage Quick Clicks.
- Expand the desired group (e.g., WorkFlow).
- Click and drag items to place them in the desired order.
To hide or unhide Quick Clicks items
- Open the desired file.
- In the Customize Current View group of the Quick Clicks pane, click Manage Quick Clicks.
- Expand the desired group.
- Select the item you want to hide or unhide, and then click the
 (Hide) icon.
To create folders for Quick Clicks items
- Open the desired file.
- In the Customize Current View group of the Quick Clicks pane, click Manage Quick Clicks.
- Expand the desired group.
- Click the
 (Add Folder) icon to create a new folder, and then give it a name.
 - Click and drag the desired items into the newly created folder.
Customizing your Quick Clicks items is easy to do, making sure you have quick access to the items you use.

Can I add explanatory notes to my fees that will be shown on draft statements but not final statements?
Statement comments allow you to include additional information on transaction descriptions that will be shown on draft statements or reports, but not final statements. This makes it easy to provide information to the person reviewing pre-bills without making it visible to the client.
To enter a statement comment
- In the Description field of a fee, cost, payment, or client funds transaction, place your cursor where you want the statement comment to appear.
- Right-click in the Description field and select Statement Comment or press Ctrl+H to enable Statement Comment mode.
- Type your statement comment.
- Right-click in the Description field and select Statement Comment or press Ctrl+H again to disable Statement Comment mode.
Statement comments are identified in the entry window with red text, are shown on reports and draft statements with a strikethrough line, and are excluded from final statements.
We received a spreadsheet of potential related parties for a case. Can we import these as contacts into PracticeMaster?
The Import Data Wizard allows you to import data into any PracticeMaster file, including new contacts.
To use the Import Data Wizard
- In the Quick Launch, search for and select “Import Data Wizard.”
- Expand the Lookup Files group, select the Contact file, and click Next.
- Click Browse, select the file to import, and click Next.
- Map the columns in the import file with fields in PracticeMaster, and then click Next.
- Click Finish.
Note: PracticeMaster requires a text file containing comma-separated values to import. If your spreadsheet is in another format, such as a XLS file, you can save the file as a CSV format using Microsoft Excel or a similar application.
