
You’ve heard about Platinum, but haven’t had time to look into it yet. Now you wonder if your firm should take action now, before it’s too late. You’ve heard the horror stories whispered around the water cooler; you try to shake off the cold chill as you walk back to your desk – is that just air conditioning, or premonition? The following stories wend their way through your thoughts for the rest of the day…
Your boss tells you that not only has the server crashed, but the external backup has been failing recently. He wants you to restore the internal backup of the Tabs3 and PracticeMaster software. You start to tremble. Time is money, so when prompted to make a backup you always click No, because you don’t want to interrupt workflow by having everyone exit the software. You close your eyes in dread; there is no internal backup…
- Platinum’s HotBackup features let you back up files while users are working, schedule backups throughout the day, and receive e-mails confirming when backups have completed. Additionally, you can maintain up to 198 HotBackups.
It’s nearing the end of a dark and stormy Friday before a long holiday weekend. You start to update statements, skipping the backup because you want to wrap things up so you can leave. The lights flicker and your computer reboots as a loud clap of thunder makes you jump. You open Tabs3 Billing again, but when trying to work in the software, you receive a message that a backup needs to be restored due to the Update Statements program being interrupted. Your pulse leaps, knowing that some of the attorneys will probably come in to work this weekend. Now they can’t use the software until the data has been restored…
- Platinum’s Transaction Processing and Auto-Recovery features help prevent the need to restore a backup. Transaction Processing ensures that transactions completely succeed while the software is running. In the case of the software not shutting down correctly, such as with a power failure, Auto-Recovery “rolls back” the data to its previous state before the transaction began.
The phone rings. You answer it, only for your breath to catch in your throat – an attorney needs a report for her meeting in 5 minutes, but that report takes more than 20 minutes to run. There’s no way to get her the information she needs in time…
- With Platinum, common reports typically run 10 to 30 times faster than the Multi-User version. This means that you can provide needed reports at the drop of a hat.
It’s midnight, but you can’t sleep with the full moon lighting your room. You’re out of town and away from the office with the current case weighing heavily on you. You get up to check your e-mail and do some research since you’re awake anyway, and discover information that will change your entire case strategy. Your client’s case hangs in the balance; you must compare the new information to what’s saved in PracticeMaster, but it’s late and you can’t access it remotely. A dog howls outside. The hair on the back of your neck raises as you pace the floor. Finally, you grab the phone to wake the managing partner…
- With Platinum, you can quickly access clients, contacts, fees, calendar records, journal records, documents, and more using Tabs3 Connect from any internet-enabled device. Whether you’re at home or out of town, and it’s midnight or Saturday, access your work while away from the office.
Someone received an error in the software, and you need to run a Data File Integrity Check. Unfortunately, several of the employees are away from their desks. You don’t have the password for their computers, nor the time to go to each one, and you know resetting users is bad. You need to make sure the data is fine before the attorneys come back from lunch. You begin to sweat, jumping at shadows as you expect someone to come in at any time demanding answers…
- Platinum provides the ability to safely Log Off Users. Select a time interval for users to wrap up tasks, and a notification will be sent that they will be automatically logged out of the software when the displayed countdown ends.
In addition to all of these features, Platinum also provides eNotes, accelerated filtering and column sorting, the Platinum Exchange Connector, an Accounts Receivable by Timekeeper Report, and enhancements to the Detail Accounts Receivable Report. For more information on all of the Platinum features, see Knowledge Base Article R11379, “Platinum Overview.”
Don’t succumb to terror. For information on a 30-day trial offer, to get a price quote, or to order Platinum, contact your local reseller, consultant, or our Sales Department at (402) 419-2200!

Backing up your firm’s data is the most important form of maintenance you can do, but many firms overlook this task. Backup prompts from within the software are skipped, and external backups are not regularly tested to verify they are working as expected. Often, this is simply due to not understanding the process.
You may have quite a few questions about backups:
- What is the difference between the built-in backup and external backup?
- How do backups work?
- What’s included in the backup?
- How is a backup restored if needed?
- How can I make sure that my strategy for backing up data is working right?
- Where do I start?
All of these topics and more can be found in Knowledge Base Article R11524, “Backup/ Restore Information Resources.” This article provides a complete list of links to articles with information and processes for backing up and restoring your data.
Don’t overlook how your firm is backing up data until it’s too late and you have to restore. Make sure you are on top of maintaining your data.
Our Knowledge Base can be accessed 24 hours a day, 7 days a week, at support.Tabs3. com. You can also access our Knowledge Base while in the software by selecting Help | Internet Resources | Knowledge Base.

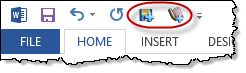
Did you know that you can add the PracticeMaster Toolbar icons to the Quick Access Toolbar in Microsoft Office 2007 and later? To add any of the PM Open, PM Save, PM Journal, PM Calendar, and/or PM Fee buttons to the Quick Access Toolbar, simply right-click the icon on the PracticeMaster ribbon and select Add to Quick Access Toolbar.
Did you know that you can find accessibility information about program features in the Help? 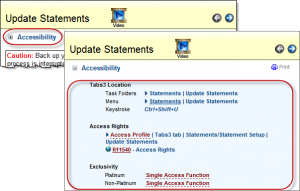 The primary topic for each program feature contains an Accessibility section that includes how to access the program feature from both the Task Folders and the program menus, as well as the keystroke if applicable; access rights required to access the feature; and what the exclusivity level is in both Platinum and non-Platinum. The Accessibility section is collapsed by default. To expand the Accessibility section, simply click the icon to the left of Accessibility.
For more information on making the Help work for you, visit Knowledge Base Article R11290, “All About Help.”
Creating form letters, documents, and contracts for clients can be time consuming, and using mail merge is limited by field availability in Word or Outlook. PracticeMaster’s Word Document Assembly is the solution! Word Document Assembly lets you instantly assemble documents that you frequently use.
The Word Document Assembly Toolbar Plug-in can be installed (Maintenance | Integration | Toolbar Plug-ins | Word tab) and used to set up templates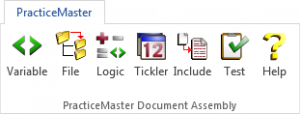 for assembling documents. Templates can include placeholders (variables) for specific types of information, such as client name, client address, judge, etc. You can even have the document assembly process prompt you to provide information that you may not have in the client’s file, such as the date that a document was signed.
Use ticklers in a template to automatically create a billing entry for the time you spend on a document, or to schedule other tasks. For example, ticklers can automatically schedule a follow-up task for you x number of days after you create the document to follow up with opposing counsel regarding the letter you are sending them.
Once a template has been created, you can assemble a document. Assembling a document will insert the relevant client and case information in your template to produce a new document. Assembling documents from templates is quick and easy. Just click the Word Document Assembly icon on your Documents Task Folder, select the client, and click OK. Once assembly is complete, the document can be saved and printed. PracticeMaster can even create a Document Management record automatically that is linked to the appropriate client, allowing you to easily find this document in the future.
If you haven’t yet worked with the Document Assembly feature in PracticeMaster and are interested in learning more, we recommend the following to help you get started:
View the following training videos at Tabs3.com/videos:
Word Document Assembly Overview
Word Document Assembly Coding
Review the following Knowledge Base articles:
R11015 – How to Start a New Word Document Template
R11447 – Working with PracticeMaster Document Assembly
Identify your top two or three documents to create document assembly templates.
If you have questions, give your PracticeMaster consultant or our Technical Support staff a call at (402) 419-2210. We will be happy to help you.

Tabs3 Connect has been around for some time now, but what exactly is Tabs3 Connect, and what can it do for your firm? Tabs3 Connect is a Platinum feature that provides access to Tabs3 and PracticeMaster anywhere you can connect to the Internet. No apps to download, simply go to Tabs3Connect.com and log in using your phone, tablet, laptop, or other internet-enabled device. Access client and contact information, enter fees and costs, use Matter Manager, access your firm’s calendar, receive alarm notifications, send and receive eNotes, and download documents and e-mail attachments via Tabs3 Connect. On smartphones and tablets, you can tap to create a fee, and flick to scroll through a list.
Keeping your data secure is top priority, and Tabs3 Connect was designed to protect attorneys’ sensitive information. The information you access using Tabs3 Connect is secure because it resides at your office, on your computer. It won’t be stored on someone else’s server in the cloud, or on a phone that you might lose. Furthermore, you choose who has access to Tabs3 Connect and who doesn’t, and access profiles affect users logged in to Tabs3 Connect as well. You can even keep track of Tabs3 Connect access and activity by reviewing the Tabs3 Connect Access Log and Tabs3 Connect Log.
If you already have Platinum, take advantage of this great feature and change the way your firm works! Don’t have Platinum yet? Now is a great time to explore the possibilities.
For more information on Tabs3 Connect, contact your reseller, consultant, or Technical Support at (402) 419-2210; or, visit Knowledge Base Article R11480, “All About Tabs3 Connect.” For more information on all of the great Platinum features, visit Knowledge Base Article R11379, “Platinum Overview.”
Do you want to start charging sales tax, but don’t know where to start? Sales tax must first be enabled in Tabs3 Billing Customization. You can then optionally set up specific transaction codes and/or clients to automatically include sales tax when billed. You can also specify sales tax on an individual transaction. So how do you set all of this up? Knowledge Base Article R10952, “Using Sales Tax in Tabs3,” provides steps on setting up Tabs3 Billing to charge sales tax and answers frequently asked questions about the Tabs3 sales tax feature.
Our Knowledge Base can be accessed 24 hours a day, 7 days a week, at support.Tabs3. com. You can also access our Knowledge Base while in the software by selecting Help | Internet Resources | Knowledge Base.

The Tabs3 Accounts Payable Software (APS) makes paying bills easier. You can print checks, track vendors, generate 1099-MISC forms, run reports and check registers, and more!
APS lets you write checks to saved vendors as well as vendors that are not individually tracked in the software. For monthly payments, set up recurring entries to create multiple invoices in one step. Writing a check by hand? Enter a manual check that will show up in your check register.
Tracking vendors is a snap. In addition to name and address, you can save information for frequently used vendors such as the Federal ID number, 1099-MISC information, vendor discount information, and more! Month-to-date, year-to-date, and to date paid figures for each vendor are also tracked for easy reference.
APS integrates with Tabs3 Billing and Tabs3 General Ledger Software (GLS) to bring things together. Costs can integrate with Tabs3 when adding, changing, or deleting an invoice or manual check. When integrating with GLS, journal entries are automatically created when checks are posted, and voided checks will create reversing journal entries.
APS also offers many reports that can be run to determine activity in the software, including a Check Register, Pre-Check Register, Cash Requirements Report, Aged Unpaid Invoice Report, Vendor Analysis, and lists for vendors, bank accounts, recurring entries, and voided checks.
If you are not currently using APS, try it out! You can install APS Trial Software using the Tabs3 CD, or download a free trial. Contact your Tabs3 reseller or consultant, or our Sales Department at (402) 419-2200 for pricing and information.
Note: Tabs3 works exclusively with Nelco to provide you with checks guaranteed to work with Tabs3 software.
You may work with multiple matters throughout the day, so how can you ensure that you are keeping an accurate account of how much time is spent on each task? The PracticeMaster Timer window (File | Timer) can be used to track Time Tasks, Phone Tasks, and Research Tasks. Each record is saved to the Journal 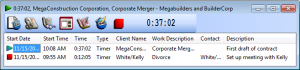 file and can include the Client, Work Description, Contact, a Description of the task, and more. Start and stop the timer for tasks throughout the day from the Timer window as needed.
Once you’re ready to bill a client for your time, you can easily turn timer records into fees using the Process Fee Records program (File | Process Timer Records). When processed, a record is created in the Fee file for the designated client, and a timer record is maintained in the Journal file. This makes it easy to keep track of your time, and to accurately bill clients for work. Using the PracticeMaster Timer means you will never again have to guess at how much time you spent on tasks.
Have you ever wondered how to make your statements stand out to clients? Have you wanted to add additional fields to your statements? You can do both by using Statement Designer! Statement Designer enables you to design custom letterhead, cover letters, statements, invoices, and envelopes.
With Statement Designer (Statements | Statement Setup | Statement Designer), you can edit one of the Sample 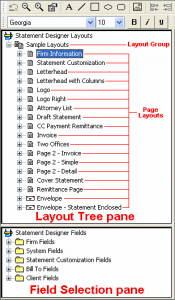 Layouts included with the software or create your own. On the left-hand side of the window there are two sections; the Layout Tree pane shows the layouts currently available, while the Field Selection pane shows the fields that are available to add to a layout.
When a layout is selected, the Page Layout pane is available on the right-hand side. This is where you can design 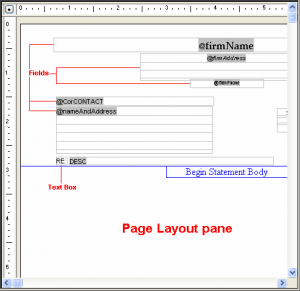 your statement layout. Simply double-click a field from the Field Selection pane, and it will appear in the page layout. From here, you can move the field to the appropriate place, resize the field, or right-click the field and select Properties to change properties such as font face, font size, color, rich text attributes, and more.
Once you have changed or created a Statement Designer layout, you will need to associate the layout to a Statement Template (Statements | Statement Setup | Statement Templates). Simply select the Template you want to change, or create a new one, and edit the Layouts tab. The template can now be assigned to a client by opening the Client file, clicking the Statement Options tab, and selecting a Draft Template or Final Template.
To enable Statement Designer when printing statements, from the File menu, select Print Setup. Click the Statement Setup button. On the right-hand side, select the Enable Statement Designer Layouts check box and click OK. Now when you print a statement for the client(s) whose statement template is associated with a statement designer layout, you will see your new statement layout!
For more information on customizing the sample layouts included with the software, see Knowledge Base Article R10901, “Customizing the Sample Page Layouts Provided with the Tabs3 Statement Designer.”
Do you know how to restore from an incremental backup? Make sure you are familiar with the process of restoring before you need to do it. Incremental backups work by backing up the full dataset, and then only backing up those files that have changed from then on. This means that if you need to restore, you cannot just restore to yesterday’s incremental backup because that is only one piece of the picture. The files in Tabs3 and PracticeMaster are all connected. If only some of the files are restored, then information is missing from other files and errors can occur in the software. Instead, if a restore is necessary, you must first restore the last full backup and then restore every incremental backup in order. For more information on how your backup system works, and if it is the right system for you, talk to your IT professional.
Did you know that you can add tabs to the Client file, Contact file, and Journal file that are specific to an Area of Practice, Contact Category, or Journal Type? These tabs are called Category Pages. Category Pages are a special type of page that is only shown in the Editor window when the selected client or record is associated with that category. You can use the Form Designer to design how the pages will look.
- Client category pages are configured for individual Areas of Practice (e.g., Personal Injury, Family Law, Workers’ Compensation, etc.). These pages will only appear when a client belonging to that Area of Practice is selected.
- Contact category pages are configured for individual contact categories (e.g., Attorney, Insurance Adjuster, Witness, etc.). These pages will only appear when a contact assigned to that contact category is selected.
- Journal category pages are configured for individual journal record types (e.g., E-mail, Phone Task, Research Task, etc.). These pages will only appear when a journal record of that record type is selected.
Setting up a Category Page provides a way of showing only those fields that are relevant to the selected “category,” thus reducing the number of visible pages.
In order to create a Category page, you must first add the fields for the Category page to the associated file using File Maintenance (e.g., add the desired fields to the Contact file). Once the fields have been added, the Category page and fields must be added to the data entry window using the Form Designer.
To create a Category Page
- From the List tab of the Client, Contact, or Journal file, select Edit | Form Designer.
- To add a Category page, click the
 (Add Category Page) button.
 - Select the appropriate Area of Practice, Contact Category, or Journal Type that the Category page will be associated with and click OK.
- A new page will be displayed. To rename the page, right-click the Category page and select Rename Page. Specify a name for the page and click OK. You are now ready to add fields to the Category page.
- Click the
 (Add Field) button.
 - Select the field you want to add and click OK.
- Continue adding fields, group boxes, and labels until the Category page is complete.
- Close the Form Designer and save the changes made to the form layout.
Additional information regarding Category Pages can be found in Knowledge Base Article R10566, “Category Pages in PracticeMaster.”
Need to jot something down about a matter after meeting with a client? Want to record information about a billable phone call? Find a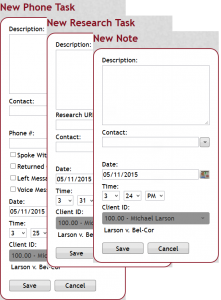 great website that applies to a case that you don’t want to lose? All of these can be recorded and associated with the desired matter right away, even when you’re not at your computer. In Tabs3 Connect, not only do you have access to all of your firm’s journal notes, e-mails, phone tasks, time tasks, and research tasks via Matter Manager, but you can also add notes, phone tasks, and research tasks on the go.
Never misplace a note again! From the Matter Manager in Tabs3 Connect, simply tap Journal to see all of the selected client’s journal records, and then tap New to add a new record for the client.
For more information on Tabs3 Connect, contact your reseller, consultant, or Technical Support at (402) 419-2210, or visit Knowledge Base Article R11480, “All About Tabs3 Connect.”
Tabs3 General Ledger Software (GLS) is a general ledger accounting program that is based on a double-entry accounting system. Chart of accounts and financial statement formats can be defined, allowing you to use your current chart of accounts. The availability of multiple departments allows you to create reports based on certain departments or the firm as a whole. Journal entries track debits and credits. Optionally create budgets for each expense account, and compare budget and actual amounts from year to year.
GLS offers bank and credit card reconciliation, printable deposit slips, summarized or detailed reports to help track your financial data, and more. If you have journal entries that must be made monthly, you can set up recurring entries to easily post a batch of entries once a month in a single process.
GLS can be used as a stand-alone ledger program for any business, or it can be combined with other Tabs3 software for full integration. Journal entries can be submitted to GLS through Tabs3 Billing, Accounts Payable, Trust Accounting, and also Peninsula Software’s PenSoft® Payroll software. Additionally, a standard input format is included, providing the ability to import journal entries from other software.
For more information regarding Tabs3 General Ledger Software, contact your local reseller or our Sales Department at (402) 419-2200.
Did you know that you can quickly and easily locate your serial number and version from within the software? When calling technical support, have your serial number and version ready to help expedite the call. To determine your serial number and version, from the Help menu, select the About menu option. Both the version and the serial number are shown in the top and middle portions of the window. For more information on what is included in the Help | About window, see Knowledge Base Article R11570, “Information in the Help | About Window.”
Did you know that if you want to change the date and/or time on a calendar entry, you can drag and drop the entry to the desired date/time via the graphical calendar? The ability to drag and drop calendar entries saves you the time of having to open the record and manually change the necessary fields. Knowledge Base Article R11294, “Drag-and-Drop Functionality in PracticeMaster Calendar,” provides information on enabling the ability to drag and drop calendar entries and performing the drag and drop.
Our Knowledge Base can be accessed 24 hours a day, 7 days a week, at support.Tabs3.com. You can also access our Knowledge Base while in the software by selecting Help | Internet Resources | Knowledge Base.
Did you know that you can quickly add an image to the top of your statements, such as your firm’s letterhead? You can always use Statement Designer to customize your statements, but if you simply want to use an existing bitmap image, this can easily be added to your statements by selecting the desired bitmap via Print Setup.
To add a bitmap to statements
- From the File menu, select Print Setup.
- Click the Statement Setup button.
- In the Page One section, select the Bitmap check box.
- Click the Select button to browse out to where your bitmap image is located.
- Click OK.
Don’t have a bitmap image of your firm’s letterhead? We offer professional bitmap scanning. For more information, see Knowledge Base Article R10168, “Bitmap Scanning Service.
Would you like to see data in Microsoft® Excel® instead of in report format? Do you 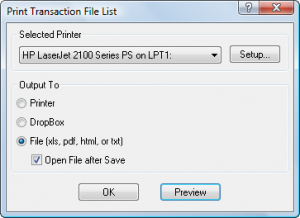 occasionally need to manipulate how data is organized for reporting purposes? Tabs3 makes it easy to send information to Excel. From any of the Tabs3 and PracticeMaster programs, you can use the Print to File option to easily send a report to Excel, or copy items from lists and paste the information into Excel.
Print to File
Reports can be printed to Excel using the File option in the Print dialog window. Excel files can be saved in either an .xlsx or .xls format.
Report Formatting – When saving to Excel, you can opt to Remove Formatting when Saving to Excel such as font size adjustments and styles, number formatting, grey and black lines, and shading. This option is located via File | Print Setup | Advanced Printing Features.
Page Layout – Page layout is different when generating the Excel report from the Preview window. When selecting the Excel File option from the Print Dialog box, the generated file will be output without page breaks, page numbers, and continuation page headings. Report headings are included at the beginning of the report only. However, when selecting the Print option from the Preview window and saving to an Excel file, the generated file will be output the same as it appears in the Preview window, including page breaks, page numbers, and continuation page headings.
Optimized Reports – Many reports have been optimized for Excel output. Optimized reports adjust the columns to match the width of data in the report, maintaining a similar output to the Tabs3 and PracticeMaster report output. Reports that have not been optimized may have a large number of columns that are all the same width. Additionally, non-optimized reports may have columns with no data in them, and number fields shown as a “#” if the number is too big for the cell.
Copy from a List
You can copy the contents of any list window into any word processing software, but the output is optimized for Microsoft Word and Excel. This feature pastes the information into columns, retaining formatting and the appearance of the information from the Tabs3 and PracticeMaster software.
To copy records from a List
- In a PracticeMaster list, you can select one record, multiple records, or all records. To select a range of records, highlight the first record that you want to copy, and either hold Shift and click the last record you want (to copy a section of the list) or hold Ctrl while clicking to select specific records to copy. To select all records, press Ctrl+A. Then, press Ctrl+C to copy the highlighted records to the Windows Clipboard.
- In Tabs3 Billing, General Ledger Software (GLS), Accounts Payable Software (APS), or Trust Account Software (TAS), you can select one record to copy (Ctrl+C) or all records to copy (Ctrl+Alt+C).
Once records have been copied to the Windows Clipboard, press Ctrl+V to paste the records into Excel or other software of your choice.
For more information on sending data to Excel, including a list of reports that are optimized for Excel output, detailed information is provided in Knowledge Base Article R11280, “All About Outputting Tabs3 and PracticeMaster Data to Excel.”
Did you know that you can import data into all of the Tabs3 and PracticeMaster software? Knowledge Base Article R11506, “Resources for Importing Data into Tabs3 and PracticeMaster Software,” provides a list of resources with information regarding programs that can be used to import data in Tabs3 and PracticeMaster software including the following:
Tabs3 Billing – Importing costs from photocopiers, telephone systems, fax machines, and more.
PracticeMaster – Importing data from third-party programs, documents into document management, Platinum Exchange Connector, Outlook, and more.
General Ledger Software (GLS) – Integration with PenSoft Payroll and importing data into GLS using an ASCII data file.
Trust Accounting Software (TAS) – Importing data into TAS using an ASCII data file.
Accounts Payable Software (APS) – Importing data into APS using an ASCII data file.
Our Knowledge Base can be accessed 24 hours a day, 7 days a week, at support.Tabs3.com. You can also access our Knowledge Base while in the software by selecting Help | Internet Resources | Knowledge Base.
Trying to create a document management record using the PracticeMaster toolbar and not sure what to expect? The behavior you see when using the PM Save or Capture Save functions depends on the current state of the document you are trying to save and whether PracticeMaster is configured to manage documents manually or automatically.
Knowledge Base Article R11630, “Document Management Quick Reference,” provides a quick reference table that shows you the result of saving a document for each scenario, along with definitions for all of the document states, and screenshots of the various windows listed.
Our Knowledge Base can be accessed 24 hours a day, 7 days a week, at support.Tabs3.com. You can also access our Knowledge Base while in the software by selecting Help | Internet Resources | Knowledge Base.
There are many keyboard shortcuts that help save time while working. These favorite shortcuts quickly get you to commonly used places.
- Ctrl+T opens the Task Folders in each program. This keystroke is handy when the Task Folders have accidentally been closed, or there are other windows on top of it.
- Ctrl+M opens the Client Manager in Tabs3 and the Matter Manager in PracticeMaster. This keystroke quickly opens a summary of your client’s activities.
- Windows Key+D minimizes all open windows. When you have a lot of windows open, this keystroke is the quickest way to get back to your Desktop icons.
For a list of keystrokes in the software, enter “Keyboard Shortcuts” or “Keystrokes” on the Index tab of Help.
