Working with WorkFlows: Using Filters with WorkFlows
April 2019 Tags: Filters, PracticeMaster, WorkFlows
We have several WorkFlows we’ve created, but some of them seem to trigger more frequently than we’d like. Is there any way we could make the WorkFlows run with more specific criteria?
WorkFlows can take advantage of filtering to ensure they only run when they’re intended to. Filters are used to limit the records you want to display or select and can be used to limit the records shown in PracticeMaster files, Report Writer, Word Document Assembly, Outlook Synchronization, and WorkFlows. Filters can be simple comparisons, or advanced expressions capable of complex functionality.
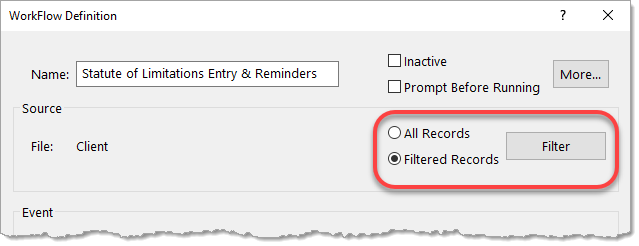
Let’s take a look at the Filter Editor, and then a few scenarios where you might want to add a filter to your WorkFlows. To add a filter to your WorkFlow, open your WorkFlow via Maintenance | WorkFlows. In the WorkFlow Definition window, select Filtered Records, and click the Filter button.
In the Filter Editor, you can click New Row to add a simple row, or click New Advanced Row to create a more complex filter.
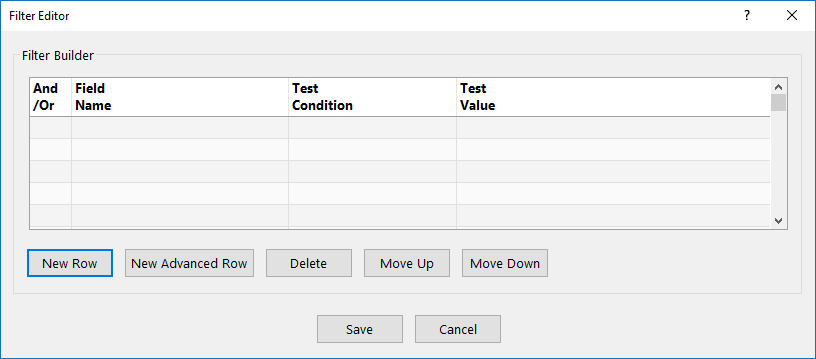
- Simple rows – Adding a standard row to the Filter Editor allows you to compare a field against a limited number of values. This allows you to easily test for blank values, common date ranges, or a specific record.
- Advanced rows – Using fields, functions, and operators, you can construct an expression by adding an Advanced Row to the Filter Editor. You can test against any range of values, or use functions to generate different values for different situations.
Below are a few scenarios where filtering the records that run the WorkFlow can help prevent the WorkFlow from running too often.
Scenario 1
Whenever we add a new Contact, our WorkFlow to create a new client record always triggers. However, we only need it to run when the contact has a Contact Category of “Client”.
To create a filter so the WorkFlow only triggers for a Contact Category of “Client”
- Open your WorkFlow.
- In the Source section, select Filtered Records and then click the Filter button to open the Filter Editor.
- Click New Row, select RP_Cat, and then click Select.
- Click in the Test Condition field and select equal to.
- In the Test Value field, enter “Client”.
- Click Save to close the Filter Editor.
- Click Save to close the WorkFlow Definition.
Scenario 2
I have a WorkFlow that starts a fee record when we save a Document Management record. However, we don’t need fees to be created for documents with a DocType of “LTTR”.
To create a filter so the WorkFlow won’t trigger for a DocType of “LTTR”
- Open your WorkFlow.
- In the Source section, select Filtered Records, and then click the Filter button to open the Filter Editor.
- Click New Row, select Doc_Type, and then click Select.
- Click in the Test Condition field and select not equal to.
- In the Test Value field, enter “LTTR”.
- Click Save to close the Filter Editor.
- Click Save to close the WorkFlow Definition.
Scenario 3
Our firm has a WorkFlow that recreates calendar records every time they’re deleted to prevent employees from accidentally deleting other people’s appointments. However, we do not want it to run when employees delete their own records.
This is a slightly more complicated scenario, but we can add an Advanced Row to compare the User ID assigned to the Calendar record with the User ID that is currently logged in by utilizing the UserID$ function. The UserID$ function always specifies the User ID logged into the software.
To create a filter so that employees can delete their own calendar records
- Open your WorkFlow.
- In the Source section, select Filtered Records and then click the Filter button to open the Filter Editor.
- Click New Advanced Row to open the Advanced Expression Editor window.
- Click the Field button, select User_ID, and then click Select.
- Click the Operator button, select not equal to, and then click Insert.
- Click the Function button, select UserId$, and then click Insert.
- Verify the Expression shows “User_ID != UserId$()”, and then click OK.
- Click Save to close the Filter Editor.
- Click New Advanced Row to open the Advanced Expression Editor window.
- Click Save to close the WorkFlow Definition.
For more information on filter expressions, including using them in WorkFlows, take a look at Knowledge Base Article R11493, “All About Expressions.”


