
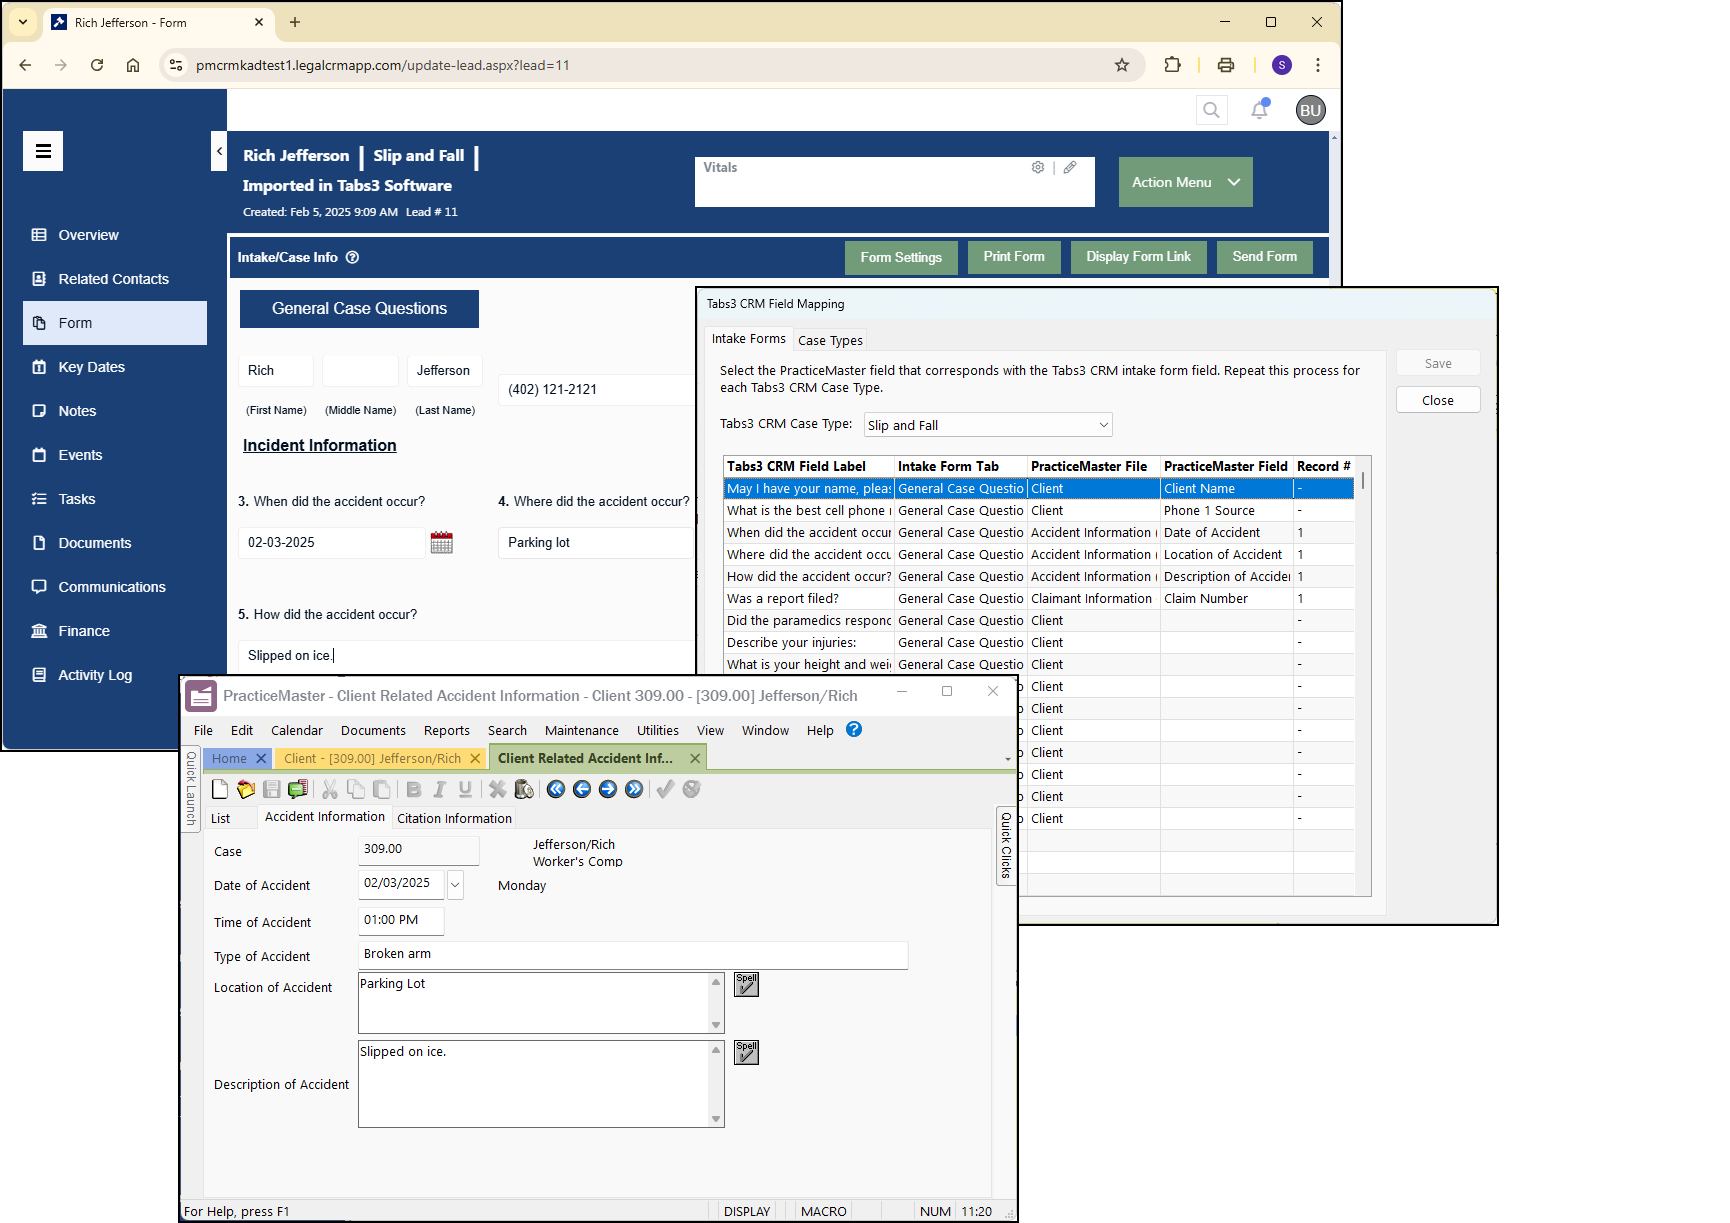
You can now map fields in Tabs3 CRM intake forms to fields in PracticeMaster Area of Practice (AOP) files. This allows you to create multiple AOP records from a single intake form for information such as witnesses to an accident or beneficiaries on a will.
New PracticeMaster File and Record # columns are now included in the Tabs3 CRM Field mapping window. To create an Area of Practice record from a field, simply select that Area of Practice file in the PracticeMaster File column. If your intake form has fields for multiple records (e.g., a form containing names of multiple witnesses), you can create multiple AOP records by assigning a number to each field in the Record # column. Fields assigned to Record #1 will be included in the first record, Record #2 in the second record, etc.
This feature is available in Version 2024, Build 24.2.26 and later.

Our office will be closed on Monday, February 17, in recognition of Presidents’ Day.
Here are some helpful Support resources that are available 24/7:

PracticeMaster allows you to specify Areas of Practice (or AOPs), which can optionally be assigned to client matters. Knowledge Base Article R11892, “All About Areas of Practice,” provides an overview of the benefits provided by Areas of Practice including information on AOP file definitions, custom fields, custom indexes, category pages in the Client file, template path, and Report Writer definitions.
Our Knowledge Base can be accessed at support.Tabs3.com. You can also access our Knowledge Base in the Quick Launch by searching for and selecting “Knowledge Base.”
As of June 1, 2025, the Tabs3 Support Team will no longer provide support for Version 2020 of Tabs3 Software.
If you are using an older version of the software, now is the perfect time to get up to date with the latest version of Tabs3 Software. You will be surprised at the number of features you’ve been missing! Click here to see What’s New in each version.
Updating to the latest version is FREE when your firm is on an active Maintenance Plan. To get started, in the Quick Launch, search for and select “Check for Updates.”
If you have any questions regarding the discontinuation of support for Version 2020, please contact your Tabs3 Software consultant, or a member of our Sales Department at sales@Tabs3.com or (402) 419-2200.
Previously published in January.

Did you know that Tabs3 Billing provides several ways to customize your statements?
Statement Designer
Statement Designer lets you create customized layouts for your Tabs3 Billing statements. You can control the placement of various fields from the Tabs3 Client file, and add customized text, images, and other layout elements to the statement. Once a page layout has been designed, it can be applied to one or more statement templates. In the Quick Launch, search for and select “Statement Designer.”
Statement Customization
Statement Customization allows you to define terminology and formatting options used for all billing statements. Optionally enter heading information that can be printed at the top of the first page of the statement (the statement heading) or at the end of the statement. Optionally adjust terminology, such as column headings. Changes made to statement customization affect all clients. In the Quick Launch, search for and select “Statement Customization.”
Statement Templates
The Statement Templates window allows you to define statement templates. A statement template consists of the various formatting options used for a particular style of statement. The same statement template can be used for multiple clients. Changes made to a statement template affect all clients who use that template. There is no limit to the number of statement templates that can be defined. In the Quick Launch, search for and select “Statement Templates.”
Statement Notes
The Statement Notes feature is used to create messages that can print on a client’s statement, cover statement, or both. Statement notes created in the statement notes file can be designated as a beginning statement note or an ending statement note in a statement template. Each note can be used by any number of statement templates. In the Quick Launch, search for and select “Statement Notes.”
For detailed information on customizing your statements, check out the Statement Formatting Guide.

Did you know that you can quickly start other Tabs3 Software applications from within any application? Once you have opened one of the Tabs3 Software applications, simply click on the desired application button in the application toolbar! The application toolbar is located at the bottom of the Quick Launch pane.
![]()
When starting any application from the application toolbar, the new software will use the same User ID as the current application. An application’s button will not be displayed on the application toolbar if you do not have access rights to that application or if it is not installed on your workstation.

Tabs3 Cloud lets you work using the suite of Tabs3 Software in the cloud! Tabs3 takes care of all of the backend maintenance, including backups and updates, while you concentrate on cases. No IT needed. Access Tabs3 Cloud on any device from anywhere with an internet connection.
Watch this two-minute video here:
Training Videos can be accessed at Tabs3.com/videos. You can also access the videos in the Quick Launch by searching for and selecting “Training Videos.”