
Tabs3 Billing now includes functionality to generate and maintain a pre-bill, which can be reviewed without leaving the software. A new Pre-Bill option is available when Generating Statements. This new option works in conjunction with the Pre-Bill Tracking feature. Transactions on a pre-bill are protected to ensure that unauthorized users cannot edit them during the review process.
From the Pre-Bill Tracking window, you can drill-down to a new Pre-Bill Information window allowing you to see the contents of a pre-bill. Within this window, you can easily make changes to the pre-bill by drilling down to the records or by using the Take Action pane to perform various tasks such as adding fees, costs, reorder fees, as well as finalizing the statement.
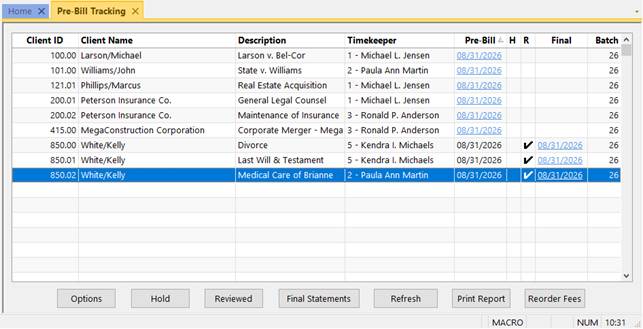
Pre-Bill Information Window
Clicking on a pre-bill from the Pre-Bill Tracking window displays a Pre-Bill Information window for that pre-bill. The Pre-Bill Information window includes matter information, pre-bill totals, a preview of the pre-bill, and the ability to perform common tasks.
The Pre-Bill Information section shows matter information, the Statement Date and Statement #, the total Billed on the statement, and the total amount Due.
The Statement Preview displays a preview of the pre-bill, using the same functionality as the Generate Statements utility. Like any preview window, you can search, zoom, and print directly from this preview. Additionally, you can drill down to transactions included on the pre-bill and make required changes, which are then immediately reflected on the pre-bill. This allows the review process for pre-bills to be done within the Tabs3 Billing application, rather than needing to print and route statements for review.
The Take Action pane allows you to perform tasks related to the pre-bill. From here you can mark the pre-bill as reviewed, add new transactions, select or edit existing transactions, write-up or write-down the total, reorder fees, or turn the pre-bill into a final statement that matches the current record.
The Comments pane lets you view and add comments during the review process. If new comments are available, a notification badge appears on the pane’s icon. Comments remain accessible throughout the pre-bill and final statement process.

Access to the Pre-Bill Information window requires both the View Statements and Print Draft Statements rights.
Transactions on Pre-Bills
In the Fee Entry, Cost Entry, Payment Entry, and Client Funds Entry windows, transactions included on a pre-bill are protected when editing outside of the Pre-Bill Tracking window. This prevents users who do not have access rights to Pre-Bill Tracking from changing transactions that are in review. The text “Pre-Bill” is also displayed in the top right of the entry window. Clicking on this text opens the Pre-Bill Information window for the pre-bill that includes the transaction.
To edit these transactions, open the Pre-Bill Information window and click on the transaction to drill down to the specific entry window. From here, you can make changes that will automatically be reflected on the pre-bill. Alternatively, a new access right has been added that allows users to make changes to transactions included on a pre-bill outside of Pre-Bill Tracking. For additional information, see KB Article R11818, “Access Rights.”
Starting in Version 2025, your firm’s default statement type will be set to Pre-Bill. You can change this at any time in Statement Customization. If your firm does not use Pre-Bill Tracking, select the Draft with “Update Pre-Bill Tracking” selected option and continue leaving “Draft” selected when generating statements to maintain your current workflow. This ensures that transactions remain editable as they were before, and won’t be locked using the new Pre-Bill protections.
For additional information on Pre-Bill Tracking, see KB Article R11972, “All About Pre-Bills.”
This feature is available in Version 2025 and later.

Our office will be closed on Monday, May 26, in recognition of Memorial Day.
Here are some helpful Support resources that are available 24/7:

Want to see all of the new features in Version 2025? Check out Knowledge Base Article R11975, “Introduction to New Features!”
This article provides information on each new feature. Features are listed by application and include screenshots and links to additional information when applicable. Each time we add a new feature to Version 2025, this article is updated so that you can get the information you need to begin using the feature.
Our Knowledge Base can be accessed at support.Tabs3.com. You can also access our Knowledge Base in the Quick Launch by searching for and selecting “Knowledge Base.”
As of June 1, 2025, the Tabs3 Support Team will no longer provide support for Version 2020 of Tabs3 Software.
If you are using an older version of the software, now is the perfect time to get up to date with the latest version of Tabs3 Software. You will be surprised at the number of features you’ve been missing! Click here to see What’s New in each version.
Updating to the latest version is FREE when your firm has an active subscription. To get started, in the Quick Launch, search for and select “Check for Updates.”
If you have any questions regarding the discontinuation of support for Version 2020, please contact your Tabs3 Software consultant, or a member of our Sales Department at sales@Tabs3.com or (402) 419-2200.
Previously published in April, March, February, and January.

Beginning with Version 2025, Tabs3 Connect optionally allows each user to enable Multi-Factor Authentication (MFA; sometimes referred to as Two-Factor Authentication or 2FA). This provides an extra layer of security when signing into Tabs3 Connect.
To configure Multi-Factor Authentication for a user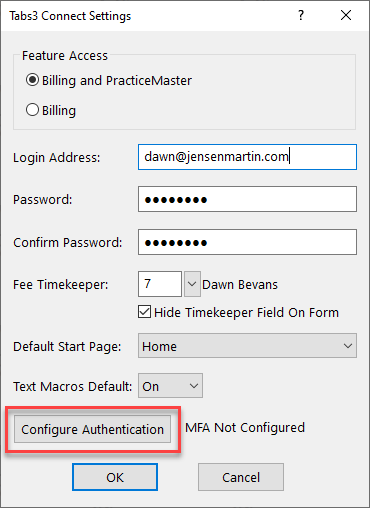
Note: The user being configured must be present with the device they will use for Multi-Factor Authentication in order to proceed.
- Start System Configuration and log in as the user being configured or a user with manager rights. (Note: If the user does not have manager rights, they must have the User Configuration access right in order to configure their Tabs3 Connect settings.)
- From the File menu, point to Open and then select Users.
- Select the User ID who will be accessing Tabs3 Connect.
- Click the Tabs3 Connect Settings button.
- Click the Configure Authentication button.
- Select the Use an Authenticator App option and click Confirm.
Note: If Multi-Factor Authentication has already been configured for this user, a warning will be displayed. Configuring Multi-Factor Authentication again will disable the existing authentication key and create a new one with a new QR code. This is typically not needed unless the user has lost access to their authenticator app or the old authentication key has been removed from the app. - A QR code will be displayed. Open your authenticator app, select the option to add a new account, and scan the QR code using your device’s camera.
For more information, see Knowledge Base Article R11480, All About Tabs3 Connect.
This feature is available in Version 2025 and later.

You can now preview files in document management records from the List tab of Document Management or the Record List in Matter Manager.
To toggle the preview, press Ctrl+F1 or right-click in the List tab, select the SnapShot submenu, and then select Show Document Preview. When enabled, a preview of the file replaces the SnapShot pane when a document management record is selected, allowing you to view the associated file. When disabled, or a non-document management record is selected, the standard SnapShot pane is shown.
PracticeMaster’s document preview displays a read-only version of the document, and supports most standard file types provided the required application is installed. This feature is similar to the Preview option in Windows Explorer.

This feature is available in Version 2025 and later.
Did you know that Tabs3Pay can help you get paid faster? Accepting credit cards helps make it easier for clients to pay their bills. Sign up directly from Tabs3 Billing or Tabs3 Trust Accounting; in the Quick Launch, search for and select “Tabs3Pay Web Portal.”
With Tabs3Pay, you can:
- Manage separate trust and operating accounts.
- Securely store payment information for future use.
- Accept credit cards and electronic checks, all from within Tabs3 Software.
- Include a payment link in email statements, allowing your clients to easily enter payment information through the secure Tabs3Pay portal.
- Include trust replenishment request links with email statements or generate email requests directly from the Tabs3 Billing Matter Manager using Request Trust Deposit.
- Schedule future or recurring payments for clients.
- Take advantage of the Surcharging feature, allowing you to minimize the expense of processing fees.
- Enable clients to pay their current balance from the Tabs3 Client Portal.
To learn more about Tabs3Pay, visit Knowledge Base Article R11871, “Tabs3Pay Frequently Asked Questions,” or R11869, “Configuring Tabs3Pay.”