Feature Article: Form Designer
February 2018 Tags: Form Designer, PracticeMaster
No comments
A common task when beginning to use the software is adding a new field to a file. PracticeMaster allows you to customize the software and add the fields that you need. Adding a field is a two-step process – once you have added the field to the file, you then need to add the field to the  form layout so that it displays when entering data. Form layouts are used to determine the layouts of the data entry screens used when adding, changing, or deleting records from a file. A form layout consists of the various fields and tabs shown in the entry program for a file. Each file has its own form layout that can be customized using the Form Designer.
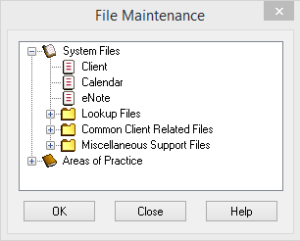
To add a field, open File Maintenance (Maintenance | File Maintenance), select the file you need to add a field to, and click OK. For example, if you want to add a field to the Client file, select the Client file and click OK. From the Field tab, click the ![]() (New) button and enter any desired information and settings. Click Done to save the new field.
(New) button and enter any desired information and settings. Click Done to save the new field.
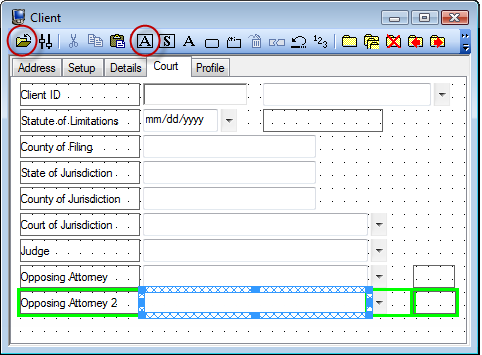
Once the field has been added to File Maintenance, it must be added to the Form Designer Layout. Let’s say you have added a Clerk field to the Client file in File Maintenance, and have named it Scheduling Clerk. To add this field to the Court tab, open the Client file; from the Edit menu, select Form Designer.
Select the Court tab and click the button (Add Field). In the Field Selection List window, select the Scheduling Clerk field and click OK. The new field will be located at the top of t he screen with a blue and green border. Move your mouse over the blue border until the cursor becomes a , then click and drag the field to where you want it positioned on the form.
Now let’s say you want to change the name of the field to be displayed. Double-click the Scheduling Clerk box, and a Label Properties window will be displayed. Rename the field as desired and click OK. Click the icon to save and run the form.
Just remember, once you add a new field to a file, you must also add it to the data entry page via Form Designer!

Video of the Month: Adding New Fields to Files and Form Designer
September 2017 Tags: Form Designer, Resources
No comments
Have you customized PracticeMaster files to show the fields you want to see in the order you want to see them? The ability to add fields to any file in PracticeMaster and then organize them as desired is one of PracticeMaster’s most powerful customization features. Want to know how you can customize your files? Take a look at the Adding New Fields to Files & Form Designer video! This video walks you through adding fields to PracticeMaster via File Maintenance, and then making them visible via Form Designer.
Watch this two-and-a-half-minute video here:
Training Videos can be accessed 24 hours a day, 7 days a week, at Tabs3.com/videos. You can also access Training Videos while in the software by selecting Help | Documentation and then clicking the See also link for Tabs3 and PracticeMaster Training Videos.

Feature Article: Category Pages
June 2015 Tags: AOPs, Clients, Contacts, Form Designer, PM Journal, PracticeMaster
No comments
Did you know that you can add tabs to the Client file, Contact file, and Journal file that are specific to an Area of Practice, Contact Category, or Journal Type? These tabs are called Category Pages. Category Pages are a special type of page that is only shown in the Editor window when the selected client or record is associated with that category. You can use the Form Designer to design how the pages will look.
- Client category pages are configured for individual Areas of Practice (e.g., Personal Injury, Family Law, Workers’ Compensation, etc.). These pages will only appear when a client belonging to that Area of Practice is selected.
- Contact category pages are configured for individual contact categories (e.g., Attorney, Insurance Adjuster, Witness, etc.). These pages will only appear when a contact assigned to that contact category is selected.
- Journal category pages are configured for individual journal record types (e.g., E-mail, Phone Task, Research Task, etc.). These pages will only appear when a journal record of that record type is selected.
Setting up a Category Page provides a way of showing only those fields that are relevant to the selected “category,” thus reducing the number of visible pages.
In order to create a Category page, you must first add the fields for the Category page to the associated file using File Maintenance (e.g., add the desired fields to the Contact file). Once the fields have been added, the Category page and fields must be added to the data entry window using the Form Designer.
To create a Category Page
- From the List tab of the Client, Contact, or Journal file, select Edit | Form Designer.
- To add a Category page, click the
 (Add Category Page) button.
 - Select the appropriate Area of Practice, Contact Category, or Journal Type that the Category page will be associated with and click OK.
- A new page will be displayed. To rename the page, right-click the Category page and select Rename Page. Specify a name for the page and click OK. You are now ready to add fields to the Category page.
- Click the
 (Add Field) button.
 - Select the field you want to add and click OK.
- Continue adding fields, group boxes, and labels until the Category page is complete.
- Close the Form Designer and save the changes made to the form layout.
Additional information regarding Category Pages can be found in Knowledge Base Article R10566, “Category Pages in PracticeMaster.”
Recent Comments
- Tabs3 Software on Feature Article: Year-End is Fast Approaching!
- Linda Thomas on Feature Article: Year-End is Fast Approaching!
- James Hunter on Spotlight: Reorder Fees
- Tabs3 Software on Video of the Month: PracticeMaster Conflict of Interest
- Stephanie Biehl on Video of the Month: PracticeMaster Conflict of Interest


