
Tabs3 Billing allows you to optionally assess finance charges on your clients’ past due balances, but how does the calculation work?
When a statement is generated for a client whose past due balances are subject to finance charges, Tabs3 Billing examines the statement date for each of the client’s past due statements, and compares each to the current statement date. A finance charge is then calculated for each of the past due statements, and these amounts are added together to determine the total amount of finance charges to be billed on the current statement.
Knowledge Base Article R10850, “All About Finance Charges,” provides a flowchart that breaks down exactly how finance charges work along with examples, and includes frequently asked questions and a finance charge worksheet.
Our Knowledge Base can be accessed at support.Tabs3.com. You can also access our Knowledge Base in the Quick Launch by searching for and selecting “Knowledge Base.”

Have you checked out Tabs3 Connect yet? Tabs3 Connect is a Platinum feature that provides access to Tabs3 and PracticeMaster anywhere you can connect to the Internet, and it’s easy to navigate. Simply browse to Tabs3Connect.com and log in to access your data!
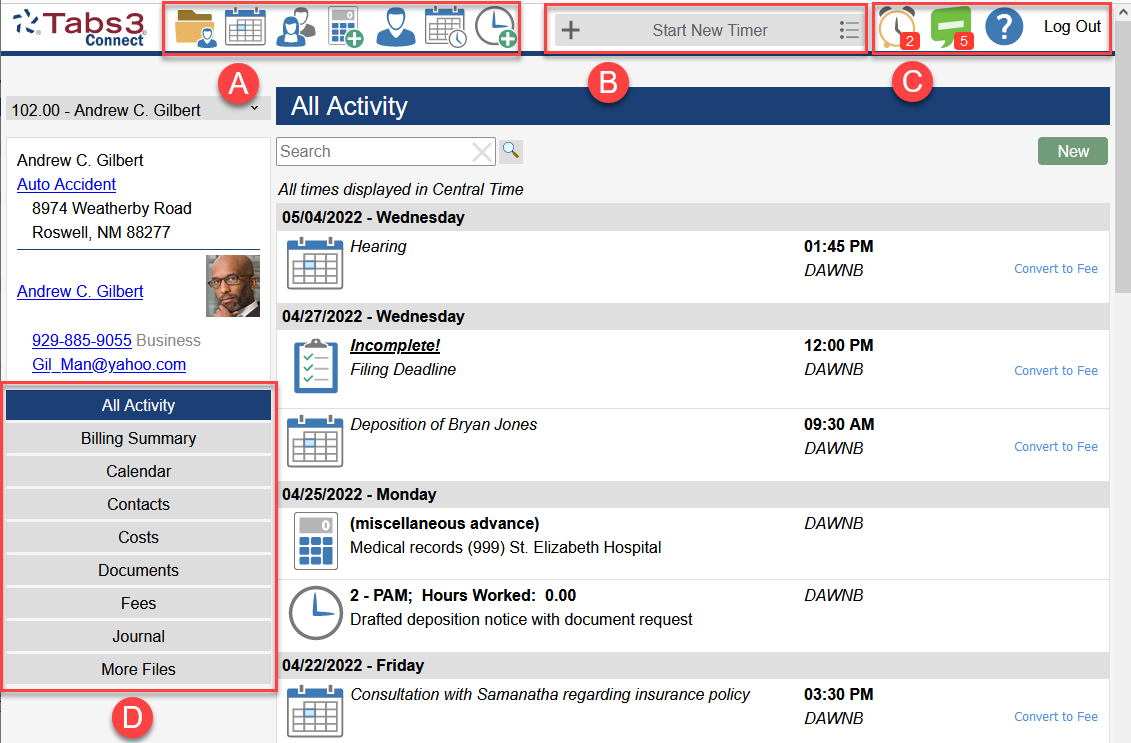
A – You can access Matter Manager, Clients, Contacts, Calendar, Costs, Fees, and Recap of Hours from the home page and from the toolbar at the top of each page.
B – Use the timer feature to start, pause, and resume a timer, and to see a list of current timers. Timers can optionally be converted to fees.
C – The Alarm icon shows how many alarms are past due, the eNote icon shows how many unread eNotes you have received, and the ? (Help) icon opens a menu with the following options: Help, Privacy Policy, Administration, Contact Us, Use Full/Phone Layout, Disable Text Macros, and Logout.
D – Use Matter Manager to access your client and contact information via the All Activity, Billing Summary, Calendar, Contacts, Costs, Documents, Fees, Journal, Phone and Email, and More Files buttons.
For more information on Tabs3 Connect, contact your consultant, call Technical Support at (402) 419-2210, or visit Knowledge Base Article R11480, “All About Tabs3 Connect.”

If your firm creates the same documents for clients on a monthly, weekly, or even daily basis, it can be a struggle to constantly rewrite and maintain your documents effectively. By using variables to automatically pull information into your commonly used documents, you can save time without the hassle of duplicate entry.
The Intro to Coding Document Assembly Templates video walks you through the basics of creating new templates and coding documents to your specifications. Learn how to insert variables, create logic statements, and automate functions like creating a fee based on the completion of a document.
Watch this five-minute video here:
Training Videos can be accessed at Tabs3.com/videos. You can also access the videos in the Quick Launch by searching for and selecting “Training Videos.”

When entering information into the software, have you saved an entry only to realize you needed to enter the same description into the next entry as well? If so, there is an easier and quicker way than going back to the last record to copy the information. When you are in Fee, Cost, Payment, or Client Funds, pressing F2 while in the description field will automatically replace the transaction code’s default description with the Description entered for the previous entry saved during the current data entry session.

We need to find a specific statement, but the only reference we received is a statement number. How can we search by statement number?
You can easily locate statements by number using the Statement Manager.
To find the statement number in Statement Manager
- In the Quick Launch, search for and select “Statement Manager.”
- Click the Stmt # column heading to sort by number, then type the statement number to use incremental searching. The list will scroll to the statement number you specified.
…or… - In the Search List field, enter the statement number. The list will be filtered to only the statement number you specified.
- Click the Stmt # column heading to sort by number, then type the statement number to use incremental searching. The list will scroll to the statement number you specified.
When you have located the statement, you can double-click the record to see the statement information, or use the Quick Clicks actions to perform other common tasks such as reprinting, emailing, or making a payment.
Our firm has recently started synchronizing contacts with Outlook. How can we prevent specific PracticeMaster contacts from synchronizing to Outlook?
There are multiple ways to prevent PracticeMaster contacts from synchronizing to Outlook. The simplest method is to select the Do Not Sync check box on the contact record.
To prevent a contact from syncing with Outlook
- In the Quick Launch, search for and select “Contacts.”
- Double-click the contact you want to change.
- Select the Do Not Sync check box.
- Press Ctrl+S.
- Repeat steps 2-4 for each contact you want to prevent from syncing.
In addition to this method, you can also filter contacts by timekeeper, category, or using a custom filter. See Knowledge Base Article R11488, “Controlling Which Contacts Synchronize Between Outlook and PracticeMaster,” for more information on these additional methods.

