
In Version 2022, all contact information has been consolidated for all Tabs3 Software applications.
The Contact file now includes information for Trust payees, AP vendors, and users, making it easy to update address information in one place, including clients, billing contacts, related parties, vendors, payees, and logon users.
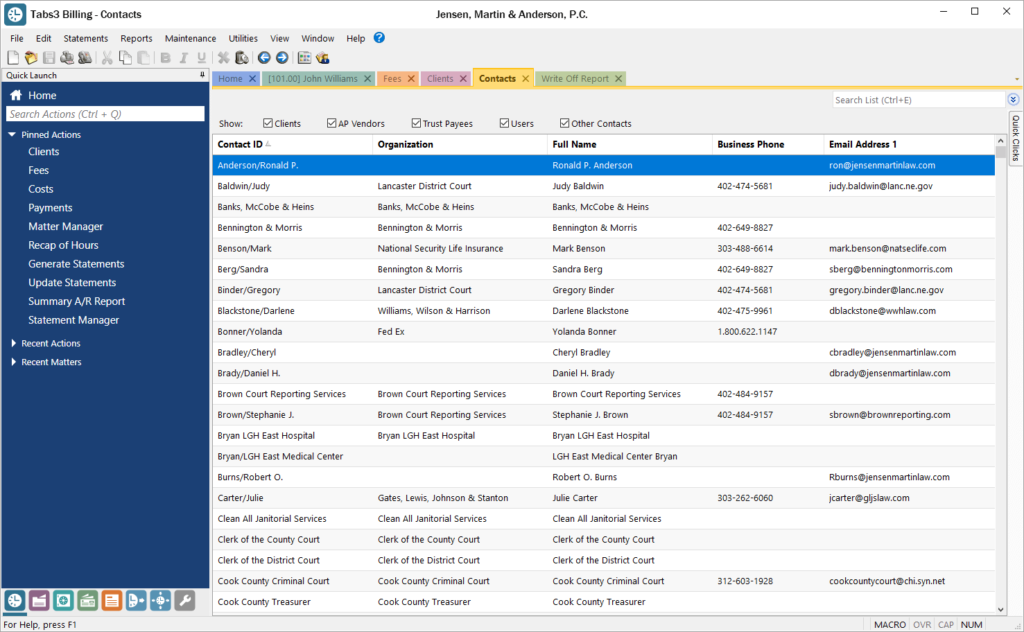
The Contact Information window is available in Tabs3 Billing, PracticeMaster, Trust Accounting, Accounts Payable, and System Configuration. This window now includes a Details button next to the Full Name field for individual contacts, which provides access to separate First Name, Middle Name, Last Name, and Initials fields. To select a contact, the Contact Lookup window has been enhanced for each of these applications, including a SnapShot pane, as well as check boxes at the top making it easy to quickly filter the list to just clients, AP vendors, Trust Payees, etc.
You can update to Version 2022 by going to Tabs3.com/update.

Want to make sure you are in the know about everything related to the Version 2022 Release?
Knowledge Base Article R11885, “Version 2022 Information & Resources,” provides a list of articles that have been added to the Knowledge Base regarding Version 2022. This includes basic articles such as the What’s New List, conversion information, and the introduction to new features. Additionally, you can quickly access detailed articles to learn all about great new features, such as the conversion of contact information and the Microsoft 365 Exchange Connector.
Our Knowledge Base can be accessed at support.Tabs3.com. You can also access our Knowledge Base in the Quick Launch by searching for and selecting “Knowledge Base.”

Do you make manual adjustments for flat fee clients when you’re ready to bill them? If so, you may be making billing more difficult than it needs to be. Tabs3 Billing provides a way to streamline billing for flat fee clients.
To set a client up to be billed a flat amount, specify that they are a flat fee billing client and assign them to a statement template that does not bill fees. You can then enter your time normally. Once you are ready to bill the client for the flat amount, run the Adjust Flat Fee Clients utility, and then bill them using a statement template that does bill fees.
To set up a client for Flat Fee Billing
- In the Quick Launch, search for and select “Client Information.”
- Select the desired Client ID.
- From the Rates tab, select a Billing Rate Code of 0 – Flat Fee Amount.
- Enter the desired Flat Amount. This is the amount that will be billed to the client when you run the Adjust Flat Fee Clients utility.
- From the Statement Options tab, in the Statement Format section, select a Final Template that has a Fee Format of No Fees or Info Only. Optionally select a Draft Template that uses the same setting.
- Press Ctrl+S.
If desired, you can bill interim statements to show the client progress on the matter. Using a Final Template with a Fee Format of Info Only will show the fees, but not bill for them.
To process a final bill for the flat fee amount
- In the Quick Launch, search for and select “Adjust Flat Fee Clients.”
- Select the desired Client ID.
- Click OK.
- In the Client file, change the Final Template (step 5 above) to a statement template that has a Fee Format of Standard. (As an alternative, you can select the statement template via Generate Statements.)
- Generate a statement for your client.
Note: Due to the number of transactions that may be changed, we recommend making a backup of your data prior to running the Adjust Flat Fee Clients utility.
When the Adjust Flat Fee Clients utility is run, all of the client’s fees are automatically adjusted to equal the client’s specified Flat Amount, making billing a breeze and leaving you time to work on other projects.

We added a brand new synchronization option for the Microsoft 365 Exchange Connector. This new feature is specifically designed to simplify the setup and improve the reliability when synchronizing with Exchange Online / Microsoft 365. This new synchronization option provides the following advantages:
- PracticeMaster (via the Exchange Connector) integrates directly with the Exchange Online server:
- Outlook does not need to be present on the file server or even the workstation in order to synchronize events, tasks, or contacts with PracticeMaster.
- Changes made in the web-based Outlook 365 will be synchronized automatically to PracticeMaster.
- Once enabled, the Exchange Connector has full rights to all of the accounts on the Exchange Online server (including future accounts) for the purposes of synchronizing records.
- Since the Exchange Connector has rights to edit all users’ accounts, calendar entries made for other users in PracticeMaster are synchronized automatically instead of waiting for the next periodic synchronization.
- Periodic synchronization occurs at the server, thereby reducing network traffic.
- The Exchange Connector performs a single periodic synchronization for all users, ensuring that everyone is up-to-date.
Additionally, using the Exchange Connector with an Exchange Online / Microsoft 365 server provides the following advantages over other types of Exchange servers:
- There is no need to configure a separate Windows user or mailbox for the Exchange Connector.
- Outlook does not need to be installed at the file server.
- Changes made to calendar records in Tabs3 Connect are automatically synchronized to the Exchange server instead of waiting for the next periodic synchronization.
- Event, task, and contact information entered in the web browser version of Outlook 365 is automatically synchronized to PracticeMaster.
For more information on the Microsoft 365 Exchange Online, see Knowledge Base R11898, “Configuring the PracticeMaster Platinum Exchange Connector for Exchange Online / Microsoft 365.” For more information about Platinum features, see Knowledge Base Article R11379, “Platinum Overview.” If you have any questions regarding Platinum features, contact your local consultant, or call Technical Support at (402) 419-2210.

Being able to easily enter and track write offs is essential. With Tabs3 Billing, you can quickly enter write offs and apply them to a matter’s accounts receivable with just a few clicks!
In the Working with Write Offs video, see how easy it is to write off all or a portion of a client’s accounts receivable from the Statement Manager. When it comes to tracking Write Offs, use the convenient Write Off tab in the Matter Manager or use the Write Off Report to access detailed information about multiple write offs at the same time.
Watch this three-minute video here:
Training Videos can be accessed at Tabs3.com/videos. You can also access the videos in the Quick Launch by searching for and selecting “Training Videos.”

Is there a way to keep users from logging into the software while I run maintenance tasks?
The Lock Out All Users feature was designed for exactly this reason. This option allows a user with manager rights to lock out all other users in the Tabs3 Software applications. In addition, users will be able to finish the task they are working on when the Lock Out is initiated, but will receive a Conflicting Activities window if they try to do anything else before they exit.
To initiate Lock Out All Users
- In the Quick Launch, search for and select “Lock Out All Users.”
- Enter a Reason.
- In the Keep users locked out for field, select the desired amount of time.
- Click OK.
The lockout will automatically end at the designated time. Alternatively, you can click Unlock to unlock the software sooner or click the Reset lockout time link to extend the lockout.
How can I avoid journaling the same email in Outlook twice?
When linking is enabled on the PracticeMaster toolbar in Outlook, the email and the journal record in PracticeMaster are linked. This means that after you create a journal, calendar, or fee record from an email in Outlook, clicking the Journal, Calendar, or Fee button on the toolbar again will open the record you created in PracticeMaster instead of creating a new record. By default, linking is enabled.
To configure the default behavior for Record Linking on
- In Outlook, go to the PracticeMaster tab.
- Click the Default Settings button to open the PracticeMaster Options window.
- In the Record Linking Defaults section, select Enabled.
- Click OK to close the PracticeMaster Options window.
For more information regarding the Outlook Toolbar Plug-in, see Knowledge Base Article R11516, “Configuring the PracticeMaster Outlook Plug-in.”
We recently installed Trust Accounting. We started printing checks, but noticed that they are printing in the order that we are entering them. Is it possible to print them in order based on trust account?
Checks can be printed in either Entry Order or Trust Account Order.
To print checks in Trust Account Order
- In the Quick Launch, search for and select “Customization.”
- On the Main tab, in the Check Printing section, select the Trust Account Order option.
- Press Ctrl+S.
Now the checks will print in trust account order. If multiple check transactions exist for the same trust account, they are additionally sorted by transaction date and then reference number to establish check order.
Which report will give me a list of voided checks and EFTs?
There are two reports that will show voided check information – the Voided Check List and the Check Register.
To run a Voided Check List
- In the Quick Launch, search for and select “Voided Check List.”
- Enter the desired criteria, or leave blank to include all voided checks.
- Click OK.
To run a Check Register for voided checks
- In the Quick Launch, search for and select “Check Register.”
- On the Options tab, in the Voids section:
- Select the Include Voided Checks check box.
- Select the Voided Checks Only check box.
- Select any other criteria as desired.
- Click OK.
While I was running a report, I noticed that an account was given the wrong account number. Is there a way to change the account number without losing any journal entries?
This can be accomplished by running the Renumber GLS Account utility. All associated journal entries, deposit slips, and recurring entries are also renumbered.
To renumber an account
- In the Quick Launch, search for and select “Renumber Account.”
- In the Old Account Number field, select the account you want to renumber.
- In the New Account Number field, enter the new account number you want for the account.
- Click OK.
Note: Renumbering an account in GL will automatically update the references to that account in Tabs3 Billing, AP, and Trust integration settings. However, GL report definitions and GL Report Writer reports that use the Old Account Number will not be updated to use the New Account number.
