
Integration has been added with LexShare, a secure file sharing and electronic document signing service, which allows your clients to easily upload files that you request, or add their electronic signature to a document that you send. The document can then be imported to the PracticeMaster Document Management file.
The Request eSignature, Request File, and Send File actions are available in the Take Actions group of the Quick Clicks pane throughout PracticeMaster. These links open a new email message in Outlook where the LexShare Outlook Add-in can be used to send a request to the client.
A new Import LexShare Files window is used to import documents that have been uploaded to LexShare as Document Management records in PracticeMaster. The number of documents available for import is displayed on the Import LexShare Files action.
Additional information about using PracticeMaster with the LexShare service can be found in KB Article R11901, “LexShare Integration,” and information on using the LexShare Add-in for Outlook can be found in KB Article R11906, “Using the LexShare Outlook Add-in.” The LexShare Add-in requires Outlook 2019 or later using a hosted version of Exchange.
The LexShare integration is available in Version 2022 (Build 22.2.7) and later.

As of June 1, 2023, the Tabs3 Support Team will no longer provide support for Version 19 of Tabs3 Software.
If you are using an older version of the software, now is the perfect time to get up to date with the latest version of Tabs3 Software. You will be surprised at the number of features you’ve been missing! Click here to see What’s New in each version.
Updating to the latest version is FREE when your firm is on an active Maintenance Plan. To get started, in Tabs3 Software, go to Help | Check for Updates.
If you have any questions regarding the discontinuation of support for Version 19, please contact your Tabs3 Software consultant, or a member of our Sales Department at sales@Tabs3.com or (402) 419-2200.

One of the most frequently asked questions our Support Department receives is, “Why isn’t my statement printing?” Whether due to client transactions that have a Status of Hold, client settings, printer drivers, or printer settings, you may have had statements that did not print at one time or another.
Knowledge Base Article R10004, “My Statement Doesn’t Print,” offers the most common reasons a statement doesn’t print and includes easy troubleshooting steps to follow. When your statements aren’t printing, use this article as a checklist to help you get back on track for your month-end activities.
Our Knowledge Base can be accessed at support.Tabs3.com. You can also access our Knowledge Base in the Quick Launch by searching for and selecting “Knowledge Base.”

Hanson Baker Ludlow Drumheller P.S. had been processing credit card payments for fifteen years—but without a way to process cards online, they had to ask clients to mail or call in their payments. This practice was time-consuming and created a drag on both productivity and collections.
With a 72-year record of providing smart, creative, and effective legal guidance to their Washington community, the time was right for the firm’s billing and payment processing solution to evolve once more.
Hanson Baker wanted to create an effortless billing experience for clients by emailing invoices to clients and accepting online credit card payments. Finding a processor with transparent rates that integrated easily with their current software and workflows proved challenging, so the firm turned to Tabs3 Software.
As long-time Tabs3 Software users, they enjoyed Tabs3’s excellent software support and the many features available to them through PracticeMaster, such as the matter manager and dashboard. With affordable fees, transparent pricing, and the ability to attach payment links directly to their emailed invoices, Tabs3Pay was a natural choice.
To help with implementation, Hanson Baker worked with software consultant Christina Cline of C.R. Cline and Company. As a certified Tabs3 consultant, Cline was able to guide Hanson Baker through the implementation process and address potential hang-ups. With her oversight, adopting Tabs3Pay went off without a hitch.
Now, Hanson Baker’s clients enjoy a modernized, reliable payment process – and the firm saves time with smoother invoicing workflows. Not only has Hanson Baker seen improved cash flow due to shorter payment processing times with Tabs3Pay, but the need for collections has also declined.
Hanson Baker appreciates Tabs3Pay’s straightforward pricing and low processing fees, as well as usability features like the ability to print receipts after the fact. They’ve also benefited from Tabs3Pay’s integration with Tabs3 Software, reducing errors from manual input and wasted time from double data entry.
Cline reports that Tabs3 Software’s long record of excellent service is another reason Tabs3Pay was the right choice for Hanson Baker. “Tabs3 has been around for a long time,” Cline says, “Their support is in Lincoln, NE. You’re going to have your problem resolved. When you purchase Tabs3 and get it up and running, you’re not left to flounder.”
If you’re a current Tabs3 Software user and want to improve your firm’s billing and payment workflows, Tabs3Pay could be the solution. Tabs3Pay is designed to offer streamlined, trust accounting-compliant payment processing for law firms while integrating seamlessly with other Tabs3 Software applications. For more information, call (402) 419-2200, email sales@tabs3.com, or visit Tabs3.com.

What is the best way to communicate and share records between users in PracticeMaster? Send an 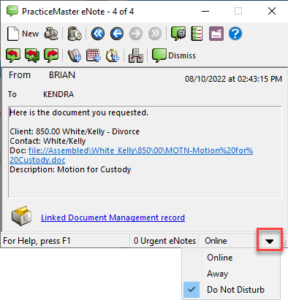 eNote! eNote is a blend of the best features of instant messaging and email to provide a remarkably easy-to-use tool that streamlines communication, facilitates workflow between users, and enhances your current case management procedures.
The eNote feature is available in the Platinum edition of PracticeMaster, and allows you to communicate instantly. Not only can you send text, but you can also link PracticeMaster records to the eNote, providing quick access to the information you need. You can even send and receive eNotes while away from the office with Tabs3 Connect! You can easily reply to, forward, or dismiss eNotes, as well as add them to the Journal, Calendar, and Fee files.
Working on a project and don’t want to be disturbed? Select Do Not Disturb to minimize interruption. When Do Not Disturb is selected, the eNote window will remain minimized so that the user is not interrupted by eNotes. Select Away to let others know you are not at your desk. The sender will receive a message of the receiving user’s status, letting the sender know that the eNote may not be received right away.
You can specify how eNotes are shown upon arrival. Click the ![]() button to open the eNote Preferences window. Select to open the full eNote window (Pop up for new eNotes) or to show a balloon notification (Balloon for new eNotes). You can also select to Play sound for new eNotes using a sound file on your computer.
button to open the eNote Preferences window. Select to open the full eNote window (Pop up for new eNotes) or to show a balloon notification (Balloon for new eNotes). You can also select to Play sound for new eNotes using a sound file on your computer.
When sending an eNote that needs immediate attention, select the Urgent check box. Urgent eNotes will appear on top of the recipient’s Windows desktop, regardless of recipient’s selected status.
eNotes can be dismissed or deleted. Dismissed eNotes are removed from the eNote window, but are available in the eNote List (in the Quick Launch, search for and select “eNote List”). Only users with the Permanently Delete eNotes access right can delete their eNotes, thus leaving a record of correspondence. Click the ![]() (eNote List) button to open the eNote List, displaying a list of your eNotes. Filters in the eNote group of the Quick Clicks pane let you select whether you want to include all of your eNotes, your unread eNotes, your sent eNotes, or your received eNotes. If you have rights to Access All Users’ eNotes, you can also include all users’ eNotes, deleted eNotes, or a specific user’s eNotes.
(eNote List) button to open the eNote List, displaying a list of your eNotes. Filters in the eNote group of the Quick Clicks pane let you select whether you want to include all of your eNotes, your unread eNotes, your sent eNotes, or your received eNotes. If you have rights to Access All Users’ eNotes, you can also include all users’ eNotes, deleted eNotes, or a specific user’s eNotes.
For additional information on eNote, see Knowledge Base Article R11246, “PracticeMaster eNote Frequently Asked Questions.” If you have any questions regarding Platinum features, contact your Tabs3 Software consultant, or contact Support at (402) 419-2210.

Whether you are a new user or just have questions about a feature, finding the information you need is easy!
Using the Navigating Help Resources video, you’ll see how easy it is to quickly access relevant information. From the easy to access Help Topics to in-depth guides to helpful Knowledge Base articles and more, Tabs3 Software has all of the resources you need to find new information and learn about various topics!
Watch this four-minute video here:
Training Videos can be accessed at Tabs3.com/videos. You can also access the videos in the Quick Launch by searching for and selecting “Training Videos.”

Did you know that you can change your view to see either more fields or fewer fields in certain files?
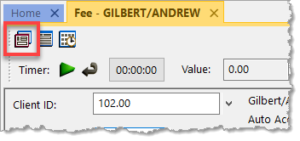
By clicking the ![]() (Detail/Rapid) button, or pressing Alt+I, you can specify whether you see all of the fields in a file or only key fields. This option is available in the Tabs3 Billing Fee, Cost, Payment, and Client Funds Entry windows, as well as the AP Invoice/Manual Check Entry window. Detail mode includes all of the fields, whereas Rapid mode simplifies the data entry process by only showing the most pertinent fields.
(Detail/Rapid) button, or pressing Alt+I, you can specify whether you see all of the fields in a file or only key fields. This option is available in the Tabs3 Billing Fee, Cost, Payment, and Client Funds Entry windows, as well as the AP Invoice/Manual Check Entry window. Detail mode includes all of the fields, whereas Rapid mode simplifies the data entry process by only showing the most pertinent fields.
The following fields are not shown when in Rapid Mode:
Tabs3 Billing Fee Entry – Hours to Bill, Rate, Amount, Category, Bill Code, Rate Code, Status, User ID, Date Entered, Sales Tax
Tabs3 Billing Cost Entry – Timekeeper, Bill Code, Rate Code, Status, User ID, Date Entered, Sales Tax
Tabs3 Billing Payment Entry – Status, User ID, Date Entered
Tabs3 Billing Client Funds Entry – User ID, Date Entered
Accounts Payable Invoice/Manual Check Entry – Due Date, Voucher #, Amount to Pay, Discount Amount, Discount Date, Net Amount, Take Discount, Hold/Pay, User ID, Date Entered
Take a moment to look at these options and see if you can help streamline data entry for your office!

Is there a way to force the descriptions for all transactions on our statements to display in uppercase text?
A Display all Transaction Descriptions in Uppercase check box was added to the Statement Templates window in Tabs3 Billing Version 2022. When this check box is selected, all text in a transaction’s Description field is automatically converted to uppercase when included on a statement.
To display all transaction descriptions in uppercase for a statement template
- From the Quick Launch, search for and select “Statement Templates.”
- In the Template ID field, select the statement template you want to edit.
- Select the Display all Transaction Descriptions in Uppercase check box.
- Press Ctrl+S.
- Repeat steps 2-4 for each template you want to edit.
- Close the Statement Templates window.
To display all transaction descriptions for a single batch of statements
- From the Quick Launch, search for and select “Generate Statements.”
- On the Options tab, in the Statement Options section, click the Statement Template button.
- Click the Select Option button.
- Select Display all Transaction Descriptions in Uppercase from the list and click OK.
- Select the Display all Transaction Descriptions in Uppercase check box.
- Click OK.
- Make any additional changes to the Generate Statements window and then click OK.
Many of our meetings take place on Zoom (or another online meeting service). Is there a way to place a link in the Calendar File and make it clickable?
Link text in the Comments field of the Calendar File (or any other Memo type field) will be clickable if it is in the correct format. Include the full URL, starting with “http:”, “https:”, or “www.” with the link text.
Alternatively, you can add a Web Page type field to the Calendar File to store these links. This field type allows you to add a clickable link to the calendar.
To add a Web Page field to the Calendar File
- In the Quick Launch, search for and select “File Maintenance.”
- Expand System Files, select Calendar, and then click OK.
- On the Field tab, click the
 (New) icon and enter a Field ID (e.g., “ZOOM”).
 - Select a field type of Web Page.
- Enter a Field Name (e.g., “Zoom Link”).
- Select any additional options needed, and then click Done.
You can now add the new field to the Calendar file via Form Designer. Form Designer can be accessed while on the List tab of any file via Edit | Form Designer.
When adding a payee, we misspelled the name. How can we change the payee’s name?
Beginning with Version 2022, Trust payees are now contacts. Therefore, in order to rename a payee, you must rename its associated contact using the Rename Contacts utility.
To rename a payee in Trust
- From the Quick Launch, search for and select “Rename Contact.”
- In the Old Contact ID field, select the contact associated with the payee you want to rename.
- In the New Contact ID field, enter the new name you want to use for that payee.
- If you want to update the individual name fields of the contact, select the Update Name fields check box and fill in the New Value fields for each name field. (Note: If you want to update the Full Name field based on these changes, select the Update Full Name based on First, Middle, and Last Name fields check box.)
- If you want to review the contact after changing it, select the Open the contact record after renaming the contact to update additional fields check box.
- Click OK.
We opened a new bank account recently that is going to be our main operating account. We added the account to AP; however, when we add new invoices, they default to the old account. Is there a way to set the new bank account as the default?
The default bank account number that is used when entering invoices, manual checks, and EFTs is defined in Customization.
To change the default Bank Account
- In the Quick Launch, search for and select “Customization.”
- In the Default Bank field, enter the new bank account.
- Press Ctrl+S.
I need to be able to subtotal my GL accounts in a different order to report on income for the firm. However, the current order is what the firm usually needs. I would only need this alternate order for reporting purposes. What can I do?
GL has the ability to set an additional account order in your Chart of Accounts, specifically for this purpose. This can be particularly useful when you need to subtotal accounts in more than one way.
To print reports using an alternate account order, you must enable the use of an alternate account order, and then specify the order in the Chart of Accounts.
To enable the use of an alternate account order
- From the Quick Launch, search for and select “Edit GLS Client.”
- Select the desired Client Number.
- In the Options section, select the Allow an alternate account order to be defined in the Chart of Accounts check box.
- Press Ctrl+S.
To set up an alternate account order
- From the Quick Launch, search for and select “Chart of Accounts.”
- Right-click and select View Alternate Account Order.
- Drag and drop accounts to their desired position.
Once defined, reports can be run using the alternate account order by selecting the Use Alternate Account Order check box on the Account tab of many GL reports.