Spotlight: Tabs3 Connect Multi-Factor Authentication
May 2025 Tags: Security, Tabs3 Connect, Version 2025
Beginning with Version 2025, Tabs3 Connect optionally allows each user to enable Multi-Factor Authentication (MFA; sometimes referred to as Two-Factor Authentication or 2FA). This provides an extra layer of security when signing into Tabs3 Connect.
To configure Multi-Factor Authentication for a user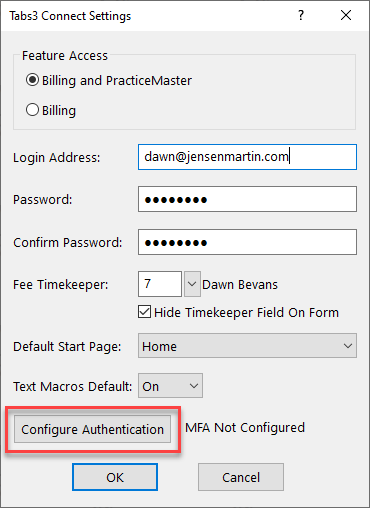
Note: The user being configured must be present with the device they will use for Multi-Factor Authentication in order to proceed.
- Start System Configuration and log in as the user being configured or a user with manager rights. (Note: If the user does not have manager rights, they must have the User Configuration access right in order to configure their Tabs3 Connect settings.)
- From the File menu, point to Open and then select Users.
- Select the User ID who will be accessing Tabs3 Connect.
- Click the Tabs3 Connect Settings button.
- Click the Configure Authentication button.
- Select the Use an Authenticator App option and click Confirm.
Note: If Multi-Factor Authentication has already been configured for this user, a warning will be displayed. Configuring Multi-Factor Authentication again will disable the existing authentication key and create a new one with a new QR code. This is typically not needed unless the user has lost access to their authenticator app or the old authentication key has been removed from the app. - A QR code will be displayed. Open your authenticator app, select the option to add a new account, and scan the QR code using your device’s camera.
For more information, see Knowledge Base Article R11480, All About Tabs3 Connect.
This feature is available in Version 2025 and later.


