
Some tasks, such as running a Data File Integrity Check or rebuilding search indexes, can be set to automatically run when the application is opened by using a startup option. This, coupled with Windows Task Scheduler, provides a way to run tasks that can take a while to run after hours when no one is working. Knowledge Base Article R11034, “Automating Tabs3 Software Maintenance Tasks,” provides information on setting up an Access Profile to use for automated tasks, an introduction to startup options, creating a desktop icon for maintenance tasks, and how to use Windows Task Scheduler for total automation.
One important task that can take a while to run is rebuilding the search indexes in PracticeMaster. Typically, it is not necessary to rebuild the search indexes until you receive a message that your intermediate conflict of interest files are getting too large. However, in certain circumstances, the Linked Documents should be rebuilt on a regular basis. This is because even if the Index Properties are set to Automatic, changes to linked documents may not be immediately searchable if changes are made to the document when PracticeMaster is closed. For more information, check out Knowledge Base Article R11659, “Rebuilding the PracticeMaster Search Index Files.” This article provides instructions on rebuilding PracticeMaster Search Indexes from within PracticeMaster as well as via a startup option.
Our Knowledge Base can be accessed at support.Tabs3.com. You can also access our Knowledge Base while in the software by selecting Help | Internet Resources | Knowledge Base.

With PracticeMaster, you can use timers to track the time you spend on research, planning, correspondence, and more. However, if you don’t turn timers into fees, you may be missing out on valuable time that can be billed to your clients.
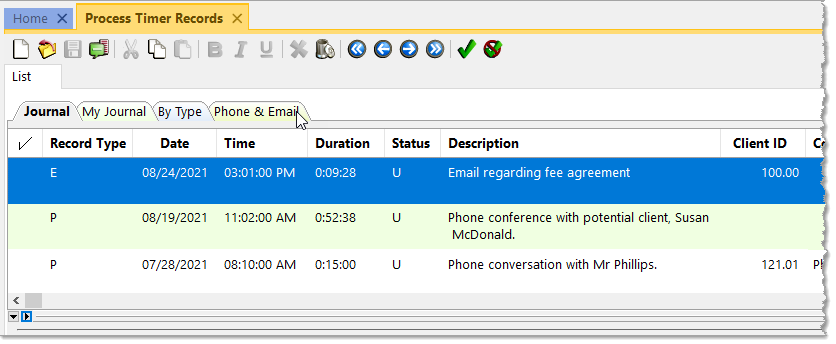
Process Timer Records (from the Quick Launch, search for and select “Process Timer Records”) provides the ability to convert your timer and other journal records into fees. You can optionally process records into individual fees or combine multiple timer records into a single fee, provided the records are for the same client.
To select a record in the Process Timer Records window, click in the ![]() column or click the
column or click the ![]() to place a check mark next to the record. If you want to remove the check mark from a record, click in the
to place a check mark next to the record. If you want to remove the check mark from a record, click in the ![]() column again or click the
column again or click the ![]() . Once one or more records have been selected:
. Once one or more records have been selected:
- Click the Combine to Fee button to combine all selected records into a single fee.
- Click the Convert to Fee button to create individual fees for each selected record.
- Click the Mark as Hidden button to remove the selected record(s) from the Process Timer Records window. (Note: Removing a record from the Process Timer Records window will not remove it from the Journal file.)
When clicking the Combine to Fee or Convert to Fee buttons, a Convert to Fee window will be opened, allowing you to edit the Fee before saving. Default Fee values for each record type (Email, Phone, Research, Timer, and more) can be specified via the Convert to Fee Settings utility (from the Quick Launch, search for and select “Convert to Fee Settings”). Specifying default values such as the tcode, timekeeper, description, and minimum time to bill can help streamline your Process Timer Records routine.
If you’re not already using the Process Timer Records feature, consider adding it to your process to help make sure you’re getting paid for your time.

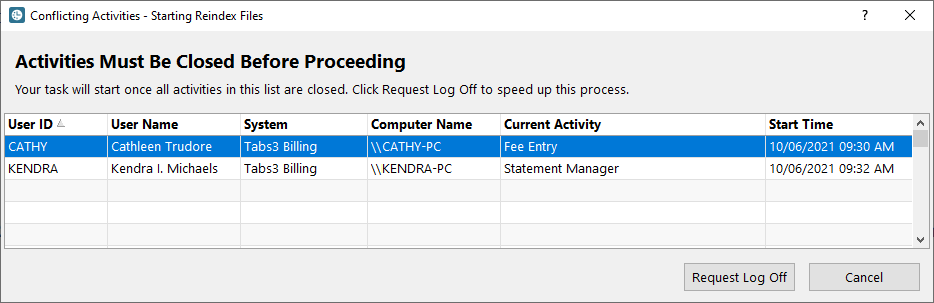
When you need to perform an exclusive task, such as running the Data File Integrity Check, it’s not always a simple task to get everyone out of the software. Phone calls you make and emails you send may not be answered or returned, so that leaves you running around the office to close the software on each computer. Resetting users isn’t recommended because resetting users while they are working in the software can cause corruption in the data. But there’s a better way! With Platinum, you can safely log off users from your computer via the Log Off Users feature.
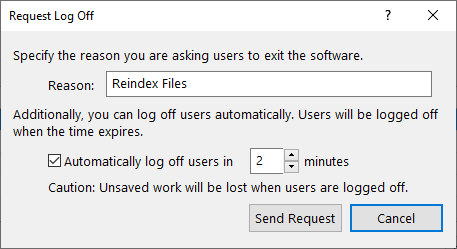
The Platinum edition provides users with the opportunity to save their work and close the software themselves, or to be safely logged out automatically. When a Conflicting Activities window is displayed, click the Request Log Off button.
Clicking the Request Log Off button opens the Request Log Off window, allowing you to enter a reason for the log off and the number of minutes before users will be automatically logged off. Clicking the Send Request button then sends a message that will be displayed on each user’s computer informing them how long they have to save their work before being safely logged off.
Once all users have logged out, the Conflicting Activities window is replaced with the window of the task you need to perform.
For more information about Platinum features, see Knowledge Base Article R11379, “Platinum Overview.” If you have any questions regarding Platinum features, contact your local consultant, or contact Technical Support at (402) 419-2210.

When it comes to tracking your advances, Tabs3 Software provides the tools you need to accurately manage your advanced client costs from start to finish.
See how the integration between Tabs3 Billing, Accounts Payable, and General Ledger makes it easy to enter and track your advances. The Tracking Advanced Client Costs in Tabs3 Software video covers how to set up integration, enter an invoice, and track your advances using the Advanced Client Costs Report.
Watch this five-minute video here:
Training Videos can be accessed at Tabs3.com/videos. You can also access the videos while in the software by selecting Help | Training Videos.

Did you know you can reset the tab order of fields in the PracticeMaster form layout? By default, the order in which fields were added is used as the tab order. However, you can change this order to fit your workflow. When you are in the Form Designer, click the ![]() icon. This will display numbers on each field, showing the current tab order. You can now click on the fields in the order you want to tab through, and the numbers will change accordingly.
icon. This will display numbers on each field, showing the current tab order. You can now click on the fields in the order you want to tab through, and the numbers will change accordingly.
But what if you need to reset the sequence in the middle? Not a problem! You can set the counter by holding the Ctrl key and then clicking on a field. Although nothing is displayed, the counter will have been set to that number behind the scenes. The next field you click will increment the counter by one and adjust all subsequent fields. For example, let’s say you want to switch fields 8 and 9. First set the counter to 7 by holding the Ctrl key and clicking on field 7. Next, click on field 9 which will be changed to field 8. The old field number 8 will automatically be changed to 9 since there cannot be two fields with the same tab order.
Once changes have been made, click the ![]() (Run Form) icon to save changes.
(Run Form) icon to save changes.

