
You can now map fields in Tabs3 CRM intake forms to fields in PracticeMaster Area of Practice (AOP) files. This allows you to create multiple AOP records from a single intake form for information such as witnesses to an accident or beneficiaries on a will.
New PracticeMaster File and Record # columns are now included in the Tabs3 CRM Field mapping window. To create an Area of Practice record from a field, simply select that Area of Practice file in the PracticeMaster File column. If your intake form has fields for multiple records (e.g., a form containing names of multiple witnesses), you can create multiple AOP records by assigning a number to each field in the Record # column. Fields assigned to Record #1 will be included in the first record, Record #2 in the second record, etc.
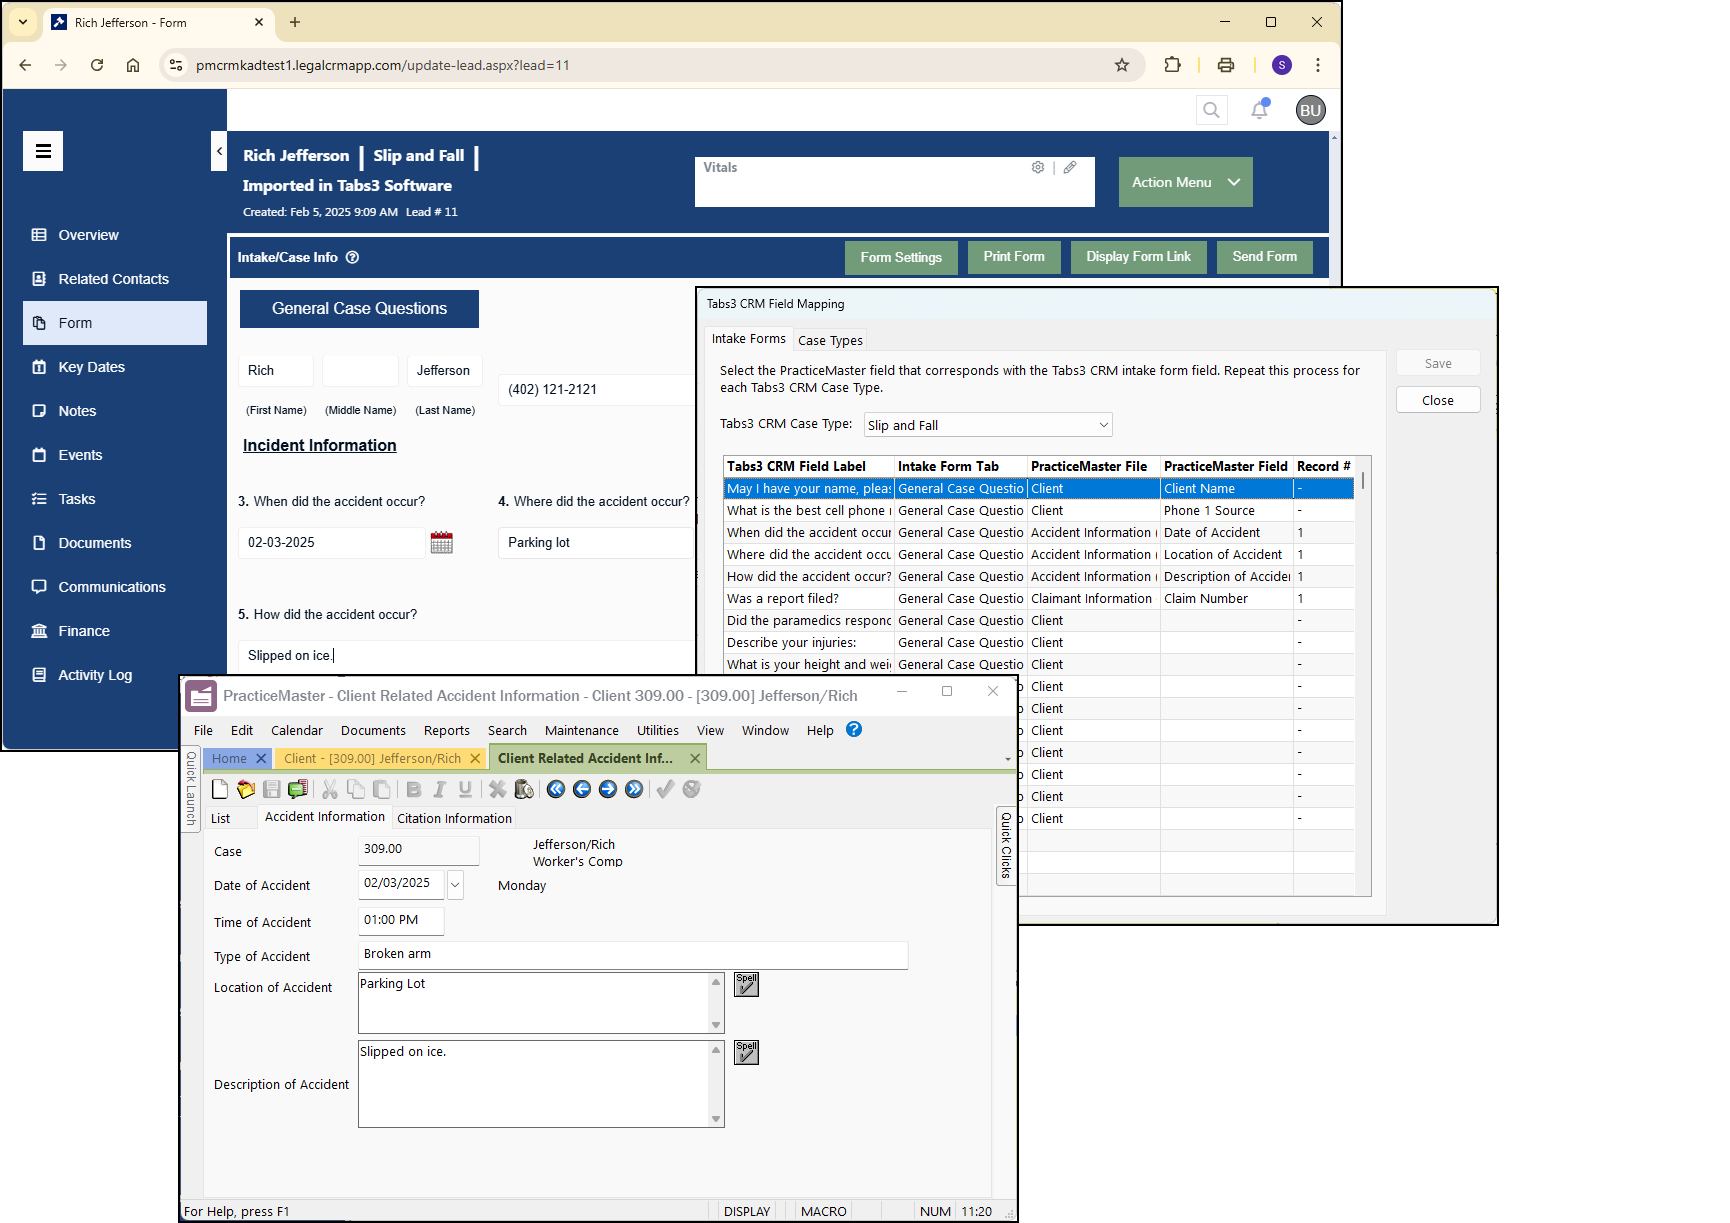
This feature is available in Version 2024, Build 24.2.26 and later.

PracticeMaster allows you to specify Areas of Practice (or AOPs), which can optionally be assigned to client matters. Knowledge Base Article R11892, “All About Areas of Practice,” provides an overview of the benefits provided by Areas of Practice including information on AOP file definitions, custom fields, custom indexes, category pages in the Client file, template path, and Report Writer definitions.
Our Knowledge Base can be accessed at support.Tabs3.com. You can also access our Knowledge Base in the Quick Launch by searching for and selecting “Knowledge Base.”

In a law firm, there can be an overwhelming amount of information to keep track of and work with – case information, contact information, upcoming meetings, research, emails, and documents galore. PracticeMaster can help make you more organized than you’ve ever been before. PracticeMaster provides the tools you need to manage it all.
Calendar – View not just your calendar, but all appointments for everyone in your office. View appointments for a specific client or matter, an employee, or view appointments based on any information in the calendar record such as date, calendar code, and location.
Contacts – Don’t just search your list of contacts; see all the contacts for any matter at a glance, and every matter in which a particular contact is involved.
Document Management – Tell PracticeMaster how you want to name and sort your documents, and then let PracticeMaster do it for you! Quickly see all documents for a case, or different versions of the same kind of documents across all your cases.
Matter Manager – Tie everything for a matter together in one place: calendar records, contacts, email, meeting notes, documents, billing summary, and more!
Conflict of Interest – Determine any potential conflicts by searching files, documents, email attachments, and contacts for key words. Optionally limit results to certain files, and more.
Timers – Use timers to track your time, phone tasks, and research. Switch between timers as needed, and then process timer records into fees!
Filtering – Add filters to your files so that you can easily see only those records that you want to see.
QuickViews – QuickViews combine a filter, column layout, and sort option into a tab at the top of the List tab of any file, which allows you to quickly switch your view depending on the records you are working with. Add Smart tabs to provide an additional level of record sorting.
Integration – Integrate calendar records and contacts with Outlook. Install the PracticeMaster toolbar in Microsoft Outlook, Word, Excel, and PowerPoint; Adobe Reader or Acrobat; Corel WordPerfect; and Ricoh ScanSnap to save documents and research to PracticeMaster, or to create journal entries, calendar entries, or fees from within the other software. Integrate with Tabs3 CRM, LexShare, NetDocuments, and CalendarRules.
Areas of Practice – Areas of Practice provide a way to save separate information for different types of matters, without having the clutter of everything all in one file or set of files.
Report Writer – Create custom reports using the data stored in PracticeMaster.
WorkFlows – Help automate your workload by creating WorkFlows to automatically start tasks or notify other users based on specified events.
Document Assembly – Help automate form letters by creating document templates that pull information from any file in PracticeMaster. Once created, simply select the client and the template, and it does the rest.
For more information about PracticeMaster features or to purchase a license of PracticeMaster, contact your local consultant, or contact our Sales Department at (402) 419-2200.

I have assigned a client’s matter to an Area of Practice. How do I show the additional Area of Practice pages when looking at my clients?
Displaying the new files that this client can store data in is a setting that can be easily included via Configure Client Pages.
To include Area of Practice tabs in the Client file
- In the Quick Launch, search for and select “Client File.”
- While on the List tab, in the Customize Current View group of the Quick Clicks pane, click Configure Client Pages.
- Select the Area of Practice Pages check box.
- Click OK.
This will add the additional tabs to the Client file for the Area of Practice that is assigned to the client.

If your firm works with multiple areas of law, it can be difficult to organize your client’s information for each type of case. That’s why using customizable Area of Practice pages can work for you!
Using PracticeMaster’s Area of Practice feature, you can store and organize matter information unique to a specific area of law, making it easy to locate and track the details that matter to you most.
Watch this three-minute video here:
Training Videos can be accessed at Tabs3.com/videos. You can also access the videos while in the software by selecting Help | Training Videos.
Did you know that you can add tabs to the Client, Contact, and Journal files that are specific to an Area of Practice, Contact Category, or Journal Type?
These tabs are called category pages. Category pages are a special type of page that is only shown in the Editor window when the selected client or record is associated with that category. You can use the Form Designer to customize how the pages will look.
- Client category pages are configured for individual Areas of Practice (e.g., Personal Injury, Family Law, Workers’ Compensation, etc.). These pages will only be shown when a client belonging to that Area of Practice is selected.
- Contact category pages are configured for individual contact categories (e.g., Attorney, Prospect, Insurance Adjuster, Witness, etc.). These pages will only be shown when a contact assigned to that contact category is selected.
- Journal category pages are configured for individual journal record types (e.g., Email, Phone Task, Research Task, etc.). These pages will only be shown when a journal record of that record type is selected.
Setting up a category page provides a way of showing only those fields that are relevant to the selected “category,” thus reducing the number of visible pages.
In order to create a category page, you must first add any fields specific to the category page to the associated file using File Maintenance (e.g., add the desired fields to the Contact file). Once the fields have been added, the category page and fields must be added to the data entry window using the Form Designer.
To create a category page
- From the List tab of the Client, Contact, or Journal file, select Edit | Form Designer.
- To add a category page, click the
 (Add Category Page) button.
 - Select the appropriate Area of Practice, Contact Category, or Journal Type with which the category page will be associated and click OK.
- A new page will be displayed. To rename the page, double-click the category page tab, specify a name for the page, and click OK.
- Add fields, group boxes, and labels until the category page is complete.
- Close the Form Designer and save the changes made to the form layout.
Additional information regarding category pages can be found in Knowledge Base Article R10566, “Category Pages in PracticeMaster.”

Did you know that you can access your client’s billing summary, documents, journal records, and Area of Practice (AOP) files via Tabs3 Connect? You probably already know that you can easily access client, contact, fee, cost, and calendar information from the standard Tabs3 Connect links as well as from within the Tabs3 Connect Matter Manager, but the Matter Manager provides access to much more.
From the Tabs3 Connect Matter Manager:
- Tap Billing Summary to quickly see how much your client currently has due, what the current
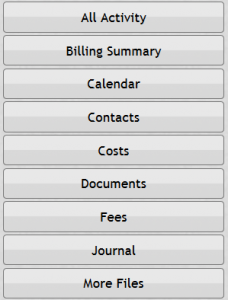 work-in-process amount is, when and how much their last payment was, and more.
 - Tap Documents to view a list of documents. Tap a document to see the entire document record, including a hyperlink you can click on to download the document to your device.
- Tap Journal to see all of your client’s journal items – including all e-mails that have been journaled by you or others in the office.
- Tap More Files to open any of your client’s Area of Practice files. Simply tap the desired Area of Practice file you want to review.
Tabs3 Connect goes beyond accessing simple client and contact information, and it’s more than just a quick way to enter fees, costs, and calendar entries. Take advantage of the Matter Manager in Tabs3 Connect while you’re out of the office to get all of the information you need, when you need it.
For more information on Tabs3 Connect, contact your reseller and consultant, contact Technical Support at (402) 419-2210, or visit Knowledge Base Article R11480, “All About Tabs3 Connect.”
Did you know that you can add tabs to the Client file, Contact file, and Journal file that are specific to an Area of Practice, Contact Category, or Journal Type? These tabs are called Category Pages. Category Pages are a special type of page that is only shown in the Editor window when the selected client or record is associated with that category. You can use the Form Designer to design how the pages will look.
- Client category pages are configured for individual Areas of Practice (e.g., Personal Injury, Family Law, Workers’ Compensation, etc.). These pages will only appear when a client belonging to that Area of Practice is selected.
- Contact category pages are configured for individual contact categories (e.g., Attorney, Insurance Adjuster, Witness, etc.). These pages will only appear when a contact assigned to that contact category is selected.
- Journal category pages are configured for individual journal record types (e.g., E-mail, Phone Task, Research Task, etc.). These pages will only appear when a journal record of that record type is selected.
Setting up a Category Page provides a way of showing only those fields that are relevant to the selected “category,” thus reducing the number of visible pages.
In order to create a Category page, you must first add the fields for the Category page to the associated file using File Maintenance (e.g., add the desired fields to the Contact file). Once the fields have been added, the Category page and fields must be added to the data entry window using the Form Designer.
To create a Category Page
- From the List tab of the Client, Contact, or Journal file, select Edit | Form Designer.
- To add a Category page, click the
 (Add Category Page) button.
 - Select the appropriate Area of Practice, Contact Category, or Journal Type that the Category page will be associated with and click OK.
- A new page will be displayed. To rename the page, right-click the Category page and select Rename Page. Specify a name for the page and click OK. You are now ready to add fields to the Category page.
- Click the
 (Add Field) button.
 - Select the field you want to add and click OK.
- Continue adding fields, group boxes, and labels until the Category page is complete.
- Close the Form Designer and save the changes made to the form layout.
Additional information regarding Category Pages can be found in Knowledge Base Article R10566, “Category Pages in PracticeMaster.”
