
Did you know that you can do more with Entry Lists than see current work-in-process transactions? The Fee, Cost, Payment, and Client Funds Entry Lists can be printed, filtered, and set to include archived records.
Entry Lists can be toggled to be hidden or displayed using the ![]() (Toggle List) button or Alt+G. Once the Entry List is displayed, the following additional buttons are available:
(Toggle List) button or Alt+G. Once the Entry List is displayed, the following additional buttons are available:

- Print List – Click the
 (Print List) button to print a list of all transactions currently displayed in the Entry List.
 - Select Date – Click the
 (Select Date) button, or press Alt+L, to select a date for which transactions will be displayed. This button is only available when filtering by Transaction Date or Entry Date via View Options.
 - View Options – Click the
 (View Options) button, or press Alt+O, to filter the Entry List by Client ID, Transaction Date, or Entry Date; select to include only those records for a certain Timekeeper or User ID, or select to Include Archived Records; or select a List Location of Right or Bottom.
You enter data regularly; make sure you are getting the most out of your Entry List by showing the information you want to see and quickly printing lists when needed.
Did you know that you can change your view to see either more fields or fewer fields in certain files?
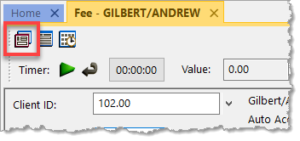
By clicking the ![]() (Detail/Rapid) button, or pressing Alt+I, you can specify whether you see all of the fields in a file or only key fields. This option is available in the Tabs3 Billing Fee, Cost, Payment, and Client Funds Entry windows, as well as the AP Invoice/Manual Check Entry window. Detail mode includes all of the fields, whereas Rapid mode simplifies the data entry process by only showing the most pertinent fields.
(Detail/Rapid) button, or pressing Alt+I, you can specify whether you see all of the fields in a file or only key fields. This option is available in the Tabs3 Billing Fee, Cost, Payment, and Client Funds Entry windows, as well as the AP Invoice/Manual Check Entry window. Detail mode includes all of the fields, whereas Rapid mode simplifies the data entry process by only showing the most pertinent fields.
The following fields are not shown when in Rapid Mode:
Tabs3 Billing Fee Entry – Hours to Bill, Rate, Amount, Category, Bill Code, Rate Code, Status, User ID, Date Entered, Sales Tax
Tabs3 Billing Cost Entry – Timekeeper, Bill Code, Rate Code, Status, User ID, Date Entered, Sales Tax
Tabs3 Billing Payment Entry – Status, User ID, Date Entered
Tabs3 Billing Client Funds Entry – User ID, Date Entered
Accounts Payable Invoice/Manual Check Entry – Due Date, Voucher #, Amount to Pay, Discount Amount, Discount Date, Net Amount, Take Discount, Hold/Pay, User ID, Date Entered
Take a moment to look at these options and see if you can help streamline data entry for your office!
When entering information into the software, have you saved an entry only to realize you needed to enter the same description into the next entry as well? If so, there is an easier and quicker way than going back to the last record to copy the information. When you are in Fee, Cost, Payment, or Client Funds, pressing F2 while in the description field will automatically replace the transaction code’s default description with the Description entered for the previous entry saved during the current data entry session.

Version 2022 has some great new features to check out!
Unified Contacts
- Consolidated contact information throughout the Tabs3 Software into a single Contact file, including clients, billing contacts, related parties, vendors, payees, and logon users. This makes it easy to update address information in one place.
- The Contacts list in Tabs3 Billing and PracticeMaster as well as in the Contact lookup window in Tabs3 Billing, Trust Accounting, Accounts Payable, and System Configuration include check boxes at the top making it easy to quickly filter the list to just clients, AP vendors, Trust payees, etc.
- The Contact Information window is now available across Tabs3 Billing, PracticeMaster, Trust Accounting, Accounts Payable, and System Configuration. When working with an individual, a Details button next to the Full Name field allows you to access fields for First Name, Middle Name, Last Name, and Initials.
- The Rename Contact utility is now available across Tabs3 Billing, PracticeMaster, Trust Accounting, and Accounts Payable. This utility has been enhanced to update the First Name, Middle Name, Last Name, and Initials fields. Because information is now stored in the Contact file, this utility replaces the Rename Payee utility in Trust.
Enhanced Lists
- Totals can now be displayed on the Fees, Costs, Payments, Client Funds, Write Offs, and Statement Manager lists in Tabs3 Billing and the Fees and Costs lists in PracticeMaster.
- Added a setting to position data entry lists either below or to the right of the data entry fields. Entry lists are available in the Fee, Cost, Payment, and Client Funds entry windows in Tabs3 Billing, the Trust Transaction entry window in Trust, and the Invoice/Manual Check entry window in AP.
New Filters and QuickViews
- New default filters and QuickViews have been added to the Clients, Fees, Costs, Payments, Client Funds, and Statement Manager lists. These allow timekeepers to easily see records for their own matters. These new QuickViews use a new function to determine the timekeeper assigned to the currently logged in user.
- Added a “My Clients Unpaid” QuickView to the Tabs3 Billing Statement Manager.
- Added the ability to easily filter the PracticeMaster Journal file list to include just Note, Email, Phone, Timer, Research, or Billing Notes by simply selecting the corresponding check box at the top of the list. Previously these check boxes were only available on the Journal tab of the Client file.
1099-NEC Forms
- Updated printing of Form 1099-NEC to utilize the 3-forms-per-page format required by the IRS for Tax Year 2021.
Updated Calendar Code File
- Added Phase/Task and Activity code fields to the Calendar Code file so you can specify which default codes need to be used when converting calendar records to fees for task based billing clients.
Exchange Online Integration
- Updated the PracticeMaster Exchange Connector with a new synchronization option for Exchange Online / Microsoft 365.
Updated Installer
- Updated to a Microsoft Installer. This change requires the first installation to be performed at the server, but will reduce the need to directly access the file server when installing future updates.
For in-depth information on all of the new Version 2022 features, including screenshots, refer to Knowledge Base Article R11880, “Version 2022 Introduction to New Features.” A list with links to all Version 2022 information can be found in R11885, “Version 2022 Information and Resources.”
To download Version 2022, visit Tabs3.com/update or contact your local consultant.
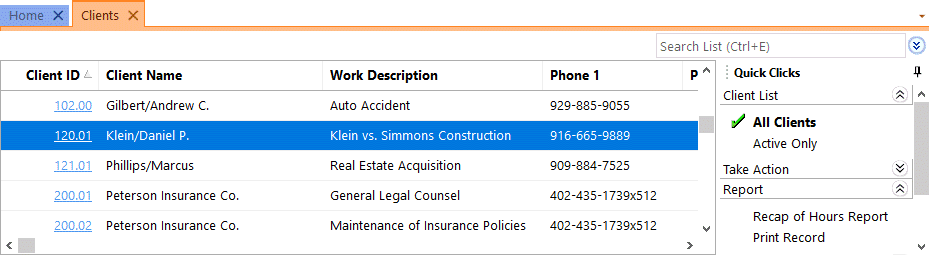
We added a new way to view clients, contacts, fees, costs, payments, client funds, and write offs without having to run a report! When accessing the new Tabs3 Billing lists, you can work with entries using the actions in the Quick Clicks pane, or drill down for additional details. Lists are available via the File | Open menu in Tabs3 Billing or by searching the Quick Launch for “clients,” “contacts,” “client funds,” “fees,” “costs,” “payments,” and “write offs.” The data entry windows for these record types are now available via File | Data Entry or by searching the Quick Launch for “client information,” “contact information,” “client funds entry,” “fee entry,” “cost entry,” and payment entry.”
Filtering
Filtering is a powerful feature. For example, you could filter the Client file to only show clients for which you’re the primary timekeeper. As another example, you could filter the Fee file to only show fees entered in the last week. There are a few ways to filter in the lists.
- The Search Box allows on-the-fly filtering capabilities and can be used to filter data based on keywords included in any column shown in the current column layout.
- The List group in the Quick Clicks pane provides different filtering options for each list. For example, the Contacts List provides the option to filter for All Contacts or Active Only.
- The Filter group in the Quick Clicks pane can be used to set up easy or complex filters that you can reuse. Filters can be added via Manage Filters.
- The QuickViews group in the Quick Clicks pane can be used to create different views of your data. Each QuickView can include a filter, column layout, and sort. QuickViews can be added via Manage QuickViews.
Quick Clicks
The Quick Clicks pane includes the following additional groups:
- The Take Action group of the Quick Clicks pane includes additional actions you can take. For example, in the Fees List, you can transfer transactions, replicate transactions, set the fee’s status to hold, set the fee’s status to print, change WIP transactions, write-up or write-down fees, generate statements, and add a new fee.
- The Report group of the Quick Clicks pane includes any reports that are relevant to the current list. For example, the Write Offs List includes the Write Off Report and the Client Ledger Report.
- The Column Layout group of the Quick Clicks pane automatically includes the Standard and (default) column layouts. Column layouts can be added via Manage Column Layouts.
- The Customize Current View group of the Quick Clicks pane includes Manage Quick Clicks, Refresh, and List Preferences. Manage Quick Clicks provides the ability to add, edit, or delete filters, QuickViews, and column layouts, as well as to organize the Quick Clicks. List Preferences include row height, row colors, and grid lines for the list.
Download the latest version of the software to get this great new feature!
Beginning with Version 2020, Tabs3 Billing and Trust Accounting Software (TAS) supports integration with LawPay for electronic processing of payments, client funds deposits, and trust deposits. LawPay supports both credit and debit cards in Tabs3 Billing and TAS, as well as electronic fund transfers (eChecks) from checking or savings accounts in Tabs3 Billing.
Tabs3 Billing allows you to manage the client’s payment methods from either the LawPay tab of the Client file or from the Payment/Client Funds Entry windows. TAS allows you to manage your LawPay payment methods from the Trust Transaction Entry window. You can add or remove payment methods as well as update the email address for each payment method. When an email address is present, the client will automatically be emailed a receipt each time that payment method is used.
Once you have enabled LawPay in Tabs3 Billing, you can include a LawPay payment link in the statements you email to your clients. This allows clients to pay their statement with a credit card or eCheck without anyone at the firm handling sensitive payment information. Once a client has paid their bill via LawPay, you can import the payment into Tabs3 via the Import Online Payments program (Maintenance | Integration | Import Online Payments). See Knowledge Base Article R11767, “Using the Tabs3 Payment Link,” for more information regarding setting up payment links and importing payments. For more information on LawPay integration, see Knowledge Base Articles R11828, “LawPay Integration Frequently Asked Questions,” and R11826, “Configuring LawPay Integration with Tabs3 Software.”

We are looking for firms to provide early feedback on Tabs3 version 2020. The following features will be available in Tabs3 Version 2020:
- LawPay
- Tabs3 Billing – LawPay integration adds a new option for processing electronic payments and client funds deposits
- Trust Accounting Software (TAS) – LawPay integration adds a new option for processing electronic Trust deposits
- Dashboards
- Tabs3 Billing – displays Aged Accounts Receivable, Unbilled work, and graphs comparing the last two years of Cash Receipts and Billing History
- Accounts Payable Software (APS) – displays Unpaid Invoices, Unposted Checks and EFTs, and the total Paid this Month with shortcuts to Print Checks, Post Checks, and the Check Register report
- General Ledger Software (GLS) – displays an overview of your Bank Accounts and a list of Recent Bank Transactions
- Trust Accounting Software (TAS) – displays an overview of your Bank Accounts and a list of Recent Trust Transactions
- Positive Pay
- Positive Pay export from APS and TAS helps provide fraud protection
If you are using Version 19 and are on maintenance, you can jump on board early with these new features. To sign up, visit Tabs3.com/prerelease. If you have any questions, please email signup@tabs3.com.
We are looking for firms to provide early feedback on Tabs3 version 2020. The following features will be available in Tabs3 Version 2020 later this year:
- LawPay
- Tabs3 Billing – LawPay integration adds a new option for processing electronic payments and client funds deposits
- Trust Accounting Software (TAS) – LawPay integration adds a new option for processing electronic Trust deposits
- Dashboards
- Tabs3 Billing – displays Aged Accounts Receivable, Unbilled work, and graphs comparing the last two years of Cash Receipts and Billing History
- Accounts Payable Software (APS) – displays Unpaid Invoices, Unposted Checks and EFTs, and the total Paid this Month with shortcuts to Print Checks, Post Checks, and the Check Register report
- General Ledger Software (GLS) – displays an overview of your Bank Accounts and a list of Recent Bank Transactions
- Trust Accounting Software (TAS) – displays an overview of your Bank Accounts and a list of Recent Trust Transactions
- Positive Pay
- Positive Pay export from APS and TAS helps provide fraud protection
If you are using Version 19 and are on maintenance, you can jump on board early with these new features. To sign up, visit Tabs3.com/prerelease. If you have any questions, please email signup@tabs3.com.

If you’re not already using client funds, you may be wondering how to set it up and start using it.
The Client Funds feature in Tabs3 can be used to maintain a separate accounting of client funds for non-refundable retainers. These funds are kept separate from the client’s accounts receivable balance and are typically deposited in the firm’s general account.
Before entering client funds transactions, you must first set up the client. Once the client is set up, you can use the Client Funds file to enter client funds transactions. Deposits, withdrawals, and payments to the firm can be made to the client funds account.
The Using Client Funds video walks you through setting up a client for client funds, including more information on each of the setup options. This video will also walk you through entering a Deposit and a Payment to Firm, explaining how each field affects how the transaction is handled.
Watch this eight-minute video here:

Note: Other funds such as trust funds, escrow funds, refundable retainers, etc., can be entered as Client Funds, but using a trust account system (such as Tabs3 Trust Accounting Software) is recommended to better comply with state bar recommendations.
Training Videos can be accessed 24 hours a day, 7 days a week, at Tabs3.com/videos. You can also access Training Videos while in the software by selecting Help | Documentation and then clicking the See also link for Tabs3 and PracticeMaster Training Videos.
