
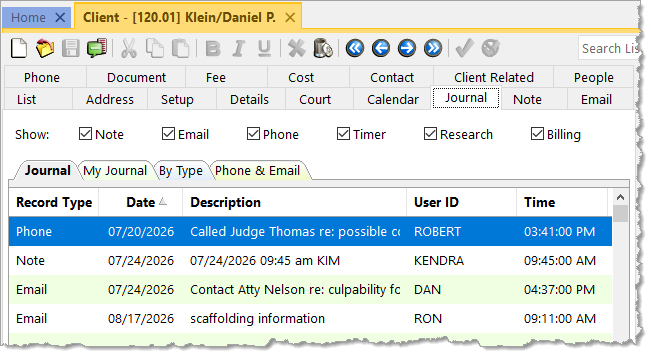
Is your desk cluttered with sticky notes, miscellaneous pieces of paper, and phone messages? Clear your work area, consolidate your notes, and link them to the appropriate clients and contacts by using the PracticeMaster Journal file!
The following types of records can be added to the Journal file (In the Quick Launch, search for and select “Journal File”) by clicking the ![]() (New) button:
(New) button:
- Notes: Add free-form notes to keep track of any necessary information.
- Time Tasks: Keep track of how much time you spend on the various tasks associated with your matter.
- Phone Tasks: Keep track of phone calls to and from clients and third parties, including the phone number and whether you spoke with the desired person or left a message.
- Research Tasks: Keep all of your research notes in one place, including the website address and a linked file.
- Emails: Use the Outlook Toolbar Plug-in (In the Quick Launch, search for and select “Toolbar-Plug-ins” and click the Outlook tab) to save both sent and received emails.
Alternatively, Time Tasks, Phone Tasks, and Research Tasks can be created via the Timer (In the Quick Launch, search for and select “Timer”). When integrated with Tabs3 Billing, any Client Notes from Tabs3 Billing (In the Quick Launch, search for and select “Client Information” and click the Client Notes tab) can also be viewed, but not edited, in the PracticeMaster Journal file.
Not only can you move information from paper to PracticeMaster, but every journal record provides a Client ID and Contact field. This links the record directly to the client’s matter and/or contact for which it applies and allows others to access the same information when they need it. Simply open the Client and/or Contact file and click on the Journal tab to see all journal records pertaining to this client, or select a Journal Page tab (e.g., Email, Phone, Timer, etc.) to see specific record types. You can configure which tabs to display in the Client file by opening Configure Client Pages (Edit | Configure Client Pages) from the List tab, and in the Contact file by opening Configure Contact Pages (Edit | Configure Contact Pages).
Use PracticeMaster to help organize your notes, research, and more – declutter your workspace, and allow others access to valuable information!

Did you know that you can quickly convert Journal, Calendar, and Document Management records into billable fees? Use the Convert to Fee option in PracticeMaster to convert emails, research records, timers, notes, meetings, tasks, documents, and more into fees. Converting records into fees helps make sure your clients are being billed for the time you spend on their matters.
Converting a record to a fee
When you convert a record to a fee, a Convert to Fee window is opened which shows the same fields as the Fee file. If the original record does not contain a Client ID, you will be prompted to select a client before the Convert to Fee window is opened. When applicable, the Date and Description fields are automatically populated from the original record. You can then enter any other information for the fee record such as the Timekeeper, Tcode, Hours to Bill, etc. and save.
There are multiple ways to convert a record into a fee.
- From the All Activity or Calendar list in Matter Manager:
- From the Take Action group of the Quick Clicks pane, select Convert to Fee.
- Click the
 (Convert to Fee) button to the right of the record (All Activity List only).
- From the Journal, Calendar, and Document Management Files:
- Right-click the record, point to Action and select Convert to Fee.
- From the Take Action group of the Quick Clicks pane, select Convert to Fee.
- From the Edit menu, point to Action and select Convert to Fee.
- From the Daily/Weekly/Monthly Calendar: Right-click the record and select Convert to Fee.
- Click the (Convert to Fee) button on the toolbar.
When a record is converted to a fee, a new fee is created without removing the record from the Journal, Calendar, or Document Management file.
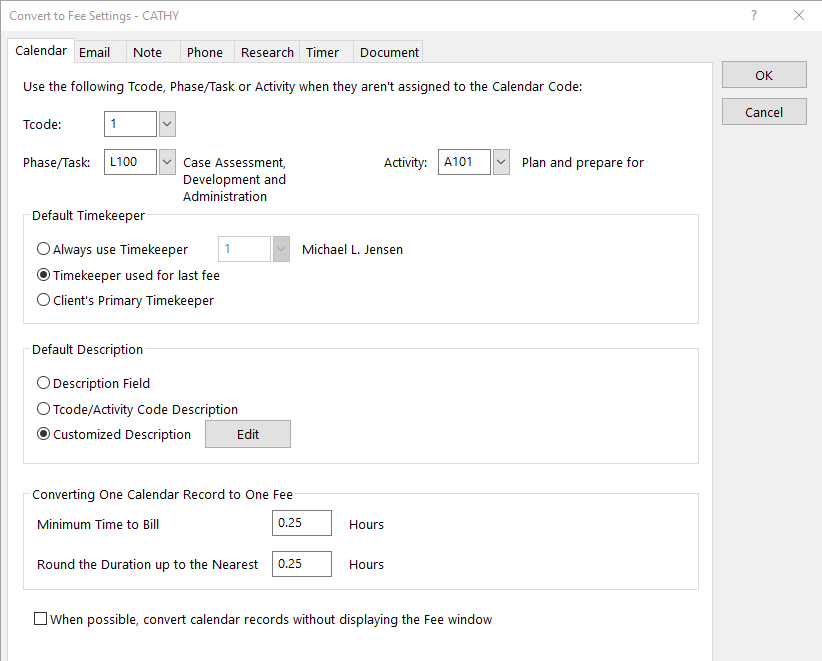
Convert to Fee Settings
Default settings can be specified for calendar, email, note, phone, research, timer, and document records via Convert to Fee Settings (In the Quick Launch, search for and select “Convert to Fee Settings”). Settings are saved per user, so each login user has their own default settings. Default settings are broken down by record type (e.g., timer, email, document, etc.) and provide defaults for tcode, timekeeper, description, time to bill, and more.
Make sure you don’t have billable time that’s slipping away. Start converting records to fees and see how much additional time you can bill for.

We recently began journaling emails from clients into PracticeMaster. I have a large number of them from a specific client, and adding them one at a time will take longer than I’d like. Is there a way to journal multiple emails at one time?
You can easily journal multiple email messages using the Outlook Toolbar.
To journal multiple email messages
- In Outlook, select the emails you want to journal by holding down the Ctrl key and clicking on your desired emails.
- On the PracticeMaster tab of the Outlook toolbar, click the Journal button. A Journal Multiple Emails window will open in PracticeMaster.
- If you want to add all of the emails with the same Client ID and Contact name, select the option to Create all Journal records silently and select the desired Client ID and Contact name in the provided fields, then click OK….or…If you want to journal multiple emails for different clients and contacts, select the option to View each Journal record before saving then click OK. PracticeMaster will then automatically generate each journal record but wait for you to edit and save each record as desired.
If you have multiple clients to journal emails for, repeat these steps for each matter.

From taking notes about an upcoming meeting, to storing emails, to recording details about a phone conversation, PracticeMaster Journal records are essential for managing your clients and contacts on a daily basis.
The Working with the Journal File video walks you through the process of accessing and creating new records from the Journal File, Matter Manager, Client File and more! Since each type of Journal record is optimized to fit your needs, records like phone tasks or timers can easily be converted to billable time with one click. Additionally, using Tabs3 Connect, you can access your journal information on the go!
Watch this four-minute video here:
Training Videos can be accessed at Tabs3.com/videos. You can also access the videos in the Quick Launch by searching for and selecting “Training Videos.”
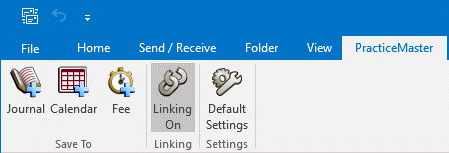
How can I avoid journaling the same email in Outlook twice?
When linking is enabled on the PracticeMaster toolbar in Outlook, the email and the journal record in PracticeMaster are linked. This means that after you create a journal, calendar, or fee record from an email in Outlook, clicking the Journal, Calendar, or Fee button on the toolbar again will open the record you created in PracticeMaster instead of creating a new record. By default, linking is enabled.
To configure the default behavior for Record Linking on
- In Outlook, go to the PracticeMaster tab.
- Click the Default Settings button to open the PracticeMaster Options window.
- In the Record Linking Defaults section, select Enabled.
- Click OK to close the PracticeMaster Options window.
For more information regarding the Outlook Toolbar Plug-in, see Knowledge Base Article R11516, “Configuring the PracticeMaster Outlook Plug-in.”
Version 2022 has some great new features to check out!
Unified Contacts
- Consolidated contact information throughout the Tabs3 Software into a single Contact file, including clients, billing contacts, related parties, vendors, payees, and logon users. This makes it easy to update address information in one place.
- The Contacts list in Tabs3 Billing and PracticeMaster as well as in the Contact lookup window in Tabs3 Billing, Trust Accounting, Accounts Payable, and System Configuration include check boxes at the top making it easy to quickly filter the list to just clients, AP vendors, Trust payees, etc.
- The Contact Information window is now available across Tabs3 Billing, PracticeMaster, Trust Accounting, Accounts Payable, and System Configuration. When working with an individual, a Details button next to the Full Name field allows you to access fields for First Name, Middle Name, Last Name, and Initials.
- The Rename Contact utility is now available across Tabs3 Billing, PracticeMaster, Trust Accounting, and Accounts Payable. This utility has been enhanced to update the First Name, Middle Name, Last Name, and Initials fields. Because information is now stored in the Contact file, this utility replaces the Rename Payee utility in Trust.
Enhanced Lists
- Totals can now be displayed on the Fees, Costs, Payments, Client Funds, Write Offs, and Statement Manager lists in Tabs3 Billing and the Fees and Costs lists in PracticeMaster.
- Added a setting to position data entry lists either below or to the right of the data entry fields. Entry lists are available in the Fee, Cost, Payment, and Client Funds entry windows in Tabs3 Billing, the Trust Transaction entry window in Trust, and the Invoice/Manual Check entry window in AP.
New Filters and QuickViews
- New default filters and QuickViews have been added to the Clients, Fees, Costs, Payments, Client Funds, and Statement Manager lists. These allow timekeepers to easily see records for their own matters. These new QuickViews use a new function to determine the timekeeper assigned to the currently logged in user.
- Added a “My Clients Unpaid” QuickView to the Tabs3 Billing Statement Manager.
- Added the ability to easily filter the PracticeMaster Journal file list to include just Note, Email, Phone, Timer, Research, or Billing Notes by simply selecting the corresponding check box at the top of the list. Previously these check boxes were only available on the Journal tab of the Client file.
1099-NEC Forms
- Updated printing of Form 1099-NEC to utilize the 3-forms-per-page format required by the IRS for Tax Year 2021.
Updated Calendar Code File
- Added Phase/Task and Activity code fields to the Calendar Code file so you can specify which default codes need to be used when converting calendar records to fees for task based billing clients.
Exchange Online Integration
- Updated the PracticeMaster Exchange Connector with a new synchronization option for Exchange Online / Microsoft 365.
Updated Installer
- Updated to a Microsoft Installer. This change requires the first installation to be performed at the server, but will reduce the need to directly access the file server when installing future updates.
For in-depth information on all of the new Version 2022 features, including screenshots, refer to Knowledge Base Article R11880, “Version 2022 Introduction to New Features.” A list with links to all Version 2022 information can be found in R11885, “Version 2022 Information and Resources.”
To download Version 2022, visit Tabs3.com/update or contact your local consultant.
You’re away from the office and need to review an email that was sent regarding a client, but trying to find it in Outlook on your phone or tablet can be cumbersome and time consuming. Tabs3 Connect can get you what you need faster!
Emails that have been journaled to PracticeMaster and assigned to a client are all easily accessed in one place – the Matter Manager. Tabs3 Connect provides access to the Matter Manager from any browser and from wherever you are, be it court, an outside business meeting, lunch, or your favorite vacation spot. Simply log in to Tabs3 Connect and click the ![]() icon to open the Matter Manager. Select the Client ID, and then click the Journal button. You can now see and search all items that were journaled for this client, including email journal records.
icon to open the Matter Manager. Select the Client ID, and then click the Journal button. You can now see and search all items that were journaled for this client, including email journal records.
For more information on Tabs3 Connect, contact your consultant, call Technical Support at (402) 419-2210, or visit Knowledge Base Article R11480, “All About Tabs3 Connect.”
With PracticeMaster, you can use timers to track the time you spend on research, planning, correspondence, and more. However, if you don’t turn timers into fees, you may be missing out on valuable time that can be billed to your clients.
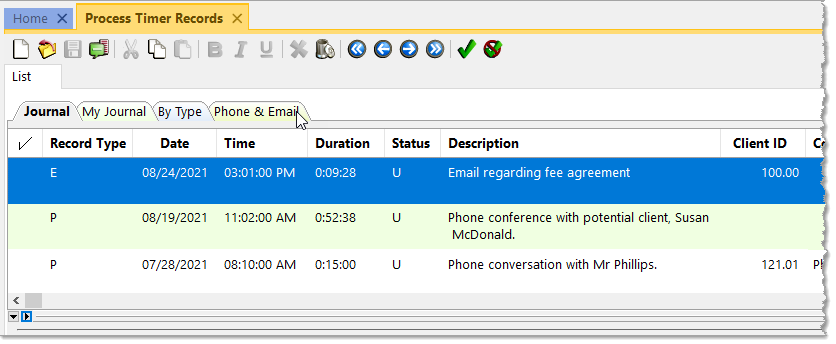
Process Timer Records (from the Quick Launch, search for and select “Process Timer Records”) provides the ability to convert your timer and other journal records into fees. You can optionally process records into individual fees or combine multiple timer records into a single fee, provided the records are for the same client.
To select a record in the Process Timer Records window, click in the ![]() column or click the
column or click the ![]() to place a check mark next to the record. If you want to remove the check mark from a record, click in the
to place a check mark next to the record. If you want to remove the check mark from a record, click in the ![]() column again or click the
column again or click the ![]() . Once one or more records have been selected:
. Once one or more records have been selected:
- Click the Combine to Fee button to combine all selected records into a single fee.
- Click the Convert to Fee button to create individual fees for each selected record.
- Click the Mark as Hidden button to remove the selected record(s) from the Process Timer Records window. (Note: Removing a record from the Process Timer Records window will not remove it from the Journal file.)
When clicking the Combine to Fee or Convert to Fee buttons, a Convert to Fee window will be opened, allowing you to edit the Fee before saving. Default Fee values for each record type (Email, Phone, Research, Timer, and more) can be specified via the Convert to Fee Settings utility (from the Quick Launch, search for and select “Convert to Fee Settings”). Specifying default values such as the tcode, timekeeper, description, and minimum time to bill can help streamline your Process Timer Records routine.
If you’re not already using the Process Timer Records feature, consider adding it to your process to help make sure you’re getting paid for your time.
When it comes to maximizing your billable hours, it’s important to have a reliable timer feature that allows you to easily convert your time into fees.
The Using Timers in PracticeMaster video shows how easy it is to record time spent in meetings, on phone calls, and doing other work, as well as how to quickly convert and process your timer records.
Watch this four-minute video here:
Training Videos can be accessed at Tabs3.com/videos. You can also access the videos while in the software by selecting Help | Training Videos.
Did you know that you can add tabs to the Client, Contact, and Journal files that are specific to an Area of Practice, Contact Category, or Journal Type?
These tabs are called category pages. Category pages are a special type of page that is only shown in the Editor window when the selected client or record is associated with that category. You can use the Form Designer to customize how the pages will look.
- Client category pages are configured for individual Areas of Practice (e.g., Personal Injury, Family Law, Workers’ Compensation, etc.). These pages will only be shown when a client belonging to that Area of Practice is selected.
- Contact category pages are configured for individual contact categories (e.g., Attorney, Prospect, Insurance Adjuster, Witness, etc.). These pages will only be shown when a contact assigned to that contact category is selected.
- Journal category pages are configured for individual journal record types (e.g., Email, Phone Task, Research Task, etc.). These pages will only be shown when a journal record of that record type is selected.
Setting up a category page provides a way of showing only those fields that are relevant to the selected “category,” thus reducing the number of visible pages.
In order to create a category page, you must first add any fields specific to the category page to the associated file using File Maintenance (e.g., add the desired fields to the Contact file). Once the fields have been added, the category page and fields must be added to the data entry window using the Form Designer.
To create a category page
- From the List tab of the Client, Contact, or Journal file, select Edit | Form Designer.
- To add a category page, click the
 (Add Category Page) button.
 - Select the appropriate Area of Practice, Contact Category, or Journal Type with which the category page will be associated and click OK.
- A new page will be displayed. To rename the page, double-click the category page tab, specify a name for the page, and click OK.
- Add fields, group boxes, and labels until the category page is complete.
- Close the Form Designer and save the changes made to the form layout.
Additional information regarding category pages can be found in Knowledge Base Article R10566, “Category Pages in PracticeMaster.”
I normally only create PracticeMaster records for a single matter per Outlook email, but occasionally an email will apply to more than one matter. However, when I try to journal the email a second time, it opens the original journal record instead. Is there a way I can journal a single email to multiple matters?
When linking is enabled on the PracticeMaster toolbar in Outlook, the email and the journal record in PracticeMaster are linked. This means that after you create a journal, calendar, or fee record from an email in Outlook, clicking the Journal, Calendar, or Fee button on the toolbar again will open the record you created in PracticeMaster instead of creating a new record. By default, linking is enabled.
When linking is disabled, clicking the Journal, Calendar, or Fee button will create a new record in PracticeMaster instead of opening an existing record. This allows you to create as many records as you need per email.
You can toggle Record Linking off and on for a single email by clicking the Linking On/Linking Off button on the PracticeMaster tab while viewing the email in Outlook.
However, keep in mind that when changing the Linking status, the default settings will determine what happens to the next email. Depending on your settings, turning Linking off may mean that the next email will also default to Linking Off, or it could automatically default back to Linking On.
To configure the default behavior for Record Linking
- In Outlook, go to the PracticeMaster tab.
- Click the Default Settings button to open the PracticeMaster Options window.
- In the Record Linking Defaults section, select your preferred Linking behavior:
- If you want Record Linking enabled by default, select Enabled.
- If you want Record Linking disabled by default, select Disabled.
- If you want to default to the last setting specified, select Last Used. When Last Used is specified, each time you toggle the Linking On/Linking Off button on the PracticeMaster tab, that setting will be retained for all future emails until you toggle it again.
- Click OK to close the PracticeMaster Options window.
For more information regarding the Outlook Toolbar Plug-in, see Knowledge Base Article R11516, “Configuring the Outlook Toolbar Plug-in.”
Is your desk cluttered with sticky notes, miscellaneous pieces of paper, and phone messages? Clear your work area, consolidate your notes, and link them to the appropriate clients and contacts by using the PracticeMaster Journal file!
The following types of records can be added to the Journal file (File | Open | Journal) by clicking the ![]() (New) button:
(New) button:
- Notes: Add free-form notes to keep track of any necessary information.
- Time Tasks: Keep track of how much time you spend on the various tasks associated with your matter.
- Phone Tasks: Keep track of phone calls to and from clients and third parties, including the phone number and whether you spoke with the desired person or left a message.
- Research Tasks: Keep all of your research notes in one place, including the Web site URL and a linked file.
- E-mails: Use the Outlook Toolbar Plug-in (Maintenance | Integration | Toolbar Plug-ins | Outlook tab) to save both sent and received e-mails.
Alternatively, Time Tasks, Phone Tasks, and Research Tasks can be created via the Timer (File | Timer). When integrated with Tabs3, any Client Notes from Tabs3 (File | Open | Client | Client Notes tab) can also be viewed, but not edited, in the PracticeMaster Journal file.
Not only can you move information from paper to PracticeMaster, but every journal record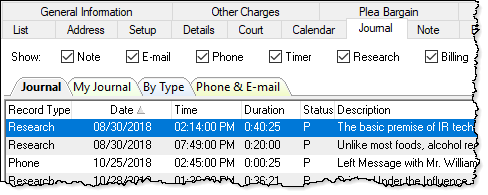 provides a Client ID and Contact field. This links the record directly to the client’s matter and/or contact for which it applies and allows others to access the same information when they need it. Simply open the Client and/or Contact file and click on the Journal tab to see all journal records pertaining to this client, or select a Journal Page tab (e.g., E-mail, Phone, Timer, etc.) to see specific record types. You can configure which tabs to display in the Client file by opening Configure Client Pages (Edit | Configure Client Pages) from the List tab, and in the Contact file by opening Configure Contact Pages (Edit | Configure Contact Pages).
Use PracticeMaster to help organize your notes, research, and more – unclutter your workspace and allow others access to valuable information!
I want to create a journal record in PracticeMaster for every e-mail that I send. How can I accomplish this automatically?
Before you can configure the toolbar to automatically journal all outgoing e-mails, you will need to install the Outlook Plug-in.
To install the PracticeMaster Outlook Plug-in
- From the Maintenance menu, point to Integration and select Toolbar Plug-ins.
- Click the Install Outlook Plug-in button.
- Click OK on the message that is displayed.
- Close and reopen Outlook.
Once the Outlook Plug-in has been installed, you can specify whether new messages will be automatically journaled or not. Additionally, you can specify whether or not the records will be linked. When Linking is enabled, PracticeMaster will maintain a link between the e-mail and the Journal/Calendar/Fee record. When Linking is enabled and you try to create a PracticeMaster record from an e-mail a second time, the existing record will be opened instead. When Linking is disabled, multiple records for the same e-mail may be created.
To automatically journal outgoing e-mails
- From Outlook, click the PracticeMaster tab.
- Click the Default Settings button.
- In the New Message Defaults section, for the Journal option, select Enabled.
- In the Record Linking Defaults section, change the Record Linking option if desired.
- Click OK.
Keep in mind that these are the default settings. When sending an e-mail, you can click on the PracticeMaster tab in the new message window and select to turn Journaling and/or Linking off for this message. The next e-mail you send will revert back to the default settings.
For more information regarding the features available in PracticeMaster’s Outlook Plug-in, refer to Knowledge Base article R11516, “Configuring the PracticeMaster Outlook Plug-in.”
Did you know that you can convert calendar, e-mail, note, phone, research, timer, and document records into fees? This allows you to easily bill your client for the time spent on their matter.
The Converting Records to Billable Fees video shows you how to convert records to fees via the Matter Manager, Calendar and Journal file, and the Process Timer Records utility. Additionally, this video walks you through the Convert to Fee Settings, which allow you to specify default settings to be used (e.g., Tcode, Minimum Time to Bill, etc.) for each type of record.
Watch this eight-minute video here: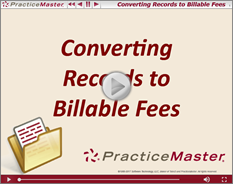
Training Videos can be accessed 24 hours a day, 7 days a week, at Tabs3.com/videos. You can also access Training Videos while in the software by selecting Help | Documentation and then clicking the See also link for Tabs3 and PracticeMaster Training Videos.
Did you know that you can access your client’s billing summary, documents, journal records, and Area of Practice (AOP) files via Tabs3 Connect? You probably already know that you can easily access client, contact, fee, cost, and calendar information from the standard Tabs3 Connect links as well as from within the Tabs3 Connect Matter Manager, but the Matter Manager provides access to much more.
From the Tabs3 Connect Matter Manager:
- Tap Billing Summary to quickly see how much your client currently has due, what the current
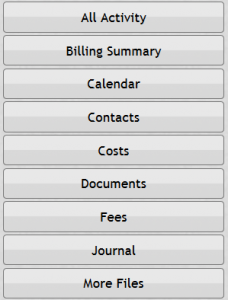 work-in-process amount is, when and how much their last payment was, and more.
 - Tap Documents to view a list of documents. Tap a document to see the entire document record, including a hyperlink you can click on to download the document to your device.
- Tap Journal to see all of your client’s journal items – including all e-mails that have been journaled by you or others in the office.
- Tap More Files to open any of your client’s Area of Practice files. Simply tap the desired Area of Practice file you want to review.
Tabs3 Connect goes beyond accessing simple client and contact information, and it’s more than just a quick way to enter fees, costs, and calendar entries. Take advantage of the Matter Manager in Tabs3 Connect while you’re out of the office to get all of the information you need, when you need it.
For more information on Tabs3 Connect, contact your reseller and consultant, contact Technical Support at (402) 419-2210, or visit Knowledge Base Article R11480, “All About Tabs3 Connect.”
You may already know that you can securely download PracticeMaster linked files and e-mail attachments onto your Internet-enabled device through Tabs3 Connect, but you may not realize the full potential. E-mails can be journaled to PracticeMaster by all users, which means that you can download e-mail attachments regardless of whose e-mail address received them. This allows you to quickly access information that was sent to any firm member without needing the e-mail to be forwarded to you.
For more information on Tabs3 Connect, contact your reseller and consultant, contact Technical Support at (402) 419-2210, or visit Knowledge Base Article R11480, “All About Tabs3 Connect.”

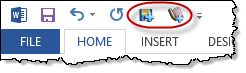
Did you know that you can add the PracticeMaster Toolbar icons to the Quick Access Toolbar in Microsoft Office 2007 and later? To add any of the PM Open, PM Save, PM Journal, PM Calendar, and/or PM Fee buttons to the Quick Access Toolbar, simply right-click the icon on the PracticeMaster ribbon and select Add to Quick Access Toolbar.
You may work with multiple matters throughout the day, so how can you ensure that you are keeping an accurate account of how much time is spent on each task? The PracticeMaster Timer window (File | Timer) can be used to track Time Tasks, Phone Tasks, and Research Tasks. Each record is saved to the Journal 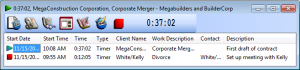 file and can include the Client, Work Description, Contact, a Description of the task, and more. Start and stop the timer for tasks throughout the day from the Timer window as needed.
Once you’re ready to bill a client for your time, you can easily turn timer records into fees using the Process Fee Records program (File | Process Timer Records). When processed, a record is created in the Fee file for the designated client, and a timer record is maintained in the Journal file. This makes it easy to keep track of your time, and to accurately bill clients for work. Using the PracticeMaster Timer means you will never again have to guess at how much time you spent on tasks.
Did you know that you can add tabs to the Client file, Contact file, and Journal file that are specific to an Area of Practice, Contact Category, or Journal Type? These tabs are called Category Pages. Category Pages are a special type of page that is only shown in the Editor window when the selected client or record is associated with that category. You can use the Form Designer to design how the pages will look.
- Client category pages are configured for individual Areas of Practice (e.g., Personal Injury, Family Law, Workers’ Compensation, etc.). These pages will only appear when a client belonging to that Area of Practice is selected.
- Contact category pages are configured for individual contact categories (e.g., Attorney, Insurance Adjuster, Witness, etc.). These pages will only appear when a contact assigned to that contact category is selected.
- Journal category pages are configured for individual journal record types (e.g., E-mail, Phone Task, Research Task, etc.). These pages will only appear when a journal record of that record type is selected.
Setting up a Category Page provides a way of showing only those fields that are relevant to the selected “category,” thus reducing the number of visible pages.
In order to create a Category page, you must first add the fields for the Category page to the associated file using File Maintenance (e.g., add the desired fields to the Contact file). Once the fields have been added, the Category page and fields must be added to the data entry window using the Form Designer.
To create a Category Page
- From the List tab of the Client, Contact, or Journal file, select Edit | Form Designer.
- To add a Category page, click the
 (Add Category Page) button.
 - Select the appropriate Area of Practice, Contact Category, or Journal Type that the Category page will be associated with and click OK.
- A new page will be displayed. To rename the page, right-click the Category page and select Rename Page. Specify a name for the page and click OK. You are now ready to add fields to the Category page.
- Click the
 (Add Field) button.
 - Select the field you want to add and click OK.
- Continue adding fields, group boxes, and labels until the Category page is complete.
- Close the Form Designer and save the changes made to the form layout.
Additional information regarding Category Pages can be found in Knowledge Base Article R10566, “Category Pages in PracticeMaster.”
Need to jot something down about a matter after meeting with a client? Want to record information about a billable phone call? Find a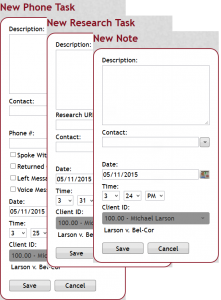 great website that applies to a case that you don’t want to lose? All of these can be recorded and associated with the desired matter right away, even when you’re not at your computer. In Tabs3 Connect, not only do you have access to all of your firm’s journal notes, e-mails, phone tasks, time tasks, and research tasks via Matter Manager, but you can also add notes, phone tasks, and research tasks on the go.
Never misplace a note again! From the Matter Manager in Tabs3 Connect, simply tap Journal to see all of the selected client’s journal records, and then tap New to add a new record for the client.
For more information on Tabs3 Connect, contact your reseller, consultant, or Technical Support at (402) 419-2210, or visit Knowledge Base Article R11480, “All About Tabs3 Connect.”

