
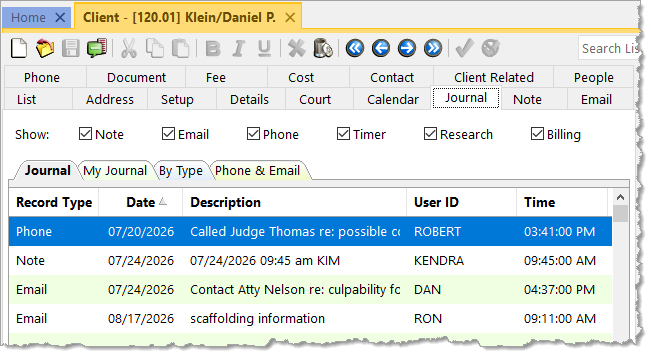
Is your desk cluttered with sticky notes, miscellaneous pieces of paper, and phone messages? Clear your work area, consolidate your notes, and link them to the appropriate clients and contacts by using the PracticeMaster Journal file!
The following types of records can be added to the Journal file (In the Quick Launch, search for and select “Journal File”) by clicking the ![]() (New) button:
(New) button:
- Notes: Add free-form notes to keep track of any necessary information.
- Time Tasks: Keep track of how much time you spend on the various tasks associated with your matter.
- Phone Tasks: Keep track of phone calls to and from clients and third parties, including the phone number and whether you spoke with the desired person or left a message.
- Research Tasks: Keep all of your research notes in one place, including the website address and a linked file.
- Emails: Use the Outlook Toolbar Plug-in (In the Quick Launch, search for and select “Toolbar-Plug-ins” and click the Outlook tab) to save both sent and received emails.
Alternatively, Time Tasks, Phone Tasks, and Research Tasks can be created via the Timer (In the Quick Launch, search for and select “Timer”). When integrated with Tabs3 Billing, any Client Notes from Tabs3 Billing (In the Quick Launch, search for and select “Client Information” and click the Client Notes tab) can also be viewed, but not edited, in the PracticeMaster Journal file.
Not only can you move information from paper to PracticeMaster, but every journal record provides a Client ID and Contact field. This links the record directly to the client’s matter and/or contact for which it applies and allows others to access the same information when they need it. Simply open the Client and/or Contact file and click on the Journal tab to see all journal records pertaining to this client, or select a Journal Page tab (e.g., Email, Phone, Timer, etc.) to see specific record types. You can configure which tabs to display in the Client file by opening Configure Client Pages (Edit | Configure Client Pages) from the List tab, and in the Contact file by opening Configure Contact Pages (Edit | Configure Contact Pages).
Use PracticeMaster to help organize your notes, research, and more – declutter your workspace, and allow others access to valuable information!

Did you know that the Tabs3 DropBox serves as a temporary holding area for reports and statements that are output as PDF files via the Tabs3 DropBox print option?
The Tabs3 DropBox is automatically started after starting and logging into any Tabs3 Software application. A ![]() icon will be shown in the system tray of the taskbar. Clicking the
icon will be shown in the system tray of the taskbar. Clicking the ![]() icon displays the Tabs3 DropBox window. Clicking the
icon displays the Tabs3 DropBox window. Clicking the ![]() in the title bar of the Tabs3 DropBox window will minimize the Tabs3 DropBox as opposed to closing it.
in the title bar of the Tabs3 DropBox window will minimize the Tabs3 DropBox as opposed to closing it.
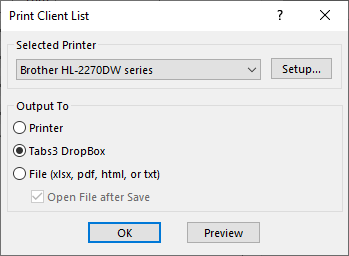 To send reports and statements to the Tabs3 DropBox, select Tabs3 DropBox from the Print window and click OK. The files sent to Tabs3 DropBox are temporary files that will be removed when all Tabs3 Software is closed. This is perfect for reports that need further action. You can run and review several reports for comparison, or email them to another party for review before printing or saving. This can save you from unnecessary time spent finding, retrieving, and ultimately deleting temporary files.
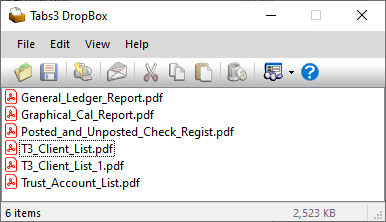 All of the Tabs3 Software applications use a common Tabs3 DropBox, so all of your files will be accessible from one location. A separate Tabs3 DropBox is maintained for each user. The name of each file is determined by the name of the report. If a report is sent to the Tabs3 DropBox more than once, a number will be appended to the end to differentiate them. For example, if a Client List is run twice, Tabs3 DropBox will display “T3_Client_List.pdf” and “T3_Client_List_1.pdf”. To rename any of the files, right-click on the file and select Rename.
You can also drag and drop files between the Tabs3 DropBox and any Windows folder. Items in the Tabs3 DropBox can be opened, saved, printed, emailed, and deleted either individually or in a group. When emailing Tabs3 DropBox items, your default email application is used to create a new email, and the file(s) selected will be attached. All you need to do is add recipients, your message, and then click Send!
Tabs3 DropBox is a great way to group files for easy handling. All of your files will be in one place for quick review, retention, or removal!

Securely sharing documents and requesting eSignatures from your clients just got easier using LexShare!
LexShare is a cloud-based service that allows users to share files with your clients and request signatures from them over email, as well as import the signed documents back into the PracticeMaster Document Management file. LexShare’s features are designed with security at its core, which is essential for keeping client information confidential and for staying compliant.
Watch this one-minute video here:
LexShare Integration is available in PracticeMaster Version 2022 (Build 22.2.7) and later.
Training Videos can be accessed at Tabs3.com/videos. You can also access the videos in the Quick Launch by searching for and selecting “Training Videos.”

Our firm has recently started synchronizing contacts with Outlook. How can we prevent specific PracticeMaster contacts from synchronizing to Outlook?
There are multiple ways to prevent PracticeMaster contacts from synchronizing to Outlook. The simplest method is to select the Do Not Sync check box on the contact record.
To prevent a contact from syncing with Outlook
- In the Quick Launch, search for and select “Contacts.”
- Double-click the contact you want to change.
- Select the Do Not Sync check box.
- Press Ctrl+S.
- Repeat steps 2-4 for each contact you want to prevent from syncing.
In addition to this method, you can also filter contacts by timekeeper, category, or using a custom filter. See Knowledge Base Article R11488, “Controlling Which Contacts Synchronize Between Outlook and PracticeMaster,” for more information on these additional methods.

Time is money, and how long it takes for your firm to complete tasks affects the bottom line. So how will Platinum software speed things up for your firm?
- Report processing speed is increased by 10 to 30 times or more.
- Filtering and column sorting are done at the server, sending only records that have been pre-filtered and pre-sorted to the workstation. Because of this, QuickViews and use of the Search Box are also faster in Platinum.
- The amount of data processed on the workstation is minimized, thereby also minimizing the amount of data transferred across the network.
- Tabs3 Billing and PracticeMaster Data File Integrity Checks are processed at the server. Rather than having to read and validate all of the records from a file, the workstation only receives the results of this process.
- Tabs3 Billing and PracticeMaster Dashboard data is also processed at the server, which reduces network traffic and increases the responsiveness and refresh capabilities of the widgets.
For more information about Platinum Accelerators, see Knowledge Base Article R11182, “Tabs3 and PracticeMaster Accelerators.” For more information about Platinum features, see Knowledge Base Article R11379, “Platinum Overview.” If you have any questions regarding Platinum features, contact your local consultant, or call Technical Support at (402) 419-2210.

Occasionally, it is necessary to generate a list of clients’ email addresses. This can be especially handy for mass mailings utilizing third-party communication systems.
Knowledge Base Article R11845, “Exporting Email Addresses from Tabs3 Software,” discusses options for creating a list of clients’ emails using Tabs3 or PracticeMaster. Typically these lists are exported to a Microsoft Excel spreadsheet or comma separated values file (.CSV). From there, you can use these lists to import your contacts into a Mail Merge in Microsoft Word or to a bulk email service such as MailChimp or Constant Contact.
Our Knowledge Base can be accessed at support.Tabs3.com. You can also access our Knowledge Base while in the software by selecting Help | Internet Resources | Knowledge Base.

I use Word Document Assembly to assemble forms for my business clients. After I save the forms to PracticeMaster as documents, I always create a fee for certain hours and amount values based on the template I’m assembling (defined by Document Type) and write an email to the client. Is there a way for PracticeMaster to automate some of this for me?
This can be accomplished by creating a WorkFlow that prompts the user if they’d like it to run when a Document Management record is created with a particular Document Type (e.g., “Form” or “Proposal”). Fee and email values will be entered automatically.
Once the WorkFlow completes, the document can easily be attached to the email.
To automatically create a fee and start an email every time Document Management records are added with certain Document Types
- From the Maintenance menu, select WorkFlows.
- Under Common Client Related Files, select Document Management, and then click the New button.
- Enter a Name for the WorkFlow (e.g., “Create Fee and Email”).
- In the Source section:
- Select the Filtered Records option and click the Filter button.
- Click the New Row button and select the Document Type field (Doc_Type).
- Select a Test Condition of “equal to”.
- In the Test Value field, select the desired Document Type (e.g., Form).
- Click the Save button.
- In the Event section, select Record Added.
- In the Actions section, click the New button.
- Select Create New Record and click Next.
- Under Common Client Related Files, select Fee and click OK.
- Click the Define Template button.
- Click the set button next to the Client ID field.
- In the Template Expression Editor window, click the Field button, select “Client_ID”, and then click Insert.
- Click OK.
- Click the set button next to the Hours Worked field.
- In the Template Expression Editor window, click the Value button, enter the desired number of hours worked (e.g., “0.50”), and then click OK.
- Click OK.
- Click the (Save) button.
- Click the set button next to the Client ID field.
- Click Finish.
- In the Actions section, click the New button.
- Select Start Email and click Next.
- Click in the To field.
- In the WorkFlow Expression Editor window, click the Field button, select “Client_ID”, and then click Insert.
- At the end of the expression, enter “:Email_Address”, and then click OK.
- Click in the Subject field.
- In the WorkFlow Expression Editor window, click the Value button, enter the applicable text for the subject (e.g., “A document has been created.”), and then click OK.
- Click OK.
- Click in the Body field.
- In the WorkFlow Expression Editor window, click the Value button, enter the applicable text (e.g., “The requested document has been created and attached.”), and then click OK.
- Click OK.
- Clear the Include event information checkbox.
- Click Finish.
- Click Save.
When run, this WorkFlow will start an email to which the document can be attached. To attach the document to the email, select the PracticeMaster tab of the email, click Attach PM Document, and then select the new Document Management record from the list.
Note: This WorkFlow can be created for each Document Type, as needed.
For more information on WorkFlows, refer to our PracticeMaster WorkFlows Guide at Tabs3.com/support/docs.html or Knowledge Base Article R11307, “All About WorkFlows.”
Sometimes I need to email several documents from the Document Store in PracticeMaster to someone. Is there an easy way to add multiple managed documents to an email?
In Version 19, we added the Attach PM Document button to the PracticeMaster toolbar in Outlook. When composing an email in Outlook, this button is available on the PracticeMaster tab if the PracticeMaster toolbar is installed.
To add multiple managed documents to an outgoing email
- Begin composing your email.
- From the PracticeMaster tab, click Attach PM Document.
- In the PracticeMaster Document Management window, select the records with the documents you want to include in your email. (Note: You can apply filters, QuickViews, or use the Search List field to narrow down the list of document management records shown.)
- To select a record, click the
 column for that record. To select multiple records at the same time, use one of the following methods to highlight multiple records, and then press the Spacebar or click the
  button. Keep in mind that you can attach up to ten records at a time.
- Press and hold the Ctrl key, and then highlight individual document management records.
- Highlight a range of records by clicking the first document management record in the range and then press the Shift key while you click the last record in the range.
- Click and drag your mouse pointer across all document management records in a range.
- Click OK to attach the selected records to your email and return to Outlook.
- Repeat steps 2-4 as necessary.
You can now finish composing your email and send it. Keep in mind that your or the recipient’s email server may have a limit on the size of attachments that can be included with an email message.
Note: If you only need to send a single managed document to someone, you can also open the document management record in PracticeMaster and click the Send Email option in the Take Action group of the Quick Clicks pane. This will create a new email message in Outlook with the document attached. However, if you need to attach a single managed document to a reply or forwarded email, use the Attach PM Document button instead.

You have a special font you downloaded for your firm to use for statements and reports. Although you print some statements and reports, you also e-mail PDFs of statements and reports to certain clients and third parties. However, did you know that if the e-mail recipient doesn’t have that font installed, the font will be replaced by a different one? When a designated font in a PDF file is not installed on the reader’s computer, the closest substitution font is found and used, but sometimes this can make the PDF more difficult to read.
The solution? You can specify that the font be embedded into the PDF, so that it reaches your recipients as expected.
To embed fonts in PDF files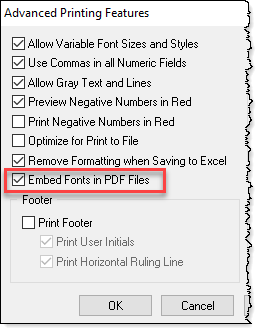
- From the File menu, select Print Setup.
- Select the Printer you use to print statements.
- Click the Advanced Printing Features button.
- Select the Embed Fonts in PDF Files check box.
- Click OK on the Advanced Printing Features window.
- Click OK on the Printer Setup window.
Note: PDF files with embedded fonts have a larger file size, which may lengthen the processing time when e-mailing statements. Additionally, some fonts cannot be embedded due to copyright laws.
You don’t need to skip the specialty font for your firm; embed the font so that others can view the file as intended!

We are pleased to inform you that we now provide e-mail support to firms with a current maintenance plan! If you have a question for support, but prefer to reach us by e-mail, send us your questions.
To request e-mail support
- Go to Tabs3.com/support in your browser (e.g., Firefox, Edge, Internet Explorer, etc.).
- Click the Submit Support Inquiry button.
- In the e-mail window that is opened, enter the requested information (your name, firm name, the software product and serial number you are requesting support for, and your question) and then click Send.
An auto response will be sent to you confirming that we received your request. Our goal is to reply to e-mails within one business day. However, please keep in mind that time-sensitive inquiries or complex issues should be handled by phone.
I want to create a journal record in PracticeMaster for every e-mail that I send. How can I accomplish this automatically?
Before you can configure the toolbar to automatically journal all outgoing e-mails, you will need to install the Outlook Plug-in.
To install the PracticeMaster Outlook Plug-in
- From the Maintenance menu, point to Integration and select Toolbar Plug-ins.
- Click the Install Outlook Plug-in button.
- Click OK on the message that is displayed.
- Close and reopen Outlook.
Once the Outlook Plug-in has been installed, you can specify whether new messages will be automatically journaled or not. Additionally, you can specify whether or not the records will be linked. When Linking is enabled, PracticeMaster will maintain a link between the e-mail and the Journal/Calendar/Fee record. When Linking is enabled and you try to create a PracticeMaster record from an e-mail a second time, the existing record will be opened instead. When Linking is disabled, multiple records for the same e-mail may be created.
To automatically journal outgoing e-mails
- From Outlook, click the PracticeMaster tab.
- Click the Default Settings button.
- In the New Message Defaults section, for the Journal option, select Enabled.
- In the Record Linking Defaults section, change the Record Linking option if desired.
- Click OK.
Keep in mind that these are the default settings. When sending an e-mail, you can click on the PracticeMaster tab in the new message window and select to turn Journaling and/or Linking off for this message. The next e-mail you send will revert back to the default settings.
For more information regarding the features available in PracticeMaster’s Outlook Plug-in, refer to Knowledge Base article R11516, “Configuring the PracticeMaster Outlook Plug-in.”
System Configuration isn’t a program you work in everyday like Tabs3 Billing, but is geared toward setting up certain features of the software. So what settings are controlled in System Configuration, and how do you access it?
Many settings in the software can be set up once and you’re done, but others may need to be updated such as when employees come and go, your server equipment changes, or your firm changes and grows. Although each individual program (Tabs3 Billing, PracticeMaster, etc.) has program-specific customization settings, many System Configuration settings affect more than just a single program.
Note: Manager Access Rights are required to access many of the settings in System Configuration.
System Configuration is used to set up the following features:
- Users and Groups, including Calendar Rights and Tabs3 Connect settings
- Access Rights
- Firm Info
- Outgoing E-mail Configuration
- Microsoft Exchange Integration
- Platinum settings
- …and more!
How to access System Configuration
You can open System Configuration via your desktop shortcut, if present, or via the ![]() Application Toolbar from any of the Tabs3 software. The Application Toolbar is typically located on the right-hand side of the main window and includes buttons for all Tabs3 software for which you have access rights. For more information about accessing System Configuration, press F1 while in the Tabs3 software and enter “System Configuration” on the Index tab.
Application Toolbar from any of the Tabs3 software. The Application Toolbar is typically located on the right-hand side of the main window and includes buttons for all Tabs3 software for which you have access rights. For more information about accessing System Configuration, press F1 while in the Tabs3 software and enter “System Configuration” on the Index tab.

You may already know that you can securely download PracticeMaster linked files and e-mail attachments onto your Internet-enabled device through Tabs3 Connect, but you may not realize the full potential. E-mails can be journaled to PracticeMaster by all users, which means that you can download e-mail attachments regardless of whose e-mail address received them. This allows you to quickly access information that was sent to any firm member without needing the e-mail to be forwarded to you.
For more information on Tabs3 Connect, contact your reseller and consultant, contact Technical Support at (402) 419-2210, or visit Knowledge Base Article R11480, “All About Tabs3 Connect.”