
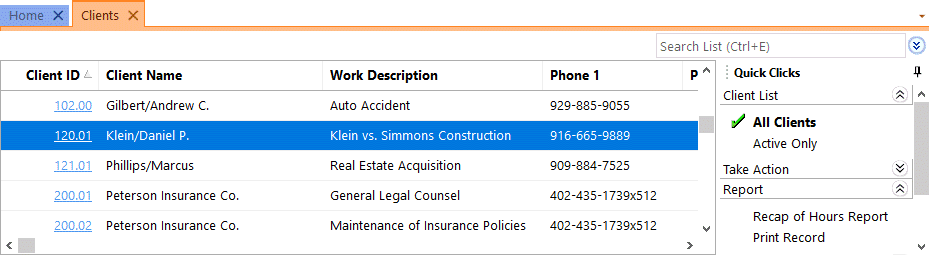
We added a new way to view clients, contacts, fees, costs, payments, client funds, and write offs without having to run a report! When accessing the new Tabs3 Billing lists, you can work with entries using the actions in the Quick Clicks pane, or drill down for additional details. Lists are available via the File | Open menu in Tabs3 Billing or by searching the Quick Launch for “clients,” “contacts,” “client funds,” “fees,” “costs,” “payments,” and “write offs.” The data entry windows for these record types are now available via File | Data Entry or by searching the Quick Launch for “client information,” “contact information,” “client funds entry,” “fee entry,” “cost entry,” and payment entry.”
Filtering
Filtering is a powerful feature. For example, you could filter the Client file to only show clients for which you’re the primary timekeeper. As another example, you could filter the Fee file to only show fees entered in the last week. There are a few ways to filter in the lists.
- The Search Box allows on-the-fly filtering capabilities and can be used to filter data based on keywords included in any column shown in the current column layout.
- The List group in the Quick Clicks pane provides different filtering options for each list. For example, the Contacts List provides the option to filter for All Contacts or Active Only.
- The Filter group in the Quick Clicks pane can be used to set up easy or complex filters that you can reuse. Filters can be added via Manage Filters.
- The QuickViews group in the Quick Clicks pane can be used to create different views of your data. Each QuickView can include a filter, column layout, and sort. QuickViews can be added via Manage QuickViews.
Quick Clicks
The Quick Clicks pane includes the following additional groups:
- The Take Action group of the Quick Clicks pane includes additional actions you can take. For example, in the Fees List, you can transfer transactions, replicate transactions, set the fee’s status to hold, set the fee’s status to print, change WIP transactions, write-up or write-down fees, generate statements, and add a new fee.
- The Report group of the Quick Clicks pane includes any reports that are relevant to the current list. For example, the Write Offs List includes the Write Off Report and the Client Ledger Report.
- The Column Layout group of the Quick Clicks pane automatically includes the Standard and (default) column layouts. Column layouts can be added via Manage Column Layouts.
- The Customize Current View group of the Quick Clicks pane includes Manage Quick Clicks, Refresh, and List Preferences. Manage Quick Clicks provides the ability to add, edit, or delete filters, QuickViews, and column layouts, as well as to organize the Quick Clicks. List Preferences include row height, row colors, and grid lines for the list.
Download the latest version of the software to get this great new feature!

Increasingly, insurance companies and other organizations are requiring that firms submit their bills electronically using specific formats. Tabs3 Taskbill software allows you to convert your updated statements into electronic bills that meet these requirements. There are multiple formats used for electronic bills, ranging from standardized formats used by multiple companies to formats specific to a single company. The amount of configuration required depends on the format you are using.
In Knowledge Base Article R11737, “Configuring and Using Taskbill,” you can select the Taskbill format instructions you want to view from either a list of known organizations, or by the name of the format. Once a format is selected, tailored step-by-step instructions with screenshots are displayed that walk you through configuring the format in both Taskbill and Tabs3 Billing, entering time in Tabs3 Billing, and exporting statements from Taskbill using the selected format.
For those of you who are not familiar with Taskbill, you can read more about it in R10435, “Tabs3 Taskbill Product Information.” If you submit bills electronically, but don’t have Taskbill, take a look at what we can do for you!
Our Knowledge Base can be accessed at support.Tabs3.com. You can also access our Knowledge Base while in the software by selecting Help | Internet Resources | Knowledge Base.

If you haven’t reviewed your HotBackup schedule, notification preferences, and storage settings in a while, now is a great time to do it! These settings can all be accessed in System Configuration via the Platinum | Platinum Server Configuration menu options, and are summarized below. Although the built-in data recovery that Platinum’s Transaction Processing provides in the event of interruption minimizes data loss, HotBackup helps minimize the amount of data you will have to reenter in the event a restore becomes necessary.
HotBackup Schedule
Do you have regular HotBackups scheduled throughout the day? When scheduling HotBackups, keep in mind that users do not have to exit the software.
A schedule can be added or edited via the HotBackup Schedule tab in the Platinum Server Configuration window.
HotBackup Folder
Where are your HotBackups stored, and how many do you keep? We recommend storing your HotBackups outside of the Tabs3 Software directory. When first setting up your HotBackup preferences, we provide a default storage threshold of four recent and two archive HotBackups. This means that a total of six HotBackups are stored at any given time. When deciding how many to keep, remember that you can store up to 198 HotBackups, provided enough space is available.
Storage settings can be updated via the HotBackup Folder tab.
Notification Center
How will you know if something happens and a HotBackup fails? Setting up a notification when a HotBackup fails helps give you peace of mind. You can set up the notification to send to one or more addresses. This helps ensure that all parties who need to know are notified. Notifications are not limited to just failures; you can also set up notifications to be sent for successful HotBackups, if desired.
Once you have this in place, it’s a good idea to regularly verify the current recipients. If you’ve switched IT companies, and/or someone is no longer employed, you may be sending failure messages to an email address that is no longer checked.
Note: Outgoing Email Configuration settings (Settings | Outgoing Email Configuration) must be set up before HotBackup notifications can be added.
Notifications can be added, edited, or deleted via the Notification Center tab.
Don’t let your HotBackup preferences become dated! Review these settings regularly to make sure you have everything in place should a restore become necessary.
For more information about Platinum features, see Knowledge Base Article R11379, “Platinum Overview.” If you have any questions regarding Platinum features, contact your local consultant, or contact Technical Support at (402) 419-2210.

Ready to take the next step in customizing PracticeMaster to fit your practice? We’ve got the solution you need!
The Adding a Field to PracticeMaster video walks you through the process of creating a new field in File Maintenance as well as how to place and adjust your new field’s location using Form Designer. Although this video focuses on the Client File, the same process can be used in any file in PracticeMaster, including Area of Practice files.
Watch this five-minute video here:
Training Videos can be accessed at Tabs3.com/videos. You can also access the videos while in the software by selecting Help | Training Videos.

Do you sometimes forget where to access programs or reports in the software that you only use occasionally? Use the Quick Launch to find what you need!
The Quick Launch provides a Search Actions field to quickly find actions in the current application. Simply start typing,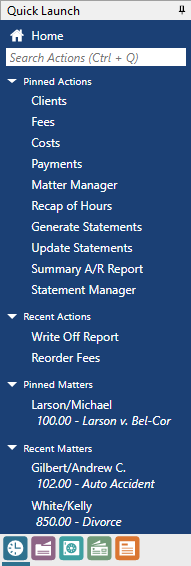 and a list of possible choices that contain the characters entered will be displayed, allowing you to easily select an action to launch. For example, searching for “check” will include Check for Updates and Data File Integrity Check in the list of options. In addition to the program names, common acronyms and alternate references are included. For example, searching for “attorney” in Tabs3 Billing will include all references to “timekeeper” in the list such as Timekeeper Information, Timekeeper Productivity Report, etc.
In addition to search capabilities, the Quick Launch displays the most recent actions and matters accessed and provides the ability to pin actions and matters. To pin an action or matter, hover over the item and click the ![]() icon. Pinned actions or matters are removed from the Recent Actions or Recent Matters sections and added to the Pinned Actions or Pinned Matters sections. Pinned items can be reordered by dragging them to the desired position in the list. To unpin an action or matter, hover over the item and click the
icon. Pinned actions or matters are removed from the Recent Actions or Recent Matters sections and added to the Pinned Actions or Pinned Matters sections. Pinned items can be reordered by dragging them to the desired position in the list. To unpin an action or matter, hover over the item and click the ![]() icon.
icon.
Another great feature is the ability to access other applications using the application icons at the bottom of the Quick Launch pane. This provides quick access to all of the Tabs3 Software installed. No need to find the shortcut on your desktop or in the Start menu.
Tip: You can instantly access the Search Actions box by pressing Ctrl+Q.
