
You can now preview files in document management records from the List tab of Document Management or the Record List in Matter Manager.
To toggle the preview, press Ctrl+F1 or right-click in the List tab, select the SnapShot submenu, and then select Show Document Preview. When enabled, a preview of the file replaces the SnapShot pane when a document management record is selected, allowing you to view the associated file. When disabled, or a non-document management record is selected, the standard SnapShot pane is shown.
PracticeMaster’s document preview displays a read-only version of the document, and supports most standard file types provided the required application is installed. This feature is similar to the Preview option in Windows Explorer.

This feature is available in Version 2025 and later.

In a law firm, there can be an overwhelming amount of information to keep track of and work with – case information, contact information, upcoming meetings, research, emails, and documents galore. PracticeMaster can help make you more organized than you’ve ever been before. PracticeMaster provides the tools you need to manage it all.
Calendar – View not just your calendar, but all appointments for everyone in your office. View appointments for a specific client or matter, an employee, or view appointments based on any information in the calendar record such as date, calendar code, and location.
Contacts – Don’t just search your list of contacts; see all the contacts for any matter at a glance, and every matter in which a particular contact is involved.
Document Management – Tell PracticeMaster how you want to name and sort your documents, and then let PracticeMaster do it for you! Quickly see all documents for a case, or different versions of the same kind of documents across all your cases.
Matter Manager – Tie everything for a matter together in one place: calendar records, contacts, email, meeting notes, documents, billing summary, and more!
Conflict of Interest – Determine any potential conflicts by searching files, documents, email attachments, and contacts for key words. Optionally limit results to certain files, and more.
Timers – Use timers to track your time, phone tasks, and research. Switch between timers as needed, and then process timer records into fees!
Filtering – Add filters to your files so that you can easily see only those records that you want to see.
QuickViews – QuickViews combine a filter, column layout, and sort option into a tab at the top of the List tab of any file, which allows you to quickly switch your view depending on the records you are working with. Add Smart tabs to provide an additional level of record sorting.
Integration – Integrate calendar records and contacts with Outlook. Install the PracticeMaster toolbar in Microsoft Outlook, Word, Excel, and PowerPoint; Adobe Reader or Acrobat; Corel WordPerfect; and Ricoh ScanSnap to save documents and research to PracticeMaster, or to create journal entries, calendar entries, or fees from within the other software. Integrate with Tabs3 CRM, LexShare, NetDocuments, and CalendarRules.
Areas of Practice – Areas of Practice provide a way to save separate information for different types of matters, without having the clutter of everything all in one file or set of files.
Report Writer – Create custom reports using the data stored in PracticeMaster.
WorkFlows – Help automate your workload by creating WorkFlows to automatically start tasks or notify other users based on specified events.
Document Assembly – Help automate form letters by creating document templates that pull information from any file in PracticeMaster. Once created, simply select the client and the template, and it does the rest.
For more information about PracticeMaster features or to purchase a license of PracticeMaster, contact your local consultant, or contact our Sales Department at (402) 419-2200.

Is there an easy way to create document management records for files directly from File Explorer?
PracticeMaster includes a Windows Explorer toolbar plug-in that allows you to right-click a file in File Explorer and create a document management record for it. This is helpful when you need to create document management records for files created in an application that doesn’t have a PracticeMaster toolbar or when you need to create document management records for multiple documents.
To install the Windows Explorer Toolbar Plug-in
- In the Quick Launch, search for and select “Toolbar Plug-ins.”
- On the Windows Explorer tab, click the Install Explorer Extension button. If a UAC prompt is shown, click Yes.
- Close the Toolbar Plug-ins window and restart your workstation to complete the installation process.
To create a document management record for a single document
- Locate the document in File Explorer and right-click it.
In Windows 11, select Show more options, then Send to, and then click PracticeMaster.
In Windows 10, select Send to and then click PracticeMaster. - A Document Management window will open for the selected document. Enter the relevant information for the record.
- Save and close the Document Management window.
To create document management records for multiple documents
- Locate the documents in File Explorer.
- Select the entire group and right-click.
In Windows 11, select Show more options, then Send to, and then click PracticeMaster.
In Windows 10, select Send to and then click PracticeMaster. - Import Multiple PracticeMaster Documents will open in PracticeMaster. You can use this window to create the document management records for each document.
When PracticeMaster performs a conflict of interest search, contact search, or document search, it searches the applicable index files for valid matches. Search Settings (In the Quick Launch, search for and select “Search Settings”) provide the ability to specify how and if indexes are updated, to rebuild indexes, and to specify words to be excluded from a search.
When accessing Search Settings, there are three tabs: Index Properties, Rebuild Index, and Exclude List.
Index Properties
To be included in a search, a field/file must be “indexed.” On the Index Properties tab, you have the option of selecting how to handle updating the Conflict/Contact Index, Email Attachments Index, and the Linked Documents Index.
- Select Automatic to update the index whenever records are added or changed.
- Select Manual to only update the index when the Rebuild Index program is run.
- Select Disable to disable search capabilities for that index.
The accuracy of PracticeMaster’s search options is dependent on the accuracy of the index files. We recommend using the Automatic setting to help ensure you have the most accurate index files, and therefore the most accurate search results.
Note: Changes made to a linked document are not automatically incorporated into the Linked Documents Index, even if it is set to Automatic. To incorporate changes to linked documents, you can update the index by manually rebuilding the Linked Documents Index, or by using a special startup option to manually rebuild the linked documents index file after hours (recommended). Alternatively, any changes made to the document management record itself, such as a change to a field, will automatically update the index.
When selecting Manual, it is recommended that you schedule times to rebuild the indexes.
Rebuild Index
Rebuilding an index updates Manual indexes, optimizes Automatic indexes, and optionally removes deleted records from the indexes. If you want to rebuild indexes, select the desired indexes and click the Rebuild Now button.
Although rebuilding the Conflict/Contact Index requires Exclusive access to the software in order to run, the Email Attachments and Linked Documents indexes can be rebuilt while users are working. For more information on rebuilding indexes via a startup option, see Knowledge Base Article R11659, “Rebuilding the PracticeMaster Search Index Files.”
Exclude List
The Exclude List tab provides a list of words that are excluded from all searches. For example, if the words a, of, and the are in the Exclude List, running a search with those words in it will display a message that the words will be excluded from the search and the search will ignore the words as it runs. This list can be edited via the Add Word and Delete Word buttons.
Make sure to take a moment and review your Search Settings to ensure your conflict of interest, contact, and document searches are optimized for your firm.

Sharing files is a cornerstone of running a successful practice. With LexShare, sending files to your clients and requesting client uploads can easily be done with just a few clicks!
The Sending and Requesting Files with LexShare video shows you just how easy it is to manage your files, even when sending large documents that are normally too big to be attached in an email. This video shows you how the file sharing process works, and you’ll be able to see what your clients will see when receiving your shared files or upload requests.
Watch this four-minute video here:
Training Videos can be accessed at Tabs3.com/videos. You can also access the videos in the Quick Launch by searching for and selecting “Training Videos.”
When it comes to requesting eSignatures from your clients, LexShare makes it easy to request the information you need, all from within PracticeMaster.
LexShare provides the easiest way to send and receive electronic signatures and files from PracticeMaster. The Requesting eSignatures with LexShare video walks you through the eSignature process, from submitting the request to importing the document back into PracticeMaster.
Watch this four-minute video here:
Training Videos can be accessed at Tabs3.com/videos. You can also access the videos in the Quick Launch by searching for and selecting “Training Videos.”
We need to move the files for our Document Management records to a bigger hard drive. Can PracticeMaster do this for us?
PracticeMaster makes it easy to move all existing documents from the current storage location to a new location by changing the Document Store path. However, PracticeMaster will only move files in Document Management records that have the Automatically Manage Document option selected. Other linked documents in any PracticeMaster record (using a File field type) or unmanaged Document Management records will not be affected.
Tip: To check if there are any Document Management records that are not set to be automatically managed, you can create a filter of “Manage_SW is False” on the List tab of the Document Management window.
To change the Document Store location
- On the new drive, create a folder (e.g., “D:\Documents”) and set up a network sharing UNC path (e.g., \\server\documents). Make sure no users have any of the document files open or are using PracticeMaster prior to continuing.
- In the Quick Launch, search for and select “Customization.”
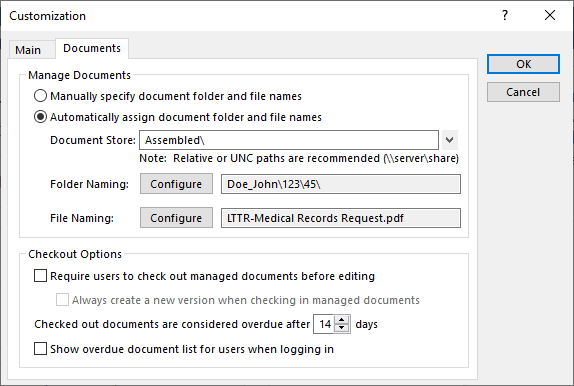
- On the Documents tab, update the Document Store path to point to the new UNC path.
- Click OK to save Customization.
- A prompt will be shown to run Verify Documents. Click Yes.
- When Verify Documents is complete, an Error Report will be displayed showing each file that was moved (error codes 40 or 42). These errors are expected. You can save this report for your records.
- Click Close to complete the process.
If any other codes are included on the Verify Documents Error Report, verify that the Document Management record is correctly set to manage the document, and then re-run the Verify Documents utility (in the Quick Launch, search for and select “Verify Documents”). If the error persists, contact Tabs3 Support for additional assistance.
Securely sharing documents and requesting eSignatures from your clients just got easier using LexShare!
LexShare is a cloud-based service that allows users to share files with your clients and request signatures from them over email, as well as import the signed documents back into the PracticeMaster Document Management file. LexShare’s features are designed with security at its core, which is essential for keeping client information confidential and for staying compliant.
Watch this one-minute video here:
LexShare Integration is available in PracticeMaster Version 2022 (Build 22.2.7) and later.
Training Videos can be accessed at Tabs3.com/videos. You can also access the videos in the Quick Launch by searching for and selecting “Training Videos.”
If your firm creates the same documents for clients on a monthly, weekly, or even daily basis, it can be a struggle to constantly rewrite and maintain your documents effectively. By using variables to automatically pull information into your commonly used documents, you can save time without the hassle of duplicate entry.
The Intro to Coding Document Assembly Templates video walks you through the basics of creating new templates and coding documents to your specifications. Learn how to insert variables, create logic statements, and automate functions like creating a fee based on the completion of a document.
Watch this five-minute video here:
Training Videos can be accessed at Tabs3.com/videos. You can also access the videos in the Quick Launch by searching for and selecting “Training Videos.”
When asking others to check documents back in to PracticeMaster so you can edit them, do you often hear that they forgot they even had it checked out? This can be remedied by setting up PracticeMaster to show the Overdue Document List for users who have documents checked out and overdue.
To show the Overdue Document List when users log in
- In the Quick Launch, search for and select “Customization.”
- From the Documents tab, in the Checkout Options section:
- Specify the desired number of days in the Checked out documents are considered overdue after (#) days field.
- Select the Show overdue document list for users when logging in check box.
- Click OK.
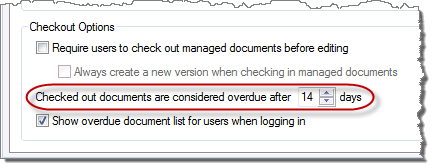
Now, when a user has a document checked out past the overdue limit, the Overdue Document List will be shown when they log in, reminding them that they still have documents checked out.

PracticeMaster’s Document Management feature is easily configured to automatically name and store linked documents in a centralized location. Document management can play a major role in your everyday workflow by streamlining the process of storing new documents and making it easy to access those documents via Tabs3 Connect, the Client File, Matter Manager, Conflict of Interest Search, and Document Search.
In Customization (Utilities | Customization | Documents tab), you can define how you want your documents to be managed and where the documents are stored. You can create a folder structure up to five folders deep to classify and store your documents. Then you can define how the documents are to be named based on fields in the Client and Document Management files.
When adding Document Management records, they will automatically be named and saved as specified in Customization settings, saving you time and ensuring all documents are saved to the correct location. Document Management records can be created several ways:
- Using Ctrl+N, the New Record right-click menu, or the button on the toolbar of the Document Management Editor window.
- Via the Quick Clicks Create Document Record menu option for email record attachments in the Journal file.
- Via the Send To PracticeMaster option of the Windows Explorer toolbar plug-in.
- Via the PM Save option of the toolbar plug-ins for Microsoft® Word, Excel®, PowerPoint®, Adobe® Acrobat®, Adobe Reader®, Corel® WordPerfect®, and more.
- Via the PracticeMaster icon in the ScanSnap Quick Menu software for Fujitsu® ScanSnap™ scanners.
- Following the Word Document Assembly process by using the Create Document Record option.
Help take your document storage to the next level by using PracticeMaster’s built-in Document Management!
When it comes to creating documents for your clients, manually entering all of the necessary information can be tedious. That’s where PracticeMaster’s Word Document Assembly feature can help!
PracticeMaster allows you to quickly and easily assemble individualized documents in Microsoft Word using templates to fit your firm’s needs.
Watch this two-minute video here:
Training Videos can be accessed at Tabs3.com/videos. You can also access the videos while in the software by selecting Help | Training Videos.

I use Word Document Assembly to assemble forms for my business clients. After I save the forms to PracticeMaster as documents, I always create a fee for certain hours and amount values based on the template I’m assembling (defined by Document Type) and write an email to the client. Is there a way for PracticeMaster to automate some of this for me?
This can be accomplished by creating a WorkFlow that prompts the user if they’d like it to run when a Document Management record is created with a particular Document Type (e.g., “Form” or “Proposal”). Fee and email values will be entered automatically.
Once the WorkFlow completes, the document can easily be attached to the email.
To automatically create a fee and start an email every time Document Management records are added with certain Document Types
- From the Maintenance menu, select WorkFlows.
- Under Common Client Related Files, select Document Management, and then click the New button.
- Enter a Name for the WorkFlow (e.g., “Create Fee and Email”).
- In the Source section:
- Select the Filtered Records option and click the Filter button.
- Click the New Row button and select the Document Type field (Doc_Type).
- Select a Test Condition of “equal to”.
- In the Test Value field, select the desired Document Type (e.g., Form).
- Click the Save button.
- In the Event section, select Record Added.
- In the Actions section, click the New button.
- Select Create New Record and click Next.
- Under Common Client Related Files, select Fee and click OK.
- Click the Define Template button.
- Click the set button next to the Client ID field.
- In the Template Expression Editor window, click the Field button, select “Client_ID”, and then click Insert.
- Click OK.
- Click the set button next to the Hours Worked field.
- In the Template Expression Editor window, click the Value button, enter the desired number of hours worked (e.g., “0.50”), and then click OK.
- Click OK.
- Click the (Save) button.
- Click the set button next to the Client ID field.
- Click Finish.
- In the Actions section, click the New button.
- Select Start Email and click Next.
- Click in the To field.
- In the WorkFlow Expression Editor window, click the Field button, select “Client_ID”, and then click Insert.
- At the end of the expression, enter “:Email_Address”, and then click OK.
- Click in the Subject field.
- In the WorkFlow Expression Editor window, click the Value button, enter the applicable text for the subject (e.g., “A document has been created.”), and then click OK.
- Click OK.
- Click in the Body field.
- In the WorkFlow Expression Editor window, click the Value button, enter the applicable text (e.g., “The requested document has been created and attached.”), and then click OK.
- Click OK.
- Clear the Include event information checkbox.
- Click Finish.
- Click Save.
When run, this WorkFlow will start an email to which the document can be attached. To attach the document to the email, select the PracticeMaster tab of the email, click Attach PM Document, and then select the new Document Management record from the list.
Note: This WorkFlow can be created for each Document Type, as needed.
For more information on WorkFlows, refer to our PracticeMaster WorkFlows Guide at Tabs3.com/support/docs.html or Knowledge Base Article R11307, “All About WorkFlows.”
Sometimes I need to email several documents from the Document Store in PracticeMaster to someone. Is there an easy way to add multiple managed documents to an email?
In Version 19, we added the Attach PM Document button to the PracticeMaster toolbar in Outlook. When composing an email in Outlook, this button is available on the PracticeMaster tab if the PracticeMaster toolbar is installed.
To add multiple managed documents to an outgoing email
- Begin composing your email.
- From the PracticeMaster tab, click Attach PM Document.
- In the PracticeMaster Document Management window, select the records with the documents you want to include in your email. (Note: You can apply filters, QuickViews, or use the Search List field to narrow down the list of document management records shown.)
- To select a record, click the
 column for that record. To select multiple records at the same time, use one of the following methods to highlight multiple records, and then press the Spacebar or click the
  button. Keep in mind that you can attach up to ten records at a time.
- Press and hold the Ctrl key, and then highlight individual document management records.
- Highlight a range of records by clicking the first document management record in the range and then press the Shift key while you click the last record in the range.
- Click and drag your mouse pointer across all document management records in a range.
- Click OK to attach the selected records to your email and return to Outlook.
- Repeat steps 2-4 as necessary.
You can now finish composing your email and send it. Keep in mind that your or the recipient’s email server may have a limit on the size of attachments that can be included with an email message.
Note: If you only need to send a single managed document to someone, you can also open the document management record in PracticeMaster and click the Send Email option in the Take Action group of the Quick Clicks pane. This will create a new email message in Outlook with the document attached. However, if you need to attach a single managed document to a reply or forwarded email, use the Attach PM Document button instead.
We use Word Document Assembly and often have to send several subpoenas at a time. Is there a way that PracticeMaster can prompt us to keep running Word Document Assembly until we are done?
You can create a WorkFlow so that each time you add a record to Document Management with a Document Type of subpoena (e.g., SUB), you will be prompted to run Word Document Assembly. This allows you to keep taking advantage of Word Document Assembly automatically running, but provides the option to click No to the prompt once you are done.
To create a WorkFlow that prompts you to run Word Document Assembly
- From the Maintenance menu, select WorkFlows.
- Expand the Common Client Related section, select Document Management, and then click the New button.
- Enter a Name for the WorkFlow (e.g., “Create Another SUB”).
- In the Source section:
- Select Filtered Records and then click the Filter button.
- Click the New Row button.
- In the Name column, select Doc_Type.
- Click the Select button.
- In the Test Value column, click the drop-down arrow and select the document type you use for subpoenas (e.g., SUB).
- Click Save.
- In the Events section, select Record Added.
- In the Actions section:
- Click the New button.
- Select Start Document Assembly and then click Next.
- In the Document Template field, click the
 (Open Folder) button.
 - Select the Word Document Assembly template you use for subpoenas (e.g., “Witness Subpoena”).
- Click Finish.
- Click Save, and then close the WorkFlows window.
For more information on WorkFlows, refer to our new PracticeMaster WorkFlows Guide at Tabs3.com/support/docs.html or Knowledge Base Article R11307, “All About WorkFlows.”

Did you know that you can access your client’s billing summary, documents, journal records, and Area of Practice (AOP) files via Tabs3 Connect? You probably already know that you can easily access client, contact, fee, cost, and calendar information from the standard Tabs3 Connect links as well as from within the Tabs3 Connect Matter Manager, but the Matter Manager provides access to much more.
From the Tabs3 Connect Matter Manager:
- Tap Billing Summary to quickly see how much your client currently has due, what the current
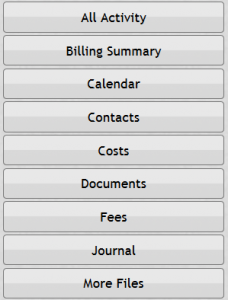 work-in-process amount is, when and how much their last payment was, and more.
 - Tap Documents to view a list of documents. Tap a document to see the entire document record, including a hyperlink you can click on to download the document to your device.
- Tap Journal to see all of your client’s journal items – including all e-mails that have been journaled by you or others in the office.
- Tap More Files to open any of your client’s Area of Practice files. Simply tap the desired Area of Practice file you want to review.
Tabs3 Connect goes beyond accessing simple client and contact information, and it’s more than just a quick way to enter fees, costs, and calendar entries. Take advantage of the Matter Manager in Tabs3 Connect while you’re out of the office to get all of the information you need, when you need it.
For more information on Tabs3 Connect, contact your reseller and consultant, contact Technical Support at (402) 419-2210, or visit Knowledge Base Article R11480, “All About Tabs3 Connect.”
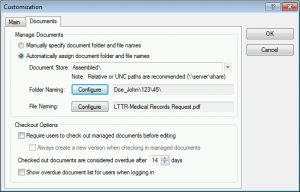
Did you know that you can customize PracticeMaster’s Document Management so that all documents automatically use the same folder and naming strategy? When PracticeMaster is set up to Automatically assign document folder and file names and Document Management records are set to Automatically Manage Document, you can specify not only where documents are saved, but also how they are named.
To Automatically assign document folder and file names
- From the Utilities menu, select Customization.
- From the Documents tab, select the Automatically assign document folder and file names option.
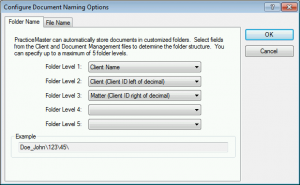
- Click the Configure button to the right of Folder Naming.
- Select the desired values for Folder Level 1 – 5.
- Click OK.
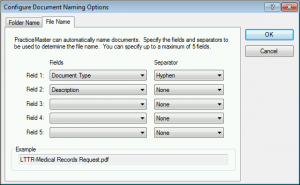
- Click the Configure button to the right of File Naming.
- Select the desired Fields and Separator for Field 1 – 5.
- Click OK.
- Select any other options as desired.
- Click OK.
For example, let’s say you use the values in the following screenshots:
 |
|
 |
 |
When using the values in the above screenshots, the Document Store (Assembled in our example), folder, and files would be organized as follows:
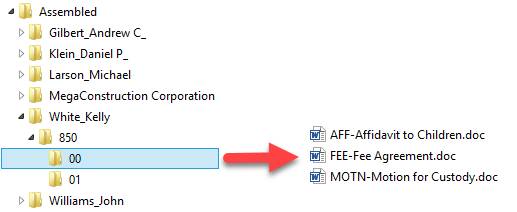
Make sure your documents can easily be found. Let PracticeMaster automate the organization of your documents!
For more information on all of the great Document Management features, check Knowledge Base Article R11572, “Document Management Guide.”

We provide many resources for information on Tabs3 and PracticeMaster software which includes white papers. What are white papers? Tabs3 white papers are informative articles used to promote or highlight certain features of Tabs3 software.
Our most popular Tabs3 white papers include:
- The #1 Billing Mistake Attorneys Make
- Top Six Reports We Recommend to Every Attorney
- Windows Explorer is Not Document Management
- How Practice Management Software is Different from Outlook (See also this month’s Product Spotlight!)
- The Four Pillars of Successful Practice Management
These top white papers can be accessed via Knowledge Base Article R11694, “White Paper Resource List.” This article provides access to more than 15 white papers and articles that can be printed or saved.
Our Knowledge Base can be accessed 24 hours a day, 7 days a week, at support.Tabs3.com. You can also access our Knowledge Base while in the software by selecting Help | Internet Resources | Knowledge Base.
Trying to create a document management record using the PracticeMaster toolbar and not sure what to expect? The behavior you see when using the PM Save or Capture Save functions depends on the current state of the document you are trying to save and whether PracticeMaster is configured to manage documents manually or automatically.
Knowledge Base Article R11630, “Document Management Quick Reference,” provides a quick reference table that shows you the result of saving a document for each scenario, along with definitions for all of the document states, and screenshots of the various windows listed.
Our Knowledge Base can be accessed 24 hours a day, 7 days a week, at support.Tabs3.com. You can also access our Knowledge Base while in the software by selecting Help | Internet Resources | Knowledge Base.
