
In a law firm, there can be an overwhelming amount of information to keep track of and work with – case information, contact information, upcoming meetings, research, emails, and documents galore. PracticeMaster can help make you more organized than you’ve ever been before. PracticeMaster provides the tools you need to manage it all.
Calendar – View not just your calendar, but all appointments for everyone in your office. View appointments for a specific client or matter, an employee, or view appointments based on any information in the calendar record such as date, calendar code, and location.
Contacts – Don’t just search your list of contacts; see all the contacts for any matter at a glance, and every matter in which a particular contact is involved.
Document Management – Tell PracticeMaster how you want to name and sort your documents, and then let PracticeMaster do it for you! Quickly see all documents for a case, or different versions of the same kind of documents across all your cases.
Matter Manager – Tie everything for a matter together in one place: calendar records, contacts, email, meeting notes, documents, billing summary, and more!
Conflict of Interest – Determine any potential conflicts by searching files, documents, email attachments, and contacts for key words. Optionally limit results to certain files, and more.
Timers – Use timers to track your time, phone tasks, and research. Switch between timers as needed, and then process timer records into fees!
Filtering – Add filters to your files so that you can easily see only those records that you want to see.
QuickViews – QuickViews combine a filter, column layout, and sort option into a tab at the top of the List tab of any file, which allows you to quickly switch your view depending on the records you are working with. Add Smart tabs to provide an additional level of record sorting.
Integration – Integrate calendar records and contacts with Outlook. Install the PracticeMaster toolbar in Microsoft Outlook, Word, Excel, and PowerPoint; Adobe Reader or Acrobat; Corel WordPerfect; and Ricoh ScanSnap to save documents and research to PracticeMaster, or to create journal entries, calendar entries, or fees from within the other software. Integrate with Tabs3 CRM, LexShare, NetDocuments, and CalendarRules.
Areas of Practice – Areas of Practice provide a way to save separate information for different types of matters, without having the clutter of everything all in one file or set of files.
Report Writer – Create custom reports using the data stored in PracticeMaster.
WorkFlows – Help automate your workload by creating WorkFlows to automatically start tasks or notify other users based on specified events.
Document Assembly – Help automate form letters by creating document templates that pull information from any file in PracticeMaster. Once created, simply select the client and the template, and it does the rest.
For more information about PracticeMaster features or to purchase a license of PracticeMaster, contact your local consultant, or contact our Sales Department at (402) 419-2200.

Reports can now filter clients based on the contents of their custom fields. This allows clients that use common custom attributes, such as those with task-based billing overrides, to use those fields as reporting criteria. To use this filter, on the Client tab of any report, change the Custom Fields option to Specific and specify an expression.
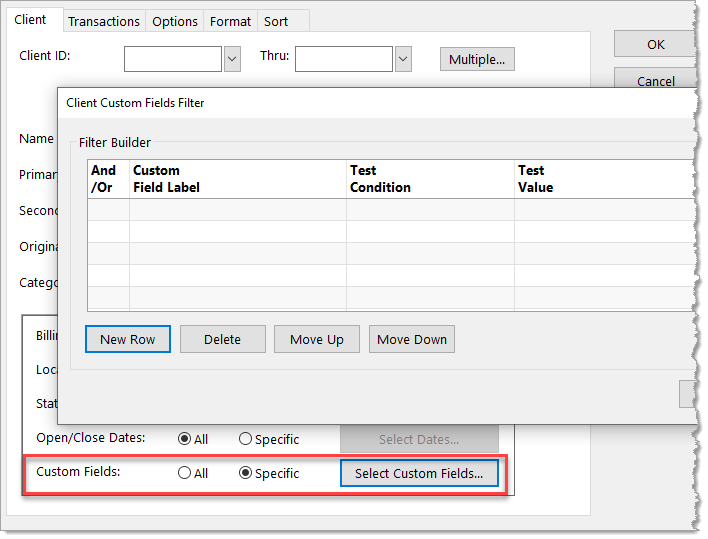
The Filter Builder table allows advanced filtering using expressions. For additional information on creating a filter, see KB Article R11493, “All About Expressions.”

Filtering is a powerful feature that lets you see only certain records, allowing you to trim your lists down to find information more easily. There are multiple ways to filter lists in Tabs3 Billing and PracticeMaster.
Search Box
The Search Box allows you to search all fields in the current column layout of the following windows: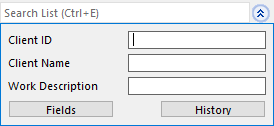
- Tabs3 Billing and PracticeMaster Lists
- Statement Manager in Tabs3 Billing
- Matter Manager in PracticeMaster
- Graphical Calendar in PracticeMaster
You can optionally narrow your search to specific fields by clicking the ![]() to the right of the Search box.
to the right of the Search box.
Filters Automatically Included in Quick Clicks
In Tabs3 Billing, the Quick Clicks pane in the Client List and Contact List automatically includes the options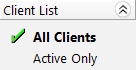 to show all records for the file or only records that have not been marked Inactive. For example, in the Client List, you have the option to show All Clients or Active Only. Additionally, the Fees, Costs, Payments, and Client Funds Lists include the options to show either Work-in-Process or Archived records.
In PracticeMaster, the Quick Clicks pane in the Client List, Contact List, and Timekeeper List automatically includes the options to show all records for the file or only records that have not been marked Inactive. For example, in the Client List, you have the option to show All Clients or Active Only.
In addition, many Lists include some common filters in the Manage Filters group of the Quick Clicks pane.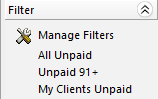 These filters vary based on the List you have open. For example, in the Tabs3 Billing Statement Manager, there are filters for All Unpaid, Unpaid 91+, and My Clients Unpaid.
Building Custom Filters
The Filter Builder can be used to create custom filters. For example, you can create a simple filter to show clients opened within a certain date range, or statements ran for a specific matter within a certain date range.
To filter clients opened in the last month
- In the Tabs3 Billing Quick Launch, search for and select “Clients.”
…or…
In the PracticeMaster Quick Launch, search for and select “Client File.” - In the Filter group of the Quick Clicks pane, click Manage Filters.
- Press Ctrl+N.
- Enter a Filter Name.
- In the Filter Builder section, click New Row.
- In the Select Field from the Client window, in the Name column, select Date_Open and then click Select.
- Select a Test Condition of in the last.
- Select a Test Value of 1 months and click OK.
- Click Save and close the Manage Quick Clicks window.
Your filter is now available to select in the Filters group of the Quick Clicks pane.
To filter the Statement Manager for statements older than 30 days on a specific matter
- In the Quick Launch, search for and select “Statement Manager.”
- In the Filter group of the Quick Clicks pane, click Manage Filters.
- Press Ctrl+N.
- Enter a Filter Name.
- In the Filter Builder section, click New Row.
- In the Select Field from the Ledger window, in the Name column, select Client_ID and then click Select.
- Select a Test Condition of equal to.
- In the Test Value column, select the Client ID.
- Click New Row.
- In the Select Field from the Ledger window, in the Name column, select Date and then click Select.
- Select a Test Condition of older than.
- In the Test Value column, select 30 days.
- Click Save and close the Manage Quick Clicks window.
Your filter is now available to select in the Filters group of the Quick Clicks pane.
Custom filters can also be more complex, using expressions. For examples of expressions used in filters, see Knowledge Base Article R11515, “Filter Expression Examples.”

What are expressions, and how can your firm use them to improve your day-to-day activities? An expression is a set of criteria you define that tells the software what records to display, and in some cases, how to display it. Filters are the most common expressions, but expressions can also be used in Report Writer reports, WorkFlows, Word Document Assembly, and Outlook Synchronization.
- Filter expressions help narrow down the records that are displayed in Tabs3 Billing lists and PracticeMaster files, and can be used in QuickViews.
- Expressions in Report Writer reports can filter the records to be included as well as format how data is shown on the report.
- Expressions can be used in WorkFlows to filter the records affected by the WorkFlow, as well as to format text in records, email messages, and more.
- Expressions in Word Document Assembly can be used to filter records, as well as to format text that appears in the assembled document.
- Expressions in Outlook Synchronization can be used to filter the contact records that are synchronized with Outlook.
So how can you learn more about expressions? Knowledge Base Article R11493, “All About Expressions,” provides the basics on expressions by breaking information down to explain what expressions are, where they’re used, and common terminology associated with them. This article also shows you how to create both simple and advanced expressions, provides filter examples, and has tips for making the most of filter expressions. To go one step further, for a list of more than 60 filter expression examples, including the file and scenario in which it would be used, visit Knowledge Base Article R11515, “Filter Expression Examples.” Take a little time to check out these resources so you can put this powerful feature to work for you and your firm!
Our Knowledge Base can be accessed at support.Tabs3.com. You can also access our Knowledge Base in the Quick Launch by searching for and selecting “Knowledge Base.”

Want to learn more about lists in Tabs3 Billing? Working with lists can save you time by utilizing customizable filters, QuickViews, and column layouts!
In the Working with Lists in Tabs3 Billing video, see how you can easily view your clients, contacts, fees, costs, payments, client funds, and write offs without having to run a report! Lists can be filtered to only show information that is important to you and makes performing actions on those records simple.
Watch this three-minute video here:
Training Videos can be accessed at Tabs3.com/videos. You can also access the videos from the Quick Launch by searching for and selecting “Training Videos.”
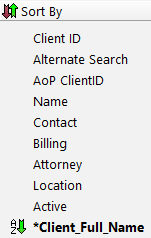
What are indexes, and how can they help your firm? The indexes in PracticeMaster control the order in which records are displayed on the List tab of each file. There are two types of indexes: temporary and permanent.
- Permanent indexes are set up in File Maintenance, are available to everyone, are not removed when
 closing files, and can be used for more than just column sorting, such as helping make filters faster. Additionally, you can select up to four sorts for each permanent index. For example, in the Client file you could create an index that will first sort by State, then City, then Area of Practice, and then Client ID.
 - Temporary indexes are created “on the fly” whenever you click on a column heading on the List tab, if that field does not already have a permanent index. Temporary indexes are available only to the user who created them and are removed as soon as the file is closed.
Although both indexes are shown in the Sort By group of the Quick Clicks pane, temporary indexes are indicated by an asterisk (*).
Why use permanent indexes?
- When creating a temporary index, PracticeMaster must look at all of the records and then sort them accordingly. Permanent indexes are already created, and thus are pre-sorted. Clicking on columns that have permanent indexes takes significantly less time for the records to refresh than when sorting using a temporary index.
- Once a permanent index is created, everyone can use it to quickly sort their records.
- Permanent indexes can be used in QuickViews. When creating a QuickView, both the Default Sort (which field/column to sort on) and Show Smart tabs by settings use permanent indexes in order to sort your records.
- Using a filter to target which records are displayed can be faster if the field you are filtering on is indexed.
- Report Writer reports can be faster when using a Primary Index.
Adding a permanent index
- In the Quick Launch, search for and select “File Maintenance.”
- Select the file for which you want to add a permanent index.
- From the Index tab, click the (New) button.
- Enter an Index ID for the new index.
- Enter a Description.
- Select the desired Sort Order(s).
- Click Done.
- Close the File Maintenance window.
If users are frequently using temporary indexes, create permanent indexes to help save time when sorting columns. For more in-depth information on indexes, visit Knowledge Base Article R11487, “Working with Indexes, Filters, and QuickViews.”

QuickViews provide a powerful way of organizing and finding information. QuickViews combine a filter, column layout, and sort option into a tab at the top of the window. When you change from one QuickView to another, you quickly change which records you see, the columns that are displayed, and the order in which records appear. In PracticeMaster, QuickViews can also include Smart tabs at the bottom of the list to further sort records into groups based on the selected indexed field. You can customize the colors used for QuickViews and Smart tabs. You can share QuickViews for all users as needed or define them for yourself. Once created, you can select a QuickView at the top of the window, or via the Quick Clicks pane.

QuickViews are available for both Platinum and non-Platinum editions of the software; however, they run faster in the Platinum edition of Tabs3 Billing and PracticeMaster.
Why are QuickViews faster in Platinum? Filters are processed at the server computer, similar to how the Accelerator processes reports. Rather than having to filter the records once they have been received from the server, the workstation receives only the records that have been pre-filtered by the server. This reduces network traffic and allows filtered lists to display considerably faster. Additionally, column sorting is processed at the server, which also improves the speed at which lists are displayed.
For more information about Platinum features, see Knowledge Base Article R11379, “Platinum Overview.” If you have any questions regarding Platinum features, contact your Tabs3 Software consultant, or call Support at (402) 419-2210.
Want to know if Platinum is right for your firm? Try out Tabs3 Platinum risk free for 30 days! This offer allows you to use all of the Platinum features with your own data for 30 days before determining whether Platinum will be a permanent upgrade.
Key features in the Platinum software include:
- Tabs3 Connect – Tabs3 Connect provides secure access to Tabs3 Billing and PracticeMaster anywhere you can connect to the Internet using smartphones, tablets, and computers away from the office. Enter fees and costs, browse client and contact information, see calendar events, receive eNotes and alarm notifications, and more!
- Tabs3 Billing and PracticeMaster Accelerators – Accelerators run on the server, helping to minimize both the amount of data transferred across the network and the amount of data processed on the workstation. This means that the performance of generating reports and statements is dramatically improved.
- Transaction Processing and Auto-Recovery – Transaction Processing ensures that database transactions complete successfully, guaranteeing that the database remains in a consistent, reliable state. If an interruption during a process such as update statements occurs, Auto-Recovery “rolls back” the database to its previous state before the database transaction began, saving you from an entire system restore.
- Accelerated Filtering and Column Sorting – PracticeMaster filters and column sorting are processed at the server, similar to the PracticeMaster accelerator, which improves the speed at which lists are displayed.
- eNote – PracticeMaster eNote provides an intra-office way to quickly communicate by blending the best features of instant messaging and email. Send a quick message, or attach a PracticeMaster file such as a calendar or journal record for review. If you don’t want to be bothered, you can even set your status to “Do Not Disturb.”
- HotBackup – With HotBackup, you can back up your data while others are actively using the software and maintain up to 198 backups in the location of your choosing. You can schedule data to be backed up automatically for the days and times of your choosing and designate one or more email addresses to be notified of successful and/or failed HotBackups.
- Historic Accounts Receivable Reports – The Detail and Summary Accounts Receivable Reports include a Print Historic A/R option in Platinum systems that will print accounts receivable balances as of a specific date. This option calculates the A/R based on records present in Tabs3, effectively showing what the A/R would have been on the given date, assuming no records have been deleted or modified. (Note: Keep in mind that although the calculated A/R will be correct based on records currently in the software, it is possible that these may not match an A/R Report run on the original date if any transactions were deleted, statements unbilled or backdated, payments reversed, write offs reversed, or any integrity check errors are present.)
- Accounts Receivable by Timekeeper Report – The Accounts Receivable by Timekeeper Report prints a list of clients with fees due for each working timekeeper, making it easy for individual timekeepers to see which clients owe money for work they performed. This report is different from other receivable reports because it allows you to filter clients by including only those clients that the timekeeper worked on, a particularly nice feature for larger firms.
- Enhanced Detail Accounts Receivable Report – The Detail Accounts Receivable Report offers the option to include a breakdown of fees by timekeeper, and costs by cost type. When this option is enabled, each timekeeper with outstanding fees is displayed on a separate row with an aging breakdown, and outstanding costs are grouped by cost type with an aging breakdown.
For more information on the 30-day trial offer, visit Knowledge Base Article R11261, “Platinum Net 30 Trial Plan,” and then contact your local consultant or contact our Sales Department at 402-419-2200 to take advantage of this great offer!

Is there a way to see a list of matters with Task Based Billing enabled?
You can filter clients in Tabs3 Billing to only show clients with the Task Based Billing check box selected.
To filter clients for Task Based Billing matters
- From the Quick Launch, search for and select “Clients.”
- In the Quick Clicks pane, expand the Filter section and click Manage Filters.
- Press Ctrl+N.
- In the Filter Name field, enter a name for the new filter (e.g., “Task Based Billing Matters”).
- Select the Show for all users check box if you want other Tabs3 Billing users to have access to this filter.
- Click the New Row button.
- In the Name column, select TASK_BASED_BILLING and then click the Select button.
- The Test Condition will automatically default to is TRUE, which is correct.
- Click Save.
- Close the Manage Quick Clicks window.
- Select the new filter in the Filter section of the Quick Clicks pane.
From taking notes about an upcoming meeting, to storing emails, to recording details about a phone conversation, PracticeMaster Journal records are essential for managing your clients and contacts on a daily basis.
The Working with the Journal File video walks you through the process of accessing and creating new records from the Journal File, Matter Manager, Client File and more! Since each type of Journal record is optimized to fit your needs, records like phone tasks or timers can easily be converted to billable time with one click. Additionally, using Tabs3 Connect, you can access your journal information on the go!
Watch this four-minute video here:
Training Videos can be accessed at Tabs3.com/videos. You can also access the videos in the Quick Launch by searching for and selecting “Training Videos.”
When it comes to organizing your clients, transactions, statements, and more, the Quick Clicks pane in Tabs3 Billing and PracticeMaster provides an easy way to navigate and customize how you interact with records.
The Using Quick Clicks video demonstrates how to utilize filters, QuickViews, and column layouts, which means that you can save time by arranging information in a way that is relevant to you. The Quick Clicks pane is available on all lists and in the Matter Manager.
Watch this three-minute video here:
Training Videos can be accessed at Tabs3.com/videos. You can also access the videos while in the software by selecting Help | Training Videos.
Did you know that there are many ways in which you can filter your data in order to make it easier to find what you need?
If you aren’t already filtering, you may not know where to begin. Knowledge Base Article R11645, “Resources for Filtering Data,” provides a list of articles for both beginners and advanced users – everything you need to start filtering, create advanced filters, or to troubleshoot unexpected results.
Our Knowledge Base can be accessed at support.Tabs3.com. You can also access our Knowledge Base while in the software by selecting Help | Internet Resources | Knowledge Base.

We have several WorkFlows we’ve created, but some of them seem to trigger more frequently than we’d like. Is there any way we could make the WorkFlows run with more specific criteria?
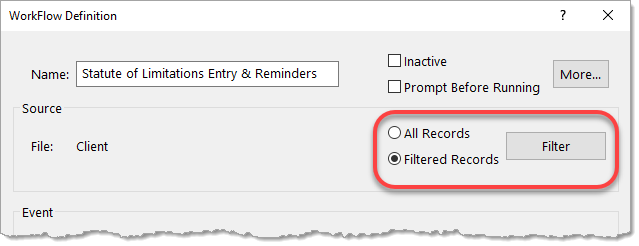
WorkFlows can take advantage of filtering to ensure they only run when they’re intended to. Filters are used to limit the records you want to display or select and can be used to limit the records shown in PracticeMaster files, Report Writer, Word Document Assembly, Outlook Synchronization, and WorkFlows. Filters can be simple comparisons, or advanced expressions capable of complex functionality.
Let’s take a look at the Filter Editor, and then a few scenarios where you might want to add a filter to your WorkFlows. To add a filter to your WorkFlow, open your WorkFlow via Maintenance | WorkFlows. In the WorkFlow Definition window, select Filtered Records, and click the Filter button.
In the Filter Editor, you can click New Row to add a simple row, or click New Advanced Row to create a more complex filter.
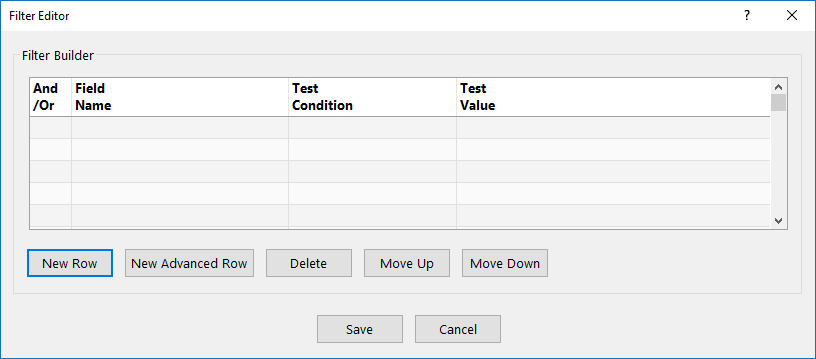
- Simple rows – Adding a standard row to the Filter Editor allows you to compare a field against a limited number of values. This allows you to easily test for blank values, common date ranges, or a specific record.
- Advanced rows – Using fields, functions, and operators, you can construct an expression by adding an Advanced Row to the Filter Editor. You can test against any range of values, or use functions to generate different values for different situations.
Below are a few scenarios where filtering the records that run the WorkFlow can help prevent the WorkFlow from running too often.
Scenario 1
Whenever we add a new Contact, our WorkFlow to create a new client record always triggers. However, we only need it to run when the contact has a Contact Category of “Client”.
To create a filter so the WorkFlow only triggers for a Contact Category of “Client”
- Open your WorkFlow.
- In the Source section, select Filtered Records and then click the Filter button to open the Filter Editor.
- Click New Row, select RP_Cat, and then click Select.
- Click in the Test Condition field and select equal to.
- In the Test Value field, enter “Client”.
- Click Save to close the Filter Editor.
- Click Save to close the WorkFlow Definition.
Scenario 2
I have a WorkFlow that starts a fee record when we save a Document Management record. However, we don’t need fees to be created for documents with a DocType of “LTTR”.
To create a filter so the WorkFlow won’t trigger for a DocType of “LTTR”
- Open your WorkFlow.
- In the Source section, select Filtered Records, and then click the Filter button to open the Filter Editor.
- Click New Row, select Doc_Type, and then click Select.
- Click in the Test Condition field and select not equal to.
- In the Test Value field, enter “LTTR”.
- Click Save to close the Filter Editor.
- Click Save to close the WorkFlow Definition.
Scenario 3
Our firm has a WorkFlow that recreates calendar records every time they’re deleted to prevent employees from accidentally deleting other people’s appointments. However, we do not want it to run when employees delete their own records.
This is a slightly more complicated scenario, but we can add an Advanced Row to compare the User ID assigned to the Calendar record with the User ID that is currently logged in by utilizing the UserID$ function. The UserID$ function always specifies the User ID logged into the software.
To create a filter so that employees can delete their own calendar records
- Open your WorkFlow.
- In the Source section, select Filtered Records and then click the Filter button to open the Filter Editor.
- Click New Advanced Row to open the Advanced Expression Editor window.
- Click the Field button, select User_ID, and then click Select.
- Click the Operator button, select not equal to, and then click Insert.
- Click the Function button, select UserId$, and then click Insert.
- Verify the Expression shows “User_ID != UserId$()”, and then click OK.
- Click Save to close the Filter Editor.
- Click New Advanced Row to open the Advanced Expression Editor window.
- Click Save to close the WorkFlow Definition.
For more information on filter expressions, including using them in WorkFlows, take a look at Knowledge Base Article R11493, “All About Expressions.”
If you haven’t tried out QuickViews yet, you haven’t unlocked PracticeMaster’s full potential! PracticeMaster QuickViews provide a  powerful way of organizing and finding information in PracticeMaster using the List tab. QuickViews combine a filter, column layout, and an index (default sort) into a tab at the top of the List tab. When you change from one QuickView to another, you quickly change which records you see, the columns that are displayed, and the order in which records appear. QuickViews can also include Smart tabs at the bottom of the List tab to further sort records into groups based on the selected indexed field. For example, when using Smart tabs in the Client file, you can quickly get a list of all clients with tabs for each area of practice, timekeeper, location, and much more!
You can customize the colors used for QuickViews and Smart tabs. You can share QuickViews for all users as needed, or define them for yourself. Once created, you can select a QuickView at the top of the List tab, or via the Quick Clicks pane.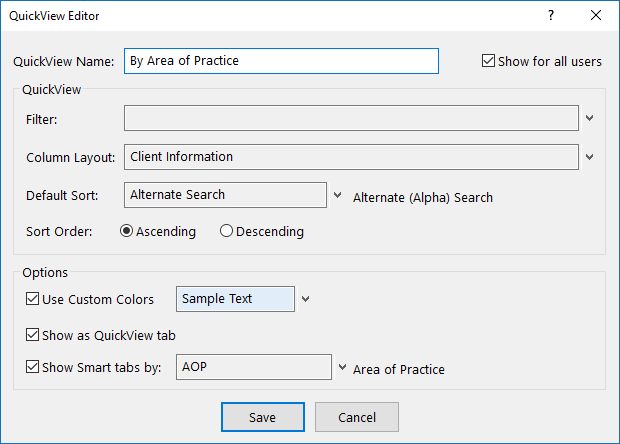
To add a QuickView
- Open the file for which you want to add a QuickView.
- From the Edit menu, select Manage QuickViews.
- Click
 to add a new QuickView.
- Enter the desired QuickView Name.
- If you want the QuickView to be available for everyone, select the Show for all users check box.
- Select a Filter, Column Layout, Default Sort, and any other desired options.
- Click the Save button.
- Close the Manage Quick Clicks window.
Unlimited QuickViews can be created for every file in PracticeMaster, providing the ability to easily view and manage your data in many different ways. The options to organize your data are nearly limitless. For information on QuickViews that are included when PracticeMaster is installed, see Knowledge Base Article R11607, “QuickViews Included in PracticeMaster.” Try out the QuickViews already included, or create your own and see how quickly you find that you can’t work without them!
QuickViews are available for both Platinum and multi-user versions of the software. QuickViews run faster in the Platinum version of PracticeMaster due to the acceleration of filtering and column sorting.
Working with a lot of data can be time consuming. However, PracticeMaster makes it easy by allowing you to restrict the records shown based on criteria you specify using filters. This powerful feature allows you to deal with just those records that apply to your situation.
The Filtering Overview video demonstrates how to select and clear filters via Quick Clicks on the List tab of data entry windows, how to select and clear filters in the Graphical Calendar, using the Search box, creating a simple filter, and how to rearrange filters in the Quick Clicks pane.
Watch this three-and-a-half minute video here:
Taking advantage of PracticeMaster filters will greatly enhance your ability to quickly and easily find exactly what you need.
Training Videos can be accessed 24 hours a day, 7 days a week, at Tabs3.com/videos. You can also access Training Videos while in the software by selecting Help | Documentation and then clicking the See also link for Tabs3 and PracticeMaster Training Videos.

I’m getting ready to configure contact integration with Outlook so I can sync my PracticeMaster contacts to my phone. However, I don’t want my private Outlook contacts syncing to PracticeMaster, nor do I want all of the contacts in PracticeMaster to sync to my phone, just the ones applicable to me. How can I accomplish this?
PracticeMaster’s Contact integration with Outlook provides the ability to restrict which contact records synchronize between PracticeMaster and Outlook. When configuring Contact syncing, you can optionally specify to not include Outlook private contacts as well as which contacts are synced to your Outlook folder.
Common filters are based on the User/Group or the Category fields in the Contact file. Alternatively, you can create a custom filter to further narrow which contacts you want to sync to Outlook. Our example will filter contacts based on the User/Group field.
To configure contact synchronization for your User ID to integrate with Outlook
- From the Maintenance menu, point to Integration and select Outlook Synchronization.
- On the Contacts tab, select the PracticeMaster to Outlook and Outlook to PracticeMaster check boxes. Select Automatic option for each.
Note: To prevent your private contacts from synchronizing, make sure that the Include private Outlook contacts check box is not selected. - In the Synchronization Options section, click the Select Folder button and select the appropriate Outlook Contacts folder.
- In the User Filter section:
- Select the Sync contacts assigned to these users check box, and then select your User ID.
- Select the Exclude contacts with no users defined check box.
- Click OK.
Because a critical setting was changed, you will be required to resynchronize with Outlook before continuing. If prompted to confirm changes, review the list of changes and, once satisfied with the changes, click Synchronize.
Note: If you have any questions regarding the above steps, please contact Tabs3 Technical Support at 402-419-2210 or your IT professional.
For complete information on Outlook Integration, refer to our Outlook Integration Guide at Tabs3.com/support/docs.html.
We’ve had several calendar records come up missing in both PracticeMaster and Outlook. We believe the entries were deleted sometime yesterday. Is there an easy way to find out what those records were so we can add them back into PracticeMaster if necessary?
Because the calendar entries were synchronized between PracticeMaster and Outlook, the Outlook Sync Log can be used to help determine if records were deleted. The Outlook Sync Log keeps track of every add, change, or delete that passes between Outlook and PracticeMaster.
Because the Outlook Sync Log records everything that synchronizes between PracticeMaster and Outlook, it can be quite large. Fortunately, we can create a filter to help narrow down the records we want to look at.
To filter the Outlook Sync Log for deleted records
- From the View menu, point to Log Files and select Outlook Sync Log.
- From the Quick Clicks pane, expand the Filter group and select Manage Filters.
- Press Ctrl+N.
- Enter the desired Filter Name (e.g., “Sync Items on 7/16/2018”).
- Click the New Row button.
- Select Sync_Date and then click the Select button.
- In the Test Condition column, select Greater than or Equal To.
- In the Test Value column, enter yesterday’s date (e.g., “07/16/2018”).
- Click the New Row button.
- Select Action and then click Select.
- In the Test Value column, enter “D”.
- Click Save.
Once the filter is enabled in the Quick Clicks pane, only those records that were deleted during the sync will be shown. You can then determine if records need to be added back into PracticeMaster based on record information in the Outlook Sync Log including the calendar Description, Owner (User), and Due Date/Time.
If you do not see the record(s) you are expecting, keep in mind that it’s also possible for records to appear deleted when they were actually changed (e.g., removing a User from the record, changing the Due Date field, etc.). If you want to look for changed records, instead of deleted records, simply change the filter’s Test Value from “D” to “U” in step 6b above.
For more information on PracticeMaster’s integration with Outlook, please see our Outlook Integration Guide.
Did you know that there are several ways of filtering your reports and statements so that you only see the data you want to see? Most reports have a Client tab and several reports have a Transactions tab. Likewise, when generating statements, both the Client tab and the Transactions tab are available. These tabs provide options for which clients and/or transactions are to be included on the report.
Client tab
The Client tab provides the ability to select a client range based on several different factors including the Client ID, Name Search, Primary/Secondary/Originating Timekeeper, Billing Category, Billing Frequency, Location, Status, and Open/Close Date. When filtering by Status, the following options are available: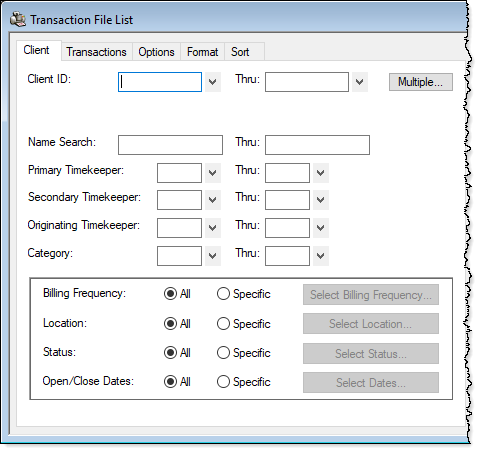
- Active, Inactive, or Both
- Progress, Non-Progress, or Both
- Billable, Non-Billable, or Both
- Task Based, Non-Task Based, or Both
- Release to Bill, Non-Release to Bill, or Both
- Bill on Demand, Non-Bill on Demand, or Both
- Statement Delivery Options
- Mail Statement: Yes, No, or Both
- E-Mail Statement: Yes, No, or Both
Transactions tab
The Transactions tab provides the ability to select a transaction range based on several different factors including whether to include Fees, Expenses, Advances, 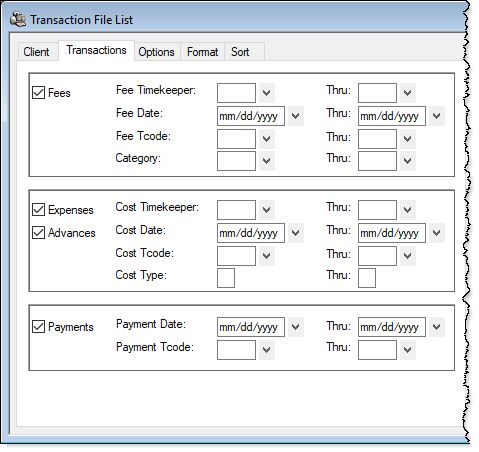 and Payments. Additionally, ranges for Fee/Cost Timekeeper (working timekeeper), Fee/Cost/Payment Date, Fee/Cost/Payment Tcode, Category, and Cost Type are available.
These are the most common options for filtering reports. However, some reports may have additional options to further filter data that are specific to that report. For example, the Transaction File List provides the option to include Work-In-Process and/or Archived transactions, Billable and/or Non-Billable transactions, and more.
So if you’re running reports or statements and you’re getting more clients and/or transactions than you want included, try using the filter options to help fine-tune your report!
Want to know if Platinum is right for your firm? Try out the Tabs3 and PracticeMaster Platinum software risk free for 30 days! This offer allows you to use all of the Platinum features with your own data for 30 days before determining whether Platinum will be a permanent upgrade.
Key features in the Platinum software include:
- Tabs3 Connect – Tabs3 Connect provides secure access to Tabs3 Billing and PracticeMaster anywhere you can connect to the Internet using smartphones, tablets, and computers away from the office. Enter fees and costs, browse client and contact information, see calendar events, receive eNotes and alarm notifications, and more!
- HotBackup – With HotBackup, you can back up your data while others are actively using the software, and maintain up to 198 backups in the location of your choosing. You can schedule data to be backed up automatically for the days and times of your choosing, and designate one or more e-mail addresses to be notified of successful and/or failed HotBackups.
- Transaction Processing and Auto-Recovery – Transaction Processing ensures that database transactions complete successfully, guaranteeing that the database remains in a consistent, reliable state. If an interruption in the network occurs, Auto-Recovery “rolls back” the database to its previous state before the database transaction began, saving you from an entire system restore.
- Tabs3 Billing and PracticeMaster Accelerators – Accelerators run on the server, helping to minimize both the amount of data transferred across the network and the amount of data processed on the workstation. This means that the performance of generating reports and statements is dramatically improved.
- Accelerated Filtering and Column Sorting – PracticeMaster filters and column sorting are processed at the server, similar to the PracticeMaster accelerator, which improves the speed at which lists are displayed.
- eNote – PracticeMaster eNote provides an intra-office way to quickly communicate by blending the best features of instant messaging and e-mail. Send a quick message, or attach a PracticeMaster file such as a calendar or journal record for review. If you don’t want to be bothered, you can even set your status to “Do Not Disturb.”
- Exchange Connector – If your firm uses Microsoft® Exchange, the PracticeMaster Exchange Connector can provide a direct link between the Platinum Server and the Exchange Server. Set up a single administrative user with rights to all calendars and contacts, and information can be synchronized between servers instead of users.
- Lockout Notification/Log Off Users – The Conflicting Activities window includes two buttons: a Notify button and a Log Off Users button. The Notify button informs logged in users that a lockout has been initiated, requesting they save their work and log off. The Log Off Users button is a way to safely log users out of the software. This button informs users that they will be logged out of the software after a specified amount of time, and provides the reason why they are being logged off.
- Accounts Receivable by Timekeeper Report – The Accounts Receivable by Timekeeper Report prints a list of clients with fees due for each working timekeeper, making it easy for individual timekeepers to see which clients owe money for work they performed. This report is different from other receivable reports because it allows you to filter clients by including only those clients that the timekeeper worked on, a particularly nice feature for larger firms.
- Enhanced Detail Accounts Receivable Report – The Detail Accounts Receivable Report offers the option to include a breakdown of fees by timekeeper, and costs by cost type. When this option is enabled, each timekeeper with outstanding fees is displayed on a separate row with an aging breakdown, and outstanding costs are grouped by cost type with an aging breakdown.
For more information on the 30 day trial offer, visit Knowledge Base Article R11261, “Platinum Version Net 30 Trial Plan,” and then contact your local consultant or contact our Sales Department at 402-419-2200 to take advantage of this great offer!
If you mark clients as Inactive, you likely do not want to see them most of the time. In both Tabs3 Billing and PracticeMaster, you can use filters to include or exclude inactive clients.
Tabs3 Billing
In Tabs3 Billing, you can include or exclude inactive clients from the Client Lookup window, reports, and statements.
- Client Lookup window – Select or clear the Show Inactive check box in the lookup window.
- Reports and Statements – On the Client tab of reports and statements, select a Status of Specific, and then click the Select Status button. Select Active or Inactive.
PracticeMaster
In PracticeMaster, you can include or exclude inactive clients from the List tab of any file, the Client Lookup window, the Client Inactivity Report, and Report Writer Reports.
- List tab and lookup windows:
- Client file and Client Lookup windows – To show only active clients, click Active Only in the Client List section of the Quick Clicks pane. To show only inactive clients, you can add a filter using an expression of “Inactive = 1”.
- All other files – Filters to show only active or inactive clients can be added to any file that includes the Client ID field. To show only records with active clients, you can add a filter using an expression of “Client_ID:Inactive = 0”. To show only inactive clients, you can add a filter using an expression of “Client_ID:Inactive = 1”.
- Reports:
- Client Inactivity Report – On the Client tab of the Client Inactivity Report, select a Status of Specific, and then click the Select Status button. Select Active or Inactive.
- Report Writer Reports – An expression can be added to the Filter tab of any Report Writer Report. To show only records with active clients, you can add a filter using an expression of “Client_ID:Inactive = 0”. To show only inactive clients, you can add a filter using an expression of “Client_ID:Inactive = 1”.
