
WorkFlows are a powerful tool, but what exactly are WorkFlows and how are they set up?
WorkFlows provide the ability for users to initiate predefined actions to occur based on creation, changes, or deletions of other records. WorkFlows provide streamlining of common tasks by automatically starting another task related to the previous creation or change. For example, you can create a WorkFlow that automatically begins an email to a colleague when a new journal record is added for their client, that automatically begins Word Document Assembly to create a welcome letter when a new client is added, that automatically sends an eNote when a record is deleted, and more!
Knowledge Base Article R11307, “All About WorkFlows,” provides an overview of WorkFlows, examples that break down how WorkFlows are set up, best practices, technical information, and frequently asked questions about WorkFlows.
Our Knowledge Base can be accessed at support.Tabs3.com. You can also access our Knowledge Base in the Quick Launch by searching for and selecting “Knowledge Base.”

In a law firm, there can be an overwhelming amount of information to keep track of and work with – case information, contact information, upcoming meetings, research, emails, and documents galore. PracticeMaster can help make you more organized than you’ve ever been before. PracticeMaster provides the tools you need to manage it all.
Calendar – View not just your calendar, but all appointments for everyone in your office. View appointments for a specific client or matter, an employee, or view appointments based on any information in the calendar record such as date, calendar code, and location.
Contacts – Don’t just search your list of contacts; see all the contacts for any matter at a glance, and every matter in which a particular contact is involved.
Document Management – Tell PracticeMaster how you want to name and sort your documents, and then let PracticeMaster do it for you! Quickly see all documents for a case, or different versions of the same kind of documents across all your cases.
Matter Manager – Tie everything for a matter together in one place: calendar records, contacts, email, meeting notes, documents, billing summary, and more!
Conflict of Interest – Determine any potential conflicts by searching files, documents, email attachments, and contacts for key words. Optionally limit results to certain files, and more.
Timers – Use timers to track your time, phone tasks, and research. Switch between timers as needed, and then process timer records into fees!
Filtering – Add filters to your files so that you can easily see only those records that you want to see.
QuickViews – QuickViews combine a filter, column layout, and sort option into a tab at the top of the List tab of any file, which allows you to quickly switch your view depending on the records you are working with. Add Smart tabs to provide an additional level of record sorting.
Integration – Integrate calendar records and contacts with Outlook. Install the PracticeMaster toolbar in Microsoft Outlook, Word, Excel, and PowerPoint; Adobe Reader or Acrobat; Corel WordPerfect; and Ricoh ScanSnap to save documents and research to PracticeMaster, or to create journal entries, calendar entries, or fees from within the other software. Integrate with Tabs3 CRM, LexShare, NetDocuments, and CalendarRules.
Areas of Practice – Areas of Practice provide a way to save separate information for different types of matters, without having the clutter of everything all in one file or set of files.
Report Writer – Create custom reports using the data stored in PracticeMaster.
WorkFlows – Help automate your workload by creating WorkFlows to automatically start tasks or notify other users based on specified events.
Document Assembly – Help automate form letters by creating document templates that pull information from any file in PracticeMaster. Once created, simply select the client and the template, and it does the rest.
For more information about PracticeMaster features or to purchase a license of PracticeMaster, contact your local consultant, or contact our Sales Department at (402) 419-2200.
What are expressions, and how can your firm use them to improve your day-to-day activities? An expression is a set of criteria you define that tells the software what records to display, and in some cases, how to display it. Filters are the most common expressions, but expressions can also be used in Report Writer reports, WorkFlows, Word Document Assembly, and Outlook Synchronization.
- Filter expressions help narrow down the records that are displayed in Tabs3 Billing lists and PracticeMaster files, and can be used in QuickViews.
- Expressions in Report Writer reports can filter the records to be included as well as format how data is shown on the report.
- Expressions can be used in WorkFlows to filter the records affected by the WorkFlow, as well as to format text in records, email messages, and more.
- Expressions in Word Document Assembly can be used to filter records, as well as to format text that appears in the assembled document.
- Expressions in Outlook Synchronization can be used to filter the contact records that are synchronized with Outlook.
So how can you learn more about expressions? Knowledge Base Article R11493, “All About Expressions,” provides the basics on expressions by breaking information down to explain what expressions are, where they’re used, and common terminology associated with them. This article also shows you how to create both simple and advanced expressions, provides filter examples, and has tips for making the most of filter expressions. To go one step further, for a list of more than 60 filter expression examples, including the file and scenario in which it would be used, visit Knowledge Base Article R11515, “Filter Expression Examples.” Take a little time to check out these resources so you can put this powerful feature to work for you and your firm!
Our Knowledge Base can be accessed at support.Tabs3.com. You can also access our Knowledge Base in the Quick Launch by searching for and selecting “Knowledge Base.”

Did you know that you can automate certain tasks in PracticeMaster, such as generating a document when a new client is saved or adding a fee when a calendar record is updated? Using WorkFlows, you can streamline your day by automatically starting designated tasks based on the creation, changes, or deletions of other records.
Watch this four-minute video here:
Training Videos can be accessed at Tabs3.com/videos. You can also access the videos while in the software by selecting Help | Training Videos.
Every time you open a new matter, what other tasks do you need accomplished? Many items on your to-do list are likely predictable and repetitive. There are people to email, documents to collect, records to update, and the list goes on. Although PracticeMaster can’t do everything on your to-do list, WorkFlows automate many tasks so that you can spend more of your time on the things that need your personal attention.
PracticeMaster WorkFlows react to tasks or activities and start a chain of events that you define in advance. For example, every time you schedule a client meeting, you can use a WorkFlow to assemble an email to the client with meeting details and directions to your office.
You can use WorkFlows to help make sure your office procedures are always followed. For example, if it is your policy that internal meetings are not billed to a client, set up a WorkFlow that will display a popup message when an employee converts an internal meeting to a fee: “You have billed for an internal meeting. Please confirm this is correct.”
WorkFlows can help you keep clients and colleagues informed. When an important milestone in a matter is reached, such as a deposition or court date is set, a WorkFlow can make sure you email all staff and clients involved to let them know. It can also schedule the next calendar milestone, update fields in a file, such as date last contacted or a change to the status, and more. If you use PracticeMaster Platinum, WorkFlows can also send eNotes (with linked PracticeMaster records) around the office to keep everyone on the same page.
WorkFlows are highly customizable and nearly limitless. Each WorkFlow can launch up to 10 activities, including adding or changing records, processing calendar plan templates, running reports, starting a backup, and more. WorkFlows can also create the scenario(s) that will launch additional WorkFlows. WorkFlows can be automatic, with or without confirming that the WorkFlow will launch. You also have the option to set up a user activated WorkFlow that launches when you manually activate it.
Other examples of WorkFlows:
- Update the last contact date for a client every time you add information to their journal.
- Assemble a client welcome letter when a new client is added.
- Launch a conflict of interest search every time you add a contact.
- Generate CalendarRules – new in Version 2020!
For more information and ideas on WorkFlows that you can use in your office (including instructions for setting them up), check out article R11307, “All About WorkFlows,” in our Knowledge Base.

I represent an insurance company with over 80 active matters. This company is now requiring fee descriptions to not exceed 300 characters. Is there a way to put a character limit on fees for a single client?
When entering fees in PracticeMaster, an automatic WorkFlow can be configured with a filter to only trigger when fee descriptions exceed 300 characters for a specific range of matters or clients.
To create a WorkFlow that prompts the user when a fee description is too long
- From the Maintenance menu, select WorkFlows.
- Expand Common Client Related Files, select the Fee file, and then click the New button.
- Enter a Name for the WorkFlow (e.g., “Desc Character Limit Exceeded”).
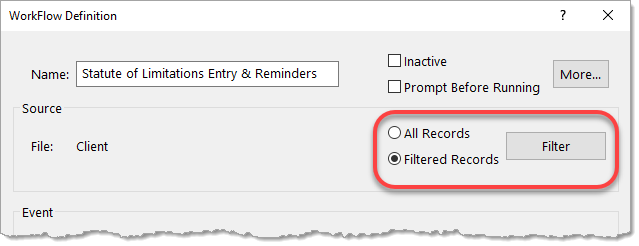
- In the Source section, select Filtered Records, and then click Filter.
- Click the New Row button, select Client ID, and then click Select.
- In the Test Condition column, select greater than or equal to.
- In the Test Value column, enter the lowest Client ID that requires the character limit (e.g., “415.00”).
- Click the New Row button, select Client ID, and then click Select.
- In the Test Condition column, select less than or equal to.
- In the Test Value column, enter the highest Client ID that requires the character limit (e.g., “415.99”).
- Click the New Advanced Row button.
- In the Advanced Expression Editor window, select Function.
- Select LEN and click Insert.
- With the cursor between the parentheses, click Field.
- Select Description and click Select.
- With the cursor at the end of the expression, select Operator.
- Select Greater than and click Insert.
- Enter the character limit (e.g., “300”) and click OK.
- In the Advanced Expression Editor window, select Function.
- Click Save.
- Click the New Row button, select Client ID, and then click Select.
- In the Event section, select Record Added and Record Changed.
- In the Actions section, click New.
- Select Change Record, and then click Next.
- Select Source Record, and then click Define Template.
- Click the set button next to Description.
- In the Template Expression Editor window, click Field.
- Select a Field ID of Description and then click Insert.
- Click OK.
- Press Ctrl+S.
- Click Finish.
- Click New again.
- Select Display Message, and then click Next.
- Click the Title field.
- In the Template Expression Editor window, click Value.
- Enter the title for the message (e.g., “Description Character Limit Exceeded”) and then click OK.
- Click OK.
- Optionally select an Icon.
- Click the Body field.
- In the Template Expression Editor window, click Value.
- Enter the message to be displayed (e.g., “The description you have entered for the recently saved fee has exceeded the description limit defined by the client. Please edit the description to be less than 300 characters”) and then click OK.
- Click OK.
- Click Finish.
- Click Save.
You now have a WorkFlow that is automatically triggered when the length of a fee description exceeds a set number of characters for a particular Client ID range. A prompt is displayed letting the user know that the description is too long for that client and reopens the record for editing.
Note: WorkFlows are a PracticeMaster-only feature. Fees entered or edited in Tabs3 will not trigger the WorkFlow.
For more information on WorkFlows, refer to our PracticeMaster WorkFlows Guide at Tabs3.com/support/docs.html or Knowledge Base Article R11307, “All About WorkFlows.”
I have a WorkFlow that runs every time anything is changed in a client record. Is there a way to set it up so the WorkFlow only runs when a specific field is changed?
WorkFlows can be configured to be run only when a specific field is changed. WorkFlows have the ability to be designed for very specific scenarios, such as when it’s difficult to remember a seldom used step or to correct errors in initial data entry (e.g., changing a client to be Inactive and having a message pop up to verify this is correct).
The Fields section of the WorkFlow Definition window can be used when a specific field needs to be the trigger for the WorkFlow.
- Any Field – When Any Field is selected, the WorkFlow will be triggered if any field is changed in the record. The Any Field selection is ideal in most cases to ensure the WorkFlow runs when a record is edited.
- Selected Fields – Using the Selected Fields option is ideal if you want to limit what changes could trigger the WorkFlow. It allows you to select certain fields so that the WorkFlow is triggered only if those fields are edited (e.g., only when the Name Search field is edited).
- Specific Field – The Specific Field option is designed to run a WorkFlow based on what the field was before or after a change to the record. For example, let’s say you want the WorkFlow to only trigger if a field is cleared. In this scenario, you’d select Specific Field, select the Value After field, and leave the value blank. That tells PracticeMaster to only run the WorkFlow if the field is blank after a user saves the record.
For more information on WorkFlows, refer to our PracticeMaster WorkFlows Guide at Tabs3.com/support/docs.html or Knowledge Base Article R11307, “All About WorkFlows.”
We use the People tab in the Client file to store information for witnesses. However, I have to create a People record every time I add a new witness to the Contact file. Is there any way to do that automatically?
A WorkFlow can be set up to create a People record every time a contact is added with a Category of Witness. When a People record is created, it requires a Client ID be selected for it to proceed. Once the Client ID is selected, the record can be created and saved automatically or be left open for additional information to be added before saving the record.
To automatically create a People record based on a Witness Contact Category
- From the PracticeMaster Maintenance menu, select WorkFlows.
- Expand the Lookup Files folder, select the Contact file and then click the New button.
- Enter a Name for the WorkFlow (e.g., “Auto-Add Witness Record”).
- In the Source section:
- Select the Filtered Records option and click the Filter button.
- Click the New Row button and select a Field Name of RP_Cat.
- Select a Test Condition of “contains”.
- In the Test Value field, enter “Witness”.
- Click the Save button.
- In the Event section:
- Select Record Added.
- Select Selected Field(s) and select RP_Cat.
- In the Actions section, click the New button.
- Select Create New Record and click Next.
- Expand the Common Client Related Files folder from the drop-down list, select People, and then click OK.
- Click the Define Template button.
- Click the set button next to the Contact field.
- In the Template Expression Editor window, click the Field button.
- Select a Field Name of Contact ID and click Insert.
- Click OK.
- Click the set button next to the How Related field.
- In the Template Expression Editor window, click the Value button, and select Witness from the drop-down list.
- Click OK on the Value window.
- Click OK on the Template Expression Editor window.
- Click the set button next to the Notes field.
- In the Template Expression Editor window, click the Value button, and enter “Witness”.
- Click OK on the Value window.
- Click OK on the Template Expression Editor window.
- Press Ctrl+S.
- Click the set button next to the Contact field.
- Click Finish.
- Click Save, and then close the WorkFlows window.
You now have a WorkFlow that will automatically create a People record for you when a contact is added as a Witness.
For more information on WorkFlows, refer to our PracticeMaster WorkFlows Guide at Tabs3.com/support/docs.html or Knowledge Base Article R11307, “All About WorkFlows.”
We have several WorkFlows we’ve created, but some of them seem to trigger more frequently than we’d like. Is there any way we could make the WorkFlows run with more specific criteria?
WorkFlows can take advantage of filtering to ensure they only run when they’re intended to. Filters are used to limit the records you want to display or select and can be used to limit the records shown in PracticeMaster files, Report Writer, Word Document Assembly, Outlook Synchronization, and WorkFlows. Filters can be simple comparisons, or advanced expressions capable of complex functionality.
Let’s take a look at the Filter Editor, and then a few scenarios where you might want to add a filter to your WorkFlows. To add a filter to your WorkFlow, open your WorkFlow via Maintenance | WorkFlows. In the WorkFlow Definition window, select Filtered Records, and click the Filter button.
In the Filter Editor, you can click New Row to add a simple row, or click New Advanced Row to create a more complex filter.
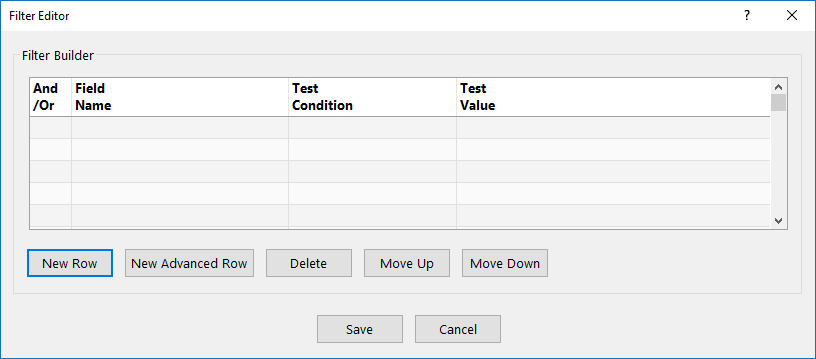
- Simple rows – Adding a standard row to the Filter Editor allows you to compare a field against a limited number of values. This allows you to easily test for blank values, common date ranges, or a specific record.
- Advanced rows – Using fields, functions, and operators, you can construct an expression by adding an Advanced Row to the Filter Editor. You can test against any range of values, or use functions to generate different values for different situations.
Below are a few scenarios where filtering the records that run the WorkFlow can help prevent the WorkFlow from running too often.
Scenario 1
Whenever we add a new Contact, our WorkFlow to create a new client record always triggers. However, we only need it to run when the contact has a Contact Category of “Client”.
To create a filter so the WorkFlow only triggers for a Contact Category of “Client”
- Open your WorkFlow.
- In the Source section, select Filtered Records and then click the Filter button to open the Filter Editor.
- Click New Row, select RP_Cat, and then click Select.
- Click in the Test Condition field and select equal to.
- In the Test Value field, enter “Client”.
- Click Save to close the Filter Editor.
- Click Save to close the WorkFlow Definition.
Scenario 2
I have a WorkFlow that starts a fee record when we save a Document Management record. However, we don’t need fees to be created for documents with a DocType of “LTTR”.
To create a filter so the WorkFlow won’t trigger for a DocType of “LTTR”
- Open your WorkFlow.
- In the Source section, select Filtered Records, and then click the Filter button to open the Filter Editor.
- Click New Row, select Doc_Type, and then click Select.
- Click in the Test Condition field and select not equal to.
- In the Test Value field, enter “LTTR”.
- Click Save to close the Filter Editor.
- Click Save to close the WorkFlow Definition.
Scenario 3
Our firm has a WorkFlow that recreates calendar records every time they’re deleted to prevent employees from accidentally deleting other people’s appointments. However, we do not want it to run when employees delete their own records.
This is a slightly more complicated scenario, but we can add an Advanced Row to compare the User ID assigned to the Calendar record with the User ID that is currently logged in by utilizing the UserID$ function. The UserID$ function always specifies the User ID logged into the software.
To create a filter so that employees can delete their own calendar records
- Open your WorkFlow.
- In the Source section, select Filtered Records and then click the Filter button to open the Filter Editor.
- Click New Advanced Row to open the Advanced Expression Editor window.
- Click the Field button, select User_ID, and then click Select.
- Click the Operator button, select not equal to, and then click Insert.
- Click the Function button, select UserId$, and then click Insert.
- Verify the Expression shows “User_ID != UserId$()”, and then click OK.
- Click Save to close the Filter Editor.
- Click New Advanced Row to open the Advanced Expression Editor window.
- Click Save to close the WorkFlow Definition.
For more information on filter expressions, including using them in WorkFlows, take a look at Knowledge Base Article R11493, “All About Expressions.”
I use Word Document Assembly to assemble forms for my business clients. After I save the forms to PracticeMaster as documents, I always create a fee for certain hours and amount values based on the template I’m assembling (defined by Document Type) and write an email to the client. Is there a way for PracticeMaster to automate some of this for me?
This can be accomplished by creating a WorkFlow that prompts the user if they’d like it to run when a Document Management record is created with a particular Document Type (e.g., “Form” or “Proposal”). Fee and email values will be entered automatically.
Once the WorkFlow completes, the document can easily be attached to the email.
To automatically create a fee and start an email every time Document Management records are added with certain Document Types
- From the Maintenance menu, select WorkFlows.
- Under Common Client Related Files, select Document Management, and then click the New button.
- Enter a Name for the WorkFlow (e.g., “Create Fee and Email”).
- In the Source section:
- Select the Filtered Records option and click the Filter button.
- Click the New Row button and select the Document Type field (Doc_Type).
- Select a Test Condition of “equal to”.
- In the Test Value field, select the desired Document Type (e.g., Form).
- Click the Save button.
- In the Event section, select Record Added.
- In the Actions section, click the New button.
- Select Create New Record and click Next.
- Under Common Client Related Files, select Fee and click OK.
- Click the Define Template button.
- Click the set button next to the Client ID field.
- In the Template Expression Editor window, click the Field button, select “Client_ID”, and then click Insert.
- Click OK.
- Click the set button next to the Hours Worked field.
- In the Template Expression Editor window, click the Value button, enter the desired number of hours worked (e.g., “0.50”), and then click OK.
- Click OK.
- Click the (Save) button.
- Click the set button next to the Client ID field.
- Click Finish.
- In the Actions section, click the New button.
- Select Start Email and click Next.
- Click in the To field.
- In the WorkFlow Expression Editor window, click the Field button, select “Client_ID”, and then click Insert.
- At the end of the expression, enter “:Email_Address”, and then click OK.
- Click in the Subject field.
- In the WorkFlow Expression Editor window, click the Value button, enter the applicable text for the subject (e.g., “A document has been created.”), and then click OK.
- Click OK.
- Click in the Body field.
- In the WorkFlow Expression Editor window, click the Value button, enter the applicable text (e.g., “The requested document has been created and attached.”), and then click OK.
- Click OK.
- Clear the Include event information checkbox.
- Click Finish.
- Click Save.
When run, this WorkFlow will start an email to which the document can be attached. To attach the document to the email, select the PracticeMaster tab of the email, click Attach PM Document, and then select the new Document Management record from the list.
Note: This WorkFlow can be created for each Document Type, as needed.
For more information on WorkFlows, refer to our PracticeMaster WorkFlows Guide at Tabs3.com/support/docs.html or Knowledge Base Article R11307, “All About WorkFlows.”
I love the way the Calendar Plans work, but I’d also like to have a new Task record created with an appropriate Due Date based on when the previous Task was completed. For example, after I send the check to the filing clerk, I need a task to confirm I’ve received the file marked petition from the clerk.
This can be accomplished by creating a WorkFlow that will automatically trigger whenever a calendar record with a particular calendar code (e.g., “FC”) is marked as completed. The WorkFlow will create a calendar entry populated with field values specified in the WorkFlow itself. For our example, the calendar entry will include the following:
- Due Date ten days after Date Completed of prior task.
- Calendar Code of “AD”
- Description of “Answer to complaint due”
- Task with a Start Time of 8:00 A.M.
- Alarm Time set for 0 Minutes
- The same Client ID selected
To automatically create the next Calendar entry every time one is completed in the set
- From the PracticeMaster Maintenance menu, select WorkFlows.
- Select the Calendar file, and then click the New button.
- Enter a Name for the WorkFlow (e.g., “Answer to Complaint Due Date”).
- In the Source section:
- Select the Filtered Records option and click the Filter button.
- Click the New Row button and select a Field Name of Calendar Code.
- Select a Test Condition of equal to.
- In the Test Value field, select a Calendar Code of FC.
- Click the Save button.
- In the Event section:
- Select Record Changed.
- Select Specific Field and choose Complet_Dt.
- Select Value Before, leaving the value blank (mm/dd/yyyy).
- In the Actions section, click the New button.
- Select Create New Record and click Next.
- Select Calendar from the drop-down list and click OK.
- Click the Define Template button.
- Click the set button next to the Due Date field.
- In the Template Expression Editor window, click the Field button.
- Select a Field ID of “Complet_Dt” and click Insert.
- The following will now be displayed: “@SrcRec:Complet_Dt”. After this, enter “+10”. The following will now be displayed:
“@SrcRec:Complet_Dt+10”. - Click OK.
- Click the set button next to the Calendar Code field.
- In the Template Expression Editor window, click the Value button, and select “AD” from the Lookup Window.
- Click OK on the Value window.
- Click OK on the Template Expression Editor window.
- Click the set button next to the Description field.
- In the Template Expression Editor window, click the Value button, and enter “Answer to complaint due”
- Click OK on the Value window.
- Click OK on the Template Expression Editor window.
- Click the set button next to the Type field.
- In the Template Expression Editor window, click the Value button, and select “T” from the drop-down list.
- Click OK on the Value window.
- Click OK on the Template Expression Editor window.
- Click the set button next to the Start Time field.
- In the Template Expression Editor window, click the Value button, and enter “08:00:00 AM”.
- Click OK on the Value window.
- Click OK on the Template Expression Editor window.
- Click the set button next to the Alarm Time field.
- In the Template Expression Editor window, click the Value button, and select “0 Minutes” from the drop-down list.
- Click OK on the Value window.
- Click OK on the Template Expression Editor window.
- Click the set button next to the Client ID field.
- In the Template Expression Editor window, click the Field button.
- Select a Field ID of “Client_ID” and click Insert.
- Click OK.
- Press Ctrl+S.
- Click the set button next to the Due Date field.
- Click Finish.
- Click Save, and then close the WorkFlows window.
You now have a WorkFlow that will create a customized calendar entry based on the completion dates of the prior task. This can be reapplied as many times as is necessary for the series to be completely automated as things are marked completed.
For more information on WorkFlows, refer to our PracticeMaster WorkFlows Guide at Tabs3.com/support/docs.html or Knowledge Base Article R11307, “All About WorkFlows.”
I know that I can synchronize only my PracticeMaster contacts with Outlook by specifying a User Filter via the Outlook Synchronization Settings. However, is there a way I can add my User ID into the User/Group field of all the contact records for my clients all at once?
A User Activated WorkFlow can be created and then run on selected records in the Client file. By not specifying a User ID in the WorkFlow, and instead having the WorkFlow use the User ID of the currently logged in User, anyone can run the WorkFlow. You can use the Search box or create a filter to display the desired clients prior to running the WorkFlow.
To create a WorkFlow that adds a User ID to the User/Group field of the linked Contact records
- From the Maintenance menu, select WorkFlows.
- Select the Client file, and then click the New button.
- Enter a Name for the WorkFlow (e.g., “Add my User ID to Contacts”).
- In the Event section, select User Activated.
- In the Actions section:
- Click the New button.
- Select Change Record and click Next.
- Select Linked Record and in the Link field, select Name.
- Click Define Template.
- Click the set button next to the User/Group field.
- In the Template Expression Editor window, click the Field button.
- Select a Field ID of Name and click Insert.
- Enter “:GroupInfo” immediately following the field name.
- Click the Operator button, select Addition, and then click the Insert button.
- Click the Value button and enter “, ” and click OK.
- Click the Operator button, select Addition, and then click the Insert button.
- Click the Function button and select UserID$(). The following will be displayed: “@SrcRec:Name:GroupInfo + “, ” + UserId$()”.
- Click OK on the Template Expression Editor window.
- Press Ctrl+S.
- Click the set button next to the User/Group field.
- Click Finish.
- Click the New button.
- Select Change Record and click Next.
- Select Linked Record and in the Link field, select Contact.
- Click Define Template.
- Click the set button next to the User/Group field.
- In the Template Expression Editor window, click the Field button.
- Select a Field ID of Contact and click Insert.
- Enter “:GroupInfo” immediately following the field name.
- Click the Operator button, select Addition, and then click the Insert button.
- Click the Value button and enter “, ” and click OK.
- Click the Operator button, select Addition, and then click the Insert button.
- Click the Function button and select UserID$(). The following will be displayed: “@SrcRec:Contact:GroupInfo + “, ” + UserId$()”.
- Click OK on the Template Expression Editor window.
- Press Ctrl+S.
- Click the set button next to the User/Group field.
- Click Finish.
- Click Save.
This WorkFlow is now ready to be run for selected clients.
For more information on WorkFlows, refer to our PracticeMaster WorkFlows Guide at Tabs3.com/support/docs.html or Knowledge Base Article R11307, “All About WorkFlows.”
I want a reminder to be shown a week prior to my hearings in addition to the alarm I have set on the record. However, I also want the reminder to synchronize to my Outlook calendar. How can I accomplish this?
PracticeMaster Reminders do not synchronize over to Outlook. However, a WorkFlow can be set up that will automatically create additional calendar records as “reminders” in PracticeMaster when a certain calendar code is used. Because we are creating separate calendar records, they will then synchronize over to Outlook.
To create a WorkFlow that adds additional calendar records based on Calendar Code
- From the Maintenance menu, select WorkFlows.
- Select the Calendar file, and then click the New button.
- Enter a Name for the WorkFlow (e.g., “Reminder Calendar Records”).
- In the Source section:
- Select the Filtered Records option and click the Filter button.
- Select a Field Name of Calendar Code.
- Select a Test Condition of equal to.
- In the Test Value field, select a Calendar Code of Hearing.
- Click the Save button.
- In the Event section:
- For Type, select Record Added and Record Changed.
- For Fields, select Selected Field(s).
- Click the Select Fields button, select the Due_Date field, and then click the OK button.
- In the Actions section, click the New button.
- Select Create New Record and click Next.
- Select the Calendar file and click OK.
- Click the Define Template button.
- Click the set button next to the Due Date field.
- In the Template Expression Editor window, click the Function button.
- Select the DATEADD function and click Insert.
- Move your cursor between the parentheses and enter ‘-1, “w”,’
- Click the Field button, select Due Date, and then click Insert. The following will now be displayed:
DATEADD(-1, “w”,@SrcRec:Due_Date) - Click OK on the Template Expression Editor window.
- Click the set button next to the Description field.
- In the Template Expression Editor window, click the Value button and enter the desired text [e.g., “Reminder for Hearing – ” (including the dash and spaces)].
- Click OK on the Value window.
- Click the Operator button, select Addition, and click Insert.
- Click the Field button, select the Description field and click Insert.
- Click OK on the Template Expression Editor window.
- Click the set button next to the User/Group field.
- In the Template Expression Editor window, click the Field button.
- Select User ID and click Insert.
- Click OK on the Template Expression Editor window.
- Press Ctrl-S.
- Click the set button next to the Due Date field.
- Click Finish.
- Click Save.
The specified user will now have an automatic reminder set up for one week prior to a record with a Calendar Code of “Hearing”.
For more information on WorkFlows, refer to our PracticeMaster WorkFlows Guide at Tabs3.com/support/docs.html or Knowledge Base Article R11307, “All About WorkFlows.”
I love PracticeMaster’s Convert to Fee feature because it takes information from the journal file and quickly turns it into a fee without me having to start from scratch and retype everything. Is there any way to make other tasks this easy?
You can turn any number of tasks into single click functions using WorkFlows.
When the User Activated check box is selected in a WorkFlow, the WorkFlow will be included in the WorkFlow group of the Quick Clicks pane for the selected file. This allows you to manually run the WorkFlow on demand for the selected records.
For example, let’s say that when a client calls in to set up an appointment, you want to quickly and easily add a calendar record. A User Activated WorkFlow can be created in the Client file so that when the client calls in to make an appointment, you can click the WorkFlow and have the calendar record automatically created with the Client ID, Description, Calendar Code, and Alarm already filled in.
To create a User Defined WorkFlow
- From the Maintenance menu, select WorkFlows.
- Select the desired file (e.g., Client).
- Click the New button.
- Enter a Name for the WorkFlow (e.g., “Create Appointment”).
- In the Event section, select the User Activated check box.
- Complete the WorkFlow by setting up the desired actions and clicking Save.
Keep in mind that WorkFlows that do not have the User Activated check box selected will not be available in the WorkFlow group of the Quick Clicks pane, and will only run when triggered. However, you can optionally make WorkFlows that automatically run when records are added, changed, or deleted also run on demand by selecting the User Activated check box. This can help provide more flexibility in a WorkFlow that sometimes needs to run automatically and sometimes on demand.
For more information on WorkFlows, refer to our PracticeMaster WorkFlows Guide at Tabs3.com/support/docs.html or Knowledge Base Article R11307, “All About WorkFlows.”
When we create Calendar records for matters, we like to have the Primary Timekeeper listed in the Description field to indicate who’s leading the meeting. Is there a way to have that information automatically added so users don’t have to check the Client file to find out who the Primary Timekeeper is?
You can create WorkFlows so that each time you add a record to the Calendar with the Client ID field populated, the Primary Timekeeper’s name will be added to the beginning of the Description field.
To create a WorkFlow that adds the Primary Timekeeper’s name to the Description field
- From the Maintenance menu, select WorkFlows.
- Select the Calendar file, and then click the New button.
- Enter a Name for the WorkFlow (e.g., “Primary Timekeeper on Calendar”).
- In the Source section:
- Select the Filtered Records option and click the Filter button.
- Select a Field Name of Client ID.
- Select a Test Condition of not equal to.
- Leave the Test Value field blank.
- Click the Save button.
- In the Event section, select Record Added.
- In the Actions section:
- Click the New button.
- Select Change Record and click Next.
- Select Source Record and click the Define Template button.
- Click the set button next to the Description field.
- In the Template Expression Editor window, click the Field button.
- Select a Field ID of “Client_ID” and click Insert.
- Enter “:Prim_Tkpr:Name” immediately following the field name. The following will now be displayed: “@SrcRec:Client_ID:Prim_Tkpr:Name”.
- Click the Operator button, select Addition, and then click the Insert button.
- Click the Value button and enter “ – ”.
- Click the Operator button, select Addition, and then click the Insert button.
- Click the Field button, select a Field ID of Desc, and then click the Insert button. The following will now be displayed: “@SrcRec:Client_ID:Prim_Tkpr:Name +” – ” +@SrcRec:Desc”.
- Click OK on the Template Expression Editor window.
- Press Ctrl+S.
- Click the set button next to the Description field.
- Click Finish.
- Click Save.
For more information on WorkFlows, refer to our PracticeMaster WorkFlows Guide at Tabs3.com/support/docs.html or Knowledge Base Article R11307, “All About WorkFlows.”
We use Word Document Assembly and often have to send several subpoenas at a time. Is there a way that PracticeMaster can prompt us to keep running Word Document Assembly until we are done?
You can create a WorkFlow so that each time you add a record to Document Management with a Document Type of subpoena (e.g., SUB), you will be prompted to run Word Document Assembly. This allows you to keep taking advantage of Word Document Assembly automatically running, but provides the option to click No to the prompt once you are done.
To create a WorkFlow that prompts you to run Word Document Assembly
- From the Maintenance menu, select WorkFlows.
- Expand the Common Client Related section, select Document Management, and then click the New button.
- Enter a Name for the WorkFlow (e.g., “Create Another SUB”).
- In the Source section:
- Select Filtered Records and then click the Filter button.
- Click the New Row button.
- In the Name column, select Doc_Type.
- Click the Select button.
- In the Test Value column, click the drop-down arrow and select the document type you use for subpoenas (e.g., SUB).
- Click Save.
- In the Events section, select Record Added.
- In the Actions section:
- Click the New button.
- Select Start Document Assembly and then click Next.
- In the Document Template field, click the
 (Open Folder) button.
 - Select the Word Document Assembly template you use for subpoenas (e.g., “Witness Subpoena”).
- Click Finish.
- Click Save, and then close the WorkFlows window.
For more information on WorkFlows, refer to our new PracticeMaster WorkFlows Guide at Tabs3.com/support/docs.html or Knowledge Base Article R11307, “All About WorkFlows.”
When the attorneys enter notes into journal records and then convert them to fees, their entire journal description goes into the fee and they have to edit it. Is there a way to only pull in a partial description when converting a journal record into a Fee?
A WorkFlow can be configured to edit a field provided there is a consistent character (or set of characters) indicating where the fee’s description begins. For our example, we will use “***” as an indicator. With a WorkFlow set up to automatically edit the description field of a new fee, the journal record will retain the original text, but only the text after “***” will be included in the fee. Additionally, if an attorney wants an entire journal record’s description included, they simply have to omit the character (or set of characters) from the description.
For example, let’s say a journal record that you will convert to a fee includes the text “could not find precedence.” You don’t want your client to see this on their bill. With this WorkFlow, you could change the description to “could not find precedence *** Research,” and when the WorkFlow runs, “Research” is all that will be included in the Fee Description.
To set up a WorkFlow that automatically trims the Description field
- From the Maintenance menu, select WorkFlows.
- Expand the Common Client Related section, select Fee, and then click New.
- Enter a Name for the WorkFlow (e.g., “Edit Description”).
- In the Event section, select the Record Added check box.
- In the Actions section, click New.
- Select Change Record, and then click Next.
- Select Source Record, and then click Define Template.
- Click on the set button next to the Description field.
- In the Template Expression Editor window, click the Function button, select FROM$, and then click Insert.
- From within the parentheses, click the Field button, select Description from the Field ID column, and then click Insert.
- Enter a comma after the field, and then enter “***”.
- The following will now be displayed: “FROM$(@SrcRec:Description,”***”)”. Click OK on the Template Expression Editor window.
- Press Ctrl+S.
- Click Finish.
- Click Save, and then close the WorkFlows window.
Note: This WorkFlow will run for any new fee entry provided that, in this example, there is *** present.
Note: In order for this WorkFlow to run properly, Description Field must be specified as the Default Description for Convert to Fee Settings (Maintenance | Preferences | Convert to Fee Settings).
Note: Before saving the Fee, the additional text will still be shown. The additional text is only removed after the save has been completed.
Alternative Methods: As an alternative, you can use the statement comments attribute in the Journal record for text you don’t want printed on a statement. Using statement comments suppresses the text from printing on a final statement, but displays in red in the Journal and Fee records. Additionally, in draft statements and reports, statement comments will be shown with a strikethrough character (e.g., could not find precedence). To use statement comments, select the desired text, right-click in the Description or Comment field of the journal record, and then select Statement Comment.
Another option to prevent text in the Journal record from being included in the fee description is to specify a different Default Description such as Tcode/Activity Code Description in the Convert to Fee Settings (Maintenance | Preferences | Convert to Fee Settings). This option uses the selected Tcode’s default description for the fee instead of the text from the Journal record.
For more information on WorkFlows, refer to our new PracticeMaster WorkFlows Guide at Tabs3.com/support/docs.html or Knowledge Base Article R11307, “All About WorkFlows.”
Whenever we add new clients, we always add the contact record first, during their consult. Is there a way to assign the “Client” Contact Category to a contact record every time a client is added?
You can set up a WorkFlow so that every time a client record is added, the contact record is updated with “Client” as a Contact Category in addition to any other contact categories already assigned. If the contact already has a contact category of Client assigned, it will not be added again.
To create a WorkFlow to add “Client” as a Contact Category when a client is added
- From the Maintenance menu, select WorkFlows.
- Select Client, and then click the New button.
- Enter a Name for the WorkFlow (e.g., “Add Client Contact Category”).
- In the Source section, select All Records.
- In the Events section, select Record Added.
- In the Actions section:
- Click the New button.
- Select Change Record and click Next.
- Select Linked Record.
- From the Link field, select Name.
- Click the Define Template button.
- Click the set button next to the Category field.
- In the Template Expression Editor window, click the Field button.
- In the Available Records field, select Target Record.
- Select a Field ID of RP_Cat and click Insert. “@Target:RP_Cat” will be shown in the Expression field.
- Click Operator, select Addition, and then click Insert.
- Click Value and enter “; Client” and click OK.
- Click OK on the Template Expression Editor window.
- Press Ctrl+S.
- Click Finish.
- Click Save.
For more information on WorkFlows, refer to our new PracticeMaster WorkFlows Guide at Tabs3.com/support/docs.html or Knowledge Base Article R11307, “All About WorkFlows.”
We have a new employee starting and we need to add her to hundreds of existing Calendar entries. Is there an easy way to accomplish this so that I don’t have to open each calendar record and edit them individually?
A WorkFlow can be created that will add the User ID to the desired calendar records. This WorkFlow will not run automatically, but will run when you click the WorkFlow in the Quick Clicks pane. This allows you the flexibility of selecting only the records to which you want the user added.
Tip: Once the WorkFlow has been created, it can easily be updated for similar scenarios in the future. For example, if you need to add another new employee at a later time, simply edit the existing WorkFlow for the new User ID.
To create a WorkFlow to add a particular User ID to calendar records
- From the Maintenance menu, select WorkFlows.
- Select Calendar, and then click the New button.
- Enter a Name for the WorkFlow (e.g., “SARA added to Calendar Entries”).
- In the Event section, select the User Activated check box.
- In the Actions section, click New.
- Select Change Record, and then click Next.
- Select Source Record, and then click the Define Template button.
- Click on the set button next to the User/Group field.
- In the Template Expression Editor window, click the Field button.
- In the Available Records field, select Source Record (Before the Save).
- Select the GroupInfo Field ID and click Insert.
- Click the Operator button, select Addition, and then click Insert.
- Click the Value button, enter a comma followed by the desired User ID, and then click OK. For our example, enter “,SARA”. The comma is necessary to separate the User ID from the others.
- The following will now be displayed:
‘@SrcRecOrig:GroupInfo +“,SARA”’
Click OK on the Template Expression Editor window. - Press Ctrl+S.
- In the Template Expression Editor window, click the Field button.
- Click Finish.
- Click Save.
To run the WorkFlow, simply open the Calendar file, select the desired calendar records, and then click the WorkFlow from the WorkFlows group of the Quick Clicks pane. All of the selected calendar records will be updated with the new user.
For more information on WorkFlows, refer to our new PracticeMaster WorkFlows Guide at Tabs3.com/support/docs.html or Knowledge Base Article R11307, “All About WorkFlows.”
I want to have an alarm displayed the day before a trial to remind me to dress appropriately, and then a second alarm an hour before I need to be in trial to remind me to leave. However, I don’t want to create a second calendar record to accomplish this. Is there any way to set up two alarms for each calendar record that has a Calendar Code of Trial?
A WorkFlow can be set up for a particular Calendar Code so that whenever the alarm is cleared, PracticeMaster sets the alarm to a new value for you and updates the description to the next action item. For example, when a “1 day” alarm is cleared, PracticeMaster can set the alarm for “1 hour.” This can be desirable if you like the alarms but don’t want to create separate calendar entries for each action item of a task or event.
To create a WorkFlow that sets a new alarm when an alarm is cleared
- From the Maintenance menu, select WorkFlows.
- Select the Calendar file, and then click the New button.
- Enter a Name for the WorkFlow (e.g., “Multiple Alarms”).
- In the Source section:
- Select the Filtered Records option and click the Filter button.
- Select a Field Name of Calendar Code.
- Select a Test Condition of equal to.
- In the Test Value field, select a Calendar Code of Trial.
- Click the Save button.
- In the Event section:
- Select a Type of Record Changed.
- In the Fields section, select Specific Field, and then select the AlarmExpr field.
- Select the Value Before check box, and then select the desired value (e.g., 1 Day).
- Select the Value After check box, and then select None.
- In the Actions section, click the New button.
- Select Change Record and click Next.
- Select Source Record and click Define Template.
- Click the set button next to the Alarm field.
- In the Template Expression Editor window, click the Value button.
- Select the desired value (e.g., 1 Hour) and click OK on the Value window.
- Click OK on the Template Expression Editor window.
- Click the set button next to the Description field.
- In the Template Expression Editor window, click the Value button and enter the desired text [e.g., “Leave for court – ” (including the dash and spaces)].
- Click OK on the Value window.
- Click the Operator button, select Addition, and click Insert.
- Click the Field button and, in the Available Records field, select Source Record (Before the Save).
- Select the Description field and click Insert.
- Click OK on the Template Expression Editor window.
- Press Ctrl+S.
- Click the set button next to the Alarm field.
- Click Finish.
- Click Save.
You now have a WorkFlow set up so that when you clear the one day alarm on a record with a Calendar Code of “Trial,” it will reset the alarm to be displayed one hour before the trial time to remind you to leave.
For more information on WorkFlows, refer to our new PracticeMaster WorkFlows Guide at Tabs3.com/support/docs.html or Knowledge Base Article R11307, “All About WorkFlows.”
Each month I need to run multiple reports and upload them to a website. Is there any way I can reduce the number of keystrokes required to do this?
Yes, there is! A WorkFlow can be created to automatically open the desired reports as well as the website to which the reports will be submitted.
When the WorkFlow runs, you will only need to enter the optional report criteria (e.g., client range, date range, etc.) and click Print to run and save the report. The website will open, and you can then upload the necessary reports.
To run multiple reports and open a specific website
- From the Maintenance menu, select WorkFlows.
- Select the file from which you want to run the WorkFlow, and then click the New button.
- Enter a Name for the WorkFlow (e.g., “Reports”).
- In the Source section, select All Records.
- In the Events section, select the User Activated check box.
- In the Actions section:
- Click the New button.
- Select Run Report Writer Report and click Next.
- Select one of the reports that needs to be run.
- Click Finish.
- Repeat steps a-b until all of the desired reports are selected.
- Click the New button.
- Select Launch Other Program and click Next.
- In the Select a program to launch field, enter the path to a web browsing program (e.g., “C:\Program Files\Internet Explorer\iexplore.exe”).
- To the right of the Define program options field, click the drop-down arrow.
- Click the Value button.
- Enter the address of the website you want to open.
- Click OK on the Value window.
- Click OK on the WorkFlow Expression Editor window.
- Click Finish.
- Click Save.
For more information on WorkFlows, refer to our new PracticeMaster WorkFlows Guide at Tabs3.com/support/docs or Knowledge Base Article R11307, “All About WorkFlows.”
When I’m creating WorkFlows, I’ve noticed the Prompt Before Running and Automatically save and close check boxes. When should I use these options?
The Prompt Before Running and Automatically save and close check boxes may be desirable to use as a permanent setting depending on the purpose of the WorkFlow. However, we recommend using these check boxes to test the WorkFlow before considering it complete. It is important to test your WorkFlows as part of the creation process to make sure they work as expected. If you make modifications, test the WorkFlow again.
Prompt Before Running
The Prompt Before Running check box is located in the WorkFlow Definition window. If the  Prompt Before Running check box is cleared, then the WorkFlow will run automatically when it’s triggered. When this check box is selected, a message will be displayed ask ing the user if they want to run the WorkFlow. Selecting this check box can be helpful when you are testing WorkFlows because you can see right away if the WorkFlow is triggered when you expect it to be triggered.
Automatically Save and Close
The Automatically save and close check box is located in the WorkFlow Action Wizard 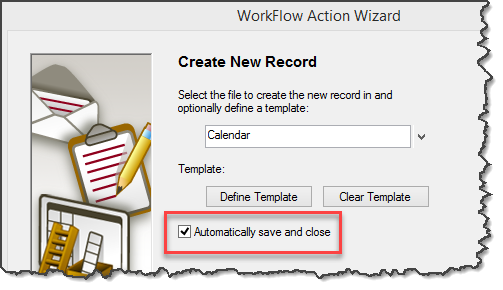 window when you select the Create New Record or Change Record action. If the Automatically Save and Close check box is selected, then new records and changes to records will be saved and closed without seeing the changes. If this check box is cleared, then the new or changed record will be left open for review with changes in green. Clearing this check box can be helpful by leaving the record open after the WorkFlow has run so that you can verify the correct additions or changes were made. If this check box is selected, you would have to find the record and open it to verify the WorkFlow worked as expected.
For more information on WorkFlows, refer to our new PracticeMaster WorkFlows Guide at Tabs3.com/support/docs.html or Knowledge Base Article R11307, “All About WorkFlows.”
When I change the Client Name field, I can no longer pull them up by typing their name into any Client lookup fields. Why is this, and how can I fix it?
Client lookup fields use the Name Search field to find clients. Reports sorted alphabetically are also sorted on the Name Search field. However, this field does not get updated automatically when the Client Name is changed.
A WorkFlow can be created to update this field automatically when the Client Name is changed in PracticeMaster.
To create a WorkFlow that will update the Name Search field
- From the Maintenance menu, select WorkFlows.
- Select Client, and then click the New button.
- Enter a Name for the WorkFlow (e.g., “Update Name Search”).
- In the Source section, select All Records.
- In the Events section:
- Select the Record Changed and User Activated check boxes.
- Select the Selected Field(s) option.
- Click the Select Fields button.
- In the Select Fields window, select Name and click OK.
- In the Actions section:
- Click the New button.
- Select Change Record and click Next.
- Select Source Record and click the Define Template button.
- Click the set button next to the Name Search field.
- In the Template Expression Editor window, click the Field button.
- Select a Field ID of Name and click Insert.
- Click OK.
- Press Ctrl+S.
- Click Finish.
- Click Save.
You now have a WorkFlow set up that will automatically update the Name Search field without user interaction any time the Client Name field is changed, provided the change is made in PracticeMaster.
Note: If the Client Name is changed in Tabs3, the WorkFlow will not be triggered to run. However, the WorkFlow can optionally be run manually via the Quick Clicks pane in PracticeMaster.
For more information on WorkFlows, refer to our new PracticeMaster WorkFlows Guide at Tabs3.com/support/docs.html or Knowledge Base Article R11307, “All About WorkFlows.”
One of my calendar entries in PracticeMaster was inadvertently deleted. This caused me to nearly miss the opportunity to file my witnesses. To prevent this in the future, is there a way I can find out if a calendar entry gets deleted and when?
There are a variety of options available to handle this. WorkFlows can be set up to copy any information from the originating record to another location. For example, if a calendar record is deleted, then the WorkFlow can be set up to copy the Due Date, Calendar Code, Description, Comments, Start Time, and more to the new record. The WorkFlow can even be set up to show who made the deletion.
Note: You can optionally set up access rights to only allow certain users rights to delete records. This can help alleviate issues with unauthorized deletions. Access rights can be set up in System Configuration via File | Open | Access Profile.
The following is a list of options where WorkFlows can help track deletions:
- Send eNote to a user – When a record is deleted, an eNote can be automatically sent to one or more users to notify them of the deletion. Sending an eNote will provide real-time deletion notifications and come from the user who deleted the record. Keep in mind that eNotes will be shown in the sender’s Sent eNotes list until deleted. Note: eNote is only available in the Platinum version of PracticeMaster.
- Creating private calendar entries – When a record is deleted, a calendar record can be created for a user or group of users and marked as private. Marking the record as private makes it easy to keep the information inaccessible to users for which you do not want access granted. Only those users with Calendar Rights to view private entries can access it. Set the Alarm Time field to receive a notification, or set the Type field to Task so that it shows up in your Task List.
- Creating records in a custom lookup file – You could create a custom lookup file with all of the desired fields and when a record is deleted, a new record would be added to the lookup file. The lookup file does not have to be referenced from any other file in the software, but can be maintained for deleted records only. Creating a lookup file provides the ability to store the deleted records in one place without being mixed up with other records. However, the additional setup time for the new lookup file should be taken into consideration.
Regardless of which option you choose, a new record will be added to PracticeMaster. The goal is for the WorkFlow to record all critical information that was removed by the deletion. A WorkFlow will need to be added to each file in which you want deleted records tracked.
You can find more information and additional options for using WorkFlows to track deleted records in Knowledge Base Article R11732, “Using WorkFlows to Track Deleted Records.”
For more information on WorkFlows, refer to our new PracticeMaster WorkFlows Guide at Tabs3.com/support/docs.html or Knowledge Base Article R11307, “All About WorkFlows.”
When creating a WorkFlow, I’m not always sure what I should select for Event Type. How do I know what to choose?
When you’re creating a new WorkFlow, the Event Type determines when you want the WorkFlow to run. You can select one or more Event Types depending on when you want the WorkFlow to be triggered.
- When the Record Added check box is selected, the WorkFlow will run when a new record is added to the selected File. For example, let’s say you want a WorkFlow to create a fee record every time a new client is added in order to bill for the initial meeting. You would use an Event Type of Record Added because the WorkFlow is triggered when a new client is added.
- When the Record Changed check box is selected, the WorkFlow will run when an existing record in the selected File is changed. For example, let’s say you want a WorkFlow to run that starts an e-mail to a certain group in PracticeMaster every time you check the Inactive field of an existing client record. You would use an Event Type of Record Changed because the WorkFlow is triggered by a change to a client record.
- When the Record Deleted check box is selected, the WorkFlow will run when an existing record is deleted from the selected File. For example, let’s say that you want a notification sent to you when a record is deleted. You would use an Event Type of Record Deleted because the WorkFlow is triggered by a record deletion.
- When the User Activated check box is selected, the WorkFlow will be included in the WorkFlow group of the Quick Clicks pane for the selected File. This allows you to manually run the WorkFlow for selected records. For example, let’s say you have several costs that show an incorrect rate, and you want to change the rate for just those records. You would use an Event Type of User Activated because the WorkFlow should only run for records that you select manually. Note: WorkFlows that do not have the User Activated check box selected are not shown in the Quick Clicks pane.
Keep in mind that Event Types can work in tandem with a Filter or specified Fields to further narrow down what triggers the WorkFlow.
For more information on WorkFlows, refer to our new PracticeMaster WorkFlows Guide at Tabs3.com/support/docs.html or Knowledge Base Article R11307, “All About WorkFlows.”
We want a calendar record automatically created every time we open a new Criminal Law client. The calendar record should remind us that in two days we need to request a copy of the arrest affidavit and bond information for the client. Is there an easy way to do this?
This can be done by creating a WorkFlow that will automatically trigger whenever a client is added with an Area of Practice (AOP) of Criminal Law. The WorkFlow will create a calendar entry populated with field values specified in the WorkFlow itself. For our example, the calendar entry will include the following:
- Due Date two days after the client’s Open Date
- Description of “Request copy of arrest affidavit & bond information”
- Task with a Start Time of 8:00 A.M.
- Alarm Time set for 0 Minutes
- The Client ID selected
To automatically create a Calendar entry every time a Criminal Law client is added
- From the Maintenance menu, select WorkFlows.
- Select the Client file, and then click the New button.
- Enter a Name for the WorkFlow (e.g., “Criminal Law Calendar”).
- In the Source section:
- Select the Filtered Records option and click the Filter button.
- Select a Field Name of AOP.
- Select a Test Condition of equal to.
- In the Test Value field, select an AOP of Criminal Law.
- Click the Save button.
- In the Event section:
- Select Record Added.
- In the Actions section, click the New button.
- Select Create New Record and click Next.
- Select Calendar from the drop-down list and click OK.
- Click the Define Template button.
- Click the set button next to the Due Date field.
- In the Template Expression Editor window, click the Field button.
- Select a Field ID of “Date_Open” and click Insert.
- The following will now be displayed: “@SrcRec:Date_Open”. After this, enter “+2”. The following will now be displayed: “@SrcRec:Date_Open +2”.
- Click OK.
- Click the set button next to the Description field.
- In the Template Expression Editor window, click the Value button, and enter “Request copy of arrest affidavit & bond information.”
- Click OK on the Value window.
- Click OK on the Template Expression Editor window.
- Click the set button next to the Type field.
- In the Template Expression Editor window, click the Value button, and select “T” from the drop-down list.
- Click OK on the Value window.
- Click OK on the Template Expression Editor window.
- Click the set button next to the Start Time field.
- In the Template Expression Editor window, click the Value button, and enter “08:00:00 AM”.
- Click OK on the Value window.
- Click OK on the Template Expression Editor window.
- Click the set button next to the Alarm Time field.
- In the Template Expression Editor window, click the Value button, and select “0 Minutes” from the drop-down list.
- Click OK on the Value window.
- Click OK on the Template Expression Editor window.
- Click the set button next to the Client ID field.
- In the Template Expression Editor window, click the Field button.
- Select a Field ID of “Client_ID” and click Insert.
- Click OK.
- Press Ctrl+S.
- Click the set button next to the Due Date field.
- Click Finish.
- Click Save, and then close the WorkFlows window.
You now have a WorkFlow set up that will create a customized calendar entry every time a new client is saved with Criminal Law selected as the Area of Practice.
We have a client who is supposed to be billed $0.12 for copies rather than our usual $0.15. However, there are many costs that have been entered with the wrong rate. Is there a way we can easily change all of them at once?
Although Tabs3 Billing has the option to change fee rates via the Change WIP Transactions program, cost rates cannot be changed using this program. As a work-around, you can accomplish the cost rate change by creating a user activated WorkFlow in PracticeMaster. This type of WorkFlow runs only when initiated by a user, which means you can choose to run it for only the costs you want to change. The WorkFlow will change the Rate of the selected costs, recalculate the amount, and then automatically save the costs.
Tip: Once the WorkFlow has been created, it can easily be changed for future scenarios. For example, if you need to adjust cost records to a different rate, simply edit the existing WorkFlow for the new scenario.
To create a WorkFlow in PracticeMaster to change the rate of existing costs
- From the Maintenance menu, select WorkFlows.
- Expand the Common Client Related section, select Cost, and then click the New button.
- Enter a Name for the WorkFlow (e.g., “$0.12 Costs”).
- In the Event section, select the User Activated check box.
- In the Actions section, click New.
- Select Change Record, and then click Next.
- Select Source Record, and then click Define Template.
- Click on the set button next to the Rate field.
- In the Template Expression Editor window, click the Value button, and then enter the desired rate. For our example, enter “0.120”.
- Click OK on the Value window, and then click OK in the Template Expression Editor window.
- Click on the set button next to the Amount field.
- Click the Value button and enter the desired rate, and then click OK. For our example, enter “0.12”.
- Click the Operator button, select Multiplication, and then click Insert.
- Click the Field button, select Units from the Field ID column, and then click Insert.
- The following will now be displayed: “0.12 * @SrcRec:Units”. Click OK on the Template Expression Editor window.
- Press Ctrl+S.
- Click Finish.
- Click Save, and then close the WorkFlows window.
To run the WorkFlow, simply open the Cost file, select the desired cost records, and then select the WorkFlow from the WorkFlows group of the Quick Clicks pane. All of the selected costs will be updated with the new rate and recalculated amount.
This was the first month of Working with WorkFlows! Did you find this article helpful? Have any article suggestions? Leave us a comment below!

