
When using Print Checks, if the Select Invoices to Print check box is selected on the Options tab, the number of invoices selected and the total amount to pay for all selected invoices are displayed at the bottom of the Select Invoices window. Additionally, a Tabs3 column shows a cost status of Paid, Unpaid, or a dash, which indicates no linked cost transaction.

You can also select to Exclude Invoices with Unpaid Tabs3 Cost Transactions from the Options tab. When this option is selected, only invoices with the entire cost amount paid will be printed. This allows firms to opt not to pay invoices until a client pays them for the associated cost.

We just ordered new Trust checks. Before we start printing checks, is there a way to make sure that everything will line up properly?
In Trust Accounting, a check test pattern can be printed that is comprised of “X’s” where the information would be printed. Although the test pattern can be printed on an actual check form, we recommend using a blank sheet of paper and holding it up to the check form so as not to waste checks.
To print a check test pattern
- In the Quick Launch, search for and select “Print Check Test pattern.”
- In the Selected Printer section, select your check printer.
- In the Output To section, select Printer and click OK.
- Select the Bank and then click OK.
If the information does not line up, adjustments can be made to the margins and printer offset adjustment via Print Setup.
Can we print a copy of the check stubs for our records?
AP has an option to Print Duplicate Stubs when printing checks on laser check forms. When this option is enabled, AP will print a check stub, then the check, then the duplicate check stub.
To print duplicate stubs
- In the Quick Launch, search for and select “Print Setup.”
- Select the Printer you use to print Accounts Payable checks.
- Click the Check Setup button.
- Select the Print Duplicate Stub check box and click OK.
- Click OK again to close the Printer Setup window.
The next time you print checks with the selected printer, it will now print duplicate stubs.
Note: Do not select this option if you print checks on continuous check forms.
Did you know that you can choose whether or not to print the initials of the user who runs a report on the left side of the footer?
To print the user initials in the report footer
- In the Quick Launch, search for and select “Print Setup.”
- Select the desired Printer.
- Click the Advanced Printing Features button.
- In the Footer section, select the Print User Initials check box.
- Click OK.
- Click OK.

Did you know that you can reprint client statements whenever needed? It’s easy to reprint statements when you’re required to provide them by the client or the court. You can reprint a single statement for a single client as well as multiple statements at one time. When printing multiple statements, you can print a range of clients, statement dates, and more.
To reprint a single updated statement
- In the Quick Launch, search for and select “Matter Manager.”
- Select the desired Client ID.
- In the List Content section, select the Statements heading.
- Click the statement you want to reprint to open a preview.
- Click the Print button.
Note: You can also reprint statements via the Quick Launch by searching for and selecting “Reprint Single Updated Statement.”
To reprint multiple updated statements
- In the Quick Launch, search for and select “Reprint Multiple Updated Statements.”
- Select the desired Statement Criteria (e.g., Statement Date, Client ID, etc.).
- Select the desired Reprint Options.
- Click OK.
Tip: Alternatively, you can run a Transaction File List (In the Quick Launch, search for and select “Transaction File List”) to show all transactions or a range of transactions for a client. Because the report uses a list format, printing a Transaction File List can significantly save paper depending on how many statements the client has had.

One of the most frequently asked questions our Support Department receives is, “Why isn’t my statement printing?” Whether due to client transactions that have a Status of Hold, client settings, printer drivers, or printer settings, you may have had statements that did not print at one time or another.
Knowledge Base Article R10004, “My Statement Doesn’t Print,” offers the most common reasons a statement doesn’t print and includes easy troubleshooting steps to follow. When your statements aren’t printing, use this article as a checklist to help you get back on track for your month-end activities.
Our Knowledge Base can be accessed at support.Tabs3.com. You can also access our Knowledge Base in the Quick Launch by searching for and selecting “Knowledge Base.”
Did you know that you can quickly print a single check in Accounts Payable (AP) and Trust Accounting (Trust) without opening the Print Checks program? This can be accomplished via the Invoice/Manual Check Entry (AP) and Trust Transactions (Trust) windows.
To print a single check in AP via the Invoice/Manual Checks window
- In the Quick Launch, search for and select “Invoice/Manual Check Entry.”
- Select the desired Vendor.
- Select the invoice you want to print, or enter a new one.
- Click the
 (Print Check) button.
To print a single check in AP via the Dashboard
- On the Home tab, select Dashboard.
- In the Unpaid Invoices section, click Print Check next to the invoice you want to print.
To print a single check in Trust Accounting
- In the Quick Launch, search for and select “Trust Transaction Entry.”
- Select the desired Trust ID.
- Select the transaction you want to print, or enter a new one.
- Click the
 (Print Check/Receipt) button.
These methods allows you to quickly print a check when you need it, saving you time when you don’t want to print a batch of checks.
We recently installed Trust Accounting. We started printing checks, but noticed that they are printing in the order that we are entering them. Is it possible to print them in order based on trust account?
Checks can be printed in either Entry Order or Trust Account Order.
To print checks in Trust Account Order
- In the Quick Launch, search for and select “Customization.”
- On the Main tab, in the Check Printing section, select the Trust Account Order option.
- Press Ctrl+S.
Now the checks will print in trust account order. If multiple check transactions exist for the same trust account, they are additionally sorted by transaction date and then reference number to establish check order.
Do you want negative numbers in reports to be more visible? Negative numbers can be set to print in red in any of the Tabs3 Software applications via Print Setup.
To print negative numbers in red
- From the File menu, select Print Setup.
- Click the Advanced Printing Features button.
- Select the Print Negative Numbers in Red check box.
- Click OK.
- Click OK.
Reports will now display negative numbers in red, thus make any negative values stand out!
When previewing reports, you always get the best formatted view of the information for reading. However, when saving a report to an .html or .txt file, you may see different formatting or missing text. So how do you get better output? By using the Optimize for Print to File setting.
When selecting to Optimize for Print to File, the software will make adjustments that help with formatting and eliminate clipping problems. This can help significantly when printing to .html or .txt format.
To Optimize for Print to File
- From the File menu, select Print Setup.
- Select the desired Printer.
- Click the Advanced Printing Features button.
- Select the Optimize for Print to File check box.
- Click OK on the Advanced Printing Features window.
- Click OK on the Printer Setup window.
The next time you print a report to a file, try selecting Optimize for Print to File and see the difference it makes.
Note: We do not recommend selecting this option for your normal printing jobs because of adjustments made to avoid clipping problems. When saving output to a file, the best solution is to configure a special printer for print-to-file output.
Did you know that you can add your letterhead to statements via the Tabs3 Billing software? If you have an image file of your firm’s letterhead, Statement Designer can insert .png, .jpg, and .bmp files into the header and/or footer of a statement page layout. Alternatively, you can add a .bmp image via Print Setup. These options mean that statements can be printed with your firm’s letterhead on any paper.
Knowledge Base Article R11829, “Adding a Letterhead Image to Tabs3 Billing Statements,” provides information about adding a header image to your Tabs3 Billing statements via Statement Designer or Print Setup.
Our Knowledge Base can be accessed at support.Tabs3.com. You can also access our Knowledge Base while in the software by selecting Help | Internet Resources | Knowledge Base.
We added a couple of new features to the Print Checks process in Version 19!
When using the Print Checks program (Checks | Print Checks), if the Select Invoices to Print check box is selected on the Options tab, the number of invoices selected and the total amount to pay for all selected invoices are now displayed at the bottom of the Select Invoices window. Additionally, a Tabs3 column has been added that shows the Tabs3 cost status of Paid, Unpaid, or a dash, which indicates no linked cost transaction.
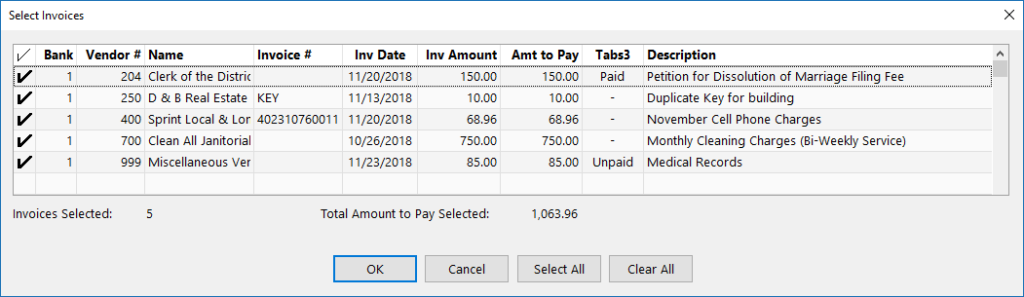
In the print checks program, you can also now select to Exclude Invoices with Unpaid Tabs3 Cost Transactions from the Options tab. When this option is selected, only invoices with the entire cost amount paid will be printed. This allows firms to opt not to pay invoices until a client pays them for the associated cost.
Did you know that envelopes can automatically be printed for each statement generated using the client’s Bill To address? When selecting to print envelopes, they will be printed for final statements, but will not be printed when running draft statements. Printing envelopes can be configured via Print Setup.
To print envelopes with final statements
- From the File menu, select Print Setup.
- Select the desired Printer.
- Click the Statement Setup button.
- Select the Print Envelopes check box.
- In the Envelopes section, select the desired settings.
- Click OK on the Statement Setup window.
- Click OK on the Printer Setup window.
Note: This feature will print one statement followed by one envelope. This works best on a printer with a separate envelope tray.
Did you know that you can print a check directly from the Invoice/Manual Check window in Accounts Payable Software (APS) and the Trust Transactions window in Trust Accounting Software (TAS)?
You don’t have to use the Print Checks program to print a single check. Instead, you can use the quick print option in either program.
To quick print a single check in APS
- From the File menu, point to Open and select Invoice/Manual Checks.
- Select the desired Vendor.
- Select the desired invoice or create a new one.
- Click the
 icon or press Ctrl+Shift+P.
To quick print a single check in TAS
- From the File menu, point to Open and select Transaction.
- Select the Trust ID.
- Select the desired transaction or create a new one.
- Click the
 icon or press Ctrl+Shift+P.
The quick print feature in APS and TAS is a quick and easy way to print a check that you need now. Try it out the next time you don’t need or want to run an entire batch of checks.
Did you know that you can print a Memo line on Accounts Payable Software (APS) checks? Although you can enter text in the Memo field of your invoices, you must be using Check Layout L1572 with the option to print the Memo field selected in order for memos to be printed on your checks.
To specify the check layout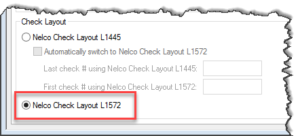
- From the File menu, point to Open and select Miscellaneous.
- From the Bank Account tab:
- Select the Bank Account.
- In the Check Layout section, select Nelco Check Layout L1572.
- Press Ctrl+S.
To specify that the Memo field be printed
- From the File menu, select Print Setup.
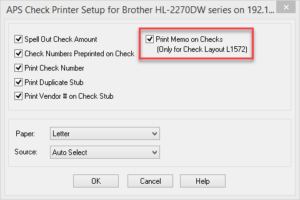
- Click the Check Setup button.
- Select the Print Memo on Checks (Only for Check Layout L1572) check box.
- Click OK on the APS Check Printer Setup window.
- Click OK on the Printer Setup window.
It’s after hours and you’ve run into some trouble printing. Something doesn’t look right, it’s printing off the page, or you need to make just a few tweaks to finish your project. However, you’re not sure what to do. What do you do? Check out the Knowledge Base, of course!
Knowledge Base Article R10469, “Frequently Asked Questions About Printing,” provides frequently asked questions regarding the following subjects:
- Printing Statements – Using letterhead for statements, centering statements on the page, reference numbers not printing on draft statements, and what the Compress Address check box in Statement Setup does.
- Printing Reports – What to do when the font is too small, and how to print landscape reports.
- Printing Checks – Printing, printing a second copy of checks, printing a duplicate stub, and printing trust information on checks.
- General Printing Questions – Stopping a print job, specifying different margins, adjusting the Preview window, changing the Offset Adjustment, fixed pitch fonts vs. proportional fonts, and configuring an additional printer.
Our Knowledge Base can be accessed 24 hours a day, 7 days a week, at support.Tabs3.com. You can also access our Knowledge Base while in the software by selecting Help | Internet Resources | Knowledge Base.
Over the next few months we will go through some of the best features of our new online newsletter format. This month, we’re going to walk you through how to print and share individual newsletter articles. There currently is no way to print or download the entire newsletter, but we are looking into that feature for the future.
To print articles
- Open up the article you’d like to print.
- Scroll to the bottom of the article.
- Click on the
 button.
 - Select your desired printer and printer settings.
- Click “Print”.
To save articles as PDFs
- Open up the article you’d like to save as a PDF.
- Scroll to the bottom of the article.
- Click on the button.
- Click “Save as a PDF”.
- Click “Save”.
To email articles directly to your coworkers
- Open up the article you’d like to email.
- Scroll to the bottom of the article.
- Click on the
 button.
 - Add the recipients and a message.
- Click “Send”.
Note: When printing newsletter articles via Firefox, the right edge of text and graphics may be cut off. If this is the case, changing the print margins can correct the issue. We have seen this as an issue using the default margins in Firefox, but not Chrome or Internet Explorer.
Do you have any other features you’d like to see in the online newsletter? Let us know in the comment section below!
Did you know that you can quickly add an image to the top of your statements, such as your firm’s letterhead? You can always use Statement Designer to customize your statements, but if you simply want to use an existing bitmap image, this can easily be added to your statements by selecting the desired bitmap via Print Setup.
To add a bitmap to statements
- From the File menu, select Print Setup.
- Click the Statement Setup button.
- In the Page One section, select the Bitmap check box.
- Click the Select button to browse out to where your bitmap image is located.
- Click OK.
Don’t have a bitmap image of your firm’s letterhead? We offer professional bitmap scanning. For more information, see Knowledge Base Article R10168, “Bitmap Scanning Service.

Would you like to see data in Microsoft® Excel® instead of in report format? Do you 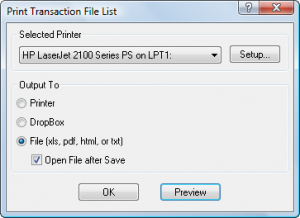 occasionally need to manipulate how data is organized for reporting purposes? Tabs3 makes it easy to send information to Excel. From any of the Tabs3 and PracticeMaster programs, you can use the Print to File option to easily send a report to Excel, or copy items from lists and paste the information into Excel.
Print to File
Reports can be printed to Excel using the File option in the Print dialog window. Excel files can be saved in either an .xlsx or .xls format.
Report Formatting – When saving to Excel, you can opt to Remove Formatting when Saving to Excel such as font size adjustments and styles, number formatting, grey and black lines, and shading. This option is located via File | Print Setup | Advanced Printing Features.
Page Layout – Page layout is different when generating the Excel report from the Preview window. When selecting the Excel File option from the Print Dialog box, the generated file will be output without page breaks, page numbers, and continuation page headings. Report headings are included at the beginning of the report only. However, when selecting the Print option from the Preview window and saving to an Excel file, the generated file will be output the same as it appears in the Preview window, including page breaks, page numbers, and continuation page headings.
Optimized Reports – Many reports have been optimized for Excel output. Optimized reports adjust the columns to match the width of data in the report, maintaining a similar output to the Tabs3 and PracticeMaster report output. Reports that have not been optimized may have a large number of columns that are all the same width. Additionally, non-optimized reports may have columns with no data in them, and number fields shown as a “#” if the number is too big for the cell.
Copy from a List
You can copy the contents of any list window into any word processing software, but the output is optimized for Microsoft Word and Excel. This feature pastes the information into columns, retaining formatting and the appearance of the information from the Tabs3 and PracticeMaster software.
To copy records from a List
- In a PracticeMaster list, you can select one record, multiple records, or all records. To select a range of records, highlight the first record that you want to copy, and either hold Shift and click the last record you want (to copy a section of the list) or hold Ctrl while clicking to select specific records to copy. To select all records, press Ctrl+A. Then, press Ctrl+C to copy the highlighted records to the Windows Clipboard.
- In Tabs3 Billing, General Ledger Software (GLS), Accounts Payable Software (APS), or Trust Account Software (TAS), you can select one record to copy (Ctrl+C) or all records to copy (Ctrl+Alt+C).
Once records have been copied to the Windows Clipboard, press Ctrl+V to paste the records into Excel or other software of your choice.
For more information on sending data to Excel, including a list of reports that are optimized for Excel output, detailed information is provided in Knowledge Base Article R11280, “All About Outputting Tabs3 and PracticeMaster Data to Excel.”
