Resetting users incorrectly can be a costly practice in terms of lost time and productivity. It is important to realize the risks involved when users reset other users.
Why is resetting a user not recommended? When the software is used, files are opened, saved, and closed by the server as they are requested by the workstation. When a user exits the software improperly, either by an unexpected computer shutdown, or being reset by another user, files that were opened by the server are not closed. Therefore, errors can occur when another user tries to access the same files. Users should always exit the software properly, and the resetting of users should only be performed for specific scenarios.
Knowledge Base Article R10789, “Resetting Users,” discusses User IDs in Tabs3 Software applications, and the consequences and error messages involved with improperly resetting users.
Our Knowledge Base can be accessed at support.Tabs3.com. You can also access our Knowledge Base in the Quick Launch by searching for and selecting “Knowledge Base.”
Performing routine maintenance tasks can be easier using the Lock Out All Users feature. This feature allows any manager to lock all other users out of all Tabs3 Software applications. With the additional option to set a timer for the duration of the lockout, using the Lock Out feature means that you can perform server maintenance tasks or run integrity checks without interruption.
Watch this two-minute video here:
Training Videos can be accessed at Tabs3.com/videos. You can also access the videos in the Quick Launch by searching for and selecting “Training Videos.”

Quick Tip: Bypassing the User ID Prompt
May 2023 Tags: Users
No comments
Did you know that you can specify the User ID as a startup option for Tabs3 software? Once implemented, when double-clicking your desktop shortcut, the User ID will already be filled in, leaving only the password to be entered.
- Right-click the desktop icon used to start the Tabs3 Software application and select Properties.
- From the Properties window, click the Shortcut tab.
- The startup option can be entered following the program file name in the Target field. An example of the Target field when using the User ID startup option is:”C:\Program Files\Tabs3\TABS.EXE” ALICE
- Click OK.
For a list of other startup options available, open the desired Tabs3 Software application (e.g., Tabs3 Billing, PracticeMaster, etc.) and enter “Startup Options” on the Index tab. For more information on automating tasks, including using startup options, refer to Knowledge Base Article R11034, “Automating Tabs3 Software Maintenance Tasks.”

Feature Article: Timekeepers vs. Users
February 2023 Tags: Accounts Payable, General Ledger, PracticeMaster, Tabs3 Billing, Timekeepers, Trust Accounting, Users
No comments
The difference between Timekeepers and Users is often confused. So what exactly is the distinction between how timekeepers and users are used in the software?
Users represent anyone who uses the software, or a resource that needs to be scheduled, such as a conference room. Timekeepers represent any person whose time is entered or billed, such as attorneys and paralegals.
You work with timekeepers and users every day, possibly in ways you don’t even realize. Let’s take a look at some different ways timekeepers and users are used in the software below.
Timekeepers can be used to:
- Track time
- Assign billing rates
- Specify which timekeeper is primary, secondary, and originating for a matter
- Track billing and productivity
- Specify reporting ranges
- Specify fee compensation rules (Tabs3 Billing only)
- …and more
Users can be used to:
- Log in to the software
- Specify access rights
- Track who enters data in Tabs3 Billing, PracticeMaster, Trust Accounting (Trust), Accounts Payable (AP), and General Ledger (GL)
- Add to groups to make entering calendar records easier
- …and more
Because there are such different uses for timekeepers and users, when, how, and why you should add or delete them vary. When adding or deleting timekeepers and users, keep the following in mind:
- You can only add as many timekeepers as your license allows. Because of this, it may be necessary to renumber or delete timekeepers or add timekeepers to your license.
- There is no limit to the number of users you can add; you are instead limited by how many users can be logged in to the software at the same time. Because of this, there is never a need to delete users. In fact, deleting users can cause Data File Integrity Check Errors.
It is important to note that Tabs3 Billing and Trust are licensed by Timekeeper whereas PracticeMaster, AP, and GL are licensed by User. For more information on timekeeper and user limits, refer to Knowledge Base Article R10788, “Active User Limits.”
Not sure what your timekeeper or user login limits are? These can be found in the About window (in the Quick Launch, search for and select “About”). The About window displays the Active User Limit in each of the applications. In Tabs3 Billing, you can also see the Maximum Timekeeper Limit, and in Trust you can see the Maximum Attorney Limit. For more information about what is contained in the About window, refer to Knowledge Base Article R11865, “Information in the About Window.”
For more information on deleting timekeepers and users, refer to Knowledge Base Articles R10969, “Renumbering vs. Deleting Inactive Timekeepers,” and R10840, “Deleting User IDs.”
Knowing the difference between timekeepers and users can help you know which settings may need to be changed when necessary, as well as when you should add or delete them, or update your license. For more information on timekeeper and users, refer to the Help by pressing F1 from any window.

Feature Article: Add New User Wizard
August 2022 Tags: PracticeMaster, System Configuration, Tabs3 Billing, Timekeepers, Users, Version 2022
No comments
Creating a new user is now performed via a wizard. Managers can create users in the User Configuration window of System Configuration, or in the Timekeeper Information window of Tabs3 Billing or PracticeMaster.
The Add New User wizard allows you to specify the User ID and optionally enter contact information, specify login credentials, create a timekeeper, configure Tabs3 Connect access, and set additional user rights.
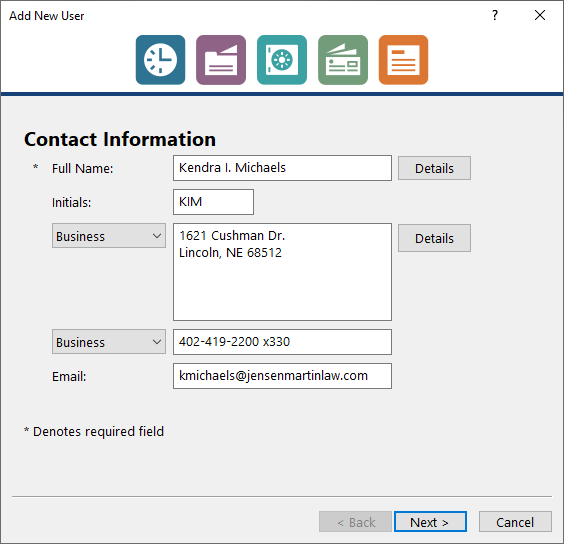
To add a new user in System Configuration
- From the File menu, select Open, and then click Users.
- Press Ctrl+N.
- Enter the user’s name and other information on the Contact Information panel, and then click Next.
- Enter the User ID, Password, and assign the appropriate access profiles on the Login Credentials panel, and then click Next.
- Optionally specify timekeeper information on the Billing Information panel, and then click Next.
- If using Tabs3 Connect, optionally allow access on the Tabs3 Connect Access panel, and then click Next.
- If integrating with PracticeMaster, optionally add the user to groups, assign calendar rights, and assign Tabs3/PracticeMaster timekeepers on the Additional Setup panel.
- Click Finish to save the new user record.
The Add New User wizard is available in Version 2022 (Build 22.2.7) or later.

Feature Article: Unified Contacts
March 2022 Tags: Accounts Payable, Contacts, Payees, PracticeMaster, Tabs3 Billing, Trust Accounting, Users, Vendors, Version 2022
No comments
In Version 2022, all contact information has been consolidated for all Tabs3 Software applications.
The Contact file now includes information for Trust payees, AP vendors, and users, making it easy to update address information in one place, including clients, billing contacts, related parties, vendors, payees, and logon users.
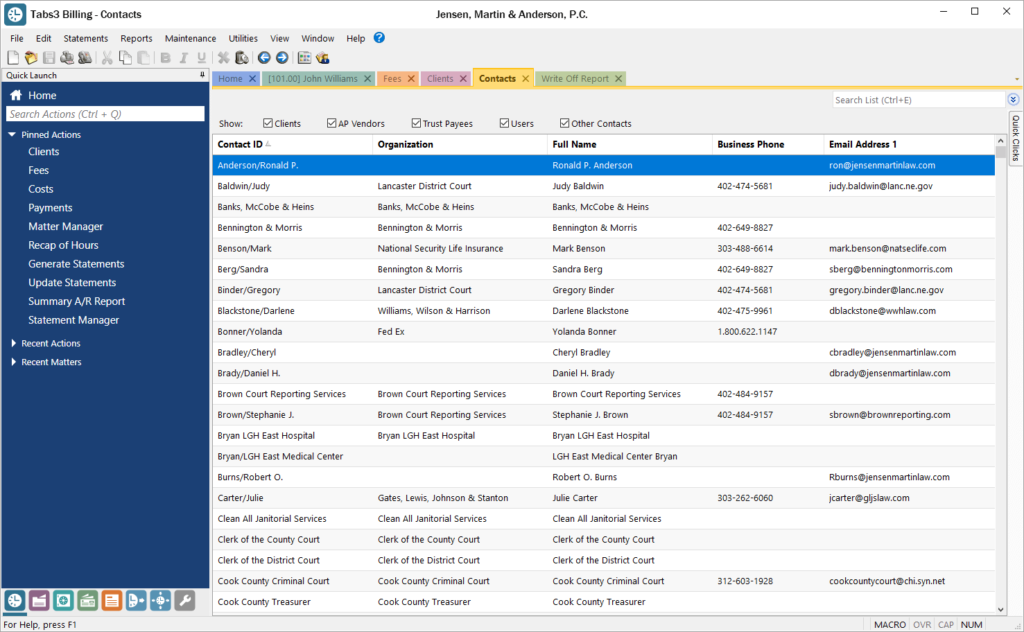
The Contact Information window is available in Tabs3 Billing, PracticeMaster, Trust Accounting, Accounts Payable, and System Configuration. This window now includes a Details button next to the Full Name field for individual contacts, which provides access to separate First Name, Middle Name, Last Name, and Initials fields. To select a contact, the Contact Lookup window has been enhanced for each of these applications, including a SnapShot pane, as well as check boxes at the top making it easy to quickly filter the list to just clients, AP vendors, Trust Payees, etc.
You can update to Version 2022 by going to Tabs3.com/update.
When you need to perform an exclusive task, such as running the Data File Integrity Check, it’s not always a simple task to get everyone out of the software. Phone calls you make and emails you send may not be answered or returned, so that leaves you running around the office to close the software on each computer. Resetting users isn’t recommended because resetting users while they are working in the software can cause corruption in the data. But there’s a better way! With Platinum, you can safely log off users from your computer via the Log Off Users feature.
The Platinum edition provides users with the opportunity to save their work and close the software themselves, or to be safely logged out automatically. When a Conflicting Activities window is displayed, click the Request Log Off button.

Clicking the Request Log Off button opens the Request Log Off window, allowing you to enter a reason for the log off and the number of minutes before users will be automatically logged off. Clicking the Send Request button then sends a message that will be displayed on each user’s computer informing them how long they have to save their work before being safely logged off.
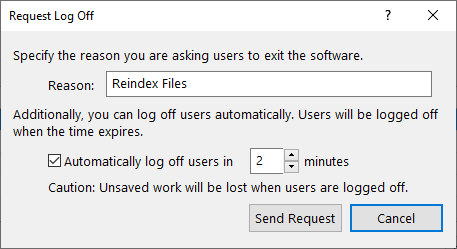
Once all users have logged out, the Conflicting Activities window is replaced with the window of the task you need to perform.
For more information about Platinum features, see Knowledge Base Article R11379, “Platinum Overview.” If you have any questions regarding Platinum features, contact your local consultant, or contact Technical Support at (402) 419-2210.

Spotlight: Best Practices for Resetting Users
May 2021 Tags: Accounts Payable, General Ledger, PracticeMaster, Tabs3 Billing, Trust Accounting, Users
No comments
Resetting users incorrectly can be a costly practice in terms of lost time and productivity. It is important to realize the risks involved when users reset other users.
If you are using the Platinum edition of Tabs3 Software, performing any exclusive function when other users are in the software is easy. Use the Log Off Users function to safely close any Tabs3 programs that other users have open, even when users are away from their desks, without worrying about data loss. However, performing those same exclusive tasks in the non-Platinum edition with active users in the software requires that you ask each person to close the software because resetting a user who is in the software can have consequences.
Why is resetting a user not recommended? When the software is used, files are opened, saved, and closed by the server as they are requested by the workstation. When a user exits the software improperly, either by an unexpected computer shutdown, or being reset by another user, files that were opened by the server are not closed. Therefore, errors can occur when another user tries to access the same files. Users should always exit the software properly, and the resetting of users should only be performed for specific scenarios.
When is it ok to reset a user?
- Once you have confirmed that the user is not currently logged into the software on any computer.
- In some situations, such as if the computer shuts down unexpectedly, a “Duplicate User IDs were found. Would you like to reset the User ID?” message is displayed. In this scenario, because the User ID is locked in the software, you must reset the user.
When resetting a user, a Reset Confirmation window will be displayed. You must select each check box before the 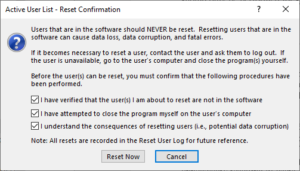 Reset Now button is available. This is intentionally designed to help prevent unnecessary resetting of users.
Manager access rights are required in order to reset other users. Users who are not managers can reset themselves, but cannot reset other users.
If you suspect that users are being reset at your firm without first verifying that they are out of the software, there is an easy way to check. Each time a user is reset, an entry is made to the Reset Log (View | Log Files | Reset Log). We strongly recommend that you periodically review the Reset Log to help ensure best practices are being implemented.
For more information on resetting users, check out Knowledge Base Article R10789, “Resetting Users.”
Taking the time to be prepared and educating your employees about resetting users and how to properly exit the software can prevent future problems and save you time and money.

Quick Tip: User List
June 2020 Tags: Reports, System Configuration, Users, Version 2020
No comments
Did you know that you can print a report that provides various settings specific to users? In addition to the User ID, User Name, and Email address for each user, the User List (System Configuration | Reports | User List) can optionally include the following information stored in the user file:
- Logon User Status
- Tabs3 Connect Access (new in Version 20.1.8)
- Only Include Tabs3 Connect Users (new in Version 20.1.8)
- Users’ Access Profiles and Calendar Rights
- Users’ Timekeepers

Video of the Month: Using Access Profiles
October 2019 Tags: Accounts Payable, General Ledger, PracticeMaster, Resources, Security, Tabs3 Billing, Trust Accounting, Users
No comments
Do you have Access Profiles set up? Access Profiles help with security by controlling what functions each user can access in the software. The Access Profiles training video walks you through creating a new access profile that limits a user to certain Tabs3 Billing functions. Once you know the basics of setting up one Access Profile, you can set up the profiles you need for your firm.
Watch this three-and-a-half-minute video here:
Training Videos can be accessed at Tabs3.com/videos. You can also access the videos while in the software by selecting Help | Training Videos.
When you don’t add users on a regular basis, it can be nice to have a quick refresher on the available settings. The User Configuration video walks you through adding a new user and includes brief information on credentials, contact information, Access Profiles, and other configuration options.
Watch this two-minute video here:
Training Videos can be accessed at Tabs3.com/videos. You can also access the videos while in the software by selecting Help | Training Videos.

Working with WorkFlows: Configure Contacts for Specific Users
October 2018 Tags: Contacts, PracticeMaster, Users, WorkFlows
No comments
I know that I can synchronize only my PracticeMaster contacts with Outlook by specifying a User Filter via the Outlook Synchronization Settings. However, is there a way I can add my User ID into the User/Group field of all the contact records for my clients all at once?
A User Activated WorkFlow can be created and then run on selected records in the Client file. By not specifying a User ID in the WorkFlow, and instead having the WorkFlow use the User ID of the currently logged in User, anyone can run the WorkFlow. You can use the Search box or create a filter to display the desired clients prior to running the WorkFlow.
To create a WorkFlow that adds a User ID to the User/Group field of the linked Contact records
- From the Maintenance menu, select WorkFlows.
- Select the Client file, and then click the New button.
- Enter a Name for the WorkFlow (e.g., “Add my User ID to Contacts”).
- In the Event section, select User Activated.
- In the Actions section:
- Click the New button.
- Select Change Record and click Next.
- Select Linked Record and in the Link field, select Name.
- Click Define Template.
- Click the set button next to the User/Group field.
- In the Template Expression Editor window, click the Field button.
- Select a Field ID of Name and click Insert.
- Enter “:GroupInfo” immediately following the field name.
- Click the Operator button, select Addition, and then click the Insert button.
- Click the Value button and enter “, ” and click OK.
- Click the Operator button, select Addition, and then click the Insert button.
- Click the Function button and select UserID$(). The following will be displayed: “@SrcRec:Name:GroupInfo + “, ” + UserId$()”.
- Click OK on the Template Expression Editor window.
- Press Ctrl+S.
- Click the set button next to the User/Group field.
- Click Finish.
- Click the New button.
- Select Change Record and click Next.
- Select Linked Record and in the Link field, select Contact.
- Click Define Template.
- Click the set button next to the User/Group field.
- In the Template Expression Editor window, click the Field button.
- Select a Field ID of Contact and click Insert.
- Enter “:GroupInfo” immediately following the field name.
- Click the Operator button, select Addition, and then click the Insert button.
- Click the Value button and enter “, ” and click OK.
- Click the Operator button, select Addition, and then click the Insert button.
- Click the Function button and select UserID$(). The following will be displayed: “@SrcRec:Contact:GroupInfo + “, ” + UserId$()”.
- Click OK on the Template Expression Editor window.
- Press Ctrl+S.
- Click the set button next to the User/Group field.
- Click Finish.
- Click Save.
This WorkFlow is now ready to be run for selected clients.
For more information on WorkFlows, refer to our PracticeMaster WorkFlows Guide at Tabs3.com/support/docs.html or Knowledge Base Article R11307, “All About WorkFlows.”

Spotlight: Active User List
September 2018 Tags: Accounts Payable, General Ledger, PracticeMaster, Tabs3 Billing, Trust Accounting, Users
No comments
Did you know that you can see who is currently logged into the software? The Active User List shows you who’s in, and which programs they are currently accessing. This can be helpful when you want to get everyone out of the software for maintenance. By accessing the Active User List via View | Active User List, you can see who you need to have close the software.
When opening the Active User List, a window is displayed with all users who are in the currently open software (e.g., if you open the Active User List from PracticeMaster, users in PracticeMaster will be displayed). Additionally, you can see which computer they are logged into, and which file they are accessing in the software. Manager users will also have an All Systems check box and a Reset button. When the All Systems check box is selected, all users in all programs will be listed. The Reset button allows managers to reset a user, which closes the software on that user’s computer. (Note: Resetting users is not recommended in most situations, and should only be used when the user in question is not in the software.)
Manager users can always access the Active User List, but other users can be given access rights, or have access rights removed for this feature.
To add or remove rights to the Active User List
- From the System Configuration File menu, point to Open and select Access Profile.
- From the System Activity tab, select the desired Access ID.
- In the System Options section, select the Display Active User List check box.
- Press Ctrl+S.
The next time you want to see who is currently in the software, check out the Active User List!

KB Corner: Assigning Tabs3/PracticeMaster Timekeepers
August 2018 Tags: Resources, Security, Tabs3 Billing, Timekeepers, Users
No comments
Security in a law firm is a top priority. In addition to many other security features, Tabs3 and PracticeMaster software provides the ability to limit a user’s access to specific timekeepers’ transactions via the Assign Tabs3/PracticeMaster Timekeepers function. Users who are assigned to timekeepers can only view transactions that have their assigned timekeepers specified as the working timekeeper. Additionally, certain reports will filter their results based on assigned timekeepers.
To assign timekeepers via System Configuration
- From the File menu, point to Open and select Users.
- Select the User ID.
- Select the Assign Tabs3/PracticeMaster Timekeepers check box.
- Select the timekeepers to assign for the selected user.
- Press Ctrl+S.
For information on how this setting affects the Tabs3 and PracticeMaster software, Knowledge Base Article R11328, “Assigning Tabs3/PracticeMaster Timekeepers,” explains how assigning timekeepers works, provides a list of reports and tasks that are affected by this setting, and explains exactly how they will be affected.
Our Knowledge Base can be accessed 24 hours a day, 7 days a week, at support.Tabs3.com. You can also access our Knowledge Base while in the software by selecting Help | Internet Resources | Knowledge Base.

Outlook Integration: What to Expect from Outlook Synchronization with PracticeMaster
March 2018 Tags: Calendar, Microsoft Exchange, Outlook Integration, PracticeMaster, Users
No comments
I entered a calendar record in Outlook for myself and another attorney. When I checked PracticeMaster, it was on my calendar but not on the other attorney’s calendar. Why would it show on one but not the other?
The way that calendar records synchronize between PracticeMaster and Outlook depends on whether you are using Microsoft Exchange, and how System Configuration is configured.
If you are not using Microsoft Exchange, or you are but do not have System Configuration set up to take advantage of Microsoft Exchange, then the following synchronization rules apply:
- If you enter a record for yourself in PracticeMaster or Outlook, it will synchronize immediately if both programs are open.
- If you enter a record for another user in PracticeMaster, the record will synchronize to the other user’s Outlook calendar when their next Periodic Sync runs. Likewise, when you enter a record for another user in Outlook, the record will synchronize to the other user’s PracticeMaster calendar when their next Periodic Sync runs.
If you have Microsoft Exchange, there are two settings in System Configuration that can be used to immediately synchronize calendar records for other users. The first option, Use Microsoft Exchange to synchronize PracticeMaster and Outlook, is available in both the Platinum and non-Platinum software. The second option, Enable the Platinum Exchange Connector, is available only in the Platinum software.
Non-Platinum
If you do not have the Platinum version of the software, and the option to Use Microsoft Exchange to synchronize PracticeMaster and Outlook is selected, the following synchronization rules apply:
- If you enter a record for yourself in PracticeMaster or Outlook, it will synchronize immediately if both programs are open.
- If you enter a record for another user in PracticeMaster, and you have permissions set up in Microsoft Exchange to add records to the other user’s Outlook calendar, the record will synchronize to the other user’s Outlook calendar.
- If you enter a record for another user in Outlook, the record will synchronize to the other user’s PracticeMaster calendar when their next Periodic Sync runs.
Platinum
If you have the Platinum version of the software, and the options to Use Microsoft Exchange to synchronize PracticeMaster and Outlook and Enable the PracticeMaster Exchange Connector are selected, the following synchronization rules apply:
- If you enter a record for yourself in PracticeMaster or Outlook, it will synchronize immediately to the other program if PracticeMaster is open on at least one workstation.
- If you enter a record for another user in PracticeMaster or Outlook, it will synchronize immediately to the other program if PracticeMaster is open on at least one workstation.
Note: In order for synchronization to occur with other users, both users must have Outlook calendar integration and automatic synchronization enabled in PracticeMaster. For example, if Mary is creating events in Susan’s PracticeMaster calendar, and Mary is not set up to automatically integrate calendar records with Outlook, the events Mary enters will not be synchronized to Susan’s Outlook calendar until the next periodic or manual synchronization occurs for Susan.
For information on setting up and troubleshooting integration with Microsoft Exchange, see Knowledge Base articles R11373, “Microsoft Exchange Server Overview,” R11596, “Configuring the PracticeMaster Platinum Exchange Connector,” and R11597, “Troubleshooting the PracticeMaster Platinum Exchange Connector.”

Quick Tip: System Configuration
November 2017 Tags: Access Rights, Accounts Payable, Calendar, Email, General Ledger, Platinum, PracticeMaster, System Configuration, Tabs3 Billing, Tabs3 Connect, Trust Accounting, Users
No comments
System Configuration isn’t a program you work in everyday like Tabs3 Billing, but is geared toward setting up certain features of the software. So what settings are controlled in System Configuration, and how do you access it?
Many settings in the software can be set up once and you’re done, but others may need to be updated such as when employees come and go, your server equipment changes, or your firm changes and grows. Although each individual program (Tabs3 Billing, PracticeMaster, etc.) has program-specific customization settings, many System Configuration settings affect more than just a single program.
Note: Manager Access Rights are required to access many of the settings in System Configuration.
System Configuration is used to set up the following features:
- Users and Groups, including Calendar Rights and Tabs3 Connect settings
- Access Rights
- Firm Info
- Outgoing E-mail Configuration
- Microsoft Exchange Integration
- Platinum settings
- …and more!
How to access System Configuration
You can open System Configuration via your desktop shortcut, if present, or via the ![]() Application Toolbar from any of the Tabs3 software. The Application Toolbar is typically located on the right-hand side of the main window and includes buttons for all Tabs3 software for which you have access rights. For more information about accessing System Configuration, press F1 while in the Tabs3 software and enter “System Configuration” on the Index tab.
Application Toolbar from any of the Tabs3 software. The Application Toolbar is typically located on the right-hand side of the main window and includes buttons for all Tabs3 software for which you have access rights. For more information about accessing System Configuration, press F1 while in the Tabs3 software and enter “System Configuration” on the Index tab.

Working with WorkFlows: Adding a New Employee to Calendar Entries
October 2017 Tags: Calendar, PracticeMaster, Users, WorkFlows
No comments
We have a new employee starting and we need to add her to hundreds of existing Calendar entries. Is there an easy way to accomplish this so that I don’t have to open each calendar record and edit them individually?
A WorkFlow can be created that will add the User ID to the desired calendar records. This WorkFlow will not run automatically, but will run when you click the WorkFlow in the Quick Clicks pane. This allows you the flexibility of selecting only the records to which you want the user added.
Tip: Once the WorkFlow has been created, it can easily be updated for similar scenarios in the future. For example, if you need to add another new employee at a later time, simply edit the existing WorkFlow for the new User ID.
To create a WorkFlow to add a particular User ID to calendar records
- From the Maintenance menu, select WorkFlows.
- Select Calendar, and then click the New button.
- Enter a Name for the WorkFlow (e.g., “SARA added to Calendar Entries”).
- In the Event section, select the User Activated check box.
- In the Actions section, click New.
- Select Change Record, and then click Next.
- Select Source Record, and then click the Define Template button.
- Click on the set button next to the User/Group field.
- In the Template Expression Editor window, click the Field button.
- In the Available Records field, select Source Record (Before the Save).
- Select the GroupInfo Field ID and click Insert.
- Click the Operator button, select Addition, and then click Insert.
- Click the Value button, enter a comma followed by the desired User ID, and then click OK. For our example, enter “,SARA”. The comma is necessary to separate the User ID from the others.
- The following will now be displayed:
‘@SrcRecOrig:GroupInfo +“,SARA”’
Click OK on the Template Expression Editor window. - Press Ctrl+S.
- In the Template Expression Editor window, click the Field button.
- Click Finish.
- Click Save.
To run the WorkFlow, simply open the Calendar file, select the desired calendar records, and then click the WorkFlow from the WorkFlows group of the Quick Clicks pane. All of the selected calendar records will be updated with the new user.
For more information on WorkFlows, refer to our new PracticeMaster WorkFlows Guide at Tabs3.com/support/docs.html or Knowledge Base Article R11307, “All About WorkFlows.”

Quick Tip: Setting Up Groups in System Configuration
May 2017 Tags: Calendar, PracticeMaster, System Configuration, Users
No comments
Are you using groups for calendaring, or do you enter each user individually in the record? A group is composed of various users, and can be a great shortcut when adding calendar records for teams, managers, or any set of users. For example, if you have regular partner meetings, create a group that includes each of the partners. When creating the calendar record, simply select the group and all of the users in the group will automatically be added to the record.
To create a new group
- Open System Configuration.
- From the File menu, point to Open and select Group.
- Click the
 (New) button.
 - Enter the desired Group ID and Group Name.
- In the Users in Group section, select the users you want to have included in this group.
- Press Ctrl+S.
By adding users to groups, you can help streamline calendar entries and save time!

Spotlight: Calendaring for Other Users
March 2017 Tags: Calendar, PracticeMaster, Users
No comments
Everyone can view your public calendar records, but did you know that you can control who has rights to edit your public calendar records and who has rights to browse or edit your private records?
Calendar rights are assigned via the User Configuration program in System Configuration. Although any user can view public calendar entries, rights must be explicitly given to edit public entries, view private entries, and edit private entries. Although this may sound complicated, it’s easy to specify who has rights to whose calendars.
To specify calendar rights for a user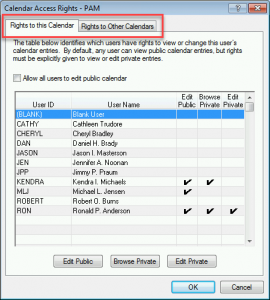
- From the System Configuration File menu, point to Open and select Users.
- Select the desired User ID.
- In the Options section, click the Calendar Rights button.
- On the Rights to this Calendar tab, select the users who need rights to this user’s calendar, and then click the Edit Public, Browse Private, and/or Edit Private buttons. Optionally select the Allow all users to edit public calendar check box.
- On the Rights to Other Calendars tab, select the users that this user has rights to, and then click the Edit Public, Browse Private, and/or Edit Private buttons.
- Click OK.
- Press Ctrl+S.
Configuring access for one user will automatically update the corresponding values in the Calendar Access Rights window for any other users affected by the change. For example, let’s say you currently have Cathy’s user profile open, and you specify that Robert has rights to edit Cathy’s public calendar records. Now opening Robert’s user profile will also show that he has rights to edit Cathy’s public calendar records.
Note: Keep in mind that while you can specify which users have rights to edit your public records, browse your private records, and edit your private records, only managers can specify what rights you have to other users’ calendars. Additionally, in order to browse, add, change, and/or delete calendar records, your User ID must be part of an Access Profile with those rights.

Feature Article: Duplicate User IDs
January 2016 Tags: Users
No comments
You open the software and enter your User Name and Password, only to see the message “Duplicate User IDs were found.”
One of the most common support calls we receive is about this message. 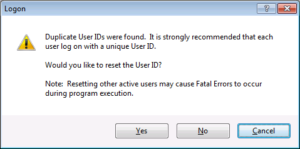 Clicking Yes opens the Active User List where you can select your user name and then click the Reset button, which opens the Active User List – Reset Confirmation window. This window prompts you to verify the user in question is not in the software and that you understand potential data corruption can be caused by resetting the user.
So, why are you receiving this message and why do you have to verify the 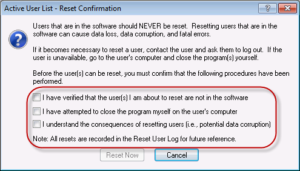 user isn’t in the software when that user is you?
Each user should be logged in only once at any given time. If the software is improperly closed, the User ID remains logged in to the software, thus creating a “duplicate” User ID the next time the user tries to log in. To properly close the software, you can use one of the following: select File | Exit, click the ![]() (Close) button in the upper-right corner of the application’s window, or press Alt+F4. Alternatively, you can click the Exit button on the Main Task Folder. If this button is not displayed on your firm’s Task Folder, you can customize the Main Task Folder to include the Exit button if desired.
(Close) button in the upper-right corner of the application’s window, or press Alt+F4. Alternatively, you can click the Exit button on the Main Task Folder. If this button is not displayed on your firm’s Task Folder, you can customize the Main Task Folder to include the Exit button if desired.
The following items are examples of improperly closing the software:
- Power loss.
- Computer lockups.
- The network connection to the server is broken/interrupted.
- The server is shut down or rebooted while users are still logged in to the software.
If the Duplicate User ID message is received and you choose to reset the user, you should always verify that the user is not in the system. If you reset an active user in the software, this can cause data loss and data corruption that results in Data File Integrity Check Errors and/or Fatal Errors. Because of this, we provide a checklist when resetting a user as a reminder to not reset anyone you are not 100% sure is out of the software. Once you have determined it is safe, you can reset the user and then log in to the software without receiving the message again.
Depending on why the Duplicate Users message is received, you may want to run a Data File Integrity Check.
For more information on resetting users, visit Knowledge Base Article R10789, “Resetting Users.”
Recent Comments
- Tabs3 Software on Feature Article: Year-End is Fast Approaching!
- Linda Thomas on Feature Article: Year-End is Fast Approaching!
- Tabs3 Software on Feature Article: Tabs3 Cloud
- Betty Pinto on Feature Article: Tabs3 Cloud
- James Hunter on Spotlight: Reorder Fees

