
The Transfer and Replicate buttons in the Fee and Cost Entry windows of Tabs3 Billing allow you to quickly transfer or replicate an entry.
![]()
Transfer Fees and Costs
The ability to transfer fees and costs is available using the Transfer Transactions utility. However, you also can transfer fee and cost transactions to a different matter directly from the Fee and Cost Entry windows using the Transfer button. Any fees and costs that have not been final billed and/or updated can be transferred to another client. When transferring a fee or cost, you can optionally select to update the rate to use the new client’s rate, and then recalculate the amount.
![]()
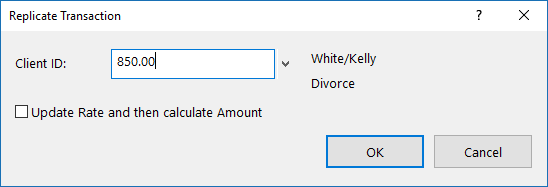
Replicate Fees and Costs
In addition to the Transfer option, you can replicate fees and costs using the Replicate button in the Fee and Cost Entry windows. Replicating fees and costs makes a copy of the transaction and saves it to the desired Client ID. Like the Transfer feature, when replicating a fee or cost, you can optionally select to update the rate to use the new client’s rate, and then recalculate the amount.

Did you know that you can split fees and costs between multiple matters in Tabs3 Billing? Split Billing provides the ability to enter fees and costs once, but split the charges between multiple matters. You must first determine which client you will be entering fees and costs for; this is your “main client.” Next, determine which clients/matters will be splitting the bill, and for what percentage each party will be responsible.

To configure clients for split billing
- In the Quick Launch, search for and select “Client Information.”
- From the Split Billing tab, in the Client ID field, select the desired main client.
- Click the Add button to open the Split Billing Matter window.
- Select the desired Split Matter ID.
- Enter the desired Split Billing Percentages for the split matter.
- Enter the desired Statement Options settings for the split matter.
- Click OK.
- Repeat step 3 for each additional split matter. (Note: This may include the main client.)
- Select the desired Split Fee Options and Split Cost Options.
- Press Ctrl+S.
Fees and costs may be entered before and/or after configuring split billing, but keep in mind that when it comes time to perform the split, only those fees and costs entered for the main client will be split amongst all parties.
When you are ready, you can Perform Split Billing (In the Quick Launch, search for and select “Perform Split Billing”). Transactions that have already been split cannot be split again so this can be run as often as needed. Perform Split Billing should be run prior to generating statements every time in order to make sure that all transactions are billed appropriately.
If, after performing the split, you need to change the way in which transactions should be split, simply Undo Split Billing (In the Quick Launch, search for and select “Undo Split Billing”). This will revert all split transactions for the selected Main Client ID and Split Billing Ref # that are still work-in-process to their pre-split values. This provides a way to make adjustments as needed.
If you have even one client who splits amounts due with other matters, and you’ve been splitting the fees and costs manually, make your billing easier by using the Split Billing feature in Tabs3.
For more information on split billing features, see Knowledge Base Article R11616, “All About Tabs3 Split Billing,” the Billing Adjustments Guide, and the Split Billing Training Video.

Did you know that you can do more with Entry Lists than see current work-in-process transactions? The Fee, Cost, Payment, and Client Funds Entry Lists can be printed, filtered, and set to include archived records.
Entry Lists can be toggled to be hidden or displayed using the ![]() (Toggle List) button or Alt+G. Once the Entry List is displayed, the following additional buttons are available:
(Toggle List) button or Alt+G. Once the Entry List is displayed, the following additional buttons are available:

- Print List – Click the
 (Print List) button to print a list of all transactions currently displayed in the Entry List.
 - Select Date – Click the
 (Select Date) button, or press Alt+L, to select a date for which transactions will be displayed. This button is only available when filtering by Transaction Date or Entry Date via View Options.
 - View Options – Click the
 (View Options) button, or press Alt+O, to filter the Entry List by Client ID, Transaction Date, or Entry Date; select to include only those records for a certain Timekeeper or User ID, or select to Include Archived Records; or select a List Location of Right or Bottom.
You enter data regularly; make sure you are getting the most out of your Entry List by showing the information you want to see and quickly printing lists when needed.
When using Print Checks, if the Select Invoices to Print check box is selected on the Options tab, the number of invoices selected and the total amount to pay for all selected invoices are displayed at the bottom of the Select Invoices window. Additionally, a Tabs3 column shows a cost status of Paid, Unpaid, or a dash, which indicates no linked cost transaction.

You can also select to Exclude Invoices with Unpaid Tabs3 Cost Transactions from the Options tab. When this option is selected, only invoices with the entire cost amount paid will be printed. This allows firms to opt not to pay invoices until a client pays them for the associated cost.
Do you have a new pro bono client, or need to enter a fee or cost at no charge for a regular client? Clients and transactions can be marked as non-billable so that you can still track your time without charging your client.
Non-billable Clients
If you have a client for which there will be no billable time, you may want to mark the client as non-billable. Marking the client as non-billable prevents the accidental entering of billable transactions for the client. Transactions can still be entered, but they will default to a non-billable Bill Code.
To mark a client as non-billable
- From Tabs3 Billing Quick Launch, search for and select “Client Information.”
- From the Setup tab, in the Status section, select the Non-billable check box.
- Press Ctrl+S.
Non-billable Transactions
When fees (or costs) are entered, the transaction’s Bill Code can be specified as 1 – Non-Billable / Non-Printable if you do not want the transaction to be printed on a statement or 2 – Non-Billable / Printable if you want the transaction to be printed on a statement.
When using a Bill Code of 2 – Non-Billable / Printable, transactions will be printed on the statement, but the amount will display “n/c” to indicate that there is no charge for the transaction. If desired, this text can be changed via Statement Customization.
To change the “n/c” terminology
- From the Quick Launch, search for and select “Statement Customization.”
- On the Terminology tab, select Line 8 from the list.
- In the Line 8 field, change the text as desired up to 60 characters.
- Press Ctrl+S.
You can optionally configure transaction codes (tcodes) to default to a non-billable Bill Code. This means that when you select the tcode on a transaction, the Bill Code will already be set as non-billable.
To specify a Bill Code for a tcode
- In the Quick Launch, search for and select “Transaction Code Information.”
- On the Tcode tab, select the desired Tcode.
- Select the desired Bill Code.
- Press Ctrl+S.
In summary, there are three different ways to track non-billable transactions: mark the client as non-billable, specify a non-billable Bill Code when entering individual transactions, and/or configure tcodes to be non-billable. Take a look at these options and see which option is right for you the next time you need transactions to be non-billable.
There are several ways you might handle billing for a contingency case, but in the end you must adjust the amount owed based on the outcome. So what options does Tabs3 Billing provide?
Contingency billing occurs when a firm performs work for a client and gets paid contingent upon a settlement. There are many variations for this type of arrangement, such as whether or not costs will be billed, percentage amounts of the settlement, etc. When billing contingency clients using Tabs3 Billing, you typically bill them after the matter is settled; however, you may also want to bill them during the course of the matter. When billing during the course of the matter, you may want to bill only expenses or advances. You may also want the client to see the services rendered for a particular period without actually billing the fees. Then, once the matter is settled, you can write the fees/costs up or down and send the client a final bill.
For example, let’s say that you have a contingency client and you want to bill them monthly for all costs incurred, but not include fees on the statement. You must first create a statement template that includes the desired information on the statement, and then assign it to the contingency client.
To create a statement template for costs only
- In the Quick Launch, search for and select “Statement Templates.”
- In the Template ID field, enter a name for your template.
- On the Fee Format tab, select a Fee Format of No Fees.
- On the Cost/Payment Format tab, select the desired Expense Format and Advance Format.
- Select any other settings as desired.
- Press Ctrl+S.
To assign a statement template to a client>
- In the Quick Launch, search for and select “Client Information.”
- Select the desired Client ID.
- On the Statement Options tab, select the desired Draft Template and Final Template (e.g., the template we created in the previous set of steps).
- Press Ctrl+S.
Using our example, let’s say that the matter has been resolved with a particularly good outcome. You determine that you need to write-up the client’s fees by $5,000 in order to meet the agreed upon percentage of the settlement that your firm will receive.
To write-up fees by an amount
- In the Quick Launch, search for and select “Write-Up/Write-Down Fees & Costs.”
- Select the desired Client ID.
- In the Transaction Type section, select Fees.
- Click the Calculate Client Total button.
- In the Amount Adjustment Type section
- Select Amount.
- In the New Total field, enter the total amount in fees you want to bill the client.
- Click OK.
You can now change the matter’s Final Template to a statement template that has a Fee Format of Standard and generate a final statement for your client. (As an alternative, you can select the statement template via Generate Statements.)

When you’re not at the office and you need to record the time you spent on a matter or a cost you incurred, what do you do? Why, log into Tabs3 Connect on your phone or tablet, of course!
Tabs3 Connect makes it easy to enter fees and costs for a client even when you’re not at the office. No more writing notes on scraps of paper that can get lost, or in an app amidst a bunch of other notes. You can use your phone to enter fees and costs directly into Tabs3 Connect from anywhere and at any time!
To add a new Fee or Cost via Tabs3 Connect
- Log into Tabs3 Connect by visiting Tabs3Connect.com.
- Tap the
 (Fees) icon to open the New Fee page or the
  (Costs) icon to open the New Cost page.
 - Enter a Client ID, Date, Tcode, Description, and more.
- Tap the Save button, and the fee or cost entry is immediately available in Tabs3 Software back at the office!
Changing Your Start Page
Want to make entering fees even easier? Set up Tabs3 Connect to open to a new fee as soon as you log 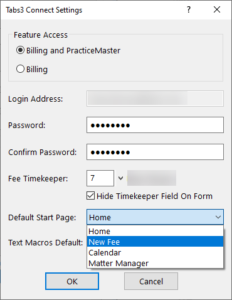 in.
in.
To set Tabs3 Connect to open to a new fee
- Open System Configuration.
- From the File menu, point to Open and select Users.
- Select the desired User ID.
- Click the Tabs3 Connect Settings button.
- Select a Default Start Page of New Fee.
- Click OK.
- Press Ctrl+S.
For more information on Tabs3 Connect, contact your Tabs3 Software consultant, call Support at (402) 419-2210, or visit Knowledge Base Article R11480, “All About Tabs3 Connect.”
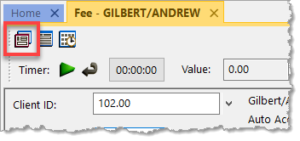
Did you know that you can change your view to see either more fields or fewer fields in certain files?
By clicking the ![]() (Detail/Rapid) button, or pressing Alt+I, you can specify whether you see all of the fields in a file or only key fields. This option is available in the Tabs3 Billing Fee, Cost, Payment, and Client Funds Entry windows, as well as the AP Invoice/Manual Check Entry window. Detail mode includes all of the fields, whereas Rapid mode simplifies the data entry process by only showing the most pertinent fields.
(Detail/Rapid) button, or pressing Alt+I, you can specify whether you see all of the fields in a file or only key fields. This option is available in the Tabs3 Billing Fee, Cost, Payment, and Client Funds Entry windows, as well as the AP Invoice/Manual Check Entry window. Detail mode includes all of the fields, whereas Rapid mode simplifies the data entry process by only showing the most pertinent fields.
The following fields are not shown when in Rapid Mode:
Tabs3 Billing Fee Entry – Hours to Bill, Rate, Amount, Category, Bill Code, Rate Code, Status, User ID, Date Entered, Sales Tax
Tabs3 Billing Cost Entry – Timekeeper, Bill Code, Rate Code, Status, User ID, Date Entered, Sales Tax
Tabs3 Billing Payment Entry – Status, User ID, Date Entered
Tabs3 Billing Client Funds Entry – User ID, Date Entered
Accounts Payable Invoice/Manual Check Entry – Due Date, Voucher #, Amount to Pay, Discount Amount, Discount Date, Net Amount, Take Discount, Hold/Pay, User ID, Date Entered
Take a moment to look at these options and see if you can help streamline data entry for your office!
When entering information into the software, have you saved an entry only to realize you needed to enter the same description into the next entry as well? If so, there is an easier and quicker way than going back to the last record to copy the information. When you are in Fee, Cost, Payment, or Client Funds, pressing F2 while in the description field will automatically replace the transaction code’s default description with the Description entered for the previous entry saved during the current data entry session.
Version 2022 has some great new features to check out!
Unified Contacts
- Consolidated contact information throughout the Tabs3 Software into a single Contact file, including clients, billing contacts, related parties, vendors, payees, and logon users. This makes it easy to update address information in one place.
- The Contacts list in Tabs3 Billing and PracticeMaster as well as in the Contact lookup window in Tabs3 Billing, Trust Accounting, Accounts Payable, and System Configuration include check boxes at the top making it easy to quickly filter the list to just clients, AP vendors, Trust payees, etc.
- The Contact Information window is now available across Tabs3 Billing, PracticeMaster, Trust Accounting, Accounts Payable, and System Configuration. When working with an individual, a Details button next to the Full Name field allows you to access fields for First Name, Middle Name, Last Name, and Initials.
- The Rename Contact utility is now available across Tabs3 Billing, PracticeMaster, Trust Accounting, and Accounts Payable. This utility has been enhanced to update the First Name, Middle Name, Last Name, and Initials fields. Because information is now stored in the Contact file, this utility replaces the Rename Payee utility in Trust.
Enhanced Lists
- Totals can now be displayed on the Fees, Costs, Payments, Client Funds, Write Offs, and Statement Manager lists in Tabs3 Billing and the Fees and Costs lists in PracticeMaster.
- Added a setting to position data entry lists either below or to the right of the data entry fields. Entry lists are available in the Fee, Cost, Payment, and Client Funds entry windows in Tabs3 Billing, the Trust Transaction entry window in Trust, and the Invoice/Manual Check entry window in AP.
New Filters and QuickViews
- New default filters and QuickViews have been added to the Clients, Fees, Costs, Payments, Client Funds, and Statement Manager lists. These allow timekeepers to easily see records for their own matters. These new QuickViews use a new function to determine the timekeeper assigned to the currently logged in user.
- Added a “My Clients Unpaid” QuickView to the Tabs3 Billing Statement Manager.
- Added the ability to easily filter the PracticeMaster Journal file list to include just Note, Email, Phone, Timer, Research, or Billing Notes by simply selecting the corresponding check box at the top of the list. Previously these check boxes were only available on the Journal tab of the Client file.
1099-NEC Forms
- Updated printing of Form 1099-NEC to utilize the 3-forms-per-page format required by the IRS for Tax Year 2021.
Updated Calendar Code File
- Added Phase/Task and Activity code fields to the Calendar Code file so you can specify which default codes need to be used when converting calendar records to fees for task based billing clients.
Exchange Online Integration
- Updated the PracticeMaster Exchange Connector with a new synchronization option for Exchange Online / Microsoft 365.
Updated Installer
- Updated to a Microsoft Installer. This change requires the first installation to be performed at the server, but will reduce the need to directly access the file server when installing future updates.
For in-depth information on all of the new Version 2022 features, including screenshots, refer to Knowledge Base Article R11880, “Version 2022 Introduction to New Features.” A list with links to all Version 2022 information can be found in R11885, “Version 2022 Information and Resources.”
To download Version 2022, visit Tabs3.com/update or contact your local consultant.
You meet up with a client away from the office, they want to write a check for what they owe, but you don’t have the balance due with you. What do you do? Simply log into Tabs3 Connect, and have the amount in a matter of seconds!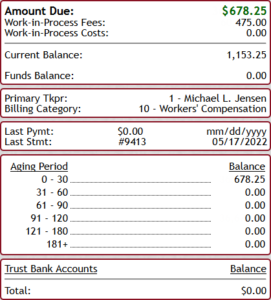
With Tabs3 Connect, you can use the Matter Manager to see exactly how much your client owes. Matter Manager’s Billing Summary provides client-specific information that includes the current amount due, work-in-process fees and costs, aged balances, and more. Make sure you’re not fumbling for a figure, or having to call the office. Accessing Tabs3 Connect is quick, easy, and secure!
For more information on Tabs3 Connect, contact your consultant, call Technical Support at (402) 419-2210, or visit Knowledge Base Article R11480, “All About Tabs3 Connect.”

When it comes to tracking your advances, Tabs3 Software provides the tools you need to accurately manage your advanced client costs from start to finish.
See how the integration between Tabs3 Billing, Accounts Payable, and General Ledger makes it easy to enter and track your advances. The Tracking Advanced Client Costs in Tabs3 Software video covers how to set up integration, enter an invoice, and track your advances using the Advanced Client Costs Report.
Watch this five-minute video here:
Training Videos can be accessed at Tabs3.com/videos. You can also access the videos while in the software by selecting Help | Training Videos.
We added a new way to view clients, contacts, fees, costs, payments, client funds, and write offs without having to run a report! When accessing the new Tabs3 Billing lists, you can work with entries using the actions in the Quick Clicks pane, or drill down for additional details. Lists are available via the File | Open menu in Tabs3 Billing or by searching the Quick Launch for “clients,” “contacts,” “client funds,” “fees,” “costs,” “payments,” and “write offs.” The data entry windows for these record types are now available via File | Data Entry or by searching the Quick Launch for “client information,” “contact information,” “client funds entry,” “fee entry,” “cost entry,” and payment entry.”
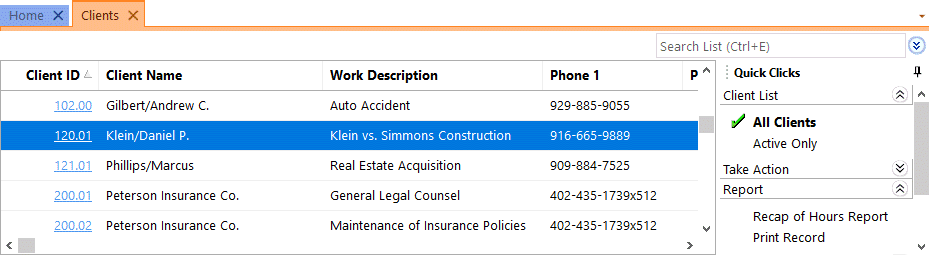
Filtering
Filtering is a powerful feature. For example, you could filter the Client file to only show clients for which you’re the primary timekeeper. As another example, you could filter the Fee file to only show fees entered in the last week. There are a few ways to filter in the lists.
- The Search Box allows on-the-fly filtering capabilities and can be used to filter data based on keywords included in any column shown in the current column layout.
- The List group in the Quick Clicks pane provides different filtering options for each list. For example, the Contacts List provides the option to filter for All Contacts or Active Only.
- The Filter group in the Quick Clicks pane can be used to set up easy or complex filters that you can reuse. Filters can be added via Manage Filters.
- The QuickViews group in the Quick Clicks pane can be used to create different views of your data. Each QuickView can include a filter, column layout, and sort. QuickViews can be added via Manage QuickViews.
Quick Clicks
The Quick Clicks pane includes the following additional groups:
- The Take Action group of the Quick Clicks pane includes additional actions you can take. For example, in the Fees List, you can transfer transactions, replicate transactions, set the fee’s status to hold, set the fee’s status to print, change WIP transactions, write-up or write-down fees, generate statements, and add a new fee.
- The Report group of the Quick Clicks pane includes any reports that are relevant to the current list. For example, the Write Offs List includes the Write Off Report and the Client Ledger Report.
- The Column Layout group of the Quick Clicks pane automatically includes the Standard and (default) column layouts. Column layouts can be added via Manage Column Layouts.
- The Customize Current View group of the Quick Clicks pane includes Manage Quick Clicks, Refresh, and List Preferences. Manage Quick Clicks provides the ability to add, edit, or delete filters, QuickViews, and column layouts, as well as to organize the Quick Clicks. List Preferences include row height, row colors, and grid lines for the list.
Download the latest version of the software to get this great new feature!
If you need to report on fees, costs, or payments, the Transaction File List or Task Code Billing Report is your answer. Both reports have great flexibility and options. The Transaction File List and Task Code Billing Report have similar options. The Task Code Billing Report includes task based billing clients only. However, the Transaction File List includes both task based transactions and non-task based transactions.
The following are examples of when you may want to run a Transaction File List or Task Based Billing Report:
- The court needs a copy of all work done on a case thus far. Run the report for only the one client, for fees only, and select both Work-In-Process and Archived.
- The case is closed and you want a list of all costs that were billed. Run the report for only the one client, for costs only, and select Archived.
- You want a list of all billed transactions using a particular transaction code or task code for the current quarter. Run the report for the desired transaction code or task code, enter the desired date range, and select Archived.
- You need to find a payment that was entered for the wrong client. Run the report for payments only, select the desired date range, and then use the Search function in the Preview window to look for the payment amount.
- You want a list of everything that was billed last month by a particular timekeeper. Run the report for the one fee timekeeper, enter the desired date range, select Archived, and use a Date Selection of Statement.
For a closer look at the Transaction File List, including detailed examples and report setup, as well as a comparison to the Task Based Billing Report, visit Knowledge Base Article R11039, “How the Tabs3 Transaction File List Can Work for You.”
Often, the most common source of unbilled costs are the everyday tasks done in your office. Photocopies, faxes, phone calls, and many other tasks can easily be overlooked when entering costs for a client. Simple cost recovery methods can reclaim these expenses as needed. Many manufacturers offer devices that collect information and create an export file, which can be used in Tabs3 Billing.
The Tabs3 Device Interface software takes the export files from most collection devices and converts them into costs that can be imported to Tabs3 Billing. Additionally, it allows you to customize import settings so any standard text file can be converted, even if it is not already configured in the conversion program. This means it is very likely that you can import your task information, regardless of the device’s manufacturer.
To see if the Tabs3 Device Interface will work for you, or to order a license of the Tabs3 Device Interface for your firm, contact your local consultant or call our Sales Department at (402) 419-2200. Information about the Tabs3 Device Interface can also be found in our Knowledge Base Article R10737, “Tabs3 Device Interface Product Information,” and in R11684, “Tabs3 Device Interface Instructions.”
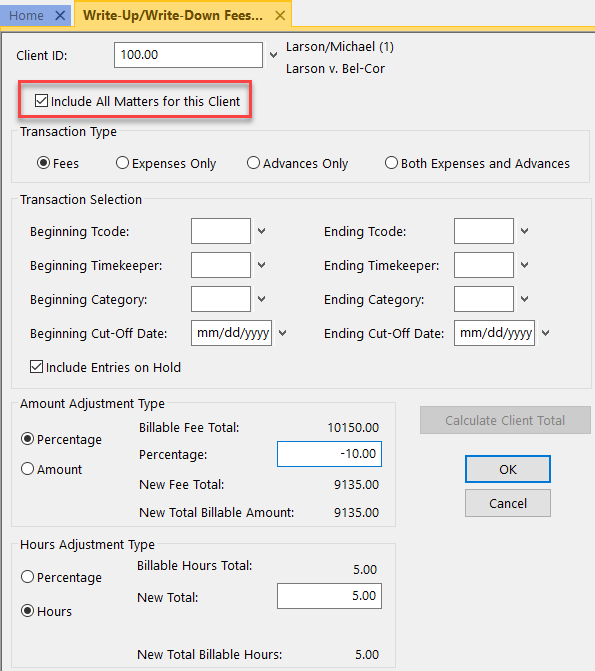 Did you know that you can write all matters for a client up or down at the same time?
As of Version 19, when using the Write-Up/Write-Down Fees and Costs program (Statements | Statement Preparation | Write-Up/Write-Down Fees and Costs), an Include All Matters for this Client check box is now available.
Prior to billing, you can use the Write-Up/Write-Down program to write-down unbilled fees, costs, or hours for a client using a range of timekeepers, transaction codes, categories, and/or dates. When writing multiple transactions up or down, each affected transaction’s amount and/or hours is adjusted by an amount proportional to the total adjustment.
When this option is selected, the Write-Up or Write-Down will include transactions for all matters for the specified Client ID. All matters that begin with the same value left of the decimal with work-in-process will be included in the calculated client total based on the criteria selected in the Transaction Selection section.
In most data entry files, like the Journal, Document Management, and Calendar files, you can easily change the Client ID by opening a record and changing it or via the Change Client ID feature. However, before now, there wasn’t a way to change the Client ID for a fee or cost in PracticeMaster without deleting the record and starting over. We recently enhanced Version 19 so that you can now use the Change Client ID feature in the PracticeMaster Fee and Cost files!
The Change Client ID feature can be used for one record, or multiple selected records. Additionally, you have the option to update the rate based on the selected client, which will automatically recalculate the amount of the transaction(s). The Change Client ID features can be accessed via the following:
- In the Take Action group of the Quick Clicks pane, select Change Client ID
- From the Edit menu, point to Action and select Change Client ID
- Right-click the record(s), point to Action and select Change Client ID
When you change the Client ID of a record that has been processed into a fee, the linked fee’s Client ID will also be changed.
We added a couple of new features to the Print Checks process in Version 19!
When using the Print Checks program (Checks | Print Checks), if the Select Invoices to Print check box is selected on the Options tab, the number of invoices selected and the total amount to pay for all selected invoices are now displayed at the bottom of the Select Invoices window. Additionally, a Tabs3 column has been added that shows the Tabs3 cost status of Paid, Unpaid, or a dash, which indicates no linked cost transaction.
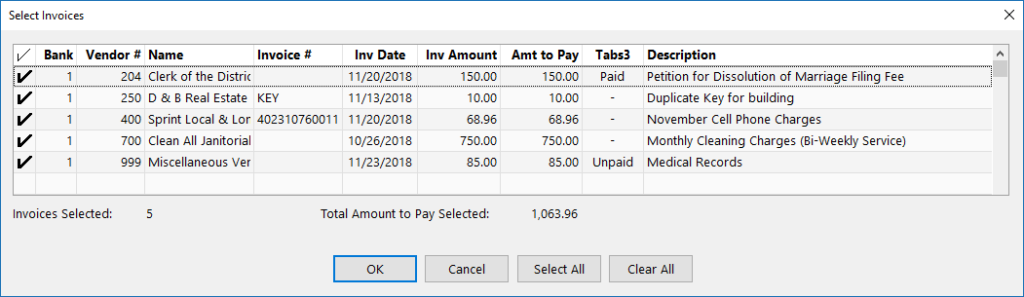
In the print checks program, you can also now select to Exclude Invoices with Unpaid Tabs3 Cost Transactions from the Options tab. When this option is selected, only invoices with the entire cost amount paid will be printed. This allows firms to opt not to pay invoices until a client pays them for the associated cost.
Occasionally, transactions may accidentally be entered for the wrong client. If there are only a couple, it’s easy to just delete them and reenter them for the correct client. However, when there are many transactions, what can you do? Use the Transfer A/R and Transactions utility in Tabs3!
The Transfer Transactions program can be used to transfer unbilled fees, costs, and/or payments between clients. When selecting to transfer fees, costs, and/or payments, you can select a range of transactions based on tcode, timekeeper, category, date, and/or reference number. This can help make sure that you are only transferring the transactions that you want to transfer.
Additionally, if a time comes when you want to transfer one client’s full accounts receivable balance, ledger, archived transactions, and client funds to another client, the Transfer A/R and Transactions utility can also be used. This function will transfer ALL of the client’s ledger records and billing history to another client. It is not possible to only transfer a client’s current A/R without also transferring everything else.
Note: When using the Transfer A/R and Transactions utility, keep in mind that once the transfer has been performed, the only way to undo it is by restoring from a backup.
To transfer transactions between clients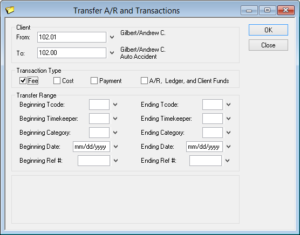
- From the Maintenance menu, select Transfer A/R and Transactions.
- Select the clients you want to transfer From and To.
- Select the desired Transaction Type(s).
- Optionally select a Transfer Range.
- Click OK.
Keep this utility in mind the next time transactions need to be transferred from one client to another client. It can save you significant time.
When entering fees and costs for task based billing clients, do you have to scroll through all of the Phase/Task or Activity Codes for other categories to get to the set of task codes applicable for your client? If you use Billing Categories for your clients, you can assign Task Code Sets to your categories so that when entering fees and costs, only the task codes that are associated with that client’s Billing Category are displayed.
To assign a Task Code Set to a Category
- From the File menu, point to Open and select Miscellaneous.
- From the Category tab, select the desired Category.
- Select the Task Based Billing Code Set you want to be assigned to the selected Category.
- Press Ctrl+S.
The next time you enter fees and costs for a client assigned to the Category selected, you will only see the Task Code Set assigned to the Category. This can greatly reduce the number of Task Codes to choose from.

We have a client who is supposed to be billed $0.12 for copies rather than our usual $0.15. However, there are many costs that have been entered with the wrong rate. Is there a way we can easily change all of them at once?
Although Tabs3 Billing has the option to change fee rates via the Change WIP Transactions program, cost rates cannot be changed using this program. As a work-around, you can accomplish the cost rate change by creating a user activated WorkFlow in PracticeMaster. This type of WorkFlow runs only when initiated by a user, which means you can choose to run it for only the costs you want to change. The WorkFlow will change the Rate of the selected costs, recalculate the amount, and then automatically save the costs.
Tip: Once the WorkFlow has been created, it can easily be changed for future scenarios. For example, if you need to adjust cost records to a different rate, simply edit the existing WorkFlow for the new scenario.
To create a WorkFlow in PracticeMaster to change the rate of existing costs
- From the Maintenance menu, select WorkFlows.
- Expand the Common Client Related section, select Cost, and then click the New button.
- Enter a Name for the WorkFlow (e.g., “$0.12 Costs”).
- In the Event section, select the User Activated check box.
- In the Actions section, click New.
- Select Change Record, and then click Next.
- Select Source Record, and then click Define Template.
- Click on the set button next to the Rate field.
- In the Template Expression Editor window, click the Value button, and then enter the desired rate. For our example, enter “0.120”.
- Click OK on the Value window, and then click OK in the Template Expression Editor window.
- Click on the set button next to the Amount field.
- Click the Value button and enter the desired rate, and then click OK. For our example, enter “0.12”.
- Click the Operator button, select Multiplication, and then click Insert.
- Click the Field button, select Units from the Field ID column, and then click Insert.
- The following will now be displayed: “0.12 * @SrcRec:Units”. Click OK on the Template Expression Editor window.
- Press Ctrl+S.
- Click Finish.
- Click Save, and then close the WorkFlows window.
To run the WorkFlow, simply open the Cost file, select the desired cost records, and then select the WorkFlow from the WorkFlows group of the Quick Clicks pane. All of the selected costs will be updated with the new rate and recalculated amount.
This was the first month of Working with WorkFlows! Did you find this article helpful? Have any article suggestions? Leave us a comment below!
When adding features for Version 18, we did not overlook Tabs3 Connect! Check out these new enhancements included when you update to Version 18:
- Tabs3 Connect now uses the Rate from Tabs3 when changing fee or cost transactions. Before, it was necessary to manually enter the desired rate when changing fees and costs via Tabs3 Connect.
- The Amount is recalculated automatically when the Timekeeper, Tcode, Activity Code, or Expense ID fields are changed. Before, making such changes in Tabs3 Connect would require you to manually change the rate and recalculate the amount.
- “Budget exceeded” messages now display when entering fees and costs in Tabs3 Connect. Before, “Budget exceeded” messages could only be displayed in Tabs3 Billing. For steps to set up budgets in Tabs3 Billing, see this month’s Budget Exceeded Messages Q&A.
- Tabs3 Connect now includes the Private check box when adding or changing calendar entries. Before, calendar entries could only be marked Private from PracticeMaster.
- Added the ability to use your Tabs3 and PracticeMaster Text Macros. For more information on text macros and Tabs3 Connect, see our June Tabs3 Connect, Text Macros.
For more information on Tabs3 Connect, contact your reseller and consultant, contact Technical Support at (402) 419-2210, or visit Knowledge Base Article R11480, “All About Tabs3 Connect.”
Did you know that you can easily split fees and costs between multiple matters in Tabs3 Billing? The Split Billing program provides the ability to enter fees and costs once, but have multiple matters pay for them. You must first determine which client you will be entering fees and costs for; this is your “main client”. Next, determine which clients/ matters will be splitting the bill, and for what percentage each party will be responsible. You can now configure split billing for the client.
To configure clients for split billing
- From the File menu, point to Open and select Client.
- From the Split Billing tab, in the Client ID field, select the desired main client.
- Click the Add button to open the Split Billing Matter window.
- Select the desired Split Matter ID.
- Enter the desired Split Billing Percentages for the split matter.
- Enter the desired Statement Options settings for the split matter.
- Click OK.
- Repeat step 3 for each additional split matter. (Note: This may include the main client.)
- Select the desired Split Fee Options and Split Cost Options.
- Press Ctrl+S.
Fees and costs may be entered before and/or after configuring split billing, but keep in mind that when it comes time to perform the split, only those fees and costs entered for the main client will be split amongst all parties. Additionally, only Type 0 (Normal) and Type 5 (Miscellaneous) fee and cost transactions that are not on hold can be split.
When you are ready, you can run the Perform Split Billing program (Statements | Statement Preparation | Perform Split Billing). Transactions that have already been split cannot be split again so this program can be run as often as needed. The Perform Split Billing program should be run prior to generating statements every time in order to make sure that all transactions are billed appropriately.
If, after performing the split, you need to change the way in which transactions should be split, simply run the Undo Split Billing program (Maintenance | Transaction Related | Undo Split Billing). This program will revert all split transactions for the selected Main Client ID and Split Billing Ref # that are still work-in-process to their pre-split values. This provides a way to easily make adjustments as needed. If you have even one client who splits amounts due with other matters, and you’ve been splitting the fees and costs manually, make your billing easier by using the Split Billing feature in Tabs3.
For more information on split billing features, see Knowledge Base Article R11616, “All About Tabs3 Split Billing,” the Billing Adjustments Guide, and the Split Billing Training Video.
Tabs3 Connect has been around for some time now, but what exactly is Tabs3 Connect, and what can it do for your firm? Tabs3 Connect is a Platinum feature that provides access to Tabs3 and PracticeMaster anywhere you can connect to the Internet. No apps to download, simply go to Tabs3Connect.com and log in using your phone, tablet, laptop, or other internet-enabled device. Access client and contact information, enter fees and costs, use Matter Manager, access your firm’s calendar, receive alarm notifications, send and receive eNotes, and download documents and e-mail attachments via Tabs3 Connect. On smartphones and tablets, you can tap to create a fee, and flick to scroll through a list.
Keeping your data secure is top priority, and Tabs3 Connect was designed to protect attorneys’ sensitive information. The information you access using Tabs3 Connect is secure because it resides at your office, on your computer. It won’t be stored on someone else’s server in the cloud, or on a phone that you might lose. Furthermore, you choose who has access to Tabs3 Connect and who doesn’t, and access profiles affect users logged in to Tabs3 Connect as well. You can even keep track of Tabs3 Connect access and activity by reviewing the Tabs3 Connect Access Log and Tabs3 Connect Log.
If you already have Platinum, take advantage of this great feature and change the way your firm works! Don’t have Platinum yet? Now is a great time to explore the possibilities.
For more information on Tabs3 Connect, contact your reseller, consultant, or Technical Support at (402) 419-2210; or, visit Knowledge Base Article R11480, “All About Tabs3 Connect.” For more information on all of the great Platinum features, visit Knowledge Base Article R11379, “Platinum Overview.”

