Feature Article: Use the PracticeMaster Journal File to Go Paperless
July 2025 Tags: Clients, Contacts, Email, PM Journal, PracticeMaster
No comments
Is your desk cluttered with sticky notes, miscellaneous pieces of paper, and phone messages? Clear your work area, consolidate your notes, and link them to the appropriate clients and contacts by using the PracticeMaster Journal file!
The following types of records can be added to the Journal file (In the Quick Launch, search for and select “Journal File”) by clicking the ![]() (New) button:
(New) button:
- Notes: Add free-form notes to keep track of any necessary information.
- Time Tasks: Keep track of how much time you spend on the various tasks associated with your matter.
- Phone Tasks: Keep track of phone calls to and from clients and third parties, including the phone number and whether you spoke with the desired person or left a message.
- Research Tasks: Keep all of your research notes in one place, including the website address and a linked file.
- Emails: Use the Outlook Toolbar Plug-in (In the Quick Launch, search for and select “Toolbar-Plug-ins” and click the Outlook tab) to save both sent and received emails.
Alternatively, Time Tasks, Phone Tasks, and Research Tasks can be created via the Timer (In the Quick Launch, search for and select “Timer”). When integrated with Tabs3 Billing, any Client Notes from Tabs3 Billing (In the Quick Launch, search for and select “Client Information” and click the Client Notes tab) can also be viewed, but not edited, in the PracticeMaster Journal file.
Not only can you move information from paper to PracticeMaster, but every journal record provides a Client ID and Contact field. This links the record directly to the client’s matter and/or contact for which it applies and allows others to access the same information when they need it. Simply open the Client and/or Contact file and click on the Journal tab to see all journal records pertaining to this client, or select a Journal Page tab (e.g., Email, Phone, Timer, etc.) to see specific record types. You can configure which tabs to display in the Client file by opening Configure Client Pages (Edit | Configure Client Pages) from the List tab, and in the Contact file by opening Configure Contact Pages (Edit | Configure Contact Pages).
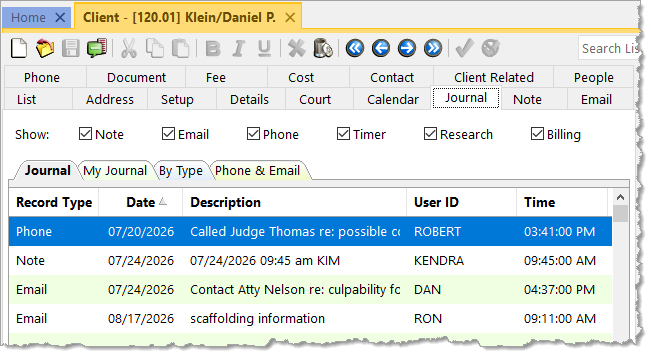
Use PracticeMaster to help organize your notes, research, and more – declutter your workspace, and allow others access to valuable information!

Quick Tip: Reverse Write Off
July 2025 Tags: Clients, Tabs3 Billing, Write Offs
No comments
Did you know that you can reverse write offs? The Reverse Write Off feature allows you to reverse a write off that was created via Write Off Client. The information for the write off will be backed out, returning the client ledger, accounts receivable, receipt allocation, and productivity to their original values.
To reverse a write off
- In the Quick Launch, search for and select “Reverse Write Off.”
- Select the Client ID.
- In the Reference Number field, select the write off you want to reverse.
- Click OK.

Spotlight: PracticeMaster Matter Manager
November 2024 Tags: Clients, PM Matter Manager, PracticeMaster
No comments
Do you use the PracticeMaster Matter Manager? Matter Manager presents client and contact information in one easy-to-read window. Emails, phone calls, client notes, documents, and more are organized so that you can see exactly what has been done for the matter and when.
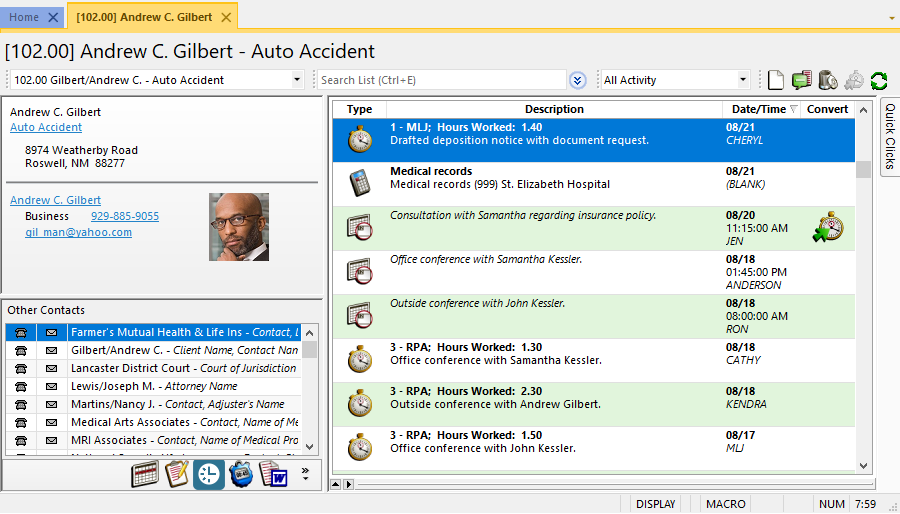
View All Activity for the current matter, or select a specific file from the Record Type Selector such as the matter’s calendar, contacts, documents, fees, journal, or Area of Practice information. If integrated with Tabs3 Billing, you can even view a Billing Summary that includes trust account balances, the current amount due, and the last payment date. Use the Billing Summary to quickly determine the financial value of the case, and convert activities to fees using the (Convert to Fee) button so that nothing gets missed on the client’s monthly statement.
Get the most out of Matter Manager by adding or removing buttons from the Custom Taskbar so that it launches features and reports you use the most.
You will soon find that almost everything you do for a matter in PracticeMaster can be started from Matter Manager. If you want to automatically launch Matter Manager every time you open PracticeMaster, right-click the PracticeMaster desktop icon you use to start the software, select Properties, then add “ /manager” to the end of the Target field.
Matter Manager is a powerful way to track your clients. If you’re not already using it, take a look!

Spotlight: Change Client Options
October 2024 Tags: Clients, Tabs3 Billing
No comments
Do you need to make a change that affects multiple clients or matters? Do you want to save time by changing clients all at once instead of one at a time? Use the Change Client Options utility! The Change Client Options utility allows you to change options in the Client Information window for a range of clients.
You can change options for client setup, rates, billing, and statements. This includes changing the timekeepers assigned to a case, client status, payment settings, fee and cost rate table information, billing status, sales tax and finance charges, statement delivery options, statement format settings, statement notes, and more!
For example, let’s say you have created a new Email Template, and you want to change all clients with a specific primary timekeeper to use this new template. You could edit each client to make the change, but with Change Client Options, you can change all clients at once!
To change all clients with a specific primary timekeeper at once
- In the Quick Launch, search for and select “Change Client Options.”
- On the Client tab, specify the Primary Timekeeper of the clients for which you want to add the new template.
- For the Client ID range, clear the Client ID Thru field. This field intentionally defaults to 0.00.
- From the Billing tab, click the Select button.
- Select Email Template from the list and click OK.
- Select the Email Template to use.
- Click OK.
The Change Client Options utility provides several features to help minimize errors. First, you are prompted to back up your data prior to running the program. If you inadvertently change a setting for the wrong clients, or you change the wrong settings, you can restore the backup to undo the changes. Second, the Client ID Thru field is automatically set to 0.00. This prevents an accidental change to all clients across the board. And third, you must click the Select button to specify the exact field(s) to which you want to make changes. Only the fields you select will be available to change; therefore, other fields and settings do not get changed.
Note: In Version 2024 (Build 24.2), we added a new Custom Fields tab to the Change Client Options utility to allow custom fields to be added or changed for multiple matters. This allows matters to have custom fields added in bulk, with or without specific text values, or to change the text value for specific fields, even if the field number is different across matters.
The Change Client Options utility simplifies global changes, which means you will have more time for your regular tasks!

Feature Article: Apply Payments to Multiple Matters
January 2024 Tags: Clients, Payments, Statements, Tabs3 Billing
No comments
Did you know that you can apply payments to multiple matters for the same client? Payments can be allocated by statement date, proportionally, or manually.

Note: The split payments will make individual journal entries in Tabs3 General Ledger that will be linked together and shown as one item on the Reconciliation and Deposit Slip Report.
To apply a payment to multiple matters
- In the Quick Launch, search for and select “Payment Entry.”
- Select the desired Client ID.
- Enter the payment as you would normally. The information entered in each field will be automatically replicated for each matter’s payment.
- Click the
 (Apply Payment to Multiple Matters) button or press Alt+A.
 - In the Payment Amount for Multiple Matters window:
- Click the Apply by Date button.
–or–
Click the Apply Proportionately button.
–or–
In the Apply column, enter the amount you want to apply to each matter. - Click Finalize.
- Click the Apply by Date button.
The Apply Payments to Multiple Matters option is also available when entering or importing Tabs3Pay payments. (Note: To use the Apply Payments to Multiple Matters option when importing Tabs3Pay payments, you must select the View each Payment record before creating option in the Import Online Payments window.)

Billing Q&A: Assessing Finance Charges
December 2023 Tags: Clients, Tabs3 Billing
No comments
We will start assessing clients a finance charge on unpaid work at the end of the year. How can we configure this?
In order to apply a finance charge, you must first enable finance charges in Customization, and then configure the clients.
To enable finance charge in Customization
- In the Quick Launch, search for and select “Customization.”
- On the Rates tab, in the Finance Charge section:
- Select the Assess Finance Charge check box.
- Select the Subject to Finance Charge check box if you will also be charging a finance charge on any unpaid finance charge (compounding).
- In the Rate 1 – Rate 5 fields, enter the desired annual percentage rate(s).
- Press Ctrl+S.
To configure clients to be assessed a finance charge
- In the Quick Launch, search for and select “Change Client Options.”
- On the Client tab, enter the range of clients that you want to assess a finance charge. Alternatively, click the Multiple button to enter multiple Client IDs or multiple client ranges.
- On the Billing tab, click the Select button, select Assess Finance Charge, Finance Charge Rate, Finance Charge Days, and Apply Payment to Finance Charge, and click OK.
- Select the Assess Finance Charge check box.
- Select the appropriate Finance Charge Rate, Finance Charge Days, and Apply Payment to Finance Charge options.
- Click OK.
Note: Alternatively, you can configure clients individually on the Billing Options tab of Client Information.
For more information, check out Knowledge Base Article R10850, “All About Tabs3 Finance Charges.”

Billing Q&A: Flat Fee Billing
November 2023 Tags: Clients, Fees, Tabs3 Billing
No comments
We have a client we need to bill a fixed fee amount every month, but we still need to keep track of our hours and productivity. Does Tabs3 Billing have a solution for this?
Tabs3 Billing includes a Flat Fee Billing feature, which allows you to enter your time for a matter normally throughout the billing period, and then write the amount of the fees proportionally up or down to a predetermined amount prior to running statements.
To configure a matter for flat fee billing
- In the Tabs3 Billing Quick Launch, search for and select “Client Information.”
- In the Client ID field, select the matter you want to configure.
- Click the Rates tab and select 0 – Flat Fee Amount in the Billing Rate Code field.
- Enter the amount you want to bill the client on each statement in the Flat Amount field.
- Press Ctrl+S.
Once you have configured the matter for flat fee billing, you can enter time in Tabs3 Billing normally.
To adjust flat fee clients prior to running statements
- Run any reports or draft statements that you need to include the original fee amounts for review or reference.
- In the Tabs3 Billing Quick Launch, search for and select “Adjust Flat Fee Clients.”
- On the Client tab, select the range of matters you want to adjust. (Note: Only matters configured for flat fee billing will be adjusted.)
- On the Transactions tab, select the range of fees you want to adjust. We recommend selecting the end date of the billing cycle as the Thru date of the Fee Date field.
- Click OK to adjust the fees for the selected matters.
Once the fees have been adjusted, you can run your statements normally.

Billing Q&A: Changing Multiple Matters to Inactive
October 2023 Tags: Clients, Tabs3 Billing
No comments
We have a client with many matters that we want to mark as inactive, so that when we run reports or statements it will only include the matters we are working on. Is there a way I can make all of them inactive at once instead of going into each individual matter?
To make changes for multiple client matters all at once, you can use Change Client Options. Because Change Client Options is a powerful feature that can make changes to all of your clients at once, we recommend making a backup when prompted.
To mark multiple matters as Inactive via Change Client Options
- In the Quick Launch, search for and select “Change Client Options.”
- On the Client tab, enter the range of client matters that you want to mark inactive. Alternatively, click the Multiple button to enter multiple Client IDs or multiple client ranges.
- On the Setup tab, click the Select button, select Inactive and Archive Matter Address, and click OK.
- Select the Inactive check box.
- Optionally select the Archive Matter Address check box.
- Click OK.

Feature Article: Client Portal
August 2023 Tags: Clients, Tabs3 Billing, Version 2023
No comments
We have added a Client Portal to Tabs3 Billing Version 2023 that allows you to invite clients and contacts you select to access an online client portal! This allows those customers to view their current balance and billing history. When combined with Tabs3Pay, clients can submit electronic payments that automatically apply towards their current balance due.
Setting up a client portal for the firm is performed in the Tabs3 Connect Administration window of System Configuration. Once a manager enables the portal and configures the web address, invitations can be sent to the firm’s clients. (Note: Tabs3 Connect must show “Connected” to enable the client portal; see KB Article R11480, “All About Tabs3 Connect,” for more information on configuring and using Tabs3 Connect.)
Configuring access to the client portal is done in the Client Portal Settings window, which can be accessed from the Tabs3 Billing Matter Manager, Client Information window, Contacts list, or Contact Information window. When starting from a client, you can select contacts to access that specific matter; when starting from a contact, you can select which matters the contact has access to.
A new access right for Client Portal Settings has been added. For additional information, see KB Article R11818, “Access Rights.”
For more information about the Client Portal, see KB Articles R11919, “Configuring the Tabs3 Client Portal,” and R11920, “Using the Tabs3 Client Portal.”

Billing Q&A: Renumbering Clients
August 2023 Tags: Clients, Tabs3 Billing
No comments
I created a new client a few weeks ago and have since added fees and costs. However, I was recently informed that this client should have been made as a matter to an existing client instead. I would prefer to not have to delete and recreate this activity. Is there a way to change the Client ID so that it becomes a matter for the other existing client?
You can change any existing Client ID to another by using the Renumber Client utility. When renumbering a client, any records associated to the original client will be renumbered to the new Client ID as well.
To renumber a client
- In the Quick Launch, search for and select “Renumber Client.” We recommend making the backup when prompted.
- In the Old Client ID field, select the Client ID that needs to be renumbered.
- In the New Client ID field, enter an unused Client ID that you want the matter to use.
- Click OK.

Billing Q&A: Configuring Client Budgets
May 2023 Tags: Clients, Tabs3 Billing
No comments
We have matters for which we only want to charge up to a set amount or set a limit for the total hours worked. Is there a way for Tabs3 Billing to notify us if we will exceed these limits?
Tabs3 Billing includes a Budget feature that allows you to set a maximum amount and/or hours per matter. Additionally, with matters configured for Task Based Billing, you can specify separate budgets by phase for both activity (fees) and expenses (costs). When you are entering fees or costs in Tabs3 Billing, PracticeMaster, or Tabs3 Accounts Payable, you will be notified before saving if the transaction will exceed the matter’s budget.
To configure a budget for a non-Task Based Billing matter
- In the Tabs3 Billing Quick Launch, search for and select “Client Information.”
- Select the Client ID for which you are creating a budget.
- Click the Budget tab.
- In the Hours to Bill field, specify the maximum total hours you want to bill the client for this matter.
- In the Amount field, specify the maximum amount you want to bill the client for this matter.
- Select the Warn if Budget Exceeded check box.
- Press Ctrl+S.
To configure phase-level budgets for a Task Based Billing matter
- In the Tabs3 Billing Quick Launch, search for and select “Client Information.”
- Select the Client ID for which you are creating a budget.
- Click the Budget tab and then click the Budget button.
- In the Phase/Task field, select the phase for which you are creating a budget.
- In the Activity Amount field, specify the maximum fee amount you want to bill for the selected phase.
- In the Expense Amount field, specify the maximum cost amount you want to bill for the selected phase.
- Click Save Record.
- Repeat steps a-d for each phase you want to budget.
- Click OK.
- Select the Warn if Budget Exceeded check box.
- Press Ctrl+S.

Feature Article: Request Trust Deposit
July 2022 Tags: Clients, Email Statements, Tabs3 Billing, Tabs3Pay, Trust Accounting
No comments
When it is time for a client to replenish a trust account, use the new Request Trust Deposit feature! Enter the amount requested and select the corresponding IOLTA account. Tabs3 Billing then creates an email message with an embedded payment button. Review the message and send it to your client.
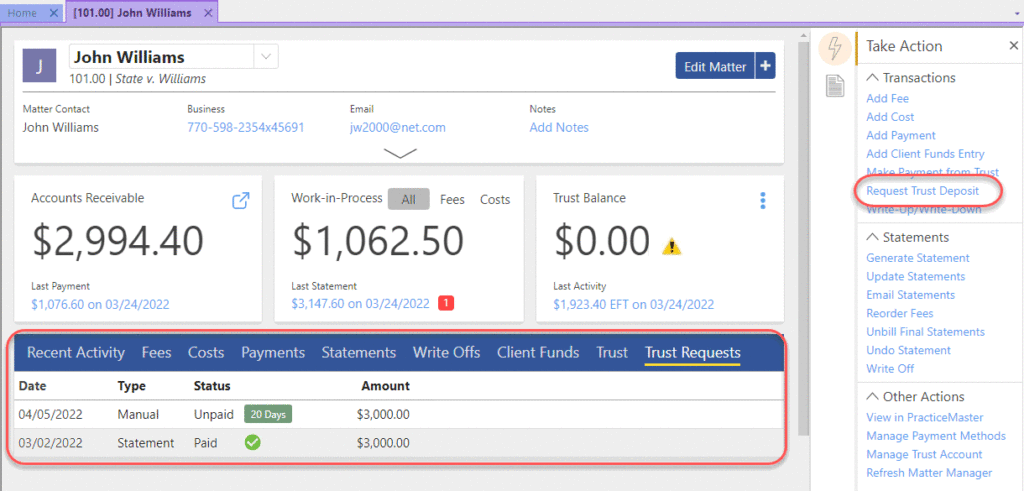
Your client receives the message, clicks the Make Trust Payment button, and funds the trust account by ACH bank transfer or credit/debit card.
Request Trust Deposit is powered by Tabs3Pay, the secure online payments platform built into Tabs3 Billing and Trust Accounting.
Note: The Trust Request feature requires Tabs3 Billing and Trust Accounting Version 2022 (Build 22.2.3) and later. Including a Make a Trust Payment button in a trust request requires a Tabs3Pay merchant account configured in Tabs3 Billing and Trust Accounting. For additional information, see KB Articles R11869, “Configuring Tabs3Pay,” and R11905, “Requesting and Importing Tabs3Pay Online Payments and Trust Deposits.”

Video of the Month: Client Ledger Report
July 2022 Tags: Clients, Reports, Resources, Tabs3 Billing
No comments
Finding that perfect report can be so satisfying! When it comes to tracking your clients’ billing and payment history, the Client Ledger Report has it all!
Check out the Client Ledger Report video to see how you can easily view detailed information about statements, payments, and write offs for your clients, all in one place. This report also includes drill-down capabilities, which makes it easy to view an updated statement or to find out more about how a payment was allocated.
Watch this three-minute video here:
Training Videos can be accessed at Tabs3.com/videos. You can also access the videos in the Quick Launch by searching for and selecting “Training Videos.”

Billing Q&A: Bill On Demand
May 2022 Tags: Clients, Statements, Tabs3 Billing
No comments
One of the matters in Tabs3 Billing requires me to select the Release To Bill check box every time I want to print a statement for them. Why does this check box keep getting cleared?
The matter is most likely configured to Bill On Demand. Bill On Demand is a feature that enables you to only bill a client when needed, rather than every billing cycle. When the Bill On Demand check box is selected, each time a statement is final billed and updated for the matter, the Release to Bill check box is automatically cleared to prevent unauthorized statements from being sent in the future. When you are ready to send another statement, simply select the Release to Bill check box again.
If you want a statement to print for the matter whenever they have a balance, simply clear the Bill on Demand check box and select the Release to Bill check box. The matter will then be included in all future billing cycles.
To enable the Bill On Demand feature
- In the Quick Launch, search for and select “Client Information.”
- Select the Client ID you want to configure.
- On the Billing Preferences tab:
- Select the Bill On Demand check box.
- Select the Release To Bill check box if you want to include this matter in the next batch of statements. Clear the Release To Bill check box to prevent statements from printing until you select it again.
- Press Ctrl+S.
To disable the Bill On Demand feature
- In the Quick Launch, search for and select “Client Information.”
- In the Client ID field, select the matter you want to configure.
- On the Billing Preferences tab:
- Clear the Bill On Demand check box.
- Select the Release To Bill check box.
- Press Ctrl+S.

Video of the Month: Working with the Journal File
April 2022 Tags: Clients, Contacts, Filters, PM Journal, PracticeMaster, Resources, Tabs3 Connect
No comments
From taking notes about an upcoming meeting, to storing emails, to recording details about a phone conversation, PracticeMaster Journal records are essential for managing your clients and contacts on a daily basis.
The Working with the Journal File video walks you through the process of accessing and creating new records from the Journal File, Matter Manager, Client File and more! Since each type of Journal record is optimized to fit your needs, records like phone tasks or timers can easily be converted to billable time with one click. Additionally, using Tabs3 Connect, you can access your journal information on the go!
Watch this four-minute video here:
Training Videos can be accessed at Tabs3.com/videos. You can also access the videos in the Quick Launch by searching for and selecting “Training Videos.”

Billing Q&A: Bill To Records
April 2022 Tags: Clients, Statements, Tabs3 Billing
No comments
I would like to send my client’s statement not only to my client, but to an additional party as well. Is there a way to have two different email addresses for the same statement?
You can have up to two Bill To records for each client, allowing you to send statements to up to two parties.
To add a Bill To Record
- In the Quick Launch, search for and select “Client Information.”
- Select the desired Client ID.
- From the Billing Preferences tab, in the Statement Delivery Options section, click the Add button.
- In the Bill To Name field, select an existing contact or enter a new name to create a new contact.
- In the Statement Delivery Options section, select the Mail Statement and/or Email Statement check box.
- Click the OK button.
- Press Ctrl+S.

Tabs3 Connect: See What They Owe – On the Spot
February 2022 Tags: Clients, Costs, Fees, Mobile Access, Platinum, PM Matter Manager, Tabs3 Connect
No comments
You meet up with a client away from the office, they want to write a check for what they owe, but you don’t have the balance due with you. What do you do? Simply log into Tabs3 Connect, and have the amount in a matter of seconds!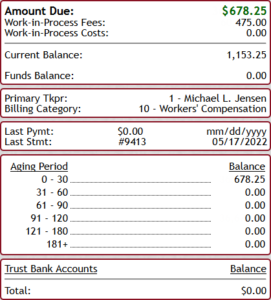
With Tabs3 Connect, you can use the Matter Manager to see exactly how much your client owes. Matter Manager’s Billing Summary provides client-specific information that includes the current amount due, work-in-process fees and costs, aged balances, and more. Make sure you’re not fumbling for a figure, or having to call the office. Accessing Tabs3 Connect is quick, easy, and secure!
For more information on Tabs3 Connect, contact your consultant, call Technical Support at (402) 419-2210, or visit Knowledge Base Article R11480, “All About Tabs3 Connect.”

Tabs3 Connect: Client Related Emails
December 2021 Tags: Clients, Mobile Access, Platinum, PM Journal, PM Matter Manager, Tabs3 Connect
No comments
You’re away from the office and need to review an email that was sent regarding a client, but trying to find it in Outlook on your phone or tablet can be cumbersome and time consuming. Tabs3 Connect can get you what you need faster!
Emails that have been journaled to PracticeMaster and assigned to a client are all easily accessed in one place – the Matter Manager. Tabs3 Connect provides access to the Matter Manager from any browser and from wherever you are, be it court, an outside business meeting, lunch, or your favorite vacation spot. Simply log in to Tabs3 Connect and click the ![]() icon to open the Matter Manager. Select the Client ID, and then click the Journal button. You can now see and search all items that were journaled for this client, including email journal records.
icon to open the Matter Manager. Select the Client ID, and then click the Journal button. You can now see and search all items that were journaled for this client, including email journal records.
For more information on Tabs3 Connect, contact your consultant, call Technical Support at (402) 419-2210, or visit Knowledge Base Article R11480, “All About Tabs3 Connect.”

Feature Article: New Lists in Tabs3 Billing
September 2021 Tags: Client Funds, Clients, Contacts, Costs, Fees, Payments, Tabs3 Billing, Version 2021, Write Offs
No comments
We added a new way to view clients, contacts, fees, costs, payments, client funds, and write offs without having to run a report! When accessing the new Tabs3 Billing lists, you can work with entries using the actions in the Quick Clicks pane, or drill down for additional details. Lists are available via the File | Open menu in Tabs3 Billing or by searching the Quick Launch for “clients,” “contacts,” “client funds,” “fees,” “costs,” “payments,” and “write offs.” The data entry windows for these record types are now available via File | Data Entry or by searching the Quick Launch for “client information,” “contact information,” “client funds entry,” “fee entry,” “cost entry,” and payment entry.”

Filtering
Filtering is a powerful feature. For example, you could filter the Client file to only show clients for which you’re the primary timekeeper. As another example, you could filter the Fee file to only show fees entered in the last week. There are a few ways to filter in the lists.
- The Search Box allows on-the-fly filtering capabilities and can be used to filter data based on keywords included in any column shown in the current column layout.
- The List group in the Quick Clicks pane provides different filtering options for each list. For example, the Contacts List provides the option to filter for All Contacts or Active Only.
- The Filter group in the Quick Clicks pane can be used to set up easy or complex filters that you can reuse. Filters can be added via Manage Filters.
- The QuickViews group in the Quick Clicks pane can be used to create different views of your data. Each QuickView can include a filter, column layout, and sort. QuickViews can be added via Manage QuickViews.
Quick Clicks
The Quick Clicks pane includes the following additional groups:
- The Take Action group of the Quick Clicks pane includes additional actions you can take. For example, in the Fees List, you can transfer transactions, replicate transactions, set the fee’s status to hold, set the fee’s status to print, change WIP transactions, write-up or write-down fees, generate statements, and add a new fee.
- The Report group of the Quick Clicks pane includes any reports that are relevant to the current list. For example, the Write Offs List includes the Write Off Report and the Client Ledger Report.
- The Column Layout group of the Quick Clicks pane automatically includes the Standard and (default) column layouts. Column layouts can be added via Manage Column Layouts.
- The Customize Current View group of the Quick Clicks pane includes Manage Quick Clicks, Refresh, and List Preferences. Manage Quick Clicks provides the ability to add, edit, or delete filters, QuickViews, and column layouts, as well as to organize the Quick Clicks. List Preferences include row height, row colors, and grid lines for the list.
Download the latest version of the software to get this great new feature!

Video of the Month: Adding a Field to PracticeMaster
September 2021 Tags: Clients, PracticeMaster
No comments
Ready to take the next step in customizing PracticeMaster to fit your practice? We’ve got the solution you need!
The Adding a Field to PracticeMaster video walks you through the process of creating a new field in File Maintenance as well as how to place and adjust your new field’s location using Form Designer. Although this video focuses on the Client File, the same process can be used in any file in PracticeMaster, including Area of Practice files.
Watch this five-minute video here:
Training Videos can be accessed at Tabs3.com/videos. You can also access the videos while in the software by selecting Help | Training Videos.
If you need to report on fees, costs, or payments, the Transaction File List or Task Code Billing Report is your answer. Both reports have great flexibility and options. The Transaction File List and Task Code Billing Report have similar options. The Task Code Billing Report includes task based billing clients only. However, the Transaction File List includes both task based transactions and non-task based transactions.
The following are examples of when you may want to run a Transaction File List or Task Based Billing Report:
- The court needs a copy of all work done on a case thus far. Run the report for only the one client, for fees only, and select both Work-In-Process and Archived.
- The case is closed and you want a list of all costs that were billed. Run the report for only the one client, for costs only, and select Archived.
- You want a list of all billed transactions using a particular transaction code or task code for the current quarter. Run the report for the desired transaction code or task code, enter the desired date range, and select Archived.
- You need to find a payment that was entered for the wrong client. Run the report for payments only, select the desired date range, and then use the Search function in the Preview window to look for the payment amount.
- You want a list of everything that was billed last month by a particular timekeeper. Run the report for the one fee timekeeper, enter the desired date range, select Archived, and use a Date Selection of Statement.
For a closer look at the Transaction File List, including detailed examples and report setup, as well as a comparison to the Task Based Billing Report, visit Knowledge Base Article R11039, “How the Tabs3 Transaction File List Can Work for You.”

Spotlight: Client Inactivity Report
June 2020 Tags: Clients, PracticeMaster, Reports, Tabs3 Billing
No comments
What is the Client Inactivity Report, and why should you use it? The Client Inactivity Report can be used to identify clients and matters with no activity in a specified time frame, which can help keep clients from slipping through the cracks. This report allows you to do the following:
- Report on which clients have not had any activity in the last year so you can mark applicable matters as closed.
- Determine which clients you have not received a payment from this month so that you can send a reminder statement or write off amounts.
- Provide each Primary Timekeeper with a report of all active matters with no fees in a certain time frame, such as the last two weeks.
- Plus much more!
A Client Inactivity Report can be run in both Tabs3 Billing and PracticeMaster; however, each program provides unique options to run the report.
- In Tabs3 Billing, you can search for activity in fees, costs, statements, payments, payment adjustments, write offs, and client funds.
- In PracticeMaster, you can search for activity in the Calendar, Journal, Document Management, Fee, Cost, Additional Common Client Related, and Area of Practice Files.
To run a Client Inactivity Report
- In Tabs3 Billing, from the Reports menu, point to Client and select Client Inactivity Report.
…or…
In PracticeMaster, from the Reports menu, select Client Inactivity Report. - On the Client tab, select the desired client range.
- On the Options tab:
- In the No activity in the last field, enter the desired time frame.
- Under Items to Search/Files to Search, select the desired check boxes.
- On the Sort tab, select the desired Primary and/or Secondary Order.
- Click OK.
Note: By default, the Client Inactivity Report is set to only include clients that are currently active and do not have a Date Closed specified. However, this setting can be changed. From the Client tab, click the Select Status button and select the desired option(s).

Spotlight: Category Pages
April 2020 Tags: AOPs, Clients, Contacts, PM Journal, PracticeMaster
No comments
Did you know that you can add tabs to the Client, Contact, and Journal files that are specific to an Area of Practice, Contact Category, or Journal Type?
These tabs are called category pages. Category pages are a special type of page that is only shown in the Editor window when the selected client or record is associated with that category. You can use the Form Designer to customize how the pages will look.
- Client category pages are configured for individual Areas of Practice (e.g., Personal Injury, Family Law, Workers’ Compensation, etc.). These pages will only be shown when a client belonging to that Area of Practice is selected.
- Contact category pages are configured for individual contact categories (e.g., Attorney, Prospect, Insurance Adjuster, Witness, etc.). These pages will only be shown when a contact assigned to that contact category is selected.
- Journal category pages are configured for individual journal record types (e.g., Email, Phone Task, Research Task, etc.). These pages will only be shown when a journal record of that record type is selected.
Setting up a category page provides a way of showing only those fields that are relevant to the selected “category,” thus reducing the number of visible pages.
In order to create a category page, you must first add any fields specific to the category page to the associated file using File Maintenance (e.g., add the desired fields to the Contact file). Once the fields have been added, the category page and fields must be added to the data entry window using the Form Designer.
To create a category page
- From the List tab of the Client, Contact, or Journal file, select Edit | Form Designer.
- To add a category page, click the
 (Add Category Page) button.
 - Select the appropriate Area of Practice, Contact Category, or Journal Type with which the category page will be associated and click OK.
- A new page will be displayed. To rename the page, double-click the category page tab, specify a name for the page, and click OK.
- Add fields, group boxes, and labels until the category page is complete.
- Close the Form Designer and save the changes made to the form layout.
Additional information regarding category pages can be found in Knowledge Base Article R10566, “Category Pages in PracticeMaster.”

Working with WorkFlows: Using WorkFlows to Limit Fee Descriptions for a Client
October 2019 Tags: Clients, Fees, PracticeMaster, WorkFlows
No comments
I represent an insurance company with over 80 active matters. This company is now requiring fee descriptions to not exceed 300 characters. Is there a way to put a character limit on fees for a single client?
When entering fees in PracticeMaster, an automatic WorkFlow can be configured with a filter to only trigger when fee descriptions exceed 300 characters for a specific range of matters or clients.
To create a WorkFlow that prompts the user when a fee description is too long
- From the Maintenance menu, select WorkFlows.
- Expand Common Client Related Files, select the Fee file, and then click the New button.
- Enter a Name for the WorkFlow (e.g., “Desc Character Limit Exceeded”).
- In the Source section, select Filtered Records, and then click Filter.
- Click the New Row button, select Client ID, and then click Select.
- In the Test Condition column, select greater than or equal to.
- In the Test Value column, enter the lowest Client ID that requires the character limit (e.g., “415.00”).
- Click the New Row button, select Client ID, and then click Select.
- In the Test Condition column, select less than or equal to.
- In the Test Value column, enter the highest Client ID that requires the character limit (e.g., “415.99”).
- Click the New Advanced Row button.
- In the Advanced Expression Editor window, select Function.
- Select LEN and click Insert.
- With the cursor between the parentheses, click Field.
- Select Description and click Select.
- With the cursor at the end of the expression, select Operator.
- Select Greater than and click Insert.
- Enter the character limit (e.g., “300”) and click OK.
- In the Advanced Expression Editor window, select Function.
- Click Save.
- Click the New Row button, select Client ID, and then click Select.
- In the Event section, select Record Added and Record Changed.
- In the Actions section, click New.
- Select Change Record, and then click Next.
- Select Source Record, and then click Define Template.
- Click the set button next to Description.
- In the Template Expression Editor window, click Field.
- Select a Field ID of Description and then click Insert.
- Click OK.
- Press Ctrl+S.
- Click Finish.
- Click New again.
- Select Display Message, and then click Next.
- Click the Title field.
- In the Template Expression Editor window, click Value.
- Enter the title for the message (e.g., “Description Character Limit Exceeded”) and then click OK.
- Click OK.
- Optionally select an Icon.
- Click the Body field.
- In the Template Expression Editor window, click Value.
- Enter the message to be displayed (e.g., “The description you have entered for the recently saved fee has exceeded the description limit defined by the client. Please edit the description to be less than 300 characters”) and then click OK.
- Click OK.
- Click Finish.
- Click Save.
You now have a WorkFlow that is automatically triggered when the length of a fee description exceeds a set number of characters for a particular Client ID range. A prompt is displayed letting the user know that the description is too long for that client and reopens the record for editing.
Note: WorkFlows are a PracticeMaster-only feature. Fees entered or edited in Tabs3 will not trigger the WorkFlow.
For more information on WorkFlows, refer to our PracticeMaster WorkFlows Guide at Tabs3.com/support/docs.html or Knowledge Base Article R11307, “All About WorkFlows.”

Outlook Integration: Prefill Client ID/Contact Fields Journaling Emails from Outlook
September 2019 Tags: Clients, Contacts, Outlook Integration, PracticeMaster
No comments
When I’m journaling emails from Outlook, the Client and Contact fields sometimes populate a value and sometimes don’t. What determines when those will have a default value or not?
To determine whether an email address is associated with a client or contact, PracticeMaster utilizes a cross-reference file that is updated each time you journal an email from Outlook into PracticeMaster. The cross-reference file tracks associations between a particular email address and the Client and/or Contact to whom an email to or from that address was saved. You can control this behavior using the settings for the Outlook Plug-in in PracticeMaster. When the PracticeMaster Outlook Plug-in is installed, there are a few options designed to simplify the process of journaling emails from Outlook. Two of those options determine whether the Client ID and Contact fields are automatically populated in the new journal record.
- Prefill Client ID/Contact fields – When this check box is selected, PracticeMaster looks for an existing association between the email address and a client or contact. If one is found, then the appropriate (Client ID or Contact) field is automatically populated in the new Journal record.
- Only prefill when single match is found – This check box adds additional refinement to the Prefill Client ID/Contact fields check box. When this check box is selected, PracticeMaster will leave the Client ID and/or Contact fields blank if it finds more than one client or contact associated with the email address. When this check box is cleared, if more than one match is found for an email address, then the most recent match is used.
Note: The Client ID and Contact fields are handled separately in these scenarios (e.g., if the email address has a client but not a contact associated with it, then only the Client ID field will be prefilled).
In order to change these settings, you must uninstall the Outlook Plug-in, make your changes, and then reinstall the Outlook Plug-in for the changes to take effect.
To make changes to the prefill options for the Outlook Plug-in
- Close Outlook if it is currently running.
- From the PracticeMaster Maintenance menu, point to Integration and select Toolbar Plug-ins.
- On the Outlook tab, click the Uninstall Outlook Plug-in button. A message will be displayed indicating that the PracticeMaster toolbar has been uninstalled. Click OK to close the message.
- Select the option(s) you want to enable. (Note: These options must be configured separately for each user.)
- Click the Install Outlook Plug-in button. A message will be displayed indicating that the PracticeMaster toolbar has been installed. Click OK to close the message.
- Click OK to close the Toolbar Plug-ins window.

Spotlight: Write-Ups and Write-Downs
August 2019 Tags: Clients, Costs, Fees, Statements, Tabs3 Billing, Version 19
No comments
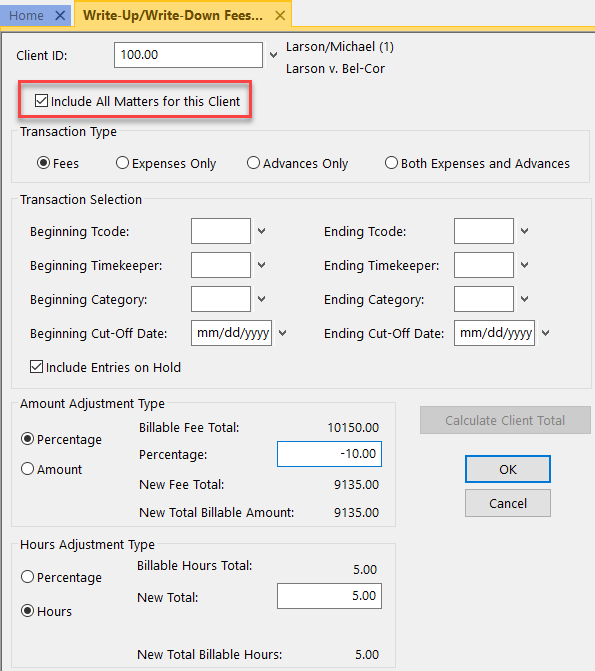 Did you know that you can write all matters for a client up or down at the same time?
As of Version 19, when using the Write-Up/Write-Down Fees and Costs program (Statements | Statement Preparation | Write-Up/Write-Down Fees and Costs), an Include All Matters for this Client check box is now available.
Prior to billing, you can use the Write-Up/Write-Down program to write-down unbilled fees, costs, or hours for a client using a range of timekeepers, transaction codes, categories, and/or dates. When writing multiple transactions up or down, each affected transaction’s amount and/or hours is adjusted by an amount proportional to the total adjustment.
When this option is selected, the Write-Up or Write-Down will include transactions for all matters for the specified Client ID. All matters that begin with the same value left of the decimal with work-in-process will be included in the calculated client total based on the criteria selected in the Transaction Selection section.

Quick Tip: Change Client ID
June 2019 Tags: Clients, Costs, Fees, PracticeMaster
No comments
In most data entry files, like the Journal, Document Management, and Calendar files, you can easily change the Client ID by opening a record and changing it or via the Change Client ID feature. However, before now, there wasn’t a way to change the Client ID for a fee or cost in PracticeMaster without deleting the record and starting over. We recently enhanced Version 19 so that you can now use the Change Client ID feature in the PracticeMaster Fee and Cost files!
The Change Client ID feature can be used for one record, or multiple selected records. Additionally, you have the option to update the rate based on the selected client, which will automatically recalculate the amount of the transaction(s). The Change Client ID features can be accessed via the following:
- In the Take Action group of the Quick Clicks pane, select Change Client ID
- From the Edit menu, point to Action and select Change Client ID
- Right-click the record(s), point to Action and select Change Client ID
When you change the Client ID of a record that has been processed into a fee, the linked fee’s Client ID will also be changed.

Outlook Integration: Journaling the Same Email to Multiple Matters
March 2019 Tags: Clients, Outlook Integration, PM Journal, PracticeMaster
No comments
I normally only create PracticeMaster records for a single matter per Outlook email, but occasionally an email will apply to more than one matter. However, when I try to journal the email a second time, it opens the original journal record instead. Is there a way I can journal a single email to multiple matters?
When linking is enabled on the PracticeMaster toolbar in Outlook, the email and the journal record in PracticeMaster are linked. This means that after you create a journal, calendar, or fee record from an email in Outlook, clicking the Journal, Calendar, or Fee button on the toolbar again will open the record you created in PracticeMaster instead of creating a new record. By default, linking is enabled.
When linking is disabled, clicking the Journal, Calendar, or Fee button will create a new record in PracticeMaster instead of opening an existing record. This allows you to create as many records as you need per email.
You can toggle Record Linking off and on for a single email by clicking the Linking On/Linking Off button on the PracticeMaster tab while viewing the email in Outlook.
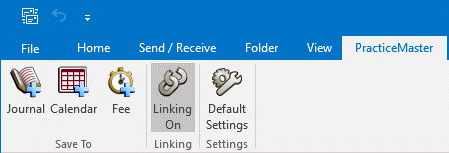
However, keep in mind that when changing the Linking status, the default settings will determine what happens to the next email. Depending on your settings, turning Linking off may mean that the next email will also default to Linking Off, or it could automatically default back to Linking On.
To configure the default behavior for Record Linking
- In Outlook, go to the PracticeMaster tab.
- Click the Default Settings button to open the PracticeMaster Options window.
- In the Record Linking Defaults section, select your preferred Linking behavior:
- If you want Record Linking enabled by default, select Enabled.
- If you want Record Linking disabled by default, select Disabled.
- If you want to default to the last setting specified, select Last Used. When Last Used is specified, each time you toggle the Linking On/Linking Off button on the PracticeMaster tab, that setting will be retained for all future emails until you toggle it again.
- Click OK to close the PracticeMaster Options window.
For more information regarding the Outlook Toolbar Plug-in, see Knowledge Base Article R11516, “Configuring the Outlook Toolbar Plug-in.”

Video of the Month: Pre-Bill Tracking
December 2018 Tags: Clients, Resources, Statements
No comments
Do you struggle with keeping track of where all of your pre-bills are at in the review process? Pre-Bill tracking makes it easy to track the progress of your billing cycle.
The Pre-Bill Tracking video provides an overview of how pre-bill tracking works in Tabs3 and how it can save you time. This video starts with how pre-bills are created via draft statements or work-in-process reports and then explains the Pre-Bill Tracking program. Each setting is explained as you are walked through the billing process.
Pre-Bill Tracking is a powerful productivity tool that lets you easily manage your firm’s billing workflow. It helps eliminate the problem of statements not being run for clients because the pre-bills were not returned.
Watch this six-and-a-half-minute video here:
Training Videos can be accessed 24 hours a day, 7 days a week, at Tabs3.com/videos. You can also access Training Videos while in the software by selecting Help | Documentation and then clicking the See also link for Tabs3 and PracticeMaster Training Videos.

Video of the Month: Using Client Funds
June 2018 Tags: Client Funds, Clients, Resources
No comments
If you’re not already using client funds, you may be wondering how to set it up and start using it.
The Client Funds feature in Tabs3 can be used to maintain a separate accounting of client funds for non-refundable retainers. These funds are kept separate from the client’s accounts receivable balance and are typically deposited in the firm’s general account.
Before entering client funds transactions, you must first set up the client. Once the client is set up, you can use the Client Funds file to enter client funds transactions. Deposits, withdrawals, and payments to the firm can be made to the client funds account.
The Using Client Funds video walks you through setting up a client for client funds, including more information on each of the setup options. This video will also walk you through entering a Deposit and a Payment to Firm, explaining how each field affects how the transaction is handled.
Watch this eight-minute video here:
Note: Other funds such as trust funds, escrow funds, refundable retainers, etc., can be entered as Client Funds, but using a trust account system (such as Tabs3 Trust Accounting Software) is recommended to better comply with state bar recommendations.
Training Videos can be accessed 24 hours a day, 7 days a week, at Tabs3.com/videos. You can also access Training Videos while in the software by selecting Help | Documentation and then clicking the See also link for Tabs3 and PracticeMaster Training Videos.

Quick Tip: Additional Bill To Address
May 2018 Tags: Clients, Email Statements, Statements, Tabs3 Billing
No comments
When you need to send a statement to two different parties, what do you do? With Tabs3 Billing, you can automatically generate a duplicate statement by adding an Additional Bill To Address. This option makes it easy to send an additional statement to a third party, such as an insurance company. When adding an Additional Bill To Address, you can select who it goes to and whether they receive a mailed statement, an e-mail statement, or both.
To create an Additional Bill To Address
- From the File menu, point to Open and select Client.
- Select the desired Client ID.
- From the Billing Preferences tab, in the Statement Delivery Options section, click the Add button.
- In the Bill To Record window, enter the desired information and select the desired options.
- Click OK.
- Press Ctrl+S.
Keep in mind that only one Additional Bill To Address can be added.
Tip: If you need to send a statement to more parties and you are e-mailing statements, consider adding additional recipients to the Cc or Bcc fields.

Video of the Month: Client Rate Report
April 2018 Tags: Clients, Rates, Reports, Resources, Tabs3 Billing
No comments
Is it time to review billing rates? The Client Rate Report allows you to print a list of clients, along with their default billing rates. Additionally, fee and cost rate tables, timekeeper level rates, and the client’s billing rate code can be included. This report is especially useful when reviewing rates or if you need to change the hourly rate for one or more timekeepers.
The Client Rate Report training video walks you through running the report, and then reviews the generated report.
Watch this two-minute video here:
Training Videos can be accessed 24 hours a day, 7 days a week, at Tabs3.com/videos. You can also access Training Videos while in the software by selecting Help | Documentation and then clicking the See also link for Tabs3 and PracticeMaster Training Videos.

Video of the Month: Client Ledger Report
March 2018 Tags: Clients, Reports, Resources, Statements
No comments
Do you need a report that shows one or more clients’ billing histories, as well as a way to track the client’s balances due? Look no further than the Client Ledger Report!
The Client Ledger Report shows the amount of payments, fees, expenses, and advances. You can optionally include finance charge, fee sales tax, expense sales tax, advance sales tax, the balance due for each statement, and more. Detailed billed information that shows amounts billed by timekeeper and Cost Type can also be included on the detail reports.
Check out the Client Ledger training video to see how the options in this report can be used to maximize output, as well as see what the end result looks like.
Watch this four-and-a-half-minute video here:
Training Videos can be accessed 24 hours a day, 7 days a week, at Tabs3.com/videos. You can also access Training Videos while in the software by selecting Help | Documentation and then clicking the See also link for Tabs3 and PracticeMaster Training Videos.

Spotlight: Transfer A/R and Transactions
December 2017 Tags: Clients, Costs, Fees, Payments, Tabs3 Billing
No comments
Occasionally, transactions may accidentally be entered for the wrong client. If there are only a couple, it’s easy to just delete them and reenter them for the correct client. However, when there are many transactions, what can you do? Use the Transfer A/R and Transactions utility in Tabs3!
The Transfer Transactions program can be used to transfer unbilled fees, costs, and/or payments between clients. When selecting to transfer fees, costs, and/or payments, you can select a range of transactions based on tcode, timekeeper, category, date, and/or reference number. This can help make sure that you are only transferring the transactions that you want to transfer.
Additionally, if a time comes when you want to transfer one client’s full accounts receivable balance, ledger, archived transactions, and client funds to another client, the Transfer A/R and Transactions utility can also be used. This function will transfer ALL of the client’s ledger records and billing history to another client. It is not possible to only transfer a client’s current A/R without also transferring everything else.
Note: When using the Transfer A/R and Transactions utility, keep in mind that once the transfer has been performed, the only way to undo it is by restoring from a backup.
To transfer transactions between clients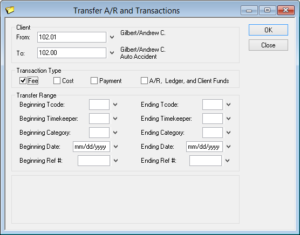
- From the Maintenance menu, select Transfer A/R and Transactions.
- Select the clients you want to transfer From and To.
- Select the desired Transaction Type(s).
- Optionally select a Transfer Range.
- Click OK.
Keep this utility in mind the next time transactions need to be transferred from one client to another client. It can save you significant time.

Feature Article: Common Client Related Files
November 2017 Tags: Clients, PracticeMaster
One Comment
There are several ways to customize how you store data in PracticeMaster. When you need a way to add multiple records of the same type for your client, Common Client Related Files are a great way to go!
You can use Common Client Related Files to store information for which you can have multiple records for each client. Unlike Area of Practice Files, Common Client Related records can be added for any matter in the Client file. Existing Common Client Related files include the Journal, Document Management, Fee, and Cost files. A couple examples of how you might use Common Client Related Files are as follows:
- Expert Witness files may be used in multiple Areas of Practice. For a litigation firm this may be a good file to configure as Common Client Related instead of setting up a separate file for each applicable Area of Practice.
- Some firms have physical files or other physical items. One way to track these files would be to create a Common Client Related File that includes the files’ current location, destroy date, and who is responsible for different items.
To add a Common Client Related File
- From the Maintenance menu, select File Maintenance.
- Right-click Common Client Related Files and select Add Common Client Related File.
- Enter the desired File Name and Description and click Next.
- Add the desired fields that you want to be available in the file using the
 (New) icon and click Next.
 - Optionally add one or more indexes using the
 (New) icon and click Finish.
Accessing Common Client Related Files
Common Client Related Files can be accessed a few ways:
- If the Client file is set up to view Common Client Related Files, an additional tab for your new file will be displayed. If the new tab is not displayed, you must select the Common Client Related Pages check box via Edit | Configure Client Pages.
- Common Client Related Files can be accessed via the Record Type Selector in Matter Manager (File | Matter Manager).
- Common Client Related Files can also be accessed via File | Open | All Other Files.
If you need to be able to add multiple custom records for your client, you can add and access a Custom Client Related File in no time!
Take a look at the Customizing PracticeMaster Guide for other ways to customize data storage in PracticeMaster including adding fields to existing files and adding Lookup Files and Areas of Practice. The Customizing PracticeMaster Guide can help you take advantage of PracticeMaster’s tremendous flexibility, help you configure PracticeMaster to best meet your firm’s needs, and show you how you can customize the different areas of PracticeMaster to work for you.

Working with WorkFlows: Assigning a Contact Category when Adding Clients
November 2017 Tags: Clients, Contacts, PracticeMaster, WorkFlows
No comments
Whenever we add new clients, we always add the contact record first, during their consult. Is there a way to assign the “Client” Contact Category to a contact record every time a client is added?
You can set up a WorkFlow so that every time a client record is added, the contact record is updated with “Client” as a Contact Category in addition to any other contact categories already assigned. If the contact already has a contact category of Client assigned, it will not be added again.
To create a WorkFlow to add “Client” as a Contact Category when a client is added
- From the Maintenance menu, select WorkFlows.
- Select Client, and then click the New button.
- Enter a Name for the WorkFlow (e.g., “Add Client Contact Category”).
- In the Source section, select All Records.
- In the Events section, select Record Added.
- In the Actions section:
- Click the New button.
- Select Change Record and click Next.
- Select Linked Record.
- From the Link field, select Name.
- Click the Define Template button.
- Click the set button next to the Category field.
- In the Template Expression Editor window, click the Field button.
- In the Available Records field, select Target Record.
- Select a Field ID of RP_Cat and click Insert. “@Target:RP_Cat” will be shown in the Expression field.
- Click Operator, select Addition, and then click Insert.
- Click Value and enter “; Client” and click OK.
- Click OK on the Template Expression Editor window.
- Press Ctrl+S.
- Click Finish.
- Click Save.
For more information on WorkFlows, refer to our new PracticeMaster WorkFlows Guide at Tabs3.com/support/docs.html or Knowledge Base Article R11307, “All About WorkFlows.”
Matter mode is a special status for the address on the Address tab of the Client file that allows the address to be used for that matter only and not be shared by other matters for the same client. But what does this mean, and when should you use Matter Mode?
The Understanding Matter Mode video explains when Matter Mode is used, what the drawbacks of using Matter Mode are, and how to determine which clients are currently in Matter Mode.
Watch this one-and-a-half-minute video here:
Training Videos can be accessed 24 hours a day, 7 days a week, at Tabs3.com/videos. You can also access Training Videos while in the software by selecting Help | Documentation and then clicking the See also link for Tabs3 and PracticeMaster Training Videos.

Quick Tip: Filtering Inactive Clients
August 2017 Tags: Clients, Filters, Inactive, PracticeMaster, Tabs3 Billing
No comments
If you mark clients as Inactive, you likely do not want to see them most of the time. In both Tabs3 Billing and PracticeMaster, you can use filters to include or exclude inactive clients.
Tabs3 Billing
In Tabs3 Billing, you can include or exclude inactive clients from the Client Lookup window, reports, and statements.
- Client Lookup window – Select or clear the Show Inactive check box in the lookup window.
- Reports and Statements – On the Client tab of reports and statements, select a Status of Specific, and then click the Select Status button. Select Active or Inactive.
PracticeMaster
In PracticeMaster, you can include or exclude inactive clients from the List tab of any file, the Client Lookup window, the Client Inactivity Report, and Report Writer Reports.
- List tab and lookup windows:
- Client file and Client Lookup windows – To show only active clients, click Active Only in the Client List section of the Quick Clicks pane. To show only inactive clients, you can add a filter using an expression of “Inactive = 1”.
- All other files – Filters to show only active or inactive clients can be added to any file that includes the Client ID field. To show only records with active clients, you can add a filter using an expression of “Client_ID:Inactive = 0”. To show only inactive clients, you can add a filter using an expression of “Client_ID:Inactive = 1”.
- Reports:
- Client Inactivity Report – On the Client tab of the Client Inactivity Report, select a Status of Specific, and then click the Select Status button. Select Active or Inactive.
- Report Writer Reports – An expression can be added to the Filter tab of any Report Writer Report. To show only records with active clients, you can add a filter using an expression of “Client_ID:Inactive = 0”. To show only inactive clients, you can add a filter using an expression of “Client_ID:Inactive = 1”.

Spotlight: Changing Key Types
July 2017 Tags: Clients, PracticeMaster, Tabs3 Billing
No comments
When setting up the software for the first time, the Key Type defaults to Numeric with 2 Decimal Places. However, some firms prefer to include letters in the Client ID or require additional decimal places. Both the Key Type and Decimal Places can be changed after the initial setup is complete, but there are a few things to keep in mind when considering making a change.
Key Types
- Numeric Key Type is the most commonly used and consists of only numerals. With a Numeric Key Type, you can automatically assign new Client IDs and matters.
- Mixed Key Type consists of alphanumeric characters to the left of the decimal and numeric characters after the decimal. With a Mixed Key Type, you cannot automatically assign new Client IDs, but you can automatically assign new matter numbers.
- Alpha Key Type consists of alphanumeric characters both to the left and the right of the decimal. With an Alpha Key Type, you cannot automatically assign new Client IDs or matters.
Note: Keep in mind that Mixed and Alpha Key Types do not integrate with select legacy cost recovery software programs. Contact Support at (402) 419-2210 for more information regarding legacy cost recovery software.
Changing the Key Type
Prior to changing the Key Type, take into consideration that all existing Client IDs must match the format of the new Key Type. For example, if you are currently set to the Alpha Key Type and you have alpha characters in your Client IDs, then all applicable Client IDs must be renumbered (Maintenance | Renumber | Client) to remove any alpha characters before changing the Key Type to Numeric.
To change the Key Type
- From the Maintenance menu, point to Renumber and select Change Key Type.
- In the Key Type section, select the desired New Type.
- Click OK.
Decimal Places
A Client ID consists of 11 characters and the decimal place for a total of 12 places. Typically, the portion to the left of the decimal is used to represent the Client, whereas the portion to the right is used to represent the matter. The most common reason to change the number of decimal places is when one or more clients have more matters than decimal places. For example, if you are set up to use 2 decimal places, then your clients will cap out at 99 matters. Although 99 matters may seem like a lot, for certain client types, such as insurance clients, you may reach that number quicker than you think. In our example, when you reach 99 matters, you have two options: start a new client or increase the Decimal Places.
Changing Decimal Places
You can either increase or decrease the Decimal Places. When increasing Decimal Places, you have the option to insert zeros at the Beginning or End of the decimal digits. For example, when selecting Beginning, client 152.82 would become 152.082. When selecting End, client 152.82 would become 152.820.
To change the number of decimals used
- From the Maintenance menu, point to Renumber and select Change Key Type.
- In the Decimal Places, enter the desired New Decimal.
- In the Insert Zeros section, select Beginning or End.
- Click OK.
For more information on changing the Key Type, including a list of things to consider prior to making a change, see Knowledge Base Article R11049, “Changing the Key Type or Decimal Places.”

Working with WorkFlows: Automatically Updating the Name Search Field
June 2017 Tags: Clients, PracticeMaster, WorkFlows
No comments
When I change the Client Name field, I can no longer pull them up by typing their name into any Client lookup fields. Why is this, and how can I fix it?
Client lookup fields use the Name Search field to find clients. Reports sorted alphabetically are also sorted on the Name Search field. However, this field does not get updated automatically when the Client Name is changed.
A WorkFlow can be created to update this field automatically when the Client Name is changed in PracticeMaster.
To create a WorkFlow that will update the Name Search field
- From the Maintenance menu, select WorkFlows.
- Select Client, and then click the New button.
- Enter a Name for the WorkFlow (e.g., “Update Name Search”).
- In the Source section, select All Records.
- In the Events section:
- Select the Record Changed and User Activated check boxes.
- Select the Selected Field(s) option.
- Click the Select Fields button.
- In the Select Fields window, select Name and click OK.
- In the Actions section:
- Click the New button.
- Select Change Record and click Next.
- Select Source Record and click the Define Template button.
- Click the set button next to the Name Search field.
- In the Template Expression Editor window, click the Field button.
- Select a Field ID of Name and click Insert.
- Click OK.
- Press Ctrl+S.
- Click Finish.
- Click Save.
You now have a WorkFlow set up that will automatically update the Name Search field without user interaction any time the Client Name field is changed, provided the change is made in PracticeMaster.
Note: If the Client Name is changed in Tabs3, the WorkFlow will not be triggered to run. However, the WorkFlow can optionally be run manually via the Quick Clicks pane in PracticeMaster.
For more information on WorkFlows, refer to our new PracticeMaster WorkFlows Guide at Tabs3.com/support/docs.html or Knowledge Base Article R11307, “All About WorkFlows.”

KB Corner: Combine Matters & Cover Statements
May 2017 Tags: Clients, Resources, Statements
No comments
When you have multiple active matters, combining matters creates a single statement file. Including a cover statement makes it easy for a client to see what they owe for each matter at a glance.
These options can be quite beneficial, but if you’ve run into a snag you may not know where to look for answers. You can always call Technical Support at (402) 419-2210, but if it’s after hours or you want to quickly look up an answer, check out Knowledge Base Article R11501, “Troubleshooting Combine Matters and Cover Statements in Tabs3.” This article not only provides troubleshooting information, but also provides a list of frequently asked questions.
Whether you have been working with combined matters and/or cover statements for a day or for years, R11501 may provide the necessary information for your current scenario.
Our Knowledge Base can be accessed 24 hours a day, 7 days a week, at support.Tabs3.com. You can also access our Knowledge Base while in the software by selecting Help | Internet Resources | Knowledge Base.
Keeping clients secure in a law firm is part of maintaining ethical walls. Some clients may require that only certain users have access to reports and statements for the client. The Working with Secure Clients video walks you through setting up a secure client and explains how to also keep contact information secure by storing it in the client file only.
Watch this 2-minute video here:
Training Videos can be accessed 24 hours a day, 7 days a week, at Tabs3.com/videos. You can also access Training Videos while in the software by selecting Help | Documentation and then clicking the See also link for Tabs3 and PracticeMaster Training Videos.

Working with WorkFlows: New Calendar Entry When a Client is Added
March 2017 Tags: Calendar, Clients, PracticeMaster, WorkFlows
No comments
We want a calendar record automatically created every time we open a new Criminal Law client. The calendar record should remind us that in two days we need to request a copy of the arrest affidavit and bond information for the client. Is there an easy way to do this?
This can be done by creating a WorkFlow that will automatically trigger whenever a client is added with an Area of Practice (AOP) of Criminal Law. The WorkFlow will create a calendar entry populated with field values specified in the WorkFlow itself. For our example, the calendar entry will include the following:
- Due Date two days after the client’s Open Date
- Description of “Request copy of arrest affidavit & bond information”
- Task with a Start Time of 8:00 A.M.
- Alarm Time set for 0 Minutes
- The Client ID selected
To automatically create a Calendar entry every time a Criminal Law client is added
- From the Maintenance menu, select WorkFlows.
- Select the Client file, and then click the New button.
- Enter a Name for the WorkFlow (e.g., “Criminal Law Calendar”).
- In the Source section:
- Select the Filtered Records option and click the Filter button.
- Select a Field Name of AOP.
- Select a Test Condition of equal to.
- In the Test Value field, select an AOP of Criminal Law.
- Click the Save button.
- In the Event section:
- Select Record Added.
- In the Actions section, click the New button.
- Select Create New Record and click Next.
- Select Calendar from the drop-down list and click OK.
- Click the Define Template button.
- Click the set button next to the Due Date field.
- In the Template Expression Editor window, click the Field button.
- Select a Field ID of “Date_Open” and click Insert.
- The following will now be displayed: “@SrcRec:Date_Open”. After this, enter “+2”. The following will now be displayed: “@SrcRec:Date_Open +2”.
- Click OK.
- Click the set button next to the Description field.
- In the Template Expression Editor window, click the Value button, and enter “Request copy of arrest affidavit & bond information.”
- Click OK on the Value window.
- Click OK on the Template Expression Editor window.
- Click the set button next to the Type field.
- In the Template Expression Editor window, click the Value button, and select “T” from the drop-down list.
- Click OK on the Value window.
- Click OK on the Template Expression Editor window.
- Click the set button next to the Start Time field.
- In the Template Expression Editor window, click the Value button, and enter “08:00:00 AM”.
- Click OK on the Value window.
- Click OK on the Template Expression Editor window.
- Click the set button next to the Alarm Time field.
- In the Template Expression Editor window, click the Value button, and select “0 Minutes” from the drop-down list.
- Click OK on the Value window.
- Click OK on the Template Expression Editor window.
- Click the set button next to the Client ID field.
- In the Template Expression Editor window, click the Field button.
- Select a Field ID of “Client_ID” and click Insert.
- Click OK.
- Press Ctrl+S.
- Click the set button next to the Due Date field.
- Click Finish.
- Click Save, and then close the WorkFlows window.
You now have a WorkFlow set up that will create a customized calendar entry every time a new client is saved with Criminal Law selected as the Area of Practice.
Do you know who your top clients are? Run the Top Client Report to see how your clients or matters measure up in hours worked, amounts billed, amounts paid, current amount due, and more! The Top Client Report allows you to obtain a report of your top clients or matters in Tabs3, based on your preferred criteria.
Watch this four-and-a-half-minute video here:
Training Videos can be accessed 24 hours a day, 7 days a week, at Tabs3.com/videos. You can also access Training Videos while in the software by selecting Help | Documentation and then clicking the See also link for Tabs3 and PracticeMaster Training Videos.

Video of the Month: Write Off Clients
January 2017 Tags: Clients, Resources, Statements, Timekeepers, Write Offs
No comments
From time to time, you may need to reduce a client’s outstanding balance, but how can this be accomplished? The Tabs3 Billing Write Off Clients training video walks you through the process of writing off all or part of a client’s balance.
View this three-minute video here:
Training Videos can be accessed 24 hours a day, 7 days a week, at Tabs3.com/videos. You can also access Training Videos while in the software by selecting Help | Documentation and then clicking the See also link for Tabs3 and PracticeMaster Training Videos.

Tabs3 Connect: Client Access
September 2016 Tags: Clients, Mobile Access, Tabs3 Connect
No comments
You know that you can access clients via Tabs3 Connect, but did you know you have access to all fields in the PracticeMaster Client file and links to quickly send an e-mail, make a phone call, or create a fee?
After logging in to Tabs3Connect.com, tap the ![]() (Client) icon to open the Clients page and see recently accessed clients. You can tap the All button to see a full list of clients.
(Client) icon to open the Clients page and see recently accessed clients. You can tap the All button to see a full list of clients.
From the Clients page, tap the client’s e-mail hyperlink to start an e-mail, tap the ![]() (Fee) icon to enter a fee for the client, or tap the client to open more information in the View Client page.
(Fee) icon to enter a fee for the client, or tap the client to open more information in the View Client page.
From the View Client page, you can see the Client ID, Client Name, Work Desc, Address, Contact Name, Phone Numbers, E-mail Address, and Misc Description fields 1-3. Tap the contact hyperlink to view more information on the contact, tap a phone number to make a phone call, tap the e-mail hyperlink to start an e-mail, or tap the ![]() (Fee) icon to enter a fee for the client. Want to see more information about the client? Tap the All Fields button to see everything from the Client file in PracticeMaster.
(Fee) icon to enter a fee for the client. Want to see more information about the client? Tap the All Fields button to see everything from the Client file in PracticeMaster.
For more information on Tabs3 Connect, contact your reseller and consultant, contact Technical Support at (402) 419-2210, or visit Knowledge Base Article R11480, “All About Tabs3 Connect.”

Quick Tip: Apply Payments to Multiple Matters
December 2015 Tags: Clients, Payments, Tabs3 Billing
No comments
When you have a client with multiple matters, what do you do when the client sends in a single check to cover all matters? You could get out the calculator to determine how much should go to each matter, and then enter multiple payment records, or you could let Tabs3 Billing do this for you.
When entering a payment for multiple matters, simply enter the payment for one of the matters and then click the ![]() (Apply Payment to Multiple Matters) button to open the Payment Amounts for Multiple Matters window. Here, you can either enter each Client ID and the corresponding amount of the matter’s Payment, or you can click the Apply Proportionately button to divide the payment amount between all matters shown proportionately based on the amount due.
(Apply Payment to Multiple Matters) button to open the Payment Amounts for Multiple Matters window. Here, you can either enter each Client ID and the corresponding amount of the matter’s Payment, or you can click the Apply Proportionately button to divide the payment amount between all matters shown proportionately based on the amount due.

KB Corner: Using Sales Tax in Tabs3
August 2015 Tags: Clients, Resources, Tabs3 Billing, Tcodes
No comments
Do you want to start charging sales tax, but don’t know where to start? Sales tax must first be enabled in Tabs3 Billing Customization. You can then optionally set up specific transaction codes and/or clients to automatically include sales tax when billed. You can also specify sales tax on an individual transaction. So how do you set all of this up? Knowledge Base Article R10952, “Using Sales Tax in Tabs3,” provides steps on setting up Tabs3 Billing to charge sales tax and answers frequently asked questions about the Tabs3 sales tax feature.
Our Knowledge Base can be accessed 24 hours a day, 7 days a week, at support.Tabs3. com. You can also access our Knowledge Base while in the software by selecting Help | Internet Resources | Knowledge Base.

Quick Tip: Use Timers
August 2015 Tags: Clients, Contacts, Convert to Fee, Fees, PM Journal, PracticeMaster, Timers
No comments
You may work with multiple matters throughout the day, so how can you ensure that you are keeping an accurate account of how much time is spent on each task? The PracticeMaster Timer window (File | Timer) can be used to track Time Tasks, Phone Tasks, and Research Tasks. Each record is saved to the Journal  file and can include the Client, Work Description, Contact, a Description of the task, and more. Start and stop the timer for tasks throughout the day from the Timer window as needed.
Once you’re ready to bill a client for your time, you can easily turn timer records into fees using the Process Fee Records program (File | Process Timer Records). When processed, a record is created in the Fee file for the designated client, and a timer record is maintained in the Journal file. This makes it easy to keep track of your time, and to accurately bill clients for work. Using the PracticeMaster Timer means you will never again have to guess at how much time you spent on tasks.

Feature Article: Category Pages
June 2015 Tags: AOPs, Clients, Contacts, Form Designer, PM Journal, PracticeMaster
No comments
Did you know that you can add tabs to the Client file, Contact file, and Journal file that are specific to an Area of Practice, Contact Category, or Journal Type? These tabs are called Category Pages. Category Pages are a special type of page that is only shown in the Editor window when the selected client or record is associated with that category. You can use the Form Designer to design how the pages will look.
- Client category pages are configured for individual Areas of Practice (e.g., Personal Injury, Family Law, Workers’ Compensation, etc.). These pages will only appear when a client belonging to that Area of Practice is selected.
- Contact category pages are configured for individual contact categories (e.g., Attorney, Insurance Adjuster, Witness, etc.). These pages will only appear when a contact assigned to that contact category is selected.
- Journal category pages are configured for individual journal record types (e.g., E-mail, Phone Task, Research Task, etc.). These pages will only appear when a journal record of that record type is selected.
Setting up a Category Page provides a way of showing only those fields that are relevant to the selected “category,” thus reducing the number of visible pages.
In order to create a Category page, you must first add the fields for the Category page to the associated file using File Maintenance (e.g., add the desired fields to the Contact file). Once the fields have been added, the Category page and fields must be added to the data entry window using the Form Designer.
To create a Category Page
- From the List tab of the Client, Contact, or Journal file, select Edit | Form Designer.
- To add a Category page, click the
 (Add Category Page) button.
 - Select the appropriate Area of Practice, Contact Category, or Journal Type that the Category page will be associated with and click OK.
- A new page will be displayed. To rename the page, right-click the Category page and select Rename Page. Specify a name for the page and click OK. You are now ready to add fields to the Category page.
- Click the
 (Add Field) button.
 - Select the field you want to add and click OK.
- Continue adding fields, group boxes, and labels until the Category page is complete.
- Close the Form Designer and save the changes made to the form layout.
Additional information regarding Category Pages can be found in Knowledge Base Article R10566, “Category Pages in PracticeMaster.”
Recent Comments
- Tabs3 Software on Feature Article: Year-End is Fast Approaching!
- Linda Thomas on Feature Article: Year-End is Fast Approaching!
- James Hunter on Spotlight: Reorder Fees
- Tabs3 Software on Video of the Month: PracticeMaster Conflict of Interest
- Stephanie Biehl on Video of the Month: PracticeMaster Conflict of Interest
