
Did you know that you can drag records to move or replicate them in the Graphical Calendar? This makes it easy to reschedule a meeting, or to schedule a continuance.
- If you want to move an event to a different time, simply move your mouse to the left side of the record until the pointer becomes a
 . Click to grab the record, and then drag it to the desired time. This removes the record from the original time slot and adds it to the new time slot.
 - If you want to replicate a record, such as when a meeting needs to continue at another time with the same people at the same location, hold the Ctrl key as you drag the record to the desired time. This does not remove the record from the original time slot; instead, a replicated record is added to the new time slot.

PracticeMaster has the ability to integrate Calendar and Contact information with Outlook. If your firm uses Microsoft 365 with Exchange Online, the Tabs3 Platinum edition makes integration even smoother.
Knowledge Base Article R11898, “Configuring the PracticeMaster Platinum Exchange Connector for Exchange Online / Microsoft 365,” walks you through configuration and provides frequently asked questions and troubleshooting information.
Our Knowledge Base can be accessed at support.Tabs3.com. You can also access our Knowledge Base in the Quick Launch by searching for and selecting “Knowledge Base.”
In PracticeMaster, you have the option of either showing each group calendar record as individual users, or to combine all users into one record on the graphical calendar. This setting can be toggled in Calendar Properties.
To change whether records are combined in the graphical calendar
- In the Quick Launch, search for and select “Calendar Properties.”
- On the General tab, in the Options section, select or clear Combine Multiple User Records into One Group Record.
- Click OK.

In a law firm, there can be an overwhelming amount of information to keep track of and work with – case information, contact information, upcoming meetings, research, emails, and documents galore. PracticeMaster can help make you more organized than you’ve ever been before. PracticeMaster provides the tools you need to manage it all.
Calendar – View not just your calendar, but all appointments for everyone in your office. View appointments for a specific client or matter, an employee, or view appointments based on any information in the calendar record such as date, calendar code, and location.
Contacts – Don’t just search your list of contacts; see all the contacts for any matter at a glance, and every matter in which a particular contact is involved.
Document Management – Tell PracticeMaster how you want to name and sort your documents, and then let PracticeMaster do it for you! Quickly see all documents for a case, or different versions of the same kind of documents across all your cases.
Matter Manager – Tie everything for a matter together in one place: calendar records, contacts, email, meeting notes, documents, billing summary, and more!
Conflict of Interest – Determine any potential conflicts by searching files, documents, email attachments, and contacts for key words. Optionally limit results to certain files, and more.
Timers – Use timers to track your time, phone tasks, and research. Switch between timers as needed, and then process timer records into fees!
Filtering – Add filters to your files so that you can easily see only those records that you want to see.
QuickViews – QuickViews combine a filter, column layout, and sort option into a tab at the top of the List tab of any file, which allows you to quickly switch your view depending on the records you are working with. Add Smart tabs to provide an additional level of record sorting.
Integration – Integrate calendar records and contacts with Outlook. Install the PracticeMaster toolbar in Microsoft Outlook, Word, Excel, and PowerPoint; Adobe Reader or Acrobat; Corel WordPerfect; and Ricoh ScanSnap to save documents and research to PracticeMaster, or to create journal entries, calendar entries, or fees from within the other software. Integrate with Tabs3 CRM, LexShare, NetDocuments, and CalendarRules.
Areas of Practice – Areas of Practice provide a way to save separate information for different types of matters, without having the clutter of everything all in one file or set of files.
Report Writer – Create custom reports using the data stored in PracticeMaster.
WorkFlows – Help automate your workload by creating WorkFlows to automatically start tasks or notify other users based on specified events.
Document Assembly – Help automate form letters by creating document templates that pull information from any file in PracticeMaster. Once created, simply select the client and the template, and it does the rest.
For more information about PracticeMaster features or to purchase a license of PracticeMaster, contact your local consultant, or contact our Sales Department at (402) 419-2200.

Is there a way to enter a specific date to see what events or tasks have been entered on the calendar?
You can go to a specific date when you’re in the Graphical Calendar or on the Dashboard tab of the Home page.
To go to a specific date
- Open the Graphical Calendar or the Dashboard tab of the Home page.
- Press Ctrl+D.
- Select the desired Date.
- Click OK.

The Microsoft 365 Exchange Connector has been enhanced in PracticeMaster Version 2023 so recurring events created in Outlook will synchronize with the PracticeMaster calendar. This makes it easy to add recurring meetings or events in either Outlook or PracticeMaster.
These events will synchronize as a series of individual calendar events in PracticeMaster. Edits to individual events can be made in PracticeMaster. However, modifying or deleting the entire series must be done in Outlook.
Important: Syncing recurring events created in Outlook with PracticeMaster is only supported when configured to use the Microsoft 365 Exchange Connector. See KB article R11898, “Configuring Platinum Exchange Connector for Exchange Online/Microsoft 365,” for more information.
Some people in our office tend to forget to assign alarms when creating calendar records in PracticeMaster. Is there a way to set a default alarm to certain types of calendar records?
Calendar codes let you specify multiple default values for calendar records, including a default alarm time. For example, you could have a calendar code for meetings with prospective clients that will display an alarm 30 minutes before the meeting. If you already use calendar codes, you can add an alarm time to any existing calendar codes that require alarms. You can also create new calendar codes for these calendar records.
To assign an alarm time to an existing calendar code
- In the Quick Launch, search for and select “Calendar Code File.”
- From the list of calendar codes, double-click the code you want to edit.
- In the Alarm Time field, specify the default alarm time.
- Press Ctrl+S to save the calendar code.
- Click the List tab and repeat steps 2-4 for each calendar code you want to edit.
To create a new calendar code
- In the Quick Launch, search for and select “Calendar Code File.”
- Press Ctrl+N to start a new record, specify the new calendar code in the New Key field, and click OK.
- Fill in the fields as needed. (Tip: Press F1 to view the help topic for the Calendar Code window.)
- Press Ctrl+S to save the calendar code.
- Click the List tab and repeat steps 2-4 for each calendar code you want to add.

With Tabs3 Connect, you can see your entire firm’s calendar, not just your appointments, wherever you are. Because Tabs3 Connect accesses the PracticeMaster calendar back at the office, you can schedule meetings while you’re away, link them to a specific client and matter, and include other people from your office. When others add something to the calendar, you can see it right away from your tablet or smartphone. You can even view your active alarms in Tabs3 Connect to make sure you don’t miss an appointment or critical task.
Tabs3 Connect can optimize your calendar layout based on your device’s available screen space. When viewing the calendar on your smartphone, use the Phone Layout to see entries using the Agenda or Task List view. When viewing the calendar on your tablet or computer, use the Full Layout to see entries using the Agenda, Task List, or Calendar view. The layout can be toggled by clicking the icon in the upper-right corner of the web page.
For more information on Tabs3 Connect, contact your Tabs3 Software consultant, call Support at (402) 419-2210, or visit Knowledge Base Article R11480, “All About Tabs3 Connect.”
Did you know that you can quickly get back to the current date in the Daily/Weekly/Monthly Calendar from any other date with a single keystroke?
While in the Daily/Weekly/Monthly Calendar, you could use the horizontal scroll bar to get back to “today” from any other date, or you could navigate through the months on the right. However, the easiest way to get back to the current date is to simply press the Home key.
To see a complete list of keystrokes available in the Daily/Weekly/Monthly Calendar, press F1 while in PracticeMaster. On the Index tab, enter “Calendar” and then select “toolbar” from the list.
We want to add some holidays that our firm observes to the predefined holiday calendar in PracticeMaster. How can we accomplish this?
PracticeMaster provides one predefined holiday venue: Standard Holidays. This venue allows additional days to be added to it on a yearly basis.
To add days to the Standard Holidays Venue
- In the Quick Launch, search for and select “Holidays by Venue.”
- Select the day you want to mark as a holiday.
- Press the Spacebar to mark the holiday.
- Enter the desired Holiday Description.
- Repeat step 2 for each holiday you want to add.
- Click Close.
Note: Only the six predefined holidays in the Standard Holidays venue are perpetual holidays. Any additional holidays must be defined for each year.
My workstation was recently upgraded to a higher resolution display. Is there a way to increase the font size in the calendar to make it more readable?
Each user can customize their calendar font settings via Calendar Properties.
To change the font in the PracticeMaster Calendar
- From the Quick Launch, search for and select “Calendar Properties.”
- Select the tab corresponding to the calendar you want to edit (i.e., Daily, Weekly, or Monthly).
- Click the Select Font button.
- In the Size section, select the font size you want to use.
- Click OK to close the Font window.
- Repeat steps 2-5 for each calendar you want to modify.
- Click OK to save changes.

Scheduling meetings doesn’t need to be complicated.
With PracticeMaster’s Calendar features, you can easily view everyone’s schedules, add a meeting to the calendar, and notify all attendees with just a few clicks. And when using the Auto Email Notification feature, this process becomes even more streamlined, which can save you time.
Watch this three-minute video here:
Training Videos can be accessed at Tabs3.com/videos. You can also access the videos in the Quick Launch by searching for and selecting “Training Videos.”
Many of our meetings take place on Zoom (or another online meeting service). Is there a way to place a link in the Calendar File and make it clickable?
Link text in the Comments field of the Calendar File (or any other Memo type field) will be clickable if it is in the correct format. Include the full URL, starting with “http:”, “https:”, or “www.” with the link text.
Alternatively, you can add a Web Page type field to the Calendar File to store these links. This field type allows you to add a clickable link to the calendar.
To add a Web Page field to the Calendar File
- In the Quick Launch, search for and select “File Maintenance.”
- Expand System Files, select Calendar, and then click OK.
- On the Field tab, click the
 (New) icon and enter a Field ID (e.g., “ZOOM”).
 - Select a field type of Web Page.
- Enter a Field Name (e.g., “Zoom Link”).
- Select any additional options needed, and then click Done.
You can now add the new field to the Calendar file via Form Designer. Form Designer can be accessed while on the List tab of any file via Edit | Form Designer.

Time is money, and how long it takes for your firm to complete tasks affects the bottom line. So how will Platinum software speed things up for your firm?
- Report processing speed is increased by 10 to 30 times or more.
- Filtering and column sorting are done at the server, sending only records that have been pre-filtered and pre-sorted to the workstation. Because of this, QuickViews and use of the Search Box are also faster in Platinum.
- The amount of data processed on the workstation is minimized, thereby also minimizing the amount of data transferred across the network.
- Tabs3 Billing and PracticeMaster Data File Integrity Checks are processed at the server. Rather than having to read and validate all of the records from a file, the workstation only receives the results of this process.
- Tabs3 Billing and PracticeMaster Dashboard data is also processed at the server, which reduces network traffic and increases the responsiveness and refresh capabilities of the widgets.
For more information about Platinum Accelerators, see Knowledge Base Article R11182, “Tabs3 and PracticeMaster Accelerators.” For more information about Platinum features, see Knowledge Base Article R11379, “Platinum Overview.” If you have any questions regarding Platinum features, contact your local consultant, or call Technical Support at (402) 419-2210.
On the Task List tab of Calendar Properties, I see that you can select an Index to use for sorting, but I only have a few options. Can I create a custom index to use for sorting the task list?
You can create a custom index to be used in the Task List via File Maintenance.
To create a custom index for the Task List
- In the Quick Launch, search for and select “File Maintenance.”
- Under System Files, select Calendar and then click OK.
- On the Index tab:
- Click the (New Insert) button.
- Enter the new Index ID for your index.
- Enter a Description for your index.
- Select the desired Sort Order.
- Click Done.
- Click the
- Close File Maintenance.
You can now select this index for the Task List in Calendar Properties.
Although you are more than likely using alarms on your calendar records, you may not be aware of the 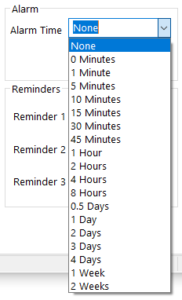 scope of how alarms can be set and snoozed.
When creating a calendar entry, you can select a preset value for an alarm, enter the desired alarm value, or use natural language, such as “tomorrow 3pm,” “next week,” “next month,” or “Monday.” Optionally select None if you do not want an alarm to be displayed.
Once an alarm becomes due, the PracticeMaster Alarm Notification window is displayed. From this window, you can mark tasks as completed, clear alarms, and snooze alarms. All alarms are displayed in this window, eliminating multiple alarm windows upon opening PracticeMaster. You can elect to snooze one of the alarms, some of the alarms, or all of the alarms at one time.
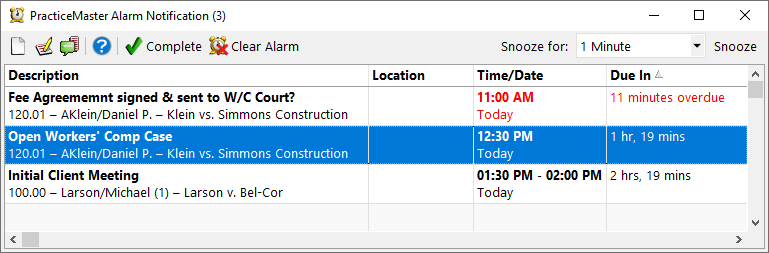
When snoozing, the PracticeMaster Alarm Notification window includes the same preset intervals as the Calendar record, but also includes “15 Minutes Before,” “10 Minutes Before,” “5 Minutes Before,” “2 Minutes Before,” and “1 Minute Before,” provided the interval does not exceed the amount of time until the record’s Start Time. Snoozed alarms are remembered – this means that once an alarm is snoozed, the alarm will not be displayed again until the snooze time indicated, including when you close and reopen PracticeMaster.
Make sure you don’t miss out on something important by taking advantage of PracticeMaster alarms.
Is there a way to increase the font in the Daily Calendar?
The font, font style, and font size can be changed for the Daily, Weekly, and Monthly Calendar via Calendar Properties.
To change the font of the Daily Calendar
- In the Quick Launch, search for and select “Calendar Properties.”
- From the Daily tab, click the Select Font button.
- Select the desired font options and click OK.
- Click OK.
In Version 2021, we added the ability to go to a specific date when you’re in the Graphical Calendar or on the Dashboard tab of the Home page.
To go to a specific date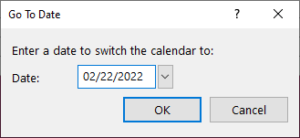
- Open the Graphical Calendar or the Dashboard tab of the Home page.
- Press Ctrl+D.
- Select the desired Date.
- Click OK.
The calendar will change to include the specified date.
Did you know that the Tabs3 Billing software comes with a one-user “Try Before You Buy” basic license of PracticeMaster that is free to use? If you don’t already use PracticeMaster, this basic license provides the ability to try out PracticeMaster and see how much practice management software will benefit your firm. Think you don’t need dedicated practice management software? If you’re relying on programs not designed for law firms, you’re missing out.
The Try Before You Buy basic license includes:
- Seamless integration with Tabs3 Billing clients.
- A PracticeMaster Matter Manager that lets you quickly see client information at a glance – check out related contacts, calendar entries, a billing summary, emails, and more. PracticeMaster allows you to link clients and contacts to any file, making it easier for everyone to find the information they need.
- A firm-wide calendar that ensures everyone in the firm can see upcoming meetings and client appointments. Additionally, you can integrate calendar records and contacts with Outlook, ensuring that everyone in the firm has access to contacts and matter information saved by anyone in the firm.
- Integration with third-party programs such as Microsoft® Outlook®, Word, Excel®, PowerPoint®, Adobe® Reader or Acrobat®, ScanSnap™, WordPerfect®, and more. Integration with these programs provides the ability to save your client and matter related documents to PracticeMaster’s document management program, journal emails to PracticeMaster, create fees, save research, and more.
- A Conflict of Interest Search used to quickly find information in the Client, Contact, Journal, Calendar, Document Management, Fee, and/or Cost files. Conflict of Interest searches help ensure that ethical walls in a firm are maintained.
- Timers to track your time on different projects and matters and make sure you’re billing for the work you perform.
- Customization. Add, edit, delete, and rearrange fields in any file. Want to see information in a different order, or only see certain fields? Use filters and QuickViews to show only the records that are pertinent to what you’re working on, in the order you want to see them.
Give PracticeMaster a chance to change the way your law firm runs by saving time and money using the free one-user “Try Before You Buy” basic license. You’ve got nothing to lose.
For more information about PracticeMaster features included in the “Try Before You Buy” license, also known as PracticeMaster Basic, see Knowledge Base Article R11548, “PracticeMaster Feature Comparison.” If you have any questions regarding PracticeMaster features, contact your local consultant, or contact Technical Support at (402) 419-2210.
Time Zones are here! Beginning in Version 2020, you can specify your time zone or set it automatically as per Windows settings (Calendar | Calendar Properties). Additionally, time zones can be changed for individual calendar records. Calendar records will be shown relative to the local time for each user. The PracticeMaster Calendar, PracticeMaster Dashboard, and Tabs3 Connect Calendar all utilize the time zone setting on the device where records are being accessed. This also provides a more seamless integration of calendar records with Microsoft Outlook.
Tabs3 Connect also now supports time zones for calendar events and tasks. Tabs3 Connect will display new calendar records relative to the local time of the device. Tabs3 Connect allows you to specify a time zone when adding an event or task to the calendar, allowing you to schedule something back at the office or for another location.
Note: Only users converting from previous versions of the software need to enable the time zone feature (Utilities | Time Zone Configuration). It is enabled by default for new systems.
Update to Version 20.2.6 to start using time zones.
Additional information on how PracticeMaster handles time zones for calendar events and tasks can be found in KB Article R11836, “PracticeMaster Time Zone Overview,” or the Help included with PracticeMaster. Click here to view the “Enabling Time Zones in PracticeMaster” training video.
Did you know that PracticeMaster has a new dashboard in Version 19? The dashboard makes it easy to see your calendar for the day, your upcoming tasks, and a quick recap of the time you entered.
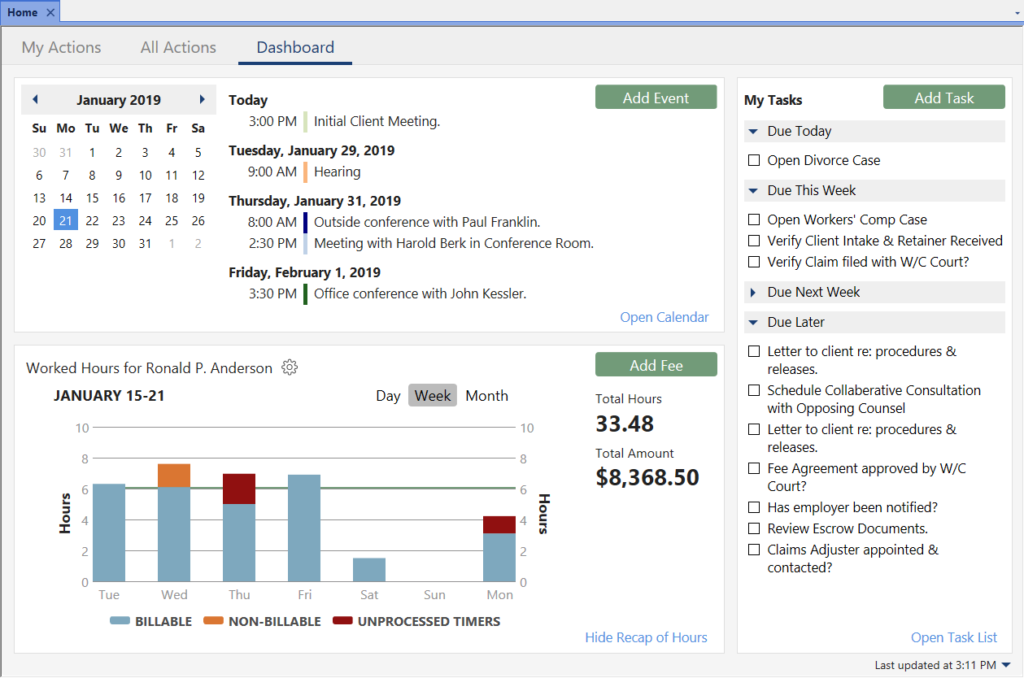
My Calendar
The Calendar widget shows a list of your upcoming events, along with a calendar that can be used to pick a different date. Mouse over an upcoming event to see more details, or click it to open the calendar record for editing. You can quickly add an item and open the full calendar.
- Click Add Event to add an event on the fly.
- Use the Date Selector to view calendar events on future days.
- Click the event’s description to open the record.
- Hover over an event’s description to view the event’s Description, Date, Time, Alarm, Location, Users, Client, and Comments.
- Click Open Calendar to open the Daily, Weekly, or Monthly Calendar depending on the view last used.
My Tasks
The My Tasks widget shows all of your incomplete tasks broken up into sections by due date. This makes it easy to see what needs to be done first.
- Click the Add Task button to add a task on the fly.
- Click the task’s description to open the record.
- Hover over a task’s description to view the task’s Description, Date, Alarm, Client, and Comments.
- Click the check box to the left of the task to mark it complete.
- Click Open Task List to open and view your Task List.
Recap of Hours
The Recap of Hours widget shows your hours worked compared to your daily target hours. This makes it easy to see the status of your worked hours, including any unprocessed timer records.
- Click Day, Week, or Month to set the range you want to see.
- Hover over the Recap of Hours widget to access the left and right arrows, allowing you to change which day, week, or month is viewed.
- Click the billable or non-billable time to open the Fee Recap list, which shows the detail that makes up the amount.
- Click the
 to change the timekeeper, select to compare the hours with a specified daily target, or select to show unprocessed timer records.
 - Click the Add Fee button to add a fee on the fly.
- Click Hide Recap of Hours if you do not want to see this information.
Note: The Home page must be selected in the PracticeMaster Theme Settings (View | Theme Settings | Home Page) to view the dashboard.

I love the way the Calendar Plans work, but I’d also like to have a new Task record created with an appropriate Due Date based on when the previous Task was completed. For example, after I send the check to the filing clerk, I need a task to confirm I’ve received the file marked petition from the clerk.
This can be accomplished by creating a WorkFlow that will automatically trigger whenever a calendar record with a particular calendar code (e.g., “FC”) is marked as completed. The WorkFlow will create a calendar entry populated with field values specified in the WorkFlow itself. For our example, the calendar entry will include the following:
- Due Date ten days after Date Completed of prior task.
- Calendar Code of “AD”
- Description of “Answer to complaint due”
- Task with a Start Time of 8:00 A.M.
- Alarm Time set for 0 Minutes
- The same Client ID selected
To automatically create the next Calendar entry every time one is completed in the set
- From the PracticeMaster Maintenance menu, select WorkFlows.
- Select the Calendar file, and then click the New button.
- Enter a Name for the WorkFlow (e.g., “Answer to Complaint Due Date”).
- In the Source section:
- Select the Filtered Records option and click the Filter button.
- Click the New Row button and select a Field Name of Calendar Code.
- Select a Test Condition of equal to.
- In the Test Value field, select a Calendar Code of FC.
- Click the Save button.
- In the Event section:
- Select Record Changed.
- Select Specific Field and choose Complet_Dt.
- Select Value Before, leaving the value blank (mm/dd/yyyy).
- In the Actions section, click the New button.
- Select Create New Record and click Next.
- Select Calendar from the drop-down list and click OK.
- Click the Define Template button.
- Click the set button next to the Due Date field.
- In the Template Expression Editor window, click the Field button.
- Select a Field ID of “Complet_Dt” and click Insert.
- The following will now be displayed: “@SrcRec:Complet_Dt”. After this, enter “+10”. The following will now be displayed:
“@SrcRec:Complet_Dt+10”. - Click OK.
- Click the set button next to the Calendar Code field.
- In the Template Expression Editor window, click the Value button, and select “AD” from the Lookup Window.
- Click OK on the Value window.
- Click OK on the Template Expression Editor window.
- Click the set button next to the Description field.
- In the Template Expression Editor window, click the Value button, and enter “Answer to complaint due”
- Click OK on the Value window.
- Click OK on the Template Expression Editor window.
- Click the set button next to the Type field.
- In the Template Expression Editor window, click the Value button, and select “T” from the drop-down list.
- Click OK on the Value window.
- Click OK on the Template Expression Editor window.
- Click the set button next to the Start Time field.
- In the Template Expression Editor window, click the Value button, and enter “08:00:00 AM”.
- Click OK on the Value window.
- Click OK on the Template Expression Editor window.
- Click the set button next to the Alarm Time field.
- In the Template Expression Editor window, click the Value button, and select “0 Minutes” from the drop-down list.
- Click OK on the Value window.
- Click OK on the Template Expression Editor window.
- Click the set button next to the Client ID field.
- In the Template Expression Editor window, click the Field button.
- Select a Field ID of “Client_ID” and click Insert.
- Click OK.
- Press Ctrl+S.
- Click the set button next to the Due Date field.
- Click Finish.
- Click Save, and then close the WorkFlows window.
You now have a WorkFlow that will create a customized calendar entry based on the completion dates of the prior task. This can be reapplied as many times as is necessary for the series to be completely automated as things are marked completed.
For more information on WorkFlows, refer to our PracticeMaster WorkFlows Guide at Tabs3.com/support/docs.html or Knowledge Base Article R11307, “All About WorkFlows.”

I’ve created several custom fields in my Calendar and Contact files (e.g., Docket No.). Is there a way I can get the new fields to sync over to Outlook?
PracticeMaster has the ability to customize which fields synchronize with Outlook. You can select which PracticeMaster field values to display in Outlook’s Subject or Description fields for Calendar records. When synchronizing contacts to Outlook, you can select which PracticeMaster fields to map to their corresponding Outlook fields. These features make it easy to display custom calendar and contact information from PracticeMaster in Outlook.
To specify which fields are displayed in the Subject field of Outlook Calendar records
- From the PracticeMaster Maintenance menu, point to Integration and select Outlook Synchronization.
- On the Calendar tab, in the Synchronization Options section, select the Customize what fields display in the Outlook subject check box.
- Click the Select Fields button.
- In the Available Fields column, double-click each field you want to include in the Subject field of the Outlook calendar records. This moves the field to the Display Fields column. Likewise, double-clicking a field in the Display Fields column moves the field back to the Available Fields column.
- In the Display Fields column, optionally change the order in which fields are displayed using the
 (Move Up) and
  (Move Down) buttons. (Note: The Description field must be the first or last field in the Display Fields column.)
 - Click OK to close the Select Subject Fields window.
- Click OK.
To specify which fields are displayed in the Description field of Outlook Calendar records
- From the PracticeMaster Maintenance menu, point to Integration and select Outlook Synchronization.
- On the Calendar tab, in the Synchronization Options section, select the Customize what fields display in the Outlook description check box.
- Click the Select Fields button.
- In the Available Fields column, double-click each field you want to include in the Description field in the Outlook calendar records. This moves the field to the Display Fields column. Likewise, double-clicking a field in the Display Fields column moves the field back to the Available Fields column.
- In the Display Fields column, optionally change the order in which fields are displayed using the (Move Up) and (Move Down) buttons.
- Click OK.
- Click OK.
To specify which fields are displayed for Outlook contacts
- From the PracticeMaster Maintenance menu, point to Integration and select Outlook Synchronization.
- On the Contact tab, in the Synchronization Options section, click the Field Mapping button.
- In the Outlook fields column, select the desired field.
- In the PracticeMaster Fields column, double-click the highlighted space or field and select the PracticeMaster field you want to be shown in the selected Outlook field.
- Click OK to close the Outlook Contact Field Mapping window.
- Click OK.
Any changes to the field settings will trigger a Critical Synchronization. This process updates previously synchronized records to use the new settings.
You may already be set up to synchronize your calendar and contacts between PracticeMaster and Microsoft Outlook via your Exchange server, but using the Platinum Exchange Connector has so many more great benefits!
What makes the Exchange Connector a better option?
- The Exchange Connector provides a direct link between the Platinum Server and your Microsoft Exchange server. PracticeMaster and Outlook stay synchronized, even when PracticeMaster is not open on your workstation.
- Only one “administrative” Exchange user needs access rights to other users’ calendars, thus eliminating the need to assign Editor rights to all users. Without the Exchange Connector, each user must individually be configured with the appropriate rights.
- Periodic synchronization occurs at the server, thereby reducing network traffic.
- The Exchange Connector performs a single periodic synchronization for all users, ensuring that everyone is up to date.
- Access rights to users’ Exchange folders are automatically assigned to the “administrative” user as they log into PracticeMaster.
- PracticeMaster is only required to be running on one computer in the office for synchronization to occur for all users.
To set up the Exchange Connector, you must configure the Active Directory Domain Controller, the Exchange Server, the Tabs3 and PracticeMaster Platinum Server, and the Exchange Connector settings. For complete instructions on setting up the Exchange Connector, refer to Knowledge Base Article R11596, “Configuring the PracticeMaster Platinum Exchange Connector.”
For more information about Platinum features, see Knowledge Base Article R11379, “Platinum Overview.” If you have any questions regarding Platinum features, including the Exchange Connector, contact your local consultant, or contact Technical Support at (402) 419-2210.
I want a reminder to be shown a week prior to my hearings in addition to the alarm I have set on the record. However, I also want the reminder to synchronize to my Outlook calendar. How can I accomplish this?
PracticeMaster Reminders do not synchronize over to Outlook. However, a WorkFlow can be set up that will automatically create additional calendar records as “reminders” in PracticeMaster when a certain calendar code is used. Because we are creating separate calendar records, they will then synchronize over to Outlook.
To create a WorkFlow that adds additional calendar records based on Calendar Code
- From the Maintenance menu, select WorkFlows.
- Select the Calendar file, and then click the New button.
- Enter a Name for the WorkFlow (e.g., “Reminder Calendar Records”).
- In the Source section:
- Select the Filtered Records option and click the Filter button.
- Select a Field Name of Calendar Code.
- Select a Test Condition of equal to.
- In the Test Value field, select a Calendar Code of Hearing.
- Click the Save button.
- In the Event section:
- For Type, select Record Added and Record Changed.
- For Fields, select Selected Field(s).
- Click the Select Fields button, select the Due_Date field, and then click the OK button.
- In the Actions section, click the New button.
- Select Create New Record and click Next.
- Select the Calendar file and click OK.
- Click the Define Template button.
- Click the set button next to the Due Date field.
- In the Template Expression Editor window, click the Function button.
- Select the DATEADD function and click Insert.
- Move your cursor between the parentheses and enter ‘-1, “w”,’
- Click the Field button, select Due Date, and then click Insert. The following will now be displayed:
DATEADD(-1, “w”,@SrcRec:Due_Date) - Click OK on the Template Expression Editor window.
- Click the set button next to the Description field.
- In the Template Expression Editor window, click the Value button and enter the desired text [e.g., “Reminder for Hearing – ” (including the dash and spaces)].
- Click OK on the Value window.
- Click the Operator button, select Addition, and click Insert.
- Click the Field button, select the Description field and click Insert.
- Click OK on the Template Expression Editor window.
- Click the set button next to the User/Group field.
- In the Template Expression Editor window, click the Field button.
- Select User ID and click Insert.
- Click OK on the Template Expression Editor window.
- Press Ctrl-S.
- Click the set button next to the Due Date field.
- Click Finish.
- Click Save.
The specified user will now have an automatic reminder set up for one week prior to a record with a Calendar Code of “Hearing”.
For more information on WorkFlows, refer to our PracticeMaster WorkFlows Guide at Tabs3.com/support/docs.html or Knowledge Base Article R11307, “All About WorkFlows.”
We’ve had several calendar records come up missing in both PracticeMaster and Outlook. We believe the entries were deleted sometime yesterday. Is there an easy way to find out what those records were so we can add them back into PracticeMaster if necessary?
Because the calendar entries were synchronized between PracticeMaster and Outlook, the Outlook Sync Log can be used to help determine if records were deleted. The Outlook Sync Log keeps track of every add, change, or delete that passes between Outlook and PracticeMaster.
Because the Outlook Sync Log records everything that synchronizes between PracticeMaster and Outlook, it can be quite large. Fortunately, we can create a filter to help narrow down the records we want to look at.
To filter the Outlook Sync Log for deleted records
- From the View menu, point to Log Files and select Outlook Sync Log.
- From the Quick Clicks pane, expand the Filter group and select Manage Filters.
- Press Ctrl+N.
- Enter the desired Filter Name (e.g., “Sync Items on 7/16/2018”).
- Click the New Row button.
- Select Sync_Date and then click the Select button.
- In the Test Condition column, select Greater than or Equal To.
- In the Test Value column, enter yesterday’s date (e.g., “07/16/2018”).
- Click the New Row button.
- Select Action and then click Select.
- In the Test Value column, enter “D”.
- Click Save.
Once the filter is enabled in the Quick Clicks pane, only those records that were deleted during the sync will be shown. You can then determine if records need to be added back into PracticeMaster based on record information in the Outlook Sync Log including the calendar Description, Owner (User), and Due Date/Time.
If you do not see the record(s) you are expecting, keep in mind that it’s also possible for records to appear deleted when they were actually changed (e.g., removing a User from the record, changing the Due Date field, etc.). If you want to look for changed records, instead of deleted records, simply change the filter’s Test Value from “D” to “U” in step 6b above.
For more information on PracticeMaster’s integration with Outlook, please see our Outlook Integration Guide.
I synchronize PracticeMaster with Outlook, and I occasionally see the message “Outlook Synchronization Suspended” in the status bar. Why would this message be displayed?
There are a few reasons the “Outlook Synchronization Suspended” message can be displayed in the PracticeMaster status bar.
![]()
The specified confirmation threshold has been exceeded.
The Outlook Synchronization confirmation threshold is used to specify the minimum number of records that will require confirmation before synchronization can proceed. The purpose of this setting is to ensure that you are alerted when an unusual number of records are being synchronized (as this can indicate a problem with your synchronization settings), without interrupting more typical synchronizations. Therefore, the ideal value will vary depending on the user.
To change the threshold
- From the Maintenance menu, point to Integration and select Outlook Synchronization.
- From the Synchronization Options tab, in the Synchronization Options section, change the Require confirmation when at least xx records will be synchronized number or clear the check box.
- Click OK.
A critical Outlook Synchronization setting has been changed and therefore a critical synchronization is required.
In order to ensure the accuracy of synchronized information, a critical synchronization must be performed before any synchronization can occur after changing the settings. All other synchronization for the user will be suspended until this synchronization is performed.
A synchronization exception has occurred.
A synchronization exception is a synchronization issue that PracticeMaster cannot resolve without user intervention. Exceptions are uncommon. Refer to the “Synchronization Exceptions” section of Knowledge Base Article R11368, “Troubleshooting Outlook Calendar & Contact Integration Issues,” for more information.
Resolution
To resolve the suspended synchronization, click the “Outlook Synchronization Suspended” message in the PracticeMaster status bar. You will then be prompted to perform the required action.
For more information on PracticeMaster’s Outlook integration, refer to our Outlook Integration Guide.
Do you manually add every calendar record individually for events that repeat on a regular basis? Save time by using PracticeMaster’s Recurring Dates feature!
PracticeMaster’s Recurring Dates feature allows you to quickly add multiple calendar records with the same information for different dates. This feature is quite useful for creating dates for repetitive tasks such as client review, filing deadlines, etc. You can even link a series of dates, making it easy to change or delete all records in the same series.
The Recurring Dates video walks you through adding calendar records for a meeting with a monthly recurring date. For this scenario, the video shows you how to create records on the third Thursday of every month for the next two years. The video then shows you how easy it is to change the date for all of the newly created meeting records to the third Friday of every month, instead.
Using PracticeMaster’s Recurring Dates feature makes it easy to create multiple linked calendar entries for a task or event that occurs on a regular basis.
Watch this three-and-a-half-minute video here:
Training Videos can be accessed 24 hours a day, 7 days a week, at Tabs3.com/videos. You can also access Training Videos while in the software by selecting Help | Documentation and then clicking the See also link for Tabs3 and PracticeMaster Training Videos.
When we create Calendar records for matters, we like to have the Primary Timekeeper listed in the Description field to indicate who’s leading the meeting. Is there a way to have that information automatically added so users don’t have to check the Client file to find out who the Primary Timekeeper is?
You can create WorkFlows so that each time you add a record to the Calendar with the Client ID field populated, the Primary Timekeeper’s name will be added to the beginning of the Description field.
To create a WorkFlow that adds the Primary Timekeeper’s name to the Description field
- From the Maintenance menu, select WorkFlows.
- Select the Calendar file, and then click the New button.
- Enter a Name for the WorkFlow (e.g., “Primary Timekeeper on Calendar”).
- In the Source section:
- Select the Filtered Records option and click the Filter button.
- Select a Field Name of Client ID.
- Select a Test Condition of not equal to.
- Leave the Test Value field blank.
- Click the Save button.
- In the Event section, select Record Added.
- In the Actions section:
- Click the New button.
- Select Change Record and click Next.
- Select Source Record and click the Define Template button.
- Click the set button next to the Description field.
- In the Template Expression Editor window, click the Field button.
- Select a Field ID of “Client_ID” and click Insert.
- Enter “:Prim_Tkpr:Name” immediately following the field name. The following will now be displayed: “@SrcRec:Client_ID:Prim_Tkpr:Name”.
- Click the Operator button, select Addition, and then click the Insert button.
- Click the Value button and enter “ – ”.
- Click the Operator button, select Addition, and then click the Insert button.
- Click the Field button, select a Field ID of Desc, and then click the Insert button. The following will now be displayed: “@SrcRec:Client_ID:Prim_Tkpr:Name +” – ” +@SrcRec:Desc”.
- Click OK on the Template Expression Editor window.
- Press Ctrl+S.
- Click the set button next to the Description field.
- Click Finish.
- Click Save.
For more information on WorkFlows, refer to our PracticeMaster WorkFlows Guide at Tabs3.com/support/docs.html or Knowledge Base Article R11307, “All About WorkFlows.”
I entered a calendar record in Outlook for myself and another attorney. When I checked PracticeMaster, it was on my calendar but not on the other attorney’s calendar. Why would it show on one but not the other?
The way that calendar records synchronize between PracticeMaster and Outlook depends on whether you are using Microsoft Exchange, and how System Configuration is configured.
If you are not using Microsoft Exchange, or you are but do not have System Configuration set up to take advantage of Microsoft Exchange, then the following synchronization rules apply:
- If you enter a record for yourself in PracticeMaster or Outlook, it will synchronize immediately if both programs are open.
- If you enter a record for another user in PracticeMaster, the record will synchronize to the other user’s Outlook calendar when their next Periodic Sync runs. Likewise, when you enter a record for another user in Outlook, the record will synchronize to the other user’s PracticeMaster calendar when their next Periodic Sync runs.
If you have Microsoft Exchange, there are two settings in System Configuration that can be used to immediately synchronize calendar records for other users. The first option, Use Microsoft Exchange to synchronize PracticeMaster and Outlook, is available in both the Platinum and non-Platinum software. The second option, Enable the Platinum Exchange Connector, is available only in the Platinum software.
Non-Platinum
If you do not have the Platinum version of the software, and the option to Use Microsoft Exchange to synchronize PracticeMaster and Outlook is selected, the following synchronization rules apply:
- If you enter a record for yourself in PracticeMaster or Outlook, it will synchronize immediately if both programs are open.
- If you enter a record for another user in PracticeMaster, and you have permissions set up in Microsoft Exchange to add records to the other user’s Outlook calendar, the record will synchronize to the other user’s Outlook calendar.
- If you enter a record for another user in Outlook, the record will synchronize to the other user’s PracticeMaster calendar when their next Periodic Sync runs.
Platinum
If you have the Platinum version of the software, and the options to Use Microsoft Exchange to synchronize PracticeMaster and Outlook and Enable the PracticeMaster Exchange Connector are selected, the following synchronization rules apply:
- If you enter a record for yourself in PracticeMaster or Outlook, it will synchronize immediately to the other program if PracticeMaster is open on at least one workstation.
- If you enter a record for another user in PracticeMaster or Outlook, it will synchronize immediately to the other program if PracticeMaster is open on at least one workstation.
Note: In order for synchronization to occur with other users, both users must have Outlook calendar integration and automatic synchronization enabled in PracticeMaster. For example, if Mary is creating events in Susan’s PracticeMaster calendar, and Mary is not set up to automatically integrate calendar records with Outlook, the events Mary enters will not be synchronized to Susan’s Outlook calendar until the next periodic or manual synchronization occurs for Susan.
For information on setting up and troubleshooting integration with Microsoft Exchange, see Knowledge Base articles R11373, “Microsoft Exchange Server Overview,” R11596, “Configuring the PracticeMaster Platinum Exchange Connector,” and R11597, “Troubleshooting the PracticeMaster Platinum Exchange Connector.”
Did you know that there are multiple calendar reports that can be printed in PracticeMaster? Different reports provide different ways to view your calendar entries and print them.
Daily Report
The Daily Report can include events, tasks, and/or reminders for the selected users and date range. You can select whether entries are listed by type and then by date, or vice versa, and specify what is appended to the description. This report automatically begins each selected user on a different page.
- View this report here: Daily_Report.pdf
The Daily Report can be accessed via Reports | Daily Report.
Graphical Calendar Report
The Graphical Calendar Report mimics the look of the Daily/Weekly/Monthly Calendar. There are four ways to print the Graphical Calendar Report. Common settings include font, whether to include color, which users to include on the report, and the date range. Additionally, when the Graphical Calendar Report is accessed from the Daily/Weekly/Monthly Calendar, you can select to print a filtered calendar based on the filter selected at the time of printing.
The following selections provide additional options:
- Daily – Additional options include how many days to include per page, start and end time, and time interval.
- View this report here: Graphical_Cal_Report_Daily.pdf
- Weekly – Additional options include the option to use the Daily Style.
- View this report here: Graphical_Cal_Report_Weekly.pdf
- Monthly – Additional options include showing exactly one month per page or to specify how many weeks to include per page, and whether or not to include weekends.
- View this report here: Graphical_Cal_Report_Monthly.pdf
- Agenda – Additional options include whether to limit the report to working hours and whether or not to include weekends.
- View this report here: Graphical_Cal_Report_Agenda.pdf
The Graphical Calendar Report can be accessed via Reports | Graphical Calendar Report or the (Print) icon in the Daily/Weekly/Monthly Calendar.
Graphical Task List Report
The Graphical Calendar Task List mimics the look of the Task List and includes the columns selected on the Task List tab of the Calendar Properties (Calendar | Calendar Properties). Options that can be selected include color and which User IDs to include. Additionally, a date range can be specified if Incomplete Tasks for Selected Day is selected on the Task List tab of the Calendar Properties.
- View this report here: Graphical_Task_List_Report.pdf
The Graphical Task List can be accessed via Reports | Graphical Task List or the (Print) icon in the Task List.
Report Writer
In addition to the ability to create your own reports, Report Writer comes with many pre-defined reports that can be edited, copied, and/or deleted. The following calendar reports are among the reports included.
- Calendar by Due Date (_caldue) – Provides a list of calendar entries sorted by date and includes the time, User ID, type, completion status, description, Client ID, and area of practice. Ranges can be selected for the Client ID, due date, and User ID. The type and whether to print incomplete entries only can also be specified.
- View this report here: Cal_by_Due_Date.pdf
- Calendar by User (_caluser) – Provides a list of calendar entries sorted by User ID and includes the day of the week, date, time, type, description, Client ID, and area of practice. Ranges can be selected for the Client ID, date, and User ID. The type can also be specified.
- View this report here: Cal_by_User.pdf
- Client Calendar (_clntcal) – Provides a list of calendar entries sorted by Client ID and includes the date, time, User ID, and description, area of practice, and primary timekeeper. Ranges can be selected for the Client ID, due date, and User ID. The type and whether to print incomplete entries only can also be specified.
- View this report here: Client_Cal.pdf
- Blank Client ID Calendar Records (_blankid) – Provides a list of calendar entries without an assigned Client ID. This report can be generated for a specified range of due dates.
- View this report here: Blank_Client_ID_Cal_Records.pdf
- To Do List (Todo_lst) – Provides a list of calendar entries sorted by type and date. You can specify a range of Client IDs, reminder/due dates, and user IDs as well as which calendar types to include on the report.
- View this report here: To_Do_List.pdf
Report Writer can be accessed via Reports | Report Writer.
For examples of each of these reports, take a look at the PracticeMaster Report Pack.
Did you know that you can convert calendar, e-mail, note, phone, research, timer, and document records into fees? This allows you to easily bill your client for the time spent on their matter.
The Converting Records to Billable Fees video shows you how to convert records to fees via the Matter Manager, Calendar and Journal file, and the Process Timer Records utility. Additionally, this video walks you through the Convert to Fee Settings, which allow you to specify default settings to be used (e.g., Tcode, Minimum Time to Bill, etc.) for each type of record.
Watch this eight-minute video here:
Training Videos can be accessed 24 hours a day, 7 days a week, at Tabs3.com/videos. You can also access Training Videos while in the software by selecting Help | Documentation and then clicking the See also link for Tabs3 and PracticeMaster Training Videos.
System Configuration isn’t a program you work in everyday like Tabs3 Billing, but is geared toward setting up certain features of the software. So what settings are controlled in System Configuration, and how do you access it?
Many settings in the software can be set up once and you’re done, but others may need to be updated such as when employees come and go, your server equipment changes, or your firm changes and grows. Although each individual program (Tabs3 Billing, PracticeMaster, etc.) has program-specific customization settings, many System Configuration settings affect more than just a single program.
Note: Manager Access Rights are required to access many of the settings in System Configuration.
System Configuration is used to set up the following features:
- Users and Groups, including Calendar Rights and Tabs3 Connect settings
- Access Rights
- Firm Info
- Outgoing E-mail Configuration
- Microsoft Exchange Integration
- Platinum settings
- …and more!
How to access System Configuration
You can open System Configuration via your desktop shortcut, if present, or via the ![]() Application Toolbar from any of the Tabs3 software. The Application Toolbar is typically located on the right-hand side of the main window and includes buttons for all Tabs3 software for which you have access rights. For more information about accessing System Configuration, press F1 while in the Tabs3 software and enter “System Configuration” on the Index tab.
Application Toolbar from any of the Tabs3 software. The Application Toolbar is typically located on the right-hand side of the main window and includes buttons for all Tabs3 software for which you have access rights. For more information about accessing System Configuration, press F1 while in the Tabs3 software and enter “System Configuration” on the Index tab.
We have a new employee starting and we need to add her to hundreds of existing Calendar entries. Is there an easy way to accomplish this so that I don’t have to open each calendar record and edit them individually?
A WorkFlow can be created that will add the User ID to the desired calendar records. This WorkFlow will not run automatically, but will run when you click the WorkFlow in the Quick Clicks pane. This allows you the flexibility of selecting only the records to which you want the user added.
Tip: Once the WorkFlow has been created, it can easily be updated for similar scenarios in the future. For example, if you need to add another new employee at a later time, simply edit the existing WorkFlow for the new User ID.
To create a WorkFlow to add a particular User ID to calendar records
- From the Maintenance menu, select WorkFlows.
- Select Calendar, and then click the New button.
- Enter a Name for the WorkFlow (e.g., “SARA added to Calendar Entries”).
- In the Event section, select the User Activated check box.
- In the Actions section, click New.
- Select Change Record, and then click Next.
- Select Source Record, and then click the Define Template button.
- Click on the set button next to the User/Group field.
- In the Template Expression Editor window, click the Field button.
- In the Available Records field, select Source Record (Before the Save).
- Select the GroupInfo Field ID and click Insert.
- Click the Operator button, select Addition, and then click Insert.
- Click the Value button, enter a comma followed by the desired User ID, and then click OK. For our example, enter “,SARA”. The comma is necessary to separate the User ID from the others.
- The following will now be displayed:
‘@SrcRecOrig:GroupInfo +“,SARA”’
Click OK on the Template Expression Editor window. - Press Ctrl+S.
- In the Template Expression Editor window, click the Field button.
- Click Finish.
- Click Save.
To run the WorkFlow, simply open the Calendar file, select the desired calendar records, and then click the WorkFlow from the WorkFlows group of the Quick Clicks pane. All of the selected calendar records will be updated with the new user.
For more information on WorkFlows, refer to our new PracticeMaster WorkFlows Guide at Tabs3.com/support/docs.html or Knowledge Base Article R11307, “All About WorkFlows.”
I want to have an alarm displayed the day before a trial to remind me to dress appropriately, and then a second alarm an hour before I need to be in trial to remind me to leave. However, I don’t want to create a second calendar record to accomplish this. Is there any way to set up two alarms for each calendar record that has a Calendar Code of Trial?
A WorkFlow can be set up for a particular Calendar Code so that whenever the alarm is cleared, PracticeMaster sets the alarm to a new value for you and updates the description to the next action item. For example, when a “1 day” alarm is cleared, PracticeMaster can set the alarm for “1 hour.” This can be desirable if you like the alarms but don’t want to create separate calendar entries for each action item of a task or event.
To create a WorkFlow that sets a new alarm when an alarm is cleared
- From the Maintenance menu, select WorkFlows.
- Select the Calendar file, and then click the New button.
- Enter a Name for the WorkFlow (e.g., “Multiple Alarms”).
- In the Source section:
- Select the Filtered Records option and click the Filter button.
- Select a Field Name of Calendar Code.
- Select a Test Condition of equal to.
- In the Test Value field, select a Calendar Code of Trial.
- Click the Save button.
- In the Event section:
- Select a Type of Record Changed.
- In the Fields section, select Specific Field, and then select the AlarmExpr field.
- Select the Value Before check box, and then select the desired value (e.g., 1 Day).
- Select the Value After check box, and then select None.
- In the Actions section, click the New button.
- Select Change Record and click Next.
- Select Source Record and click Define Template.
- Click the set button next to the Alarm field.
- In the Template Expression Editor window, click the Value button.
- Select the desired value (e.g., 1 Hour) and click OK on the Value window.
- Click OK on the Template Expression Editor window.
- Click the set button next to the Description field.
- In the Template Expression Editor window, click the Value button and enter the desired text [e.g., “Leave for court – ” (including the dash and spaces)].
- Click OK on the Value window.
- Click the Operator button, select Addition, and click Insert.
- Click the Field button and, in the Available Records field, select Source Record (Before the Save).
- Select the Description field and click Insert.
- Click OK on the Template Expression Editor window.
- Press Ctrl+S.
- Click the set button next to the Alarm field.
- Click Finish.
- Click Save.
You now have a WorkFlow set up so that when you clear the one day alarm on a record with a Calendar Code of “Trial,” it will reset the alarm to be displayed one hour before the trial time to remind you to leave.
For more information on WorkFlows, refer to our new PracticeMaster WorkFlows Guide at Tabs3.com/support/docs.html or Knowledge Base Article R11307, “All About WorkFlows.”
One of my calendar entries in PracticeMaster was inadvertently deleted. This caused me to nearly miss the opportunity to file my witnesses. To prevent this in the future, is there a way I can find out if a calendar entry gets deleted and when?
There are a variety of options available to handle this. WorkFlows can be set up to copy any information from the originating record to another location. For example, if a calendar record is deleted, then the WorkFlow can be set up to copy the Due Date, Calendar Code, Description, Comments, Start Time, and more to the new record. The WorkFlow can even be set up to show who made the deletion.
Note: You can optionally set up access rights to only allow certain users rights to delete records. This can help alleviate issues with unauthorized deletions. Access rights can be set up in System Configuration via File | Open | Access Profile.
The following is a list of options where WorkFlows can help track deletions:
- Send eNote to a user – When a record is deleted, an eNote can be automatically sent to one or more users to notify them of the deletion. Sending an eNote will provide real-time deletion notifications and come from the user who deleted the record. Keep in mind that eNotes will be shown in the sender’s Sent eNotes list until deleted. Note: eNote is only available in the Platinum version of PracticeMaster.
- Creating private calendar entries – When a record is deleted, a calendar record can be created for a user or group of users and marked as private. Marking the record as private makes it easy to keep the information inaccessible to users for which you do not want access granted. Only those users with Calendar Rights to view private entries can access it. Set the Alarm Time field to receive a notification, or set the Type field to Task so that it shows up in your Task List.
- Creating records in a custom lookup file – You could create a custom lookup file with all of the desired fields and when a record is deleted, a new record would be added to the lookup file. The lookup file does not have to be referenced from any other file in the software, but can be maintained for deleted records only. Creating a lookup file provides the ability to store the deleted records in one place without being mixed up with other records. However, the additional setup time for the new lookup file should be taken into consideration.
Regardless of which option you choose, a new record will be added to PracticeMaster. The goal is for the WorkFlow to record all critical information that was removed by the deletion. A WorkFlow will need to be added to each file in which you want deleted records tracked.
You can find more information and additional options for using WorkFlows to track deleted records in Knowledge Base Article R11732, “Using WorkFlows to Track Deleted Records.”
For more information on WorkFlows, refer to our new PracticeMaster WorkFlows Guide at Tabs3.com/support/docs.html or Knowledge Base Article R11307, “All About WorkFlows.”
Are you using groups for calendaring, or do you enter each user individually in the record? A group is composed of various users, and can be a great shortcut when adding calendar records for teams, managers, or any set of users. For example, if you have regular partner meetings, create a group that includes each of the partners. When creating the calendar record, simply select the group and all of the users in the group will automatically be added to the record.
To create a new group
- Open System Configuration.
- From the File menu, point to Open and select Group.
- Click the
 (New) button.
 - Enter the desired Group ID and Group Name.
- In the Users in Group section, select the users you want to have included in this group.
- Press Ctrl+S.
By adding users to groups, you can help streamline calendar entries and save time!
Everyone can view your public calendar records, but did you know that you can control who has rights to edit your public calendar records and who has rights to browse or edit your private records?
Calendar rights are assigned via the User Configuration program in System Configuration. Although any user can view public calendar entries, rights must be explicitly given to edit public entries, view private entries, and edit private entries. Although this may sound complicated, it’s easy to specify who has rights to whose calendars.
To specify calendar rights for a user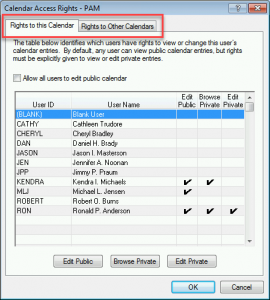
- From the System Configuration File menu, point to Open and select Users.
- Select the desired User ID.
- In the Options section, click the Calendar Rights button.
- On the Rights to this Calendar tab, select the users who need rights to this user’s calendar, and then click the Edit Public, Browse Private, and/or Edit Private buttons. Optionally select the Allow all users to edit public calendar check box.
- On the Rights to Other Calendars tab, select the users that this user has rights to, and then click the Edit Public, Browse Private, and/or Edit Private buttons.
- Click OK.
- Press Ctrl+S.
Configuring access for one user will automatically update the corresponding values in the Calendar Access Rights window for any other users affected by the change. For example, let’s say you currently have Cathy’s user profile open, and you specify that Robert has rights to edit Cathy’s public calendar records. Now opening Robert’s user profile will also show that he has rights to edit Cathy’s public calendar records.
Note: Keep in mind that while you can specify which users have rights to edit your public records, browse your private records, and edit your private records, only managers can specify what rights you have to other users’ calendars. Additionally, in order to browse, add, change, and/or delete calendar records, your User ID must be part of an Access Profile with those rights.
We want a calendar record automatically created every time we open a new Criminal Law client. The calendar record should remind us that in two days we need to request a copy of the arrest affidavit and bond information for the client. Is there an easy way to do this?
This can be done by creating a WorkFlow that will automatically trigger whenever a client is added with an Area of Practice (AOP) of Criminal Law. The WorkFlow will create a calendar entry populated with field values specified in the WorkFlow itself. For our example, the calendar entry will include the following:
- Due Date two days after the client’s Open Date
- Description of “Request copy of arrest affidavit & bond information”
- Task with a Start Time of 8:00 A.M.
- Alarm Time set for 0 Minutes
- The Client ID selected
To automatically create a Calendar entry every time a Criminal Law client is added
- From the Maintenance menu, select WorkFlows.
- Select the Client file, and then click the New button.
- Enter a Name for the WorkFlow (e.g., “Criminal Law Calendar”).
- In the Source section:
- Select the Filtered Records option and click the Filter button.
- Select a Field Name of AOP.
- Select a Test Condition of equal to.
- In the Test Value field, select an AOP of Criminal Law.
- Click the Save button.
- In the Event section:
- Select Record Added.
- In the Actions section, click the New button.
- Select Create New Record and click Next.
- Select Calendar from the drop-down list and click OK.
- Click the Define Template button.
- Click the set button next to the Due Date field.
- In the Template Expression Editor window, click the Field button.
- Select a Field ID of “Date_Open” and click Insert.
- The following will now be displayed: “@SrcRec:Date_Open”. After this, enter “+2”. The following will now be displayed: “@SrcRec:Date_Open +2”.
- Click OK.
- Click the set button next to the Description field.
- In the Template Expression Editor window, click the Value button, and enter “Request copy of arrest affidavit & bond information.”
- Click OK on the Value window.
- Click OK on the Template Expression Editor window.
- Click the set button next to the Type field.
- In the Template Expression Editor window, click the Value button, and select “T” from the drop-down list.
- Click OK on the Value window.
- Click OK on the Template Expression Editor window.
- Click the set button next to the Start Time field.
- In the Template Expression Editor window, click the Value button, and enter “08:00:00 AM”.
- Click OK on the Value window.
- Click OK on the Template Expression Editor window.
- Click the set button next to the Alarm Time field.
- In the Template Expression Editor window, click the Value button, and select “0 Minutes” from the drop-down list.
- Click OK on the Value window.
- Click OK on the Template Expression Editor window.
- Click the set button next to the Client ID field.
- In the Template Expression Editor window, click the Field button.
- Select a Field ID of “Client_ID” and click Insert.
- Click OK.
- Press Ctrl+S.
- Click the set button next to the Due Date field.
- Click Finish.
- Click Save, and then close the WorkFlows window.
You now have a WorkFlow set up that will create a customized calendar entry every time a new client is saved with Criminal Law selected as the Area of Practice.
Did you know that when adding, changing, or deleting a calendar record, PracticeMaster can be set up to generate an e-mail with the record’s details in the body and the applicable users in the To field? This makes it easy to notify users of calendar additions and changes.
To enable the Auto E-mail Notification feature, from the Calendar menu, select Auto E-mail Notification. A ![]() to the left of the menu option indicates that this feature is enabled. Keep in mind that each user who wants to have an e-mail auto-generated must enable this feature.
to the left of the menu option indicates that this feature is enabled. Keep in mind that each user who wants to have an e-mail auto-generated must enable this feature.
Once the e-mail has been generated, make any additional changes as desired and click Send. It’s that easy!
When adding multiple calendar records, should you use Calendar Plan Templates or Recurring Dates? Both are great ways to create multiple records at once, but each option has distinct differences between them.
For example, Calendar Plan Templates provide the ability to enter custom information on records and are designed to generate a set of records relating to a specific job, court appearance, etc. On the other hand, Recurring Dates create a set of records with the same information with different dates, which is perfect for when you are scheduling repetitive records for meetings or tasks such as a weekly partner’s meeting.
For more information to help determine which option is better for your scenario, visit Knowledge Base Article R10692, “Calendar Plan Templates vs. Recurring Dates.” This article provides a direct comparison between Calendar Plan Templates and Recurring Dates in PracticeMaster in an easy-to-read table.
Our Knowledge Base can be accessed 24 hours a day, 7 days a week, at support.Tabs3.com. You can also access our Knowledge Base while in the software by selecting Help | Internet Resources | Knowledge Base.
You’ve probably seen the announcements that CompuLaw will no longer update or support CompuLaw Court Rules that integrate with PracticeMaster after December 31, 2016, and that we are now integrating with CalendarRules. But if you’re not yet familiar with CalendarRules, keep reading to see what all it’s all about!
What is CalendarRules?
CalendarRules offers general civil litigation-related court and agency Rule Sets for State, Federal, Appellate, and Bankruptcy courts across the United States. Currently, rules are available in all 50 states, with additional courts being added every month.
Why subscribe to CalendarRules?
- CalendarRules works through an online connection via PracticeMaster. No additional software is required.
- Updates are automatic so you will always have the most current rules.
- Licenses are not based on the number of users. Purchase a license for the desired rule set(s), and everyone can use it through PracticeMaster.
- E-mail notifications can be set up to e-mail specified users when rules have been updated.
You can contact CalendarRules at CalendarRules.com to subscribe. Make sure to let them know you use PracticeMaster.
How is CalendarRules Set Up?
After purchasing a license from CalendarRules, integration is set up entirely through PracticeMaster.
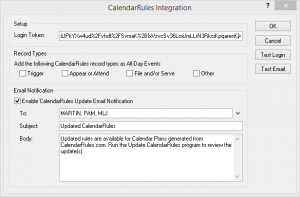
To set up CalendarRules Integration
- From the Maintenance menu, point to Integration and select CalendarRules Integration.
- Enter the Login Token provided by CalendarRules.
- Click the Test Login button to verify the Login Token is accepted.
- Optionally select the desired Record Types to display in the All-Day Events area of the Daily/Weekly/Monthly Calendars.
- Optionally select to Enable CalendarRules Update E-mail Notification, including the To, Subject, and Body fields.
- Click the Test E-mail button, enter the From Address, and click Send to verify e-mails can be successfully sent from PracticeMaster.
- Click OK.
How are Calendar Plans Generated?
CalendarRules’ calendar plans are easy to generate.
To generate a CalendarRules plan
- From the Calendar menu, select Generate CalendarRules.
- Enter the desired Client ID and, optionally, Contact.
- Select the appropriate Jurisdiction, Trigger, Date, Time, and Service Type (if applicable).
- Select the User/Group.
- Optionally select the Prepend Notes to Comments check box, and then enter any desired Notes.
- Click Preview.

You can now preview the calendar plan.
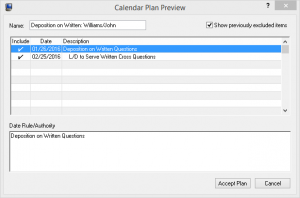
Once you have clicked the Accept Plan button, the PracticeMaster View Calendar Plans window will be opened. Plans that have been generated via CalendarRules can be reviewed at any time via the PracticeMaster View Calendar Plans window.
For more information on CalendarRules, see Knowledge Base Article R11713, “CalendarRules Integration Overview.”

We want to let you know that Aderant informed us that they are not planning to update or support CompuLaw Calendar Rules that integrate with PracticeMaster after December 31, 2016.
In other words, if you currently use CompuLaw calendar plans, your plans will still exist within PracticeMaster, however Aderant will no longer update your court rules to reflect changes after December 31, 2016.
If you rely on court rules to keep organized and you are on the latest version of PracticeMaster, you can purchase a subscription from CalendarRules, our new calendar plans integration partner. You can read more about this integration in our KB article, CalendarRules Integration Overview.
We held an in-depth web session on the new CalendarRules integration on Wednesday, November 30. If you’d like to request a recording, you can do so here: forms.tabs3.com/cr
We added two great new features to Tabs3 Connect – the ability to stay logged in regardless of inactivity, and the ability to view all Calendar file fields!
- Individual users can now optionally select to stay logged in regardless of the
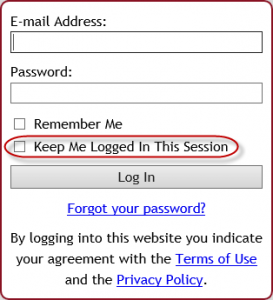 Automatically log off users after xx minutes of inactivity setting. When logging in to Tabs3 Connect, select the Keep Me Logged in This Session check box to prevent yourself from being logged out due to inactivity. (Note: We recommend that this option not be used on public or mobile devices.) This change is automatic and does not require a software update.
 - You can now view all calendar fields in Tabs3 Connect, including custom fields. Previously, only the default fields in the Calendar File were accessible via Tabs3 Connect. To view all fields, simply open a Calendar record and click the All Fields button. This change requires downloading and installing the latest software update.
For steps to download and install the latest version of the software, visit Knowledge Base Article R10154, “How to Download Files from Software Technology, Inc.’s Download Pages.”
For more information on Tabs3 Connect, contact your reseller and consultant, contact Technical Support at (402) 419-2210, or visit Knowledge Base Article R11480, “All About Tabs3 Connect.”
PracticeMaster is capable of integrating with CalendarRules to create and maintain Calendar Plans using rule sets from CalendarRules.com! CalendarRules offers general civil litigation-related court and agency rule sets for State, Federal, Appellate, and Bankruptcy courts across the United States. Currently, rules are available in all 50 states, with additional courts being added every month.
Knowledge Base Article R11713, “CalendarRules Integration Overview,” provides everything you need to get started: integration requirements, steps for configuring CalendarRules integration, frequently asked questions, and troubleshooting.
Our Knowledge Base can be accessed 24 hours a day, 7 days a week, at support.Tabs3.com. You can also access our Knowledge Base while in the software by selecting Help | Internet Resources | Knowledge Base.
We’re excited to announce our new integration partner, CalendarRules!
CalendarRules.com offers general civil litigation-related court and agency Rule Sets for State, Federal, Appellate and Bankruptcy courts across the United States. Currently, rules are available in all 50 states, with additional courts being added every month.
CalendarRules makes updated rules available to the end user in real time. Courts generally announce updates in two ways:
- Many updates are published for comment, with a scheduled effective date. CalendarRules makes these updates in their staging environment and releases them to production on the effective date. Thereafter, any subscriber to that court is automatically using the new rules.
- Sometimes a court will publish rule changes with an immediate effective date. CalendarRules is positioned to make these changes effective immediately.
CalendarRules can really add to the power of PracticeMaster for your firm. We would love to show you how it can save you time, and give you peace of mind. We recently had a webinar with Scott Davis, the founder of CalendarRules, and Bruce Policky, the Product Manager for Tabs3 Software, and had them demonstrate the new CalendarRules integration with PracticeMaster.
View the Recording here –> http://forms.tabs3.com/cr
Aderant, the company who makes CompuLaw Rules, has informed us that they are not planning on updating or supporting CompuLaw Rules that currently integrate with PracticeMaster after December 31, 2016.
As a result of Aderant’s decision, PracticeMaster Version 18 will be the last version of PracticeMaster that will generate or update CompuLaw Calendar Plans. Any CompuLaw Calendar Plans already processed with PracticeMaster will still be accessible.
In order to continue providing up-to-date court rules to our users, we have teamed up with CalendarRules.com, a provider of court rules for law firms. PracticeMaster integration with CalendarRules.com is available with Version 18.1.4, released August 11, 2016.
Did you know that you can add the PracticeMaster Toolbar icons to the Quick Access Toolbar in Microsoft Office 2007 and later? To add any of the PM Open, PM Save, PM Journal, PM Calendar, and/or PM Fee buttons to the Quick Access Toolbar, simply right-click the icon on the PracticeMaster ribbon and select Add to Quick Access Toolbar.
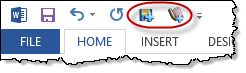
Tabs3 Connect has been around for some time now, but what exactly is Tabs3 Connect, and what can it do for your firm? Tabs3 Connect is a Platinum feature that provides access to Tabs3 and PracticeMaster anywhere you can connect to the Internet. No apps to download, simply go to Tabs3Connect.com and log in using your phone, tablet, laptop, or other internet-enabled device. Access client and contact information, enter fees and costs, use Matter Manager, access your firm’s calendar, receive alarm notifications, send and receive eNotes, and download documents and e-mail attachments via Tabs3 Connect. On smartphones and tablets, you can tap to create a fee, and flick to scroll through a list.
Keeping your data secure is top priority, and Tabs3 Connect was designed to protect attorneys’ sensitive information. The information you access using Tabs3 Connect is secure because it resides at your office, on your computer. It won’t be stored on someone else’s server in the cloud, or on a phone that you might lose. Furthermore, you choose who has access to Tabs3 Connect and who doesn’t, and access profiles affect users logged in to Tabs3 Connect as well. You can even keep track of Tabs3 Connect access and activity by reviewing the Tabs3 Connect Access Log and Tabs3 Connect Log.
If you already have Platinum, take advantage of this great feature and change the way your firm works! Don’t have Platinum yet? Now is a great time to explore the possibilities.
For more information on Tabs3 Connect, contact your reseller, consultant, or Technical Support at (402) 419-2210; or, visit Knowledge Base Article R11480, “All About Tabs3 Connect.” For more information on all of the great Platinum features, visit Knowledge Base Article R11379, “Platinum Overview.”
Did you know that if you want to change the date and/or time on a calendar entry, you can drag and drop the entry to the desired date/time via the graphical calendar? The ability to drag and drop calendar entries saves you the time of having to open the record and manually change the necessary fields. Knowledge Base Article R11294, “Drag-and-Drop Functionality in PracticeMaster Calendar,” provides information on enabling the ability to drag and drop calendar entries and performing the drag and drop.
Our Knowledge Base can be accessed 24 hours a day, 7 days a week, at support.Tabs3.com. You can also access our Knowledge Base while in the software by selecting Help | Internet Resources | Knowledge Base.