
Did you know that you can email statements to your clients? Emailing statements saves on postage and delivers statements to your clients immediately. You can also optionally include a Tabs3Pay payment link along with the email statement, allowing your clients to pay online.
Once you decide to email statements to a client, you must complete certain steps to ensure that the client, as well as the email, is configured properly. Knowledge Base Article R11913, “Emailing Tabs3 Billing Statements,” walks you through setting up and using the Email Statements feature.
Our Knowledge Base can be accessed at support.Tabs3.com. You can also access our Knowledge Base in the Quick Launch by searching for and selecting “Knowledge Base.”

Did you know that Tabs3 Billing provides several ways to customize your statements?
Statement Designer
Statement Designer lets you create customized layouts for your Tabs3 Billing statements. You can control the placement of various fields from the Tabs3 Client file, and add customized text, images, and other layout elements to the statement. Once a page layout has been designed, it can be applied to one or more statement templates. In the Quick Launch, search for and select “Statement Designer.”
Statement Customization
Statement Customization allows you to define terminology and formatting options used for all billing statements. Optionally enter heading information that can be printed at the top of the first page of the statement (the statement heading) or at the end of the statement. Optionally adjust terminology, such as column headings. Changes made to statement customization affect all clients. In the Quick Launch, search for and select “Statement Customization.”
Statement Templates
The Statement Templates window allows you to define statement templates. A statement template consists of the various formatting options used for a particular style of statement. The same statement template can be used for multiple clients. Changes made to a statement template affect all clients who use that template. There is no limit to the number of statement templates that can be defined. In the Quick Launch, search for and select “Statement Templates.”
Statement Notes
The Statement Notes feature is used to create messages that can print on a client’s statement, cover statement, or both. Statement notes created in the statement notes file can be designated as a beginning statement note or an ending statement note in a statement template. Each note can be used by any number of statement templates. In the Quick Launch, search for and select “Statement Notes.”
For detailed information on customizing your statements, check out the Statement Formatting Guide.
Did you know that the Tabs3 DropBox serves as a temporary holding area for reports and statements that are output as PDF files via the Tabs3 DropBox print option?
The Tabs3 DropBox is automatically started after starting and logging into any Tabs3 Software application. A ![]() icon will be shown in the system tray of the taskbar. Clicking the
icon will be shown in the system tray of the taskbar. Clicking the ![]() icon displays the Tabs3 DropBox window. Clicking the
icon displays the Tabs3 DropBox window. Clicking the ![]() in the title bar of the Tabs3 DropBox window will minimize the Tabs3 DropBox as opposed to closing it.
in the title bar of the Tabs3 DropBox window will minimize the Tabs3 DropBox as opposed to closing it.
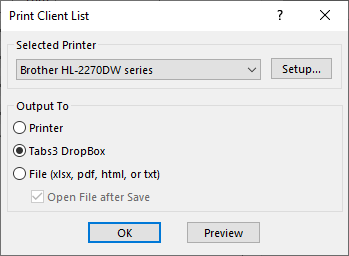 To send reports and statements to the Tabs3 DropBox, select Tabs3 DropBox from the Print window and click OK. The files sent to Tabs3 DropBox are temporary files that will be removed when all Tabs3 Software is closed. This is perfect for reports that need further action. You can run and review several reports for comparison, or email them to another party for review before printing or saving. This can save you from unnecessary time spent finding, retrieving, and ultimately deleting temporary files.
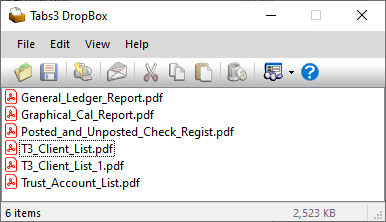 All of the Tabs3 Software applications use a common Tabs3 DropBox, so all of your files will be accessible from one location. A separate Tabs3 DropBox is maintained for each user. The name of each file is determined by the name of the report. If a report is sent to the Tabs3 DropBox more than once, a number will be appended to the end to differentiate them. For example, if a Client List is run twice, Tabs3 DropBox will display “T3_Client_List.pdf” and “T3_Client_List_1.pdf”. To rename any of the files, right-click on the file and select Rename.
You can also drag and drop files between the Tabs3 DropBox and any Windows folder. Items in the Tabs3 DropBox can be opened, saved, printed, emailed, and deleted either individually or in a group. When emailing Tabs3 DropBox items, your default email application is used to create a new email, and the file(s) selected will be attached. All you need to do is add recipients, your message, and then click Send!
Tabs3 DropBox is a great way to group files for easy handling. All of your files will be in one place for quick review, retention, or removal!

When using Tabs3Pay, you can now include a QR code on a statement with Version 2024 (Build 24.2). This allows a client to scan the QR code with a smartphone to pay their bills directly via a credit/debit card or electronic check. Those payments can then be imported into Tabs3 Billing from the Import Online Payments window.
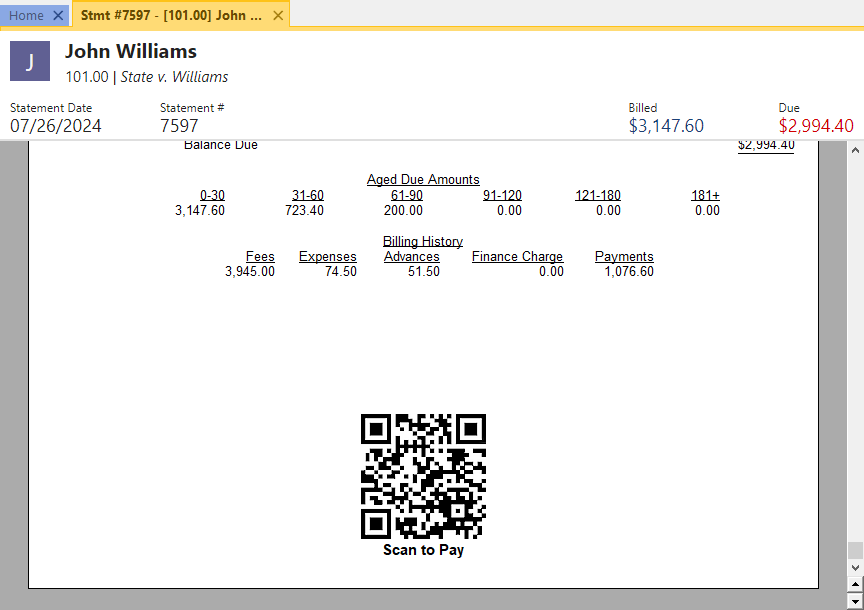
QR codes can also be included when reprinting a single updated statement. This makes it easy to re-send a statement to a client and allow them to make a payment online.
To include the QR code, modify the page layout used as the first page of your statement or cover statement.
- From the Quick Launch, search for and select “Statement Designer.”
- Select the page layout where you want to add the QR code. (Note: When sending a combined statement for a client with multiple matters, the QR code should be added to the cover statement to allow a payment for the total amount due for all matters.)
- In the System Fields group, double-click the Payment QR Code field.
- Position the QR code as desired.
- Save the page layout.
Note: See KB Article R11905, “Requesting and Importing Tabs3Pay Online Payments and Trust Deposits,” for more information about configuring payment links, including Payment QR Codes.
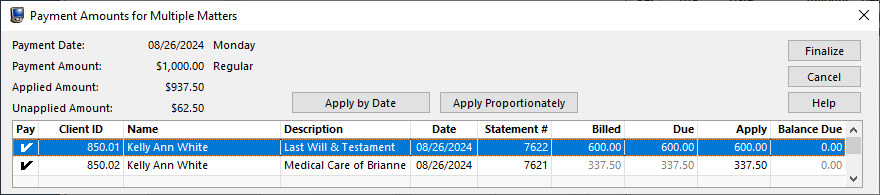
Did you know that you can apply payments to multiple matters for the same client? Payments can be allocated by statement date, proportionally, or manually.
Note: The split payments will make individual journal entries in Tabs3 General Ledger that will be linked together and shown as one item on the Reconciliation and Deposit Slip Report.
To apply a payment to multiple matters
- In the Quick Launch, search for and select “Payment Entry.”
- Select the desired Client ID.
- Enter the payment as you would normally. The information entered in each field will be automatically replicated for each matter’s payment.
- Click the
 (Apply Payment to Multiple Matters) button or press Alt+A.
 - In the Payment Amount for Multiple Matters window:
- Click the Apply by Date button.
–or–
Click the Apply Proportionately button.
–or–
In the Apply column, enter the amount you want to apply to each matter. - Click Finalize.
- Click the Apply by Date button.
The Apply Payments to Multiple Matters option is also available when entering or importing Tabs3Pay payments. (Note: To use the Apply Payments to Multiple Matters option when importing Tabs3Pay payments, you must select the View each Payment record before creating option in the Import Online Payments window.)
Want a quick and easy way to review your clients’ statements, and take action if necessary? Check out the Statement Manager!
The Statement Manager allows you to see a list of statements to determine what has been billed and paid. This makes it easy to quickly locate statements that have been final billed and updated. You can work with statements here using the actions in the Quick Clicks pane, or drill down to the Statement Information window for additional information. A Search box is available to quickly locate information anywhere in the list, such as finding a specific statement number when you receive a check.
Using the Quick Clicks on the right-hand side, you can:
- Take Action on one or more selected statement(s), such as reprinting a statement, making payments, writing off balances, or undoing updated statements.
- Utilize a QuickView, which combines a Filter, Column Layout, and default sort into a customized view that you can easily switch to at any time.
- Create a Filter to narrow down which records are displayed. Save filters for the whole firm to use, or just for your own use.
- Change the Column Layout used, which modifies the columns shown in the statement list.
- Customize your List Preferences to change how the list is displayed, and Manage Quick Clicks to customize the contents of the Quick Clicks pane. Customization is saved for each user.
Click here to view the “Using the Statement Manager” training video.

Is it possible to change the order in which fees appear on a statement?
Fees are always displayed in date order on statements. However, Tabs3 Billing does include a utility to change the order in which fees that share the same date will appear.
To change the order of fees on a statement
- In the Tabs3 Quick Launch, search for and select “Reorder Fees.”
- In the Client ID field, select the matter whose fee order you want to change.
- In the Group fees by field, select the option that matches your statement grouping.
- Select each fee you want to reorder and click the Move Up or Move Down button to change the fee’s position within the date group.
- When you are finished, close the Reorder Fees window.
Note: The Reorder Fees utility works by editing the reference numbers assigned to the updated fees. Reference numbers on previously generated reports and verification lists may no longer refer to the original fees.
Do you want to take your statements to the next level? Statements are at the heart of Tabs3 Billing, so you want to get the most out of this feature. We make it easy by providing a one-stop article with everything you need.
Knowledge Base Article R11582, “Statements Information Resources,” provides a list of Knowledge Base Articles, Guides, and Videos to help you become the office expert on statements. This article includes resources for printing, emailing, and customizing statements, along with general information. You can find information on frequently asked questions, statement numbering, finance charge, troubleshooting, and more.
Our Knowledge Base can be accessed at support.Tabs3.com. You can also access our Knowledge Base in the Quick Launch by searching for and selecting “Knowledge Base.”
There are several ways you might handle billing for a contingency case, but in the end you must adjust the amount owed based on the outcome. So what options does Tabs3 Billing provide?
Contingency billing occurs when a firm performs work for a client and gets paid contingent upon a settlement. There are many variations for this type of arrangement, such as whether or not costs will be billed, percentage amounts of the settlement, etc. When billing contingency clients using Tabs3 Billing, you typically bill them after the matter is settled; however, you may also want to bill them during the course of the matter. When billing during the course of the matter, you may want to bill only expenses or advances. You may also want the client to see the services rendered for a particular period without actually billing the fees. Then, once the matter is settled, you can write the fees/costs up or down and send the client a final bill.
For example, let’s say that you have a contingency client and you want to bill them monthly for all costs incurred, but not include fees on the statement. You must first create a statement template that includes the desired information on the statement, and then assign it to the contingency client.
To create a statement template for costs only
- In the Quick Launch, search for and select “Statement Templates.”
- In the Template ID field, enter a name for your template.
- On the Fee Format tab, select a Fee Format of No Fees.
- On the Cost/Payment Format tab, select the desired Expense Format and Advance Format.
- Select any other settings as desired.
- Press Ctrl+S.
To assign a statement template to a client>
- In the Quick Launch, search for and select “Client Information.”
- Select the desired Client ID.
- On the Statement Options tab, select the desired Draft Template and Final Template (e.g., the template we created in the previous set of steps).
- Press Ctrl+S.
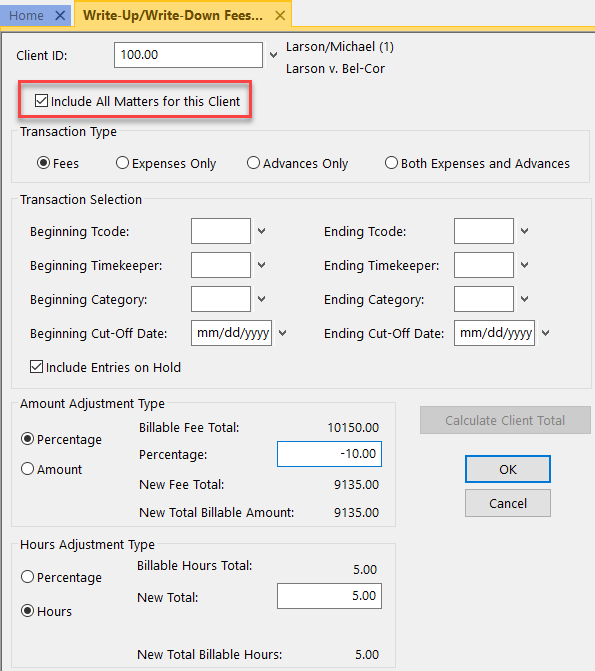
Using our example, let’s say that the matter has been resolved with a particularly good outcome. You determine that you need to write-up the client’s fees by $5,000 in order to meet the agreed upon percentage of the settlement that your firm will receive.
To write-up fees by an amount
- In the Quick Launch, search for and select “Write-Up/Write-Down Fees & Costs.”
- Select the desired Client ID.
- In the Transaction Type section, select Fees.
- Click the Calculate Client Total button.
- In the Amount Adjustment Type section
- Select Amount.
- In the New Total field, enter the total amount in fees you want to bill the client.
- Click OK.
You can now change the matter’s Final Template to a statement template that has a Fee Format of Standard and generate a final statement for your client. (As an alternative, you can select the statement template via Generate Statements.)
There are several ways to customize the heading for your statements. The Statement Setup window helps determine which method is used to print the statement heading. To access Statement Setup from the Quick Launch, search for and select “Print Setup,” select your printer, and click the Statement Setup button.
- If the firm’s name and address are entered on the Headings tab of Statement Customization (In the Quick Launch, search for and select “Statement Customization”), they will be printed at the top of your statements using the font specified in the Statement Setup window.
- Selecting the Enable Statement Designer Layouts check box in the Statement Setup window will use the heading defined in the custom page layout created by the Statement Designer.
- Selecting the Bitmap check box in the Page One section of the Statement Setup window lets you specify a bitmap image of your firm’s letterhead to include on your statements.
Statement Designer (In the Quick Launch, search for and select “Statement Designer”) can be used to design your letterhead using text, image, and layout elements. This option has the advantage of no additional cost and the ability to make changes at any time. For more information, refer to Knowledge Base Article R10901, “Customizing the Sample Page Layouts Provided with the Tabs3 Statement Designer.”
Tabs3 Support also offers a bitmap scanning service for Tabs3 Software users. Bitmap files of a firm’s letterhead can be created and used to print the letterhead directly on statements generated by Tabs3 Billing. This eliminates the need to use preprinted stationery for statements. Once scanned, the bitmap file can be specified to print on a statement via Statement Designer or the Statement Setup button in Printer Setup. Knowledge Base Article R10168, “Bitmap Scanning Service,” explains what a bitmap file is and why resolution matters, as well as more information about our scanning service and frequently asked questions.
Our Knowledge Base can be accessed at support.Tabs3.com. You can also access our Knowledge Base in the Quick Launch by searching for and selecting “Knowledge Base.”

As more law firms switch to paperless environments, emailing statements can be a great solution for reducing your office paper needs while adding convenience for your clients!
The Email Statements Overview video walks you through the process of setting up email templates, changing statement delivery options for your clients, and reviewing emails before they are sent. If you use Tabs3Pay, you can also see how to include payment and trust request links in your emails, which makes it easy for your clients to pay.
Watch this four-minute video here:
Training Videos can be accessed at Tabs3.com/videos. You can also access the videos in the Quick Launch by searching for and selecting “Training Videos.”

Did you know that the language used on statements can be customized? The Terminology tab of Statement Customization provides 77 terms that can be changed.
To change the terminology used on statements
- In the Quick Launch, search for and select “Statement Customization.”
- From the Terminology tab, select the line you want to change.
- Press F2 or click to place focus in the Line field, and make any desired changes.
In addition to changing the terminology, in many fields you can also specify to bold, italicize, or underline text. Furthermore, you can add special codes in some fields to add additional text to the statement. For example, you can enter the “+” character in the first position of Line 2, to display the Attn line before the client’s name.
To see a complete list of terminology line items, and the special codes that can be used, press F1 while in the software and enter “terminology” on the Index tab. Click a line item to see what special options are available.
Can I add explanatory notes to my fees that will be shown on draft statements but not final statements?
Statement comments allow you to include additional information on transaction descriptions that will be shown on draft statements or reports, but not final statements. This makes it easy to provide information to the person reviewing pre-bills without making it visible to the client.
To enter a statement comment
- In the Description field of a fee, cost, payment, or client funds transaction, place your cursor where you want the statement comment to appear.
- Right-click in the Description field and select Statement Comment or press Ctrl+H to enable Statement Comment mode.
- Type your statement comment.
- Right-click in the Description field and select Statement Comment or press Ctrl+H again to disable Statement Comment mode.
Statement comments are identified in the entry window with red text, are shown on reports and draft statements with a strikethrough line, and are excluded from final statements.
Did you know that you can reprint client statements whenever needed? It’s easy to reprint statements when you’re required to provide them by the client or the court. You can reprint a single statement for a single client as well as multiple statements at one time. When printing multiple statements, you can print a range of clients, statement dates, and more.
To reprint a single updated statement
- In the Quick Launch, search for and select “Matter Manager.”
- Select the desired Client ID.
- In the List Content section, select the Statements heading.
- Click the statement you want to reprint to open a preview.
- Click the Print button.
Note: You can also reprint statements via the Quick Launch by searching for and selecting “Reprint Single Updated Statement.”
To reprint multiple updated statements
- In the Quick Launch, search for and select “Reprint Multiple Updated Statements.”
- Select the desired Statement Criteria (e.g., Statement Date, Client ID, etc.).
- Select the desired Reprint Options.
- Click OK.
Tip: Alternatively, you can run a Transaction File List (In the Quick Launch, search for and select “Transaction File List”) to show all transactions or a range of transactions for a client. Because the report uses a list format, printing a Transaction File List can significantly save paper depending on how many statements the client has had.
We are starting to use the Email Statements feature but want to protect our client’s sensitive information. Is there a way to add more security to the statements that are sent?
Tabs3 Billing allows you to specify a password for the PDF statements sent via Email Statements for added security. The password can be unique for each matter and client.
To password protect PDF email statements
- In the Quick Launch, search for and select “Client Information.”
- Select the desired Client ID.
- On the Billing Preferences tab, in the Statement Delivery Options section, select the Use a password to protect PDF statements when emailed check box.
- Enter the desired password.
- Press Ctrl+S.
The next time you send an Email Statement, the client will be prompted to enter the password to open the PDF. For additional information about Email Statements and password security, see Knowledge Base Article R11913, “Emailing Tabs3 Billing Statements.”
How can I change the terminology used in the trust section of my statements?
The terminology for trust information on statements is stored in Tabs3 Trust Accounting, and is specific to each bank you have configured.
To change the trust account terminology
- In the Quick Launch, search for and select “Bank Account.”
- Select the bank you want to modify in the Bank Account field.
- Click the Integration Settings button.
- In the Tabs3 Billing Statement/WIP Terminology section, enter the text you want to use in each field.
- Click on the OK button.
- Press Ctrl+S.
Did you know that you can select multiple ranges of clients when running reports or generating Statements? Located on the Client tab, the Multiple button can be used to select multiple ranges of Client IDs. After clicking the Multiple button, the Ranges window will be displayed. From here, you can enter multiple beginning and ending Client IDs. Up to 50 client ranges can be specified.

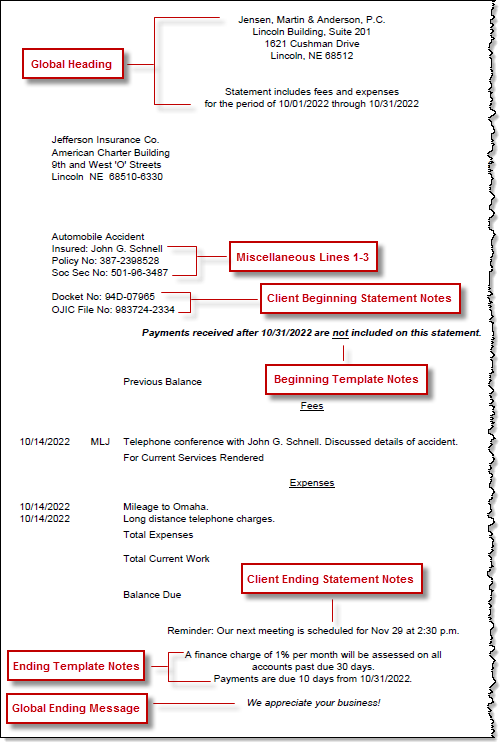
Are there additional notes that you want to add to statements for one or more clients? There are multiple areas in Tabs3 Billing to enter notes that can then be shown on statements for a single client, a group of clients, or all clients. A graphic is provided at the end of this article that represents each of the following elements.
Statement Notes for a Single Client
If you want to add notes to a single client’s statement, this can be set up in the Client file using the Beginning and Ending Statement Notes fields, located on the Statement Options tab, or the Miscellaneous lines 1-3, located on the Custom Fields tab.
Beginning and Ending Statement Notes
The Beginning Statement Notes will print following the Work Description and Miscellaneous Lines 1-3. The Ending Statement Notes will print at the end of the statement, but before any statement notes included in a statement template or ending text defined on the Headings tab of Statement Customization. Each of these fields has a maximum of 250 characters.
You can optionally select to Change Notes to blank after Statement updated if you want the note to only be included on the next statement.
Tip: You can optionally use Change Client Options (in the Quick Launch, search for and select “Change Client Options”) to set Beginning and Ending Statement Notes for multiple clients.
Miscellaneous Lines 1-3
The Miscellaneous Lines 1-3 will print following the Work Description. Each of these fields has a maximum of 255 characters.
Statement Notes for a Group of Clients
To add notes to multiple clients’ statements, you can use Statement Notes (in the Quick Launch, search for and select “Statement Notes”). Statement Notes can be up to 511 characters. Once Statement Notes have been created, they can be assigned to a statement template (in the Quick Launch, search for and select “Statement Templates”).
Statement templates provide the ability to include a Beginning Note that is shown below the Client’s Beginning Statement Notes, and an Ending Note that is shown below the Client’s Ending Statement Notes. Statement templates are assigned to each client via the Statement Options tab in the Client file.
Statement Notes for All Clients
If you want to show the same note on every statement for every client, then you can use Statement Customization (in the Quick Launch, search for and select “Statement Customization”). On the Headings tab, you can add up to 9 lines of text to the top of the statement (60 characters each), or 250 characters of text at the bottom. When adding Lines of text to be printed as a heading on the first page of each billing statement, this text will be the first text shown on the statement. When adding Lines of text to be printed as a message at the end of each billing statement, this text will be the last text shown on the statement.
We have some clients with multiple matters that pay with a credit card. Can we apply a single electronic payment to multiple matters or statements for a client?
Both Tabs3Pay and LawPay can be used with the Apply Payments to Multiple Matters feature. This feature allows you to enter a single payment and apply it to specific matters and statements associated with the client. Apply Payment to Multiple Matters can be used when entering new payments as well as when using the Import Online Payments feature.
To apply a payment to multiple matters or statements when entering a payment
- From the Quick Launch, search for and select “Payment Entry.”
- Enter all information for the payment record, including the Tabs3Pay or LawPay payment method.
- Click the (Apply Payment to Multiple Matters) button or press Alt+A to open the Apply Payment to Multiple Matters window.
- A list of matters and their statements will be displayed. Specify the amount to apply to each statement. When you are finished, click Finalize. (Note: For more information on using this window, press F1.)
To apply a payment to multiple matters or statement when importing a payment
- From the Quick Launch, search for and select “Import Online Payments.”
- Double-click the payment you want to import to open the Payment Entry window.
- Click the (Apply Payment to Multiple Matters) button or press Alt+A to open the Apply Payments to Multiple Matters window.
- A list of matters and their statements will be displayed. Specify the amount to apply to each statement. When you are finished, click Finalize. (Note: For more information on using this window, press F1.)
Note: LexCharge (formerly ProPay) integration does not support the Apply Payments to Multiple Matters feature. If you are interested in using this feature, visit Tabs3Pay.com for information on signing up for Tabs3Pay.
One of the most frequently asked questions our Support Department receives is, “Why isn’t my statement printing?” Whether due to client transactions that have a Status of Hold, client settings, printer drivers, or printer settings, you may have had statements that did not print at one time or another.
Knowledge Base Article R10004, “My Statement Doesn’t Print,” offers the most common reasons a statement doesn’t print and includes easy troubleshooting steps to follow. When your statements aren’t printing, use this article as a checklist to help you get back on track for your month-end activities.
Our Knowledge Base can be accessed at support.Tabs3.com. You can also access our Knowledge Base in the Quick Launch by searching for and selecting “Knowledge Base.”
Is there a way to force the descriptions for all transactions on our statements to display in uppercase text?
A Display all Transaction Descriptions in Uppercase check box was added to the Statement Templates window in Tabs3 Billing Version 2022. When this check box is selected, all text in a transaction’s Description field is automatically converted to uppercase when included on a statement.
To display all transaction descriptions in uppercase for a statement template
- From the Quick Launch, search for and select “Statement Templates.”
- In the Template ID field, select the statement template you want to edit.
- Select the Display all Transaction Descriptions in Uppercase check box.
- Press Ctrl+S.
- Repeat steps 2-4 for each template you want to edit.
- Close the Statement Templates window.
To display all transaction descriptions for a single batch of statements
- From the Quick Launch, search for and select “Generate Statements.”
- On the Options tab, in the Statement Options section, click the Statement Template button.
- Click the Select Option button.
- Select Display all Transaction Descriptions in Uppercase from the list and click OK.
- Select the Display all Transaction Descriptions in Uppercase check box.
- Click OK.
- Make any additional changes to the Generate Statements window and then click OK.
We have two Statement Designer layouts that we want to combine into one layout. One is a header we used on Page 1, and one is a footer we used on Page 2. Is there a way to merge layouts?
You can include one statement designer layout in the background of another layout, allowing you to easily reuse templates. In this example, you can modify the statement designer layout with your heading to include the layout with the footer.
To add a statement designer layout to another statement designer layout
- In the Tabs3 Quick Launch, search for and select “Statement Designer.”
- In the Layout Tree, select the statement designer layout with your header.
- Click the
 button (Figure 1, below) at the top left corner of the Page Layout pane to open the Properties dialog box.
 - In the Background 1 or Background 2 field, select the layout with the footer.
- Adjust the position of the End Statement Body line to just above the footer:
- Mouse over the blue End Statement Body line until you see
 .
. - Click and drag the line up or down as needed.
- Mouse over the blue End Statement Body line until you see
- Press Ctrl+S.
The background elements will appear as dimmed on the form layout, but will print normally on the next statement.
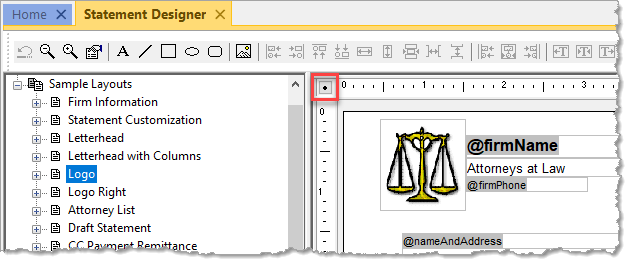
Figure 1
Tabs3 Billing allows you to optionally assess finance charges on your clients’ past due balances, but how does the calculation work?
When a statement is generated for a client whose past due balances are subject to finance charges, Tabs3 Billing examines the statement date for each of the client’s past due statements, and compares each to the current statement date. A finance charge is then calculated for each of the past due statements, and these amounts are added together to determine the total amount of finance charges to be billed on the current statement.
Knowledge Base Article R10850, “All About Finance Charges,” provides a flowchart that breaks down exactly how finance charges work along with examples, and includes frequently asked questions and a finance charge worksheet.
Our Knowledge Base can be accessed at support.Tabs3.com. You can also access our Knowledge Base in the Quick Launch by searching for and selecting “Knowledge Base.”
We need to find a specific statement, but the only reference we received is a statement number. How can we search by statement number?
You can easily locate statements by number using the Statement Manager.
To find the statement number in Statement Manager
- In the Quick Launch, search for and select “Statement Manager.”
- Click the Stmt # column heading to sort by number, then type the statement number to use incremental searching. The list will scroll to the statement number you specified.
…or… - In the Search List field, enter the statement number. The list will be filtered to only the statement number you specified.
- Click the Stmt # column heading to sort by number, then type the statement number to use incremental searching. The list will scroll to the statement number you specified.
When you have located the statement, you can double-click the record to see the statement information, or use the Quick Clicks actions to perform other common tasks such as reprinting, emailing, or making a payment.
Looking for a quick way to apply a discount to your client’s bill? Including a Courtesy Discount in your statements may be the solution you are looking for!
In the Using Courtesy Discounts video, see how easy it is to apply discounts to your clients based on a specified percentage or amount. Additionally, you can view how the discount will appear on your statements and how to customize the terminology and placement based on your needs.
Watch this two-minute video here:
Training Videos can be accessed at Tabs3.com/videos. You can also access the videos in the Quick Launch by searching for and selecting “Training Videos.”
One of the matters in Tabs3 Billing requires me to select the Release To Bill check box every time I want to print a statement for them. Why does this check box keep getting cleared?
The matter is most likely configured to Bill On Demand. Bill On Demand is a feature that enables you to only bill a client when needed, rather than every billing cycle. When the Bill On Demand check box is selected, each time a statement is final billed and updated for the matter, the Release to Bill check box is automatically cleared to prevent unauthorized statements from being sent in the future. When you are ready to send another statement, simply select the Release to Bill check box again.
If you want a statement to print for the matter whenever they have a balance, simply clear the Bill on Demand check box and select the Release to Bill check box. The matter will then be included in all future billing cycles.
To enable the Bill On Demand feature
- In the Quick Launch, search for and select “Client Information.”
- Select the Client ID you want to configure.
- On the Billing Preferences tab:
- Select the Bill On Demand check box.
- Select the Release To Bill check box if you want to include this matter in the next batch of statements. Clear the Release To Bill check box to prevent statements from printing until you select it again.
- Press Ctrl+S.
To disable the Bill On Demand feature
- In the Quick Launch, search for and select “Client Information.”
- In the Client ID field, select the matter you want to configure.
- On the Billing Preferences tab:
- Clear the Bill On Demand check box.
- Select the Release To Bill check box.
- Press Ctrl+S.
I would like to send my client’s statement not only to my client, but to an additional party as well. Is there a way to have two different email addresses for the same statement?
You can have up to two Bill To records for each client, allowing you to send statements to up to two parties.
To add a Bill To Record
- In the Quick Launch, search for and select “Client Information.”
- Select the desired Client ID.
- From the Billing Preferences tab, in the Statement Delivery Options section, click the Add button.
- In the Bill To Name field, select an existing contact or enter a new name to create a new contact.
- In the Statement Delivery Options section, select the Mail Statement and/or Email Statement check box.
- Click the OK button.
- Press Ctrl+S.
Do you make manual adjustments for flat fee clients when you’re ready to bill them? If so, you may be making billing more difficult than it needs to be. Tabs3 Billing provides a way to streamline billing for flat fee clients.
To set a client up to be billed a flat amount, specify that they are a flat fee billing client and assign them to a statement template that does not bill fees. You can then enter your time normally. Once you are ready to bill the client for the flat amount, run the Adjust Flat Fee Clients utility, and then bill them using a statement template that does bill fees.
To set up a client for Flat Fee Billing
- In the Quick Launch, search for and select “Client Information.”
- Select the desired Client ID.
- From the Rates tab, select a Billing Rate Code of 0 – Flat Fee Amount.
- Enter the desired Flat Amount. This is the amount that will be billed to the client when you run the Adjust Flat Fee Clients utility.
- From the Statement Options tab, in the Statement Format section, select a Final Template that has a Fee Format of No Fees or Info Only. Optionally select a Draft Template that uses the same setting.
- Press Ctrl+S.
If desired, you can bill interim statements to show the client progress on the matter. Using a Final Template with a Fee Format of Info Only will show the fees, but not bill for them.
To process a final bill for the flat fee amount
- In the Quick Launch, search for and select “Adjust Flat Fee Clients.”
- Select the desired Client ID.
- Click OK.
- In the Client file, change the Final Template (step 5 above) to a statement template that has a Fee Format of Standard. (As an alternative, you can select the statement template via Generate Statements.)
- Generate a statement for your client.
Note: Due to the number of transactions that may be changed, we recommend making a backup of your data prior to running the Adjust Flat Fee Clients utility.
When the Adjust Flat Fee Clients utility is run, all of the client’s fees are automatically adjusted to equal the client’s specified Flat Amount, making billing a breeze and leaving you time to work on other projects.
Being able to easily enter and track write offs is essential. With Tabs3 Billing, you can quickly enter write offs and apply them to a matter’s accounts receivable with just a few clicks!
In the Working with Write Offs video, see how easy it is to write off all or a portion of a client’s accounts receivable from the Statement Manager. When it comes to tracking Write Offs, use the convenient Write Off tab in the Matter Manager or use the Write Off Report to access detailed information about multiple write offs at the same time.
Watch this three-minute video here:
Training Videos can be accessed at Tabs3.com/videos. You can also access the videos in the Quick Launch by searching for and selecting “Training Videos.”
Prior to running final statements, each timekeeper typically reviews pre-bills for accuracy. Tabs3 Billing’s Pre-Bill Tracking (in the Quick Launch, search for and select Pre-Bill Tracking) can be used to track whether a pre-bill is on hold, has been reviewed, is ready to be printed as a final statement, or has already been printed as a final statement. This feature makes it easy to always know where a bill is at and what steps must be taken in order to complete the current billing cycle.
Using the Pre-Bill Tracking program to track the billing status of statements is quite simple. Pre-Bill Tracking records are added to the Pre-Bill Tracking window when a draft statement or a Detail Work-In-Process Report is run for a client (provided the Update Pre-Bill Tracking check box is selected on the Options tab). Once the records are displayed in the Pre-Bill Tracking window, you can track the status of each pre-bill.
![]()
When the reviewing timekeeper returns pre-bills to you, individual statements can be marked as “Reviewed” or on “Hold.” Once statement records are marked as reviewed, final statements can be printed directly from the Pre-Bill Tracking window by clicking the Final Statements button (provided they are not on hold and a final statement has not already been run). The records in the Pre-Bill Tracking window can easily be sorted by Client ID, Client Name, Description, Timekeeper, Pre-Bill Date, Hold Status, Reviewed Status, Final Date, or Batch by clicking the applicable column heading.
Click the Options button to select whether to view clients that are on hold or not on hold, clients that have been reviewed or not reviewed, clients that have had a final statement processed, or a combination of these selections. Additionally, you can select to view pre-bills for specific timekeepers, or a specific batch.
If you haven’t been using Pre-Bill Tracking, try it out the next time you run your pre-bills.
When previewing reports, you always get the best formatted view of the information for reading. However, when saving a report to an .html or .txt file, you may see different formatting or missing text. So how do you get better output? By using the Optimize for Print to File setting.
When selecting to Optimize for Print to File, the software will make adjustments that help with formatting and eliminate clipping problems. This can help significantly when printing to .html or .txt format.
To Optimize for Print to File
- From the File menu, select Print Setup.
- Select the desired Printer.
- Click the Advanced Printing Features button.
- Select the Optimize for Print to File check box.
- Click OK on the Advanced Printing Features window.
- Click OK on the Printer Setup window.
The next time you print a report to a file, try selecting Optimize for Print to File and see the difference it makes.
Note: We do not recommend selecting this option for your normal printing jobs because of adjustments made to avoid clipping problems. When saving output to a file, the best solution is to configure a special printer for print-to-file output.
As a legal professional, it’s important to be able to track and utilize statements for your clients. Using the Tabs3 Statement Manager, accessing your updated statements has never been easier!
The Statement Manager allows you to easily review all of your updated statements, with one-button access to perform necessary actions, such as making a payment, adding a write-off, or reprinting a statement for a client.
Watch this four-minute video here:
Training Videos can be accessed at Tabs3.com/videos. You can also access the videos while in the software by selecting Help | Training Videos.
Version 2021 has some great new features we know you’ll want right away!
All Applications
- Simplified Update – Updating from Version 2020 to Version 2021 does not require a conversion. If updating from Version 19 to Version 2021, only a single conversion is required.
- New Look – We’ve updated the icons for all of the actions on the Home page in each Tabs3 Software application to provide a fresh look.
Tabs3 Billing Highlights
- Payment Information – Provides detailed payment allocation information for both archived and work-in-process payments. In addition to payment allocation, this page shows associated Tabs3 General Ledger transactions and payment adjustments (refunds or reversals).
- Write Off Information – Provides detailed information about the selected write off, including a breakdown of how the write off was applied (each timekeeper, cost type, tax amount, or finance charge) across each statement that was written off, and who performed the write off.
- Matter Manager:
- Write Off List – This list provides an easy way to see any write off performed on the matter. Clicking an entry in the list displays the Write Off Information page.
- Statement Status Indicators – The statement list in the Matter Manager now includes color-coded indicators to help you see at a glance which statements are unpaid and for how long.
- Email an Individual Statement – In the Statement Manager or Statement Information window, a new Send Email action is available. This reprints the selected statement, just like using the Reprint Updated Statements feature, and then starts a new email with the statement attached.
- Report Drilldown – We’ve updated numerous Tabs3 Billing reports to support drilling down to statements, payments, and write offs in the Report Preview window.
Tabs3 Trust Accounting and Accounts Payable Highlights
- IRS 1099-MISC and 1099-NEC Changes for Tax Year 2020 – We’ve updated the software to support new requirements from the IRS for tax year 2020.
Updating to Version 2021 is as easy as using Check for Updates (Help | Check for Updates)!
A new Separate PDF for each Sort option has been added to the Sort tab of both Generate Statements (Statements | Generate Statements) and the Detail Work-in-Process Report (Reports | Work-In-Process | Detail Work-in-Process Report). When this option is selected, matters are grouped into separate PDFs based on the specified sort criteria. For example, if you choose to sort by primary timekeeper, all of the matters with timekeeper 1 assigned as their Primary Timekeeper will be included in a single PDF, timekeeper 2 in a separate PDF, etc. This feature is intended to help firms that distribute their pre-bills electronically by allowing them to send a single PDF to each timekeeper that only includes the matters that are relevant to that timekeeper.
Note: The Separate PDF for each Sort option only applies when you select DropBox or File (with a file type or PDF selected) as your output method.
Beginning with Version 2020, you can now quickly access statement information via the Tabs3 Billing Matter Manager (File | Matter Manager). Simply click on a Statement from the Matter Manager to display a Statement Information window for that statement. The Statement Information window includes the following:
The Statement Information section shows matter information, the Statement Date, Statement #, the total Billed on the statement, and the total Amount still Due.
The Statement Preview displays a reprint of the statement, using the same functionality as the Reprint Updated Statements program. Like any preview window, you can search, zoom, and print directly from this preview.
The Take Action pane allows you to perform tasks related to the statement, such as reprinting or undoing the statement, adding a payment, or writing off the balance.
Note: This feature is available in Tabs3 Version 2020 beginning in Version 20.2.6.
We have just added several new features! Use the Check for Updates feature (Help | Check for Updates) to make sure you are running the most recent release of Version 2020.
Update to Version 20.2.6 to access the following:
- Tabs3 Billing Matter Manager – The Client Manager has been revamped and renamed to the Matter Manager. Like the PracticeMaster Matter Manager, the Tabs3 Matter Manager acts as a central hub for matter-related information and activities in Tabs3 Billing. The Matter Manager allows you to view relevant information for each matter at a glance, perform common tasks, and run reports.
- Statement Information Window – Clicking on a Statement from the Matter Manager in Tabs3 Billing displays a Statement Information window for that statement. The Statement Information window includes matter information, statement totals, a preview of the statement, and the ability to perform common tasks.
- Time Zones – PracticeMaster now allows you to specify a time zone for calendar events and tasks. If you opt to enable the time zone feature, new calendar records will be shown relative to the local time for each user. The PracticeMaster Calendar, PracticeMaster Dashboard, and Tabs3 Connect Calendar will all utilize the time zone setting on the device where records are being accessed. This also provides a more seamless integration of calendar records with Microsoft Outlook.
- Field Length Changes – Increased the field length for several fields in the software, such as the Work Description in the Client file and the Amount field in the Payment file.
For more information on these great new features, as well as a detailed list of all new features in Version 2020, check out Knowledge Base Article R11812, “Version 2020 Introduction to New Features.”
When it comes to reviewing statements in a paperless environment, it can be difficult to know where to start. The Reviewing Pre-Bills Digitally video walks you through generating your pre-bills to PDF, allowing your attorneys to review them digitally and move toward a paperless process.
Watch this four-minute video here:
Training Videos can be accessed at Tabs3.com/videos. You can also access the videos while in the software by selecting Help | Training Videos.
Did you know that you can add your letterhead to statements via the Tabs3 Billing software? If you have an image file of your firm’s letterhead, Statement Designer can insert .png, .jpg, and .bmp files into the header and/or footer of a statement page layout. Alternatively, you can add a .bmp image via Print Setup. These options mean that statements can be printed with your firm’s letterhead on any paper.
Knowledge Base Article R11829, “Adding a Letterhead Image to Tabs3 Billing Statements,” provides information about adding a header image to your Tabs3 Billing statements via Statement Designer or Print Setup.
Our Knowledge Base can be accessed at support.Tabs3.com. You can also access our Knowledge Base while in the software by selecting Help | Internet Resources | Knowledge Base.
 Did you know that you can write all matters for a client up or down at the same time?
As of Version 19, when using the Write-Up/Write-Down Fees and Costs program (Statements | Statement Preparation | Write-Up/Write-Down Fees and Costs), an Include All Matters for this Client check box is now available.
Prior to billing, you can use the Write-Up/Write-Down program to write-down unbilled fees, costs, or hours for a client using a range of timekeepers, transaction codes, categories, and/or dates. When writing multiple transactions up or down, each affected transaction’s amount and/or hours is adjusted by an amount proportional to the total adjustment.
When this option is selected, the Write-Up or Write-Down will include transactions for all matters for the specified Client ID. All matters that begin with the same value left of the decimal with work-in-process will be included in the calculated client total based on the criteria selected in the Transaction Selection section.
Statement comments provide the ability to add internal notes to fee, cost, client funds, and payment transactions that will be shown on draft statements, but not on final statements. Additionally, statement comments are included on the Fee and Cost Verification Lists, Detail Work-in-Process Report, and optionally on the Transaction File List and Task Code Billing Report (new for Version 19.1.10.1180).
Statement comments entered for individual fee, cost, payment, or client funds transactions are shown in red. When printing reports or draft statements, statement comments will print with a strike-through character (e.g., “Send statement by the 2nd”).
To create a Statement Comment
- Open the desired transaction entry window, such as the Fee file (File | Open | Fee).
- In the Description field, select Statement Comment from the right-click menu. The text that you enter next will display in red, which means it is a statement comment.
- When you are done with the comment, select Statement Comment from the right-click menu again. The text that you enter now will be normal.
Note: Alternatively, you can enter all desired text, highlight the portion you want to have shown as a statement comment, and then select Statement Comment from the right-click menu.
Fees can occasionally be entered in an order that may be confusing on a statement. For example, when the statement is printed out, it might look like you reviewed a document before writing the first draft! In Version 19, you can use the Reorder Fees utility to change the order in which fees with the same date are displayed on a single statement.
The order in which fee transactions are printed on a statement is based on three levels:
- First, transactions are sorted by the Subtotal selected on the Fee Format tab of the Statement Template being used (i.e., No Subtotal, Timekeeper, Transaction Code, Category, or Date).
- Next, transactions are sorted by the Date of the transaction.
- Finally, transactions with the same date are sorted by the Reference number of the transaction. This is the order that can be modified using the Reorder Fees utility.
The Reorder Fees utility (Statements | Statement Preparation | Reorder Fees) lists all work-in-process fees for the selected client. Fees can be moved using the Move Up and Move Down buttons. Moving fees up and down changes the reference number of the fee immediately.
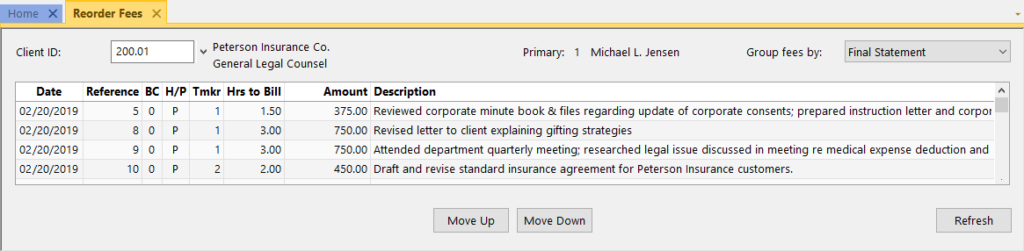
However, keep in mind that fees can only be moved up or down within the same date. For example, if there are three fees dated 2/15, and one fee dated 2/16, only the fees dated 2/15 can be moved.
You can use the Group fees by drop-down option to see what order fees would be listed on a client’s statement based on the Subtotal selected in the Statement Template. When selecting Draft or Final, the fees will be grouped as specified in the Subtotal field of the selected client’s Draft or Final Statement Template.
Take a look at how fees are shown on your clients’ statements, and see how the Reorder Fees utility can help you. Your clients will appreciate the order, and you might get paid faster!
Do you struggle with keeping track of where all of your pre-bills are at in the review process? Pre-Bill tracking makes it easy to track the progress of your billing cycle.
The Pre-Bill Tracking video provides an overview of how pre-bill tracking works in Tabs3 and how it can save you time. This video starts with how pre-bills are created via draft statements or work-in-process reports and then explains the Pre-Bill Tracking program. Each setting is explained as you are walked through the billing process.
Pre-Bill Tracking is a powerful productivity tool that lets you easily manage your firm’s billing workflow. It helps eliminate the problem of statements not being run for clients because the pre-bills were not returned.
Watch this six-and-a-half-minute video here:
![]()
Training Videos can be accessed 24 hours a day, 7 days a week, at Tabs3.com/videos. You can also access Training Videos while in the software by selecting Help | Documentation and then clicking the See also link for Tabs3 and PracticeMaster Training Videos.
Did you know that there are several ways of filtering your reports and statements so that you only see the data you want to see? Most reports have a Client tab and several reports have a Transactions tab. Likewise, when generating statements, both the Client tab and the Transactions tab are available. These tabs provide options for which clients and/or transactions are to be included on the report.
Client tab
The Client tab provides the ability to select a client range based on several different factors including the Client ID, Name Search, Primary/Secondary/Originating Timekeeper, Billing Category, Billing Frequency, Location, Status, and Open/Close Date. When filtering by Status, the following options are available: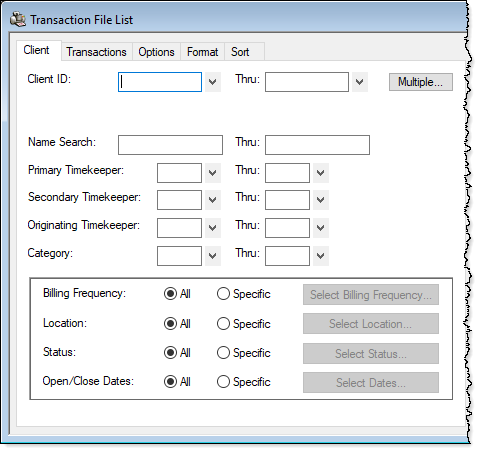
- Active, Inactive, or Both
- Progress, Non-Progress, or Both
- Billable, Non-Billable, or Both
- Task Based, Non-Task Based, or Both
- Release to Bill, Non-Release to Bill, or Both
- Bill on Demand, Non-Bill on Demand, or Both
- Statement Delivery Options
- Mail Statement: Yes, No, or Both
- E-Mail Statement: Yes, No, or Both
Transactions tab
The Transactions tab provides the ability to select a transaction range based on several different factors including whether to include Fees, Expenses, Advances, 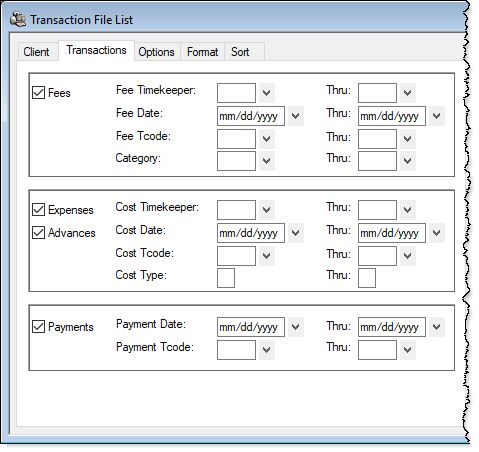 and Payments. Additionally, ranges for Fee/Cost Timekeeper (working timekeeper), Fee/Cost/Payment Date, Fee/Cost/Payment Tcode, Category, and Cost Type are available.
These are the most common options for filtering reports. However, some reports may have additional options to further filter data that are specific to that report. For example, the Transaction File List provides the option to include Work-In-Process and/or Archived transactions, Billable and/or Non-Billable transactions, and more.
So if you’re running reports or statements and you’re getting more clients and/or transactions than you want included, try using the filter options to help fine-tune your report!
When you need to send a statement to two different parties, what do you do? With Tabs3 Billing, you can automatically generate a duplicate statement by adding an Additional Bill To Address. This option makes it easy to send an additional statement to a third party, such as an insurance company. When adding an Additional Bill To Address, you can select who it goes to and whether they receive a mailed statement, an e-mail statement, or both.
To create an Additional Bill To Address
- From the File menu, point to Open and select Client.
- Select the desired Client ID.
- From the Billing Preferences tab, in the Statement Delivery Options section, click the Add button.
- In the Bill To Record window, enter the desired information and select the desired options.
- Click OK.
- Press Ctrl+S.
Keep in mind that only one Additional Bill To Address can be added.
Tip: If you need to send a statement to more parties and you are e-mailing statements, consider adding additional recipients to the Cc or Bcc fields.
You have a special font you downloaded for your firm to use for statements and reports. Although you print some statements and reports, you also e-mail PDFs of statements and reports to certain clients and third parties. However, did you know that if the e-mail recipient doesn’t have that font installed, the font will be replaced by a different one? When a designated font in a PDF file is not installed on the reader’s computer, the closest substitution font is found and used, but sometimes this can make the PDF more difficult to read.
The solution? You can specify that the font be embedded into the PDF, so that it reaches your recipients as expected.
To embed fonts in PDF files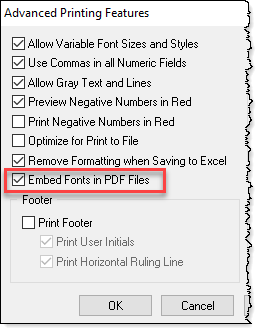
- From the File menu, select Print Setup.
- Select the Printer you use to print statements.
- Click the Advanced Printing Features button.
- Select the Embed Fonts in PDF Files check box.
- Click OK on the Advanced Printing Features window.
- Click OK on the Printer Setup window.
Note: PDF files with embedded fonts have a larger file size, which may lengthen the processing time when e-mailing statements. Additionally, some fonts cannot be embedded due to copyright laws.
You don’t need to skip the specialty font for your firm; embed the font so that others can view the file as intended!
Do you need a report that shows one or more clients’ billing histories, as well as a way to track the client’s balances due? Look no further than the Client Ledger Report!
The Client Ledger Report shows the amount of payments, fees, expenses, and advances. You can optionally include finance charge, fee sales tax, expense sales tax, advance sales tax, the balance due for each statement, and more. Detailed billed information that shows amounts billed by timekeeper and Cost Type can also be included on the detail reports.
Check out the Client Ledger training video to see how the options in this report can be used to maximize output, as well as see what the end result looks like.
Watch this four-and-a-half-minute video here:

Training Videos can be accessed 24 hours a day, 7 days a week, at Tabs3.com/videos. You can also access Training Videos while in the software by selecting Help | Documentation and then clicking the See also link for Tabs3 and PracticeMaster Training Videos.
Did you know that envelopes can automatically be printed for each statement generated using the client’s Bill To address? When selecting to print envelopes, they will be printed for final statements, but will not be printed when running draft statements. Printing envelopes can be configured via Print Setup.
To print envelopes with final statements
- From the File menu, select Print Setup.
- Select the desired Printer.
- Click the Statement Setup button.
- Select the Print Envelopes check box.
- In the Envelopes section, select the desired settings.
- Click OK on the Statement Setup window.
- Click OK on the Printer Setup window.
Note: This feature will print one statement followed by one envelope. This works best on a printer with a separate envelope tray.
During a typical monthly billing cycle, many steps are performed that lead to the production of statements. Once statements have been produced in their final form and sent to clients, do you follow the recommended steps to close the month in Tabs3?
It is important to follow Month-End procedures in order to make sure that statements are archived, you have the desired reports printed, data is error-free, and you have a solid internal backup. The Month-End Procedures video provides more information on performing these recommended tasks after statements have been run.
Watch this four-and-a-half-minute video here:
For information on Year-End Procedures, refer to Knowledge Base Article R10429, “Year-End Overviews for Tabs3 Software Products.”
Training Videos can be accessed 24 hours a day, 7 days a week, at Tabs3.com/videos. You can also access Training Videos while in the software by selecting Help | Documentation and then clicking the See also link for Tabs3 and PracticeMaster Training Videos.
If you accept credit cards, do you have a credit card form on the statements you send to your clients? Many clients prefer to pay by credit card, and if there isn’t an easy way to do so, you may not be getting paid as quickly as you could be.
So how can you include a credit card form on the statements you send to your clients?
Statement Designer (Statements | Statement Setup | Statement Designer) provides two layouts that have a place at the bottom of the page to fill out credit card information: CC Payment Remittance and Remittance Page. Simply edit one of these layouts as desired for your firm’s needs, and then include it on the statement templates (Statements | Statement Setup | Statement Templates) you use for your clients.
For more information on editing Statement Designer Layouts, refer to Knowledge Base Article R10901, “Customizing the Sample Page Layouts Provided with the Tabs3 Statement Designer.”
The next time you send out statements, clients can send the credit card form back with their information and you may very well get paid sooner!
Did you know that you can customize your Statement Templates to define how fees, costs, and payments are displayed on your statement and to determine whether billing history, transaction recaps, and more are included? Statement Templates can be saved and assigned to clients or created at the time a statement is generated. There is no limit to the number of Statement Templates you can create and save so you can maintain Statement Templates for every client need.
Defining Statement Templates
Statement Templates can be defined via Statements | Statement Setup | Statement Templates.
- The General tab is used to specify invoice or statement formatting, billing history options, past due messages, and statement notes.
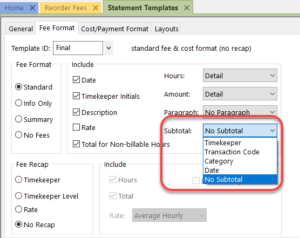
- The Fee Format tab is used to determine whether fees print and, if so, whether timekeeper initials, dates, hours, hourly rates, and amounts are included. Subtotaling of fees is defined here. An optional fee recap by timekeeper, timekeeper level, or rate can also be set up. The recap can include hours, timekeeper levels, rates, and a total amount.
- The Cost/Payment Format tab is used to specify whether expenses and advances print and, if so, the format used on the statement. You can also indicate whether payments will be shown in detail, be subtotaled by date, or show totals only.
- The Layouts tab is optional and is used to designate which custom Page Layouts created in Statement Designer will be used when statements are printed for clients that are assigned to this template.
Assigning Statement Templates
Statement Templates can be assigned to clients individually, multiple clients at one time, or at the time a statement is generated as a one-off.
- Statement Templates can be individually assigned to clients in the Client file (File | Open | Client) by selecting the desired Draft Template and Final Template on the Statement Options tab.
- Statement Templates can be assigned to multiple clients at once by using the Change Client Options utility (Maintenance | Client Related | Change Client Options) by selecting a range of Client IDs, and then selecting the desired Draft Template and Final Template on the Statements tab.
- Statement Template settings can be applied at the time a statement is generated (Statements | Generate Statements) by clicking the Statement Template button on the Options tab, selecting the desired settings, and then clicking OK.
For more information on Statement Templates, see the Statement Formatting Guide or refer to the Help files for Tabs3 Billing.
You may be using the default statements that came with the software, but did you know that there are many ways to customize statements? The Customizing Statements video provides an overview of the Statement Customization, Statement Designer, and Statement Templates programs.
When the video starts, you have the option of watching the video from beginning to end or jumping straight to one of the following three segments:
- Statement Customization – This five-and-a-half-minute segment provides information on the Statement Customization program. The information in this video pertains to statement terminology, headings, cover statements, and more.
- Creating Statement Designer Layouts – This three-minute segment provides information on the Statement Designer program. The information in this video pertains to creating, enabling, and assigning Statement Designer Layouts.
- Using Statement Templates – This ten-minute segment provides information on the Statement Templates program. The information in this video pertains to accessing and defining Statement Templates.
To learn more about how you can customize your client statements, watch this 19-minute video here:
Training Videos can be accessed 24 hours a day, 7 days a week, at Tabs3.com/videos. You can also access Training Videos while in the software by selecting Help | Documentation and then clicking the See also link for Tabs3 and PracticeMaster Training Videos.
When you have multiple active matters, combining matters creates a single statement file. Including a cover statement makes it easy for a client to see what they owe for each matter at a glance.
These options can be quite beneficial, but if you’ve run into a snag you may not know where to look for answers. You can always call Technical Support at (402) 419-2210, but if it’s after hours or you want to quickly look up an answer, check out Knowledge Base Article R11501, “Troubleshooting Combine Matters and Cover Statements in Tabs3.” This article not only provides troubleshooting information, but also provides a list of frequently asked questions.
Whether you have been working with combined matters and/or cover statements for a day or for years, R11501 may provide the necessary information for your current scenario.
Our Knowledge Base can be accessed 24 hours a day, 7 days a week, at support.Tabs3.com. You can also access our Knowledge Base while in the software by selecting Help | Internet Resources | Knowledge Base.
Do you want a way to streamline trust payments to Tabs3 Billing? Trust Accounting Software (TAS) provides the ability to automatically draw funds from a trust account when final statements are generated in Tabs3.
You will no longer need to enter payments to Firm from TAS; simply enter your transactions in Tabs3, and then bill like normal. As final statements are generated in Tabs3, the software will automatically create trust transactions and Tabs3 payment records based on the client’s due amounts. This feature can be enabled or disabled on a global level, at the bank account level, and at the trust account level. You can specify whether to pay work-in-process, accounts receivable, or both; whether to pay fees, expenses, or advances from these amounts; and whether to create check or EFT transactions in TAS for these amounts.
Note: We recommend consulting your local Bar Association before enabling Automatic Trust Transactions to ensure that you are complying with local trust regulations.
To implement Automatic Trust Payments, you will need to enable TAS Integration in Tabs3 and then configure TAS Customization, the desired TAS Bank account(s), and the desired Trust Account(s). For complete step-by-step instructions on setting up Automatic Trust Payments, refer to the Integration Guide or the Automatic Trust Payments Overview topic in the TAS Help.
We recommend updating statements on a regular basis, but why is that? What does the Update Statements program actually do?
Why Statements Should Be Updated
When the Update Statements program is run, numerous files are updated in the software. Furthermore, some processes cannot take place until statements are updated.
The following is a list of what occurs when statements are updated:
- Fee, cost, payment, and client funds transactions included on a final statement will be updated and archived.
- Accounts receivable is updated.
- Billed productivity figures are updated.
- E-mail Statements can be sent via the E-mail Statements window.
- Unallocated payments are allocated if billed amounts are due. If integrating with General Ledger Software (GLS), GLS journal entries are posted to reflect the new allocations.
- Archived payment records are created for any Client Funds Payment to Firm transactions that do not have a Fund Application of WIP Payment.
- Archived payment records are created for any Pending Auto Trust Payments that were included on the final statements.
Backing Up Before Updating Statements
Because Update Statements affects so many files, we highly recommend backing up your data files (File | Back Up Data Files) prior to updating statements. If the statement update process is interrupted (e.g., network drop, power loss, etc.), you must restore your data before continuing to work. This is because your data may be mismatched, meaning some files may have been updated for a client’s statement, but the interruption may have occurred before all files were updated. For more information on the effects of an Update Statements interruption, see Knowledge Base Article R10064, “Update Statements Program was Interrupted.”
Platinum Note: Platinum users have a huge benefit because backing up before updating statements is not necessary. This is because Platinum software provides Transaction Processing, which allows firms to automatically recover data in many potential data loss situations, including when Update Statements is interrupted. For more information on Platinum’s Transaction Processing feature, see Knowledge Base Article R11179, “Transaction Processing: Auto-Recovery of Interrupted Database Transactions.”
Updating Statements
To update a statement, you must first run a final statement, which is different than a draft statement (and is specified on the Options tab of the Generate Statements program). Once a final statement has been generated, complete the following steps to update the statement:
- From the Statements menu, select Update Statements.
- Click Yes to create a backup.
- Optionally select a Client ID and/or Timekeeper range.
- Click OK.
After Statements Have Been Updated
Need to get another copy of an older statement? You can always reprint updated statements using the Reprint Single Updated Statement program (Statements | Reprint Updated Statement | Reprint Single Updated Statement) or Reprint Multiple Updated Statements program (Statements | Reprint Updated Statement | Reprint Multiple Updated Statements).
Additionally, you may occasionally need to undo a statement that was updated in order to make changes. This can easily be accomplished via the Undo Single Updated Statement program (Statements | Undo Updated Statement | Undo Single Updated Statement) or Undo Multiple Updated Statements program (Statements | Undo Updated Statement | Undo Multiple Updated Statements).
Updating statements is an important part of the billing process in Tabs3. If you’re not already updating statements on a regular basis, take the time to review your current procedures and consider making a change.
From time to time, you may need to reduce a client’s outstanding balance, but how can this be accomplished? The Tabs3 Billing Write Off Clients training video walks you through the process of writing off all or part of a client’s balance.
View this three-minute video here:

Training Videos can be accessed 24 hours a day, 7 days a week, at Tabs3.com/videos. You can also access Training Videos while in the software by selecting Help | Documentation and then clicking the See also link for Tabs3 and PracticeMaster Training Videos.
Are there additional notes that you want to add to statements for one or more clients? There are multiple areas in Tabs3 Billing to enter notes that can then be shown on statements for a single client, a group of clients, or all clients. A graphic is provided at the end of this article that represents each of the following elements.
Statement Notes for a Single Client
If you want to add notes to a single client’s statement, this can be set up in the Client file using the Beginning and Ending Statement Notes fields (File | Open | Client | Statement Options tab), or the Miscellaneous Lines 1-3 (File | Open | Client | Custom Fields tab).
Beginning and Ending Statement Notes
The Beginning Statement Notes will print following the Work Description and Miscellaneous Lines 1-3. The Ending Statement Notes will print at the end of the statement, but before any statement notes included in a statement template or ending text defined on the Headings tab of Statement Customization. Each of these fields has a maximum of 250 characters.
You can optionally select to Change Notes to blank after Statement updated if you want the note to only be included on the next statement.
Tip: You can optionally use the Change Client Options program (Maintenance | Client Related | Change Client Options) to copy Beginning and Ending Statement Notes for multiple clients.
Miscellaneous Lines 1-3
The Miscellaneous Lines 1-3 will print following the Work Description. Each of these fields has a maximum of 50 characters.
Statement Notes for a Group of Clients
To add notes to multiple clients’ statements, you can use the Statement Notes program (Statements | Statement Setup | Statement Notes). Statement Notes can be up to 511 characters. Once Statement Notes have been created, they can be assigned to a statement template (Statements | Statement Setup | Statement Templates | General tab | Statement Notes section).
Statement templates provide the ability to include a Beginning Note that is shown below the Client’s Beginning Statement Notes, and an Ending Note that is shown below the Client’s Ending Statement Notes. Statement templates are assigned to each client via the Client file (File | Open | Client | Statement Options tab).
To recap, adding statement notes for a group of clients can be set up as follows:
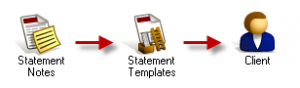
Statement Notes for All Clients
If you want to show the same note on every statement for every client, then you want to use the Statement Customization program (Statements | Statement Setup | Statement Customization | Headings tab). You can add up to 9 lines of text at the top of the statement (60 characters each), or 250 characters of text at the bottom. When adding Lines of text to be printed as a heading on the first page of each billing statement, this text will be the first text shown on the statement. When adding Lines of text to be printed as a message at the end of each billing statement, this text will be the last text shown on the statement.

For more information on Statement Notes, see the Tabs3 Billing Help or the Statement Formatting Guide located at Tabs3.com/support/docs.html.
It’s after hours and you’ve run into some trouble printing. Something doesn’t look right, it’s printing off the page, or you need to make just a few tweaks to finish your project. However, you’re not sure what to do. What do you do? Check out the Knowledge Base, of course!
Knowledge Base Article R10469, “Frequently Asked Questions About Printing,” provides frequently asked questions regarding the following subjects:
- Printing Statements – Using letterhead for statements, centering statements on the page, reference numbers not printing on draft statements, and what the Compress Address check box in Statement Setup does.
- Printing Reports – What to do when the font is too small, and how to print landscape reports.
- Printing Checks – Printing, printing a second copy of checks, printing a duplicate stub, and printing trust information on checks.
- General Printing Questions – Stopping a print job, specifying different margins, adjusting the Preview window, changing the Offset Adjustment, fixed pitch fonts vs. proportional fonts, and configuring an additional printer.
Our Knowledge Base can be accessed 24 hours a day, 7 days a week, at support.Tabs3.com. You can also access our Knowledge Base while in the software by selecting Help | Internet Resources | Knowledge Base.
You’ve heard about Platinum, but haven’t had time to look into it yet. Now you wonder if your firm should take action now, before it’s too late. You’ve heard the horror stories whispered around the water cooler; you try to shake off the cold chill as you walk back to your desk – is that just air conditioning, or premonition? The following stories wend their way through your thoughts for the rest of the day…
Your boss tells you that not only has the server crashed, but the external backup has been failing recently. He wants you to restore the internal backup of the Tabs3 and PracticeMaster software. You start to tremble. Time is money, so when prompted to make a backup you always click No, because you don’t want to interrupt workflow by having everyone exit the software. You close your eyes in dread; there is no internal backup…
- Platinum’s HotBackup features let you back up files while users are working, schedule backups throughout the day, and receive e-mails confirming when backups have completed. Additionally, you can maintain up to 198 HotBackups.
It’s nearing the end of a dark and stormy Friday before a long holiday weekend. You start to update statements, skipping the backup because you want to wrap things up so you can leave. The lights flicker and your computer reboots as a loud clap of thunder makes you jump. You open Tabs3 Billing again, but when trying to work in the software, you receive a message that a backup needs to be restored due to the Update Statements program being interrupted. Your pulse leaps, knowing that some of the attorneys will probably come in to work this weekend. Now they can’t use the software until the data has been restored…
- Platinum’s Transaction Processing and Auto-Recovery features help prevent the need to restore a backup. Transaction Processing ensures that transactions completely succeed while the software is running. In the case of the software not shutting down correctly, such as with a power failure, Auto-Recovery “rolls back” the data to its previous state before the transaction began.
The phone rings. You answer it, only for your breath to catch in your throat – an attorney needs a report for her meeting in 5 minutes, but that report takes more than 20 minutes to run. There’s no way to get her the information she needs in time…
- With Platinum, common reports typically run 10 to 30 times faster than the Multi-User version. This means that you can provide needed reports at the drop of a hat.
It’s midnight, but you can’t sleep with the full moon lighting your room. You’re out of town and away from the office with the current case weighing heavily on you. You get up to check your e-mail and do some research since you’re awake anyway, and discover information that will change your entire case strategy. Your client’s case hangs in the balance; you must compare the new information to what’s saved in PracticeMaster, but it’s late and you can’t access it remotely. A dog howls outside. The hair on the back of your neck raises as you pace the floor. Finally, you grab the phone to wake the managing partner…
- With Platinum, you can quickly access clients, contacts, fees, calendar records, journal records, documents, and more using Tabs3 Connect from any internet-enabled device. Whether you’re at home or out of town, and it’s midnight or Saturday, access your work while away from the office.
Someone received an error in the software, and you need to run a Data File Integrity Check. Unfortunately, several of the employees are away from their desks. You don’t have the password for their computers, nor the time to go to each one, and you know resetting users is bad. You need to make sure the data is fine before the attorneys come back from lunch. You begin to sweat, jumping at shadows as you expect someone to come in at any time demanding answers…
- Platinum provides the ability to safely Log Off Users. Select a time interval for users to wrap up tasks, and a notification will be sent that they will be automatically logged out of the software when the displayed countdown ends.
In addition to all of these features, Platinum also provides eNotes, accelerated filtering and column sorting, the Platinum Exchange Connector, an Accounts Receivable by Timekeeper Report, and enhancements to the Detail Accounts Receivable Report. For more information on all of the Platinum features, see Knowledge Base Article R11379, “Platinum Overview.”
Don’t succumb to terror. For information on a 30-day trial offer, to get a price quote, or to order Platinum, contact your local reseller, consultant, or our Sales Department at (402) 419-2200!
Have you ever wondered how to make your statements stand out to clients? Have you wanted to add additional fields to your statements? You can do both by using Statement Designer! Statement Designer enables you to design custom letterhead, cover letters, statements, invoices, and envelopes.
With Statement Designer (Statements | Statement Setup | Statement Designer), you can edit one of the Sample 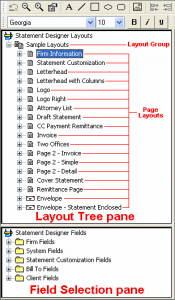 Layouts included with the software or create your own. On the left-hand side of the window there are two sections; the Layout Tree pane shows the layouts currently available, while the Field Selection pane shows the fields that are available to add to a layout.
When a layout is selected, the Page Layout pane is available on the right-hand side. This is where you can design 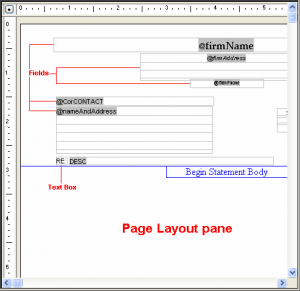 your statement layout. Simply double-click a field from the Field Selection pane, and it will appear in the page layout. From here, you can move the field to the appropriate place, resize the field, or right-click the field and select Properties to change properties such as font face, font size, color, rich text attributes, and more.
Once you have changed or created a Statement Designer layout, you will need to associate the layout to a Statement Template (Statements | Statement Setup | Statement Templates). Simply select the Template you want to change, or create a new one, and edit the Layouts tab. The template can now be assigned to a client by opening the Client file, clicking the Statement Options tab, and selecting a Draft Template or Final Template.
To enable Statement Designer when printing statements, from the File menu, select Print Setup. Click the Statement Setup button. On the right-hand side, select the Enable Statement Designer Layouts check box and click OK. Now when you print a statement for the client(s) whose statement template is associated with a statement designer layout, you will see your new statement layout!
For more information on customizing the sample layouts included with the software, see Knowledge Base Article R10901, “Customizing the Sample Page Layouts Provided with the Tabs3 Statement Designer.”
Did you know that you can quickly add an image to the top of your statements, such as your firm’s letterhead? You can always use Statement Designer to customize your statements, but if you simply want to use an existing bitmap image, this can easily be added to your statements by selecting the desired bitmap via Print Setup.
To add a bitmap to statements
- From the File menu, select Print Setup.
- Click the Statement Setup button.
- In the Page One section, select the Bitmap check box.
- Click the Select button to browse out to where your bitmap image is located.
- Click OK.
Don’t have a bitmap image of your firm’s letterhead? We offer professional bitmap scanning. For more information, see Knowledge Base Article R10168, “Bitmap Scanning Service.
