
Did you know that you can reverse write offs? The Reverse Write Off feature allows you to reverse a write off that was created via Write Off Client. The information for the write off will be backed out, returning the client ledger, accounts receivable, receipt allocation, and productivity to their original values.
To reverse a write off
- In the Quick Launch, search for and select “Reverse Write Off.”
- Select the Client ID.
- In the Reference Number field, select the write off you want to reverse.
- Click OK.
Did you know that pressing F9 in the Matter Manager takes you right to the matter field? This makes it quick and easy to change matters after opening the Matter Manager, and works in both Tabs3 Billing and PracticeMaster.
You can now preview files in document management records from the List tab of Document Management or the Record List in Matter Manager.
To toggle the preview, press Ctrl+F1 or right-click in the List tab, select the SnapShot submenu, and then select Show Document Preview. When enabled, a preview of the file replaces the SnapShot pane when a document management record is selected, allowing you to view the associated file. When disabled, or a non-document management record is selected, the standard SnapShot pane is shown.
PracticeMaster’s document preview displays a read-only version of the document, and supports most standard file types provided the required application is installed. This feature is similar to the Preview option in Windows Explorer.

This feature is available in Version 2025 and later.
Did you know that Tabs3Pay can help you get paid faster? Accepting credit cards helps make it easier for clients to pay their bills. Sign up directly from Tabs3 Billing or Tabs3 Trust Accounting; in the Quick Launch, search for and select “Tabs3Pay Web Portal.”
With Tabs3Pay, you can:
- Manage separate trust and operating accounts.
- Securely store payment information for future use.
- Accept credit cards and electronic checks, all from within Tabs3 Software.
- Include a payment link in email statements, allowing your clients to easily enter payment information through the secure Tabs3Pay portal.
- Include trust replenishment request links with email statements or generate email requests directly from the Tabs3 Billing Matter Manager using Request Trust Deposit.
- Schedule future or recurring payments for clients.
- Take advantage of the Surcharging feature, allowing you to minimize the expense of processing fees.
- Enable clients to pay their current balance from the Tabs3 Client Portal.
To learn more about Tabs3Pay, visit Knowledge Base Article R11871, “Tabs3Pay Frequently Asked Questions,” or R11869, “Configuring Tabs3Pay.”
 Did you know there is a calculator built into number and amount fields? When your cursor is in any number or amount field, you can use the math operators (+, -, *, /, or =) to add, subtract, multiply, and divide values just as you would on a calculator. When you press Enter, the total of your calculations will be displayed in the field that you are currently in. This feature can be used to easily perform calculations without using a separate calculator. The popup calculator can be accessed from a number or amount field by pressing M or one of the math operators.
With Tabs3 Cloud, all of the Tabs3 software is on a server in the cloud; offering you access from anywhere, and lightening your own server load. No need to hire IT to manage the software – backups are made automatically, updates are posted regularly by the Tabs3 team, and support is still just a phone call away with the same team you’re already familiar with! Tabs3 Cloud includes Tabs3 Billing and Financials, and PracticeMaster can be added for an additional charge.
To see how Tabs3 Cloud can benefit you and to get a quote, visit tabs3.com/Cloud to schedule a demo with a product expert.
Did you know that some activities are logged in the software, such as when the software is backed up or restored? This information can come in handy when you want to determine when something happened and who initiated it.
A Support Log is available for viewing or printing in every application, but provides different information based on the application. Not all activities are logged, but those that have a high impact are typically included.
To print a Support Log
- In the Quick Launch, search for and select “View the Support Log.”
- Optionally enter a Date range.
- Optionally select the Specific option next to Users, and then select the desired users for whom you want the report to run.
- Optionally select the Specific option next to Features, and then select the desired features for which you want the report to run.
- Click the Print button.
There are many helpful features in the Support Log. For example, let’s say you are sure that you updated statements last week, but now those transactions are showing as work-in-process again. In Tabs3 Billing, you can print the Support Log and include the Undo Updated Statements feature. When reviewing the report, you will see a list that includes every time Undo Updated Statements has been run. The following information will also be included: Date, Time, User, Statement, Cnt (Count), Client Range, and Reporting Month. Now you can see who undid the statements and talk to them to find out why.
To view a complete list of what features are included in the Support Log for each application, visit Knowledge Base Article R11288, “Support Log Information.”
Did you know that you can quickly start other Tabs3 Software applications from within any application? Once you have opened one of the Tabs3 Software applications, simply click on the desired application button in the application toolbar! The application toolbar is located at the bottom of the Quick Launch pane.
![]()
When starting any application from the application toolbar, the new software will use the same User ID as the current application. An application’s button will not be displayed on the application toolbar if you do not have access rights to that application or if it is not installed on your workstation.
Did you know that you can drag records to move or replicate them in the Graphical Calendar? This makes it easy to reschedule a meeting, or to schedule a continuance.
- If you want to move an event to a different time, simply move your mouse to the left side of the record until the pointer becomes a
 . Click to grab the record, and then drag it to the desired time. This removes the record from the original time slot and adds it to the new time slot.
 - If you want to replicate a record, such as when a meeting needs to continue at another time with the same people at the same location, hold the Ctrl key as you drag the record to the desired time. This does not remove the record from the original time slot; instead, a replicated record is added to the new time slot.
If you use the Convert to Fee feature, customizing your Convert to Fee Settings can be a time saver!
Default settings can be specified for calendar, email, note, phone, research, timer, and document records via Convert to Fee Settings (In the Quick Launch, search for and select “Convert to Fee Settings”). Settings are saved per user, so each login user has their own default settings. Default settings are broken down by record type (e.g., timer, email, document, etc.) and provide defaults for tcode, timekeeper, description, time to bill, and more.
For example, you can specify the Default Timekeeper setting for each record type to one of the following:
- Always use Timekeeper <number>
- Timekeeper used for last fee
- Client’s Primary Timekeeper
This means that every time you convert a record to a fee, the timekeeper will be automatically entered based on your preferred setting for that record type.
As another example, you can specify a particular tcode, or task-based billing code, for each record type. This means that you could set a default tcode of “14 – Communicate with” for email type journal records, and a default tcode of “10 – Legal research” for research type journal records.
By specifying Convert to Fee Settings, you will have less editing to do when converting records to fees, making this administrative task run quicker and more smoothly.
Do you sometimes forget where to access features or reports in the software that you only use occasionally? Use the Quick Launch to find what you need!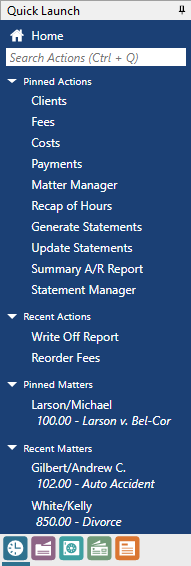
The Quick Launch provides a Search Actions field to quickly find actions in the current application. Simply start typing, and a list of possible choices that contain the characters entered will be displayed, allowing you to easily select an action to launch. For example, searching for “check” will include Check for Updates and Data File Integrity Check in the list of options. In addition to the feature names, common acronyms and alternate references are included. For example, searching for “attorney” in Tabs3 Billing will include all references to “timekeeper” in the list such as Timekeeper Information, Timekeeper Productivity Report, etc.
In addition to search capabilities, the Quick Launch displays the most recent actions and matters accessed and provides the ability to pin actions and matters. To pin an action or matter, hover over the item and click the ![]() icon. Pinned actions or matters are removed from the Recent Actions or Recent Matters sections and added to the Pinned Actions or Pinned Matters sections. Pinned items can be reordered by dragging them to the desired position in the list. To unpin an action or matter, hover over the item and click the
icon. Pinned actions or matters are removed from the Recent Actions or Recent Matters sections and added to the Pinned Actions or Pinned Matters sections. Pinned items can be reordered by dragging them to the desired position in the list. To unpin an action or matter, hover over the item and click the ![]() icon.
icon.
Another great feature is the ability to access other applications using the application icons at the bottom of the Quick Launch pane. This provides quick access to all of the Tabs3 Software installed. No need to find the shortcut on your desktop or in the Start menu.
Tip: You can instantly access the Search Actions box by pressing Ctrl+Q.
Did you know that there are several record types throughout the software in which you can mark people or accounts as inactive? Selecting the Inactive check box provides the ability to keep the associated history, but removes the ability to accidentally add associated records. You can also typically choose whether or not you want to include inactive people or accounts on lookup windows and reports.
Records in the following files can be marked as inactive:
- System Configuration – Users
- Tabs3 Billing – Clients, Contacts, and Timekeepers
- PracticeMaster – Clients and Contacts
- General Ledger Software (GLS) – Chart of Accounts
- Accounts Payable Software (APS) – Vendors and Bank Accounts
- Trust Accounting Software (TAS) – Contacts and Bank Accounts (Note: Clients must be marked as inactive in Tabs3 Billing)
For more information on marking records inactive, press F1 to open the Help, enter “inactive” on the Index tab, and select the desired topic.
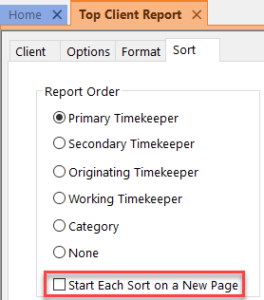 Did you know that you can configure Tabs3 Billing reports to start each sort on a new page? This means that you can give copies to individual timekeepers without running reports more than once. Simply select the Start Each Sort on a New Page check box on the Sort tab of most reports.
Have you ever encountered comments in a Client’s file stating that the client was contacted about their past due balance without any reference as to by who or when? When adding comments to any Memo type field in PracticeMaster, or to the Client Notes field in the Tabs3 Billing Client file, press F5 to automatically insert the current system date, system time, and User ID for the currently logged in user. When pressing F5, the text will be displayed in the following format:
08/15/2024 01:53pm DAWN
F5 is a quick and easy way to take the guesswork out of determining when information was entered, and who entered it.
In PracticeMaster, you have the option of either showing each group calendar record as individual users, or to combine all users into one record on the graphical calendar. This setting can be toggled in Calendar Properties.
To change whether records are combined in the graphical calendar
- In the Quick Launch, search for and select “Calendar Properties.”
- On the General tab, in the Options section, select or clear Combine Multiple User Records into One Group Record.
- Click OK.
Reports can now filter clients based on the contents of their custom fields. This allows clients that use common custom attributes, such as those with task-based billing overrides, to use those fields as reporting criteria. To use this filter, on the Client tab of any report, change the Custom Fields option to Specific and specify an expression.
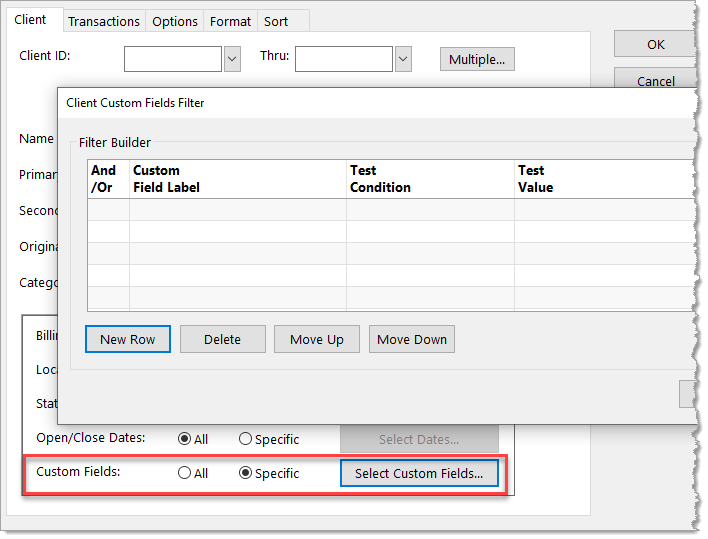
The Filter Builder table allows advanced filtering using expressions. For additional information on creating a filter, see KB Article R11493, “All About Expressions.”
You can now configure Tabs3 Billing to email statements using a Microsoft 365 account with an Exchange Online server. This new sending option allows you to send statements without the need to install Outlook on the workstation or configure SMTP access. The Microsoft 365 option is configured in Customization.
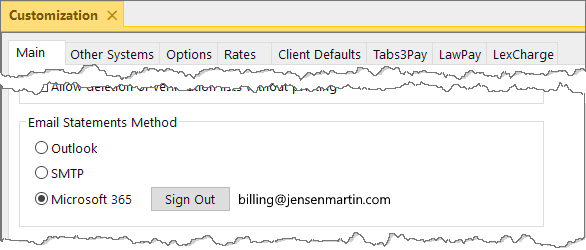
When configuring an account, you will be prompted to grant permissions for Tabs3 Software Email. Once accepted, you are ready to send statements.
Additional information about sending email statements from Tabs3 Billing can be found in KB Article R11913, “Emailing Tabs3 Billing Statements.”
Certain productivity reports use the current reporting month and year to return data. If your report does not show the desired time frame, you may need to change the current reporting month and year. The following reports use the current reporting month and year:
- Timekeeper Productivity Report
- Category Productivity Report
- Timekeeper Profitability Report
- Productivity Report by Category for Each Timekeeper
- Productivity Report by Transaction Code for Each Timekeeper
The current reporting month and year are used to determine report values in the following ways:
- Default dates in report windows: When displaying dates or months in various reports, Tabs3 Billing will default the date or month to the current reporting month unless a report definition is in use. For example, the Ending Reporting Month in the Timekeeper Productivity Report will default to the current reporting month unless a report definition is loaded for the report.
- Period Selection in report windows: The Time Period Selector includes several options for report generation based on the current reporting month and year, such as the Current Reporting Month Prior Year. The values used when these options are selected are dependent on the current reporting month and year selected in the Set Current Reporting Month window.
- Report Definitions: When saving report definitions, Tabs3 Billing can save either a variable or a specific date. The option saved is determined by comparing the date entered and the current reporting month.
To change the current reporting month and year
- In the Quick Launch, search for and select “Set Current Reporting Month.”
- Select the desired month and/or year.
- Click OK.
If you want to learn more in-depth information about individual features in the software, guides are the way to go. A guide is a closer look at how different features work, providing in-depth information and screenshots where appropriate. Guides are a great tool to use when you need to know more. From the table of contents, you can easily jump to the section you most want to learn about, or you can read it straight through. There are over 20 guides available, each focusing on a specific topic within the software such as clients and contacts, statements, Tabs3Pay, Matter Manager, and more.
Guides can be accessed from within the software, as well as on our website.
- To access the guides from within the software, in the Quick Launch, search for and select “Documentation,” or from the Help menu, select Documentation. You can expand and collapse each application to view the desired documentation.
- To access the guides from our website, browse to Tabs3.com/support/docs.html for a full listing of all available guides.
Take a look – you may be surprised to learn how many resources are available!
Did you know that you can do more with Entry Lists than see current work-in-process transactions? The Fee, Cost, Payment, and Client Funds Entry Lists can be printed, filtered, and set to include archived records.
Entry Lists can be toggled to be hidden or displayed using the ![]() (Toggle List) button or Alt+G. Once the Entry List is displayed, the following additional buttons are available:
(Toggle List) button or Alt+G. Once the Entry List is displayed, the following additional buttons are available:

- Print List – Click the
 (Print List) button to print a list of all transactions currently displayed in the Entry List.
 - Select Date – Click the
 (Select Date) button, or press Alt+L, to select a date for which transactions will be displayed. This button is only available when filtering by Transaction Date or Entry Date via View Options.
 - View Options – Click the
 (View Options) button, or press Alt+O, to filter the Entry List by Client ID, Transaction Date, or Entry Date; select to include only those records for a certain Timekeeper or User ID, or select to Include Archived Records; or select a List Location of Right or Bottom.
You enter data regularly; make sure you are getting the most out of your Entry List by showing the information you want to see and quickly printing lists when needed.
Tabs3 Software provides context-sensitive help, but exactly what does that mean? Context-sensitive help means that you can quickly access the Help files based on where you are at in the software. Simply pressing F1 on your keyboard will take you directly to the Help file for the window that is currently open in the software.
For example, let’s say you’re on the Billing Preferences tab of the Client file in Tabs3 Billing. You notice the Bill On Demand check box, and wonder what it does. If you press F1, the Help for the Billing Preferences tab is displayed. Click the Bill On Demand link, and you can now read information on the purpose of the check box.
For another example, let’s say you have a Document Management record open in PracticeMaster. You’re not sure what the Automatically Manage Document and Protect Document check boxes are for, so you press F1 and the Help for the Document Management File is displayed. Scroll down to the File Information section, and information is provided for both check boxes.
Keep in mind that all information for fields and features may not be contained in a single Help topic. When a field or feature relates to additional topics, we provide links to those topics to learn more.
Note: The Help files provide general information on accessing and using the software, including information on every individual field. For information on troubleshooting the software, refer to our Knowledge Base instead.
Drill-down capabilities provide the ability to quickly access data while previewing many reports. When you mouse over a drill-down field on a report while viewing it in a Preview window, the field will be highlighted in yellow. Clicking the field will open the appropriate data entry window for that field, allowing you to edit the record. After saving the change and closing the data entry window, you will be returned to the Preview window. Click the Refresh button (or press F5) to update the report to reflect the change you just made.
For a complete list of reports with drill-down capabilities, refer to Knowledge Base Article R10646, “Drill-Down Features in the Software.”
When using Print Checks, if the Select Invoices to Print check box is selected on the Options tab, the number of invoices selected and the total amount to pay for all selected invoices are displayed at the bottom of the Select Invoices window. Additionally, a Tabs3 column shows a cost status of Paid, Unpaid, or a dash, which indicates no linked cost transaction.

You can also select to Exclude Invoices with Unpaid Tabs3 Cost Transactions from the Options tab. When this option is selected, only invoices with the entire cost amount paid will be printed. This allows firms to opt not to pay invoices until a client pays them for the associated cost.
We release additional enhancements through the life of each Tabs3 Software version. We post interim release updates instead of only when a brand new version is released. So how can you tell what features are in the latest update? Because the software is regularly being updated with great new features, we have a resource for what’s in each update – Release Notes. Release Notes provide a list of changes in the software with the most recently released features at the top. Release Notes can be accessed in the Quick Launch by searching for and selecting “What’s New,” or via the Help | What’s New menu option in the software.
Sometimes you want to see more information about a PracticeMaster file, such as whether a field is set to be included on a Conflict of Interest report, or if History Tracking is turned on. Although File Maintenance provides this information, opening it requires users to be out of the software. Instead, run a File Definition Report to get the information you need!
The File Definition Report (In the PracticeMaster Quick Launch, search for and select “File Definition Report”) provides a list of every field in a file, and includes whether the field is protected or required, if history tracking is turned on, if the field is included on a Conflict Report, if the field is restricted, and more. Additionally, the File Definition Report provides a list of indexes set up for the file.
Did you know that if you are currently on Version 2020, 2021, or 2022, updating to Version 2023 is as easy as checking for updates?
Version 2023 only requires you to use the Check for Updates feature (In the Quick Launch, search for and select “Check for Updates”) if you are already on Version 2020 or later. No separate conversion to run, DFICs, or other steps. This makes it easier than ever to be on the latest version!
Did you know that you can choose whether or not to print the initials of the user who runs a report on the left side of the footer?
To print the user initials in the report footer
- In the Quick Launch, search for and select “Print Setup.”
- Select the desired Printer.
- Click the Advanced Printing Features button.
- In the Footer section, select the Print User Initials check box.
- Click OK.
- Click OK.
Did you know that you can specify the User ID as a startup option for Tabs3 software? Once implemented, when double-clicking your desktop shortcut, the User ID will already be filled in, leaving only the password to be entered.
- Right-click the desktop icon used to start the Tabs3 Software application and select Properties.
- From the Properties window, click the Shortcut tab.
- The startup option can be entered following the program file name in the Target field. An example of the Target field when using the User ID startup option is:”C:\Program Files\Tabs3\TABS.EXE” ALICE
- Click OK.
For a list of other startup options available, open the desired Tabs3 Software application (e.g., Tabs3 Billing, PracticeMaster, etc.) and enter “Startup Options” on the Index tab. For more information on automating tasks, including using startup options, refer to Knowledge Base Article R11034, “Automating Tabs3 Software Maintenance Tasks.”
Did you know that you can quickly get back to the current date in the Daily/Weekly/Monthly Calendar from any other date with a single keystroke?
While in the Daily/Weekly/Monthly Calendar, you could use the horizontal scroll bar to get back to “today” from any other date, or you could navigate through the months on the right. However, the easiest way to get back to the current date is to simply press the Home key.
To see a complete list of keystrokes available in the Daily/Weekly/Monthly Calendar, press F1 while in PracticeMaster. On the Index tab, enter “Calendar” and then select “toolbar” from the list.
Did you know that the language used on statements can be customized? The Terminology tab of Statement Customization provides 77 terms that can be changed.
To change the terminology used on statements
- In the Quick Launch, search for and select “Statement Customization.”
- From the Terminology tab, select the line you want to change.
- Press F2 or click to place focus in the Line field, and make any desired changes.
In addition to changing the terminology, in many fields you can also specify to bold, italicize, or underline text. Furthermore, you can add special codes in some fields to add additional text to the statement. For example, you can enter the “+” character in the first position of Line 2, to display the Attn line before the client’s name.
To see a complete list of terminology line items, and the special codes that can be used, press F1 while in the software and enter “terminology” on the Index tab. Click a line item to see what special options are available.
With the ability for everyone to create their own QuickViews, filters, column layouts, and WorkFlows, these sections in the Quick Clicks pane can start to appear cluttered with other users’ additions, making it harder to find what you need.
There are several ways you can organize items in the Quick Clicks pane. You can drag items around to rearrange the order in which they appear, hide items you don’t use, and create folders into which you can then drag Quick Clicks items. Each of these options are user-specific and will not affect other users.
To rearrange Quick Clicks items
- Open the desired file (e.g., the Client file).
- In the Customize Current View group of the Quick Clicks pane, click Manage Quick Clicks.
- Expand the desired group (e.g., WorkFlow).
- Click and drag items to place them in the desired order.
To hide or unhide Quick Clicks items
- Open the desired file.
- In the Customize Current View group of the Quick Clicks pane, click Manage Quick Clicks.
- Expand the desired group.
- Select the item you want to hide or unhide, and then click the
 (Hide) icon.
To create folders for Quick Clicks items
- Open the desired file.
- In the Customize Current View group of the Quick Clicks pane, click Manage Quick Clicks.
- Expand the desired group.
- Click the
 (Add Folder) icon to create a new folder, and then give it a name.
 - Click and drag the desired items into the newly created folder.
Customizing your Quick Clicks items is easy to do, making sure you have quick access to the items you use.
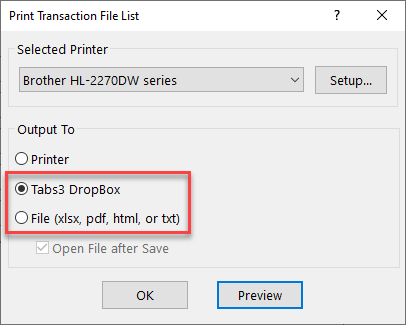
Did you know that you can save reports generated from Tabs3 Software as PDFs? Instead of maintaining folders and/or boxes of paper, store your reports digitally instead!
When printing your reports, there are two ways to save the file as a PDF:
- Select an Output of Tabs3 DropBox. Tabs3 Software’s DropBox is a good option if you want to review the PDF report(s) before saving them to their final location. You can then save multiple files in the DropBox to another location simultaneously. Once all your reports are saved to the DropBox, simply drag them to the desired location.
- Select an Output of File, and then save the file as a PDF to the desired location. This is a good option if you’re ready to save the report and be done.
Once you start saving your reports as PDFs, think about saving them as document management records in PracticeMaster. When saved to PracticeMaster, your reports become easily searchable. Worried about security? Assigning documents to a secure client will limit the information available to users. When running a conflict search, any hits belonging to a secure client will display “This is a secure record.”
Tip: Use the Send to PracticeMaster option while in File Explorer to automatically create document management records in PracticeMaster for multiple reports. For more information on the Send to PracticeMaster feature, see Knowledge Base Article R11571, “Document Management Frequently Asked Questions.”
Did you know that you can select multiple ranges of clients when running reports or generating Statements? Located on the Client tab, the Multiple button can be used to select multiple ranges of Client IDs. After clicking the Multiple button, the Ranges window will be displayed. From here, you can enter multiple beginning and ending Client IDs. Up to 50 client ranges can be specified.

Did you know that PracticeMaster integrates with several third-party programs such as Microsoft Outlook and Word? This integration provides the ability to add emails to PracticeMaster as Journal records and documents as Document Management records. Fee and Calendar records can also be added.
To install a toolbar plug-in
- In the Quick Launch, search for and select “Toolbar Plug-ins.”
- Select the tab of the program for which you want to install a Toolbar Plug-in.
- Click the Install button and follow any instructions noted.
The next time you open the third-party program, you will be able to use the toolbar! For more information about Toolbar Plug-ins, press F1 from within PracticeMaster and enter “Toolbar Plug-ins” on the Index tab.
Did you know that you can change your view to see either more fields or fewer fields in certain files?
By clicking the ![]() (Detail/Rapid) button, or pressing Alt+I, you can specify whether you see all of the fields in a file or only key fields. This option is available in the Tabs3 Billing Fee, Cost, Payment, and Client Funds Entry windows, as well as the AP Invoice/Manual Check Entry window. Detail mode includes all of the fields, whereas Rapid mode simplifies the data entry process by only showing the most pertinent fields.
(Detail/Rapid) button, or pressing Alt+I, you can specify whether you see all of the fields in a file or only key fields. This option is available in the Tabs3 Billing Fee, Cost, Payment, and Client Funds Entry windows, as well as the AP Invoice/Manual Check Entry window. Detail mode includes all of the fields, whereas Rapid mode simplifies the data entry process by only showing the most pertinent fields.
The following fields are not shown when in Rapid Mode:
Tabs3 Billing Fee Entry – Hours to Bill, Rate, Amount, Category, Bill Code, Rate Code, Status, User ID, Date Entered, Sales Tax
Tabs3 Billing Cost Entry – Timekeeper, Bill Code, Rate Code, Status, User ID, Date Entered, Sales Tax
Tabs3 Billing Payment Entry – Status, User ID, Date Entered
Tabs3 Billing Client Funds Entry – User ID, Date Entered
Accounts Payable Invoice/Manual Check Entry – Due Date, Voucher #, Amount to Pay, Discount Amount, Discount Date, Net Amount, Take Discount, Hold/Pay, User ID, Date Entered
Take a moment to look at these options and see if you can help streamline data entry for your office!
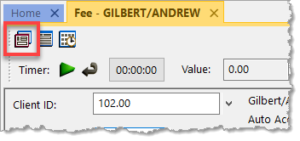
Did you know that you can create a Custom Activity List in PracticeMaster Matter Manager that shows the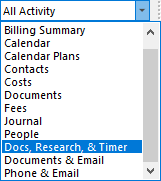 record types you want to see? For example, you could create a Custom Activity List that shows only Document, Research, and Timer records for any selected matter. Once created, custom activity lists can be viewed in Tabs3 Connect as well.
To create a custom activity list
- In the Quick Launch, search for and select “Matter Manager.”
- From the Quick Clicks pane, in the Customize Current View group, select Custom Activity List.
- Click the Add button.
- Enter a Name for the Activity List.
- In the Include Record Types section, select the desired check boxes.
- Click OK.
- Click Close.
Now, when you select the new Custom Activity List, you will see only those records types selected for this list.
When entering information into the software, have you saved an entry only to realize you needed to enter the same description into the next entry as well? If so, there is an easier and quicker way than going back to the last record to copy the information. When you are in Fee, Cost, Payment, or Client Funds, pressing F2 while in the description field will automatically replace the transaction code’s default description with the Description entered for the previous entry saved during the current data entry session.
Data entry lists now have a setting to position the list either below or to the right of the data entry fields. This allows you to take advantage of available space on widescreen monitors, and reduces the amount of scrolling necessary. Entry lists are available in the Fee, Cost, Payment, and Client Funds entry windows in Tabs3 Billing; the Trust Transaction entry window in Trust; and the Invoice/Manual Check entry window in AP.
The data entry list position can be toggled by pressing Alt+O in the data entry window and selecting either Right or Bottom in the List Location section.
This feature is available in Version 2022 (Build 22.1.4) and later.
In Version 2021, we added the ability to go to a specific date when you’re in the Graphical Calendar or on the Dashboard tab of the Home page.
To go to a specific date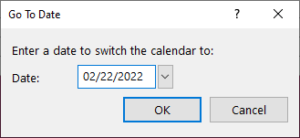
- Open the Graphical Calendar or the Dashboard tab of the Home page.
- Press Ctrl+D.
- Select the desired Date.
- Click OK.
The calendar will change to include the specified date.
When asking others to check documents back in to PracticeMaster so you can edit them, do you often hear that they forgot they even had it checked out? This can be remedied by setting up PracticeMaster to show the Overdue Document List for users who have documents checked out and overdue.
To show the Overdue Document List when users log in
- In the Quick Launch, search for and select “Customization.”
- From the Documents tab, in the Checkout Options section:
- Specify the desired number of days in the Checked out documents are considered overdue after (#) days field.
- Select the Show overdue document list for users when logging in check box.
- Click OK.
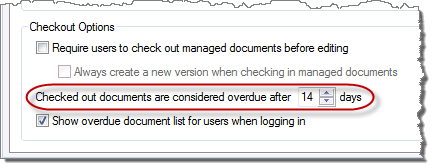
Now, when a user has a document checked out past the overdue limit, the Overdue Document List will be shown when they log in, reminding them that they still have documents checked out.
Want to quickly see how many records are selected in a Tabs3 Billing list or on the List tab of a PracticeMaster file? In Tabs3 Billing and PracticeMaster, a Record Count indicator is shown on the status bar at the bottom of the window. When multiple records are selected, this area will display the text “Selected:” followed by the number of records currently selected. You can use Ctrl+A to select all records, use Shift+click to select a range of records, or use Ctrl+click to select records one by one.
![]()
Did you know you can reset the tab order of fields in the PracticeMaster form layout? By default, the order in which fields were added is used as the tab order. However, you can change this order to fit your workflow. When you are in the Form Designer, click the ![]() icon. This will display numbers on each field, showing the current tab order. You can now click on the fields in the order you want to tab through, and the numbers will change accordingly.
icon. This will display numbers on each field, showing the current tab order. You can now click on the fields in the order you want to tab through, and the numbers will change accordingly.
But what if you need to reset the sequence in the middle? Not a problem! You can set the counter by holding the Ctrl key and then clicking on a field. Although nothing is displayed, the counter will have been set to that number behind the scenes. The next field you click will increment the counter by one and adjust all subsequent fields. For example, let’s say you want to switch fields 8 and 9. First set the counter to 7 by holding the Ctrl key and clicking on field 7. Next, click on field 9 which will be changed to field 8. The old field number 8 will automatically be changed to 9 since there cannot be two fields with the same tab order.
Once changes have been made, click the ![]() (Run Form) icon to save changes.
(Run Form) icon to save changes.
Do you want negative numbers in reports to be more visible? Negative numbers can be set to print in red in any of the Tabs3 Software applications via Print Setup.
To print negative numbers in red
- From the File menu, select Print Setup.
- Click the Advanced Printing Features button.
- Select the Print Negative Numbers in Red check box.
- Click OK.
- Click OK.
Reports will now display negative numbers in red, thus make any negative values stand out!
Did you know that there are several keyboard shortcuts you can use to quickly adjust the date in any Date field?
- To quickly set the date to the current system date, press T (Today) or D (Date).
- To open the QuickDate Calculator, which can be used to calculate a past or future date, press Q (QuickDate) or M (Date Math).
- To change the value of the Date field to mm/dd/yyyy, press C (Clear).
- To increase or decrease the month, press PgUp/Page Up or PgDn/Page Down, respectively.
- To increase the day, press one of the following:
- Up-Arrow
- >
- . (period)
- To decrease the day, press one of the following:
- Down-Arrow
- <
- , (comma)
Additionally, if either no portion of the date is highlighted or the entire date is highlighted, pressing + (plus) or – (minus) will increase or decrease the day, respectively. However, keep in mind that if any segment of the date is highlighted, pressing + or – will increase or decrease that segment.
When previewing reports, you always get the best formatted view of the information for reading. However, when saving a report to an .html or .txt file, you may see different formatting or missing text. So how do you get better output? By using the Optimize for Print to File setting.
When selecting to Optimize for Print to File, the software will make adjustments that help with formatting and eliminate clipping problems. This can help significantly when printing to .html or .txt format.
To Optimize for Print to File
- From the File menu, select Print Setup.
- Select the desired Printer.
- Click the Advanced Printing Features button.
- Select the Optimize for Print to File check box.
- Click OK on the Advanced Printing Features window.
- Click OK on the Printer Setup window.
The next time you print a report to a file, try selecting Optimize for Print to File and see the difference it makes.
Note: We do not recommend selecting this option for your normal printing jobs because of adjustments made to avoid clipping problems. When saving output to a file, the best solution is to configure a special printer for print-to-file output.
Did you know that you can now drill down to all payments (including archived payment) in Tabs3 Billing Version 2021? For example, in the Matter Manager, you can click on any payment to view the Payment Date, Payment Amount, which Timekeeper it applied to, the Statement Date and Number to which it applied, and more. This makes it easy to get payment information without having to run a report!
We recently made two new improvements to the Tabs3 Matter Manager feature!
- Added a convenient way to create a new matter from the Matter Manager. Simply click the + to the right of the Edit Matter button.

- Expanded the Type column in the Matter Manager Payments list to include LawPay transaction information.
Update to Version 20.3.6 or later to get these great new additions!
Did you know that the autofill feature allows you to type in certain fields in order to quickly find what you’re looking for?
All fields with lookup windows have autofill capabilities. As you enter characters into a lookup field, the field will autofill based on the information entered. The first available result will be displayed as highlighted text, with additional characters entered replacing the autofill and updating the results.
When an autofill suggestion exists, a list of possible choices matching the characters entered will also be displayed, allowing you to easily select the entry you want to complete the field. For records that use an identifier, such as the Client ID field for Client records (Tabs3 Billing, PracticeMaster, and Tabs3 Trust Accounting) or User/Group field for Calendar records (PracticeMaster), a second column will be shown containing additional information about the record (e.g., the client’s Name and Work Description, or the User Name).
Note: This feature can be disabled by selecting the Disable Autofill for all lookup fields check box in User Configuration (System Configuration | File | Open | Users).
A new Separate PDF for each Sort option has been added to the Sort tab of both Generate Statements (Statements | Generate Statements) and the Detail Work-in-Process Report (Reports | Work-In-Process | Detail Work-in-Process Report). When this option is selected, matters are grouped into separate PDFs based on the specified sort criteria. For example, if you choose to sort by primary timekeeper, all of the matters with timekeeper 1 assigned as their Primary Timekeeper will be included in a single PDF, timekeeper 2 in a separate PDF, etc. This feature is intended to help firms that distribute their pre-bills electronically by allowing them to send a single PDF to each timekeeper that only includes the matters that are relevant to that timekeeper.
Note: The Separate PDF for each Sort option only applies when you select DropBox or File (with a file type or PDF selected) as your output method.
Time Zones are here! Beginning in Version 2020, you can specify your time zone or set it automatically as per Windows settings (Calendar | Calendar Properties). Additionally, time zones can be changed for individual calendar records. Calendar records will be shown relative to the local time for each user. The PracticeMaster Calendar, PracticeMaster Dashboard, and Tabs3 Connect Calendar all utilize the time zone setting on the device where records are being accessed. This also provides a more seamless integration of calendar records with Microsoft Outlook.
Tabs3 Connect also now supports time zones for calendar events and tasks. Tabs3 Connect will display new calendar records relative to the local time of the device. Tabs3 Connect allows you to specify a time zone when adding an event or task to the calendar, allowing you to schedule something back at the office or for another location.
Note: Only users converting from previous versions of the software need to enable the time zone feature (Utilities | Time Zone Configuration). It is enabled by default for new systems.
Update to Version 20.2.6 to start using time zones.
Additional information on how PracticeMaster handles time zones for calendar events and tasks can be found in KB Article R11836, “PracticeMaster Time Zone Overview,” or the Help included with PracticeMaster. Click here to view the “Enabling Time Zones in PracticeMaster” training video.
Did you know that you can easily review past reconciliation reports when needed, right from the software? Both General Ledger (GLS) and Trust Accounting (TAS) store Reconciliation Reports as PDFs for quick review.
To review a past Reconciliation Report
- From the Reports menu, select Reconciliation Reports.
- Select the report you want to view.
- Click Open.
Note: Reconciliation reports are stored in the Reconciliation folder of the Current Working Directory.
Did you know that you can print a report that provides various settings specific to users? In addition to the User ID, User Name, and Email address for each user, the User List (System Configuration | Reports | User List) can optionally include the following information stored in the user file:
- Logon User Status
- Tabs3 Connect Access (new in Version 20.1.8)
- Only Include Tabs3 Connect Users (new in Version 20.1.8)
- Users’ Access Profiles and Calendar Rights
- Users’ Timekeepers
Did you know that you can print checks right from the Accounts Payable Software (APS) and Trust Accounting Software (TAS) Dashboards?
We’ve made it easier to quickly print checks when you need them.
- In TAS, click the Print Checks button to open the Print Trust Checks program and print a range of checks.
- In APS, click the Print Check button to open the Print Checks program and print a range of checks. Beginning in APS version 20.1.8.804, click the Print Check link next to any invoice to print only that invoice.
As your firm deals with the spread of COVID-19, we want to help you prepare to work from home.
Resources for working from home can be found at Tabs3.com/WorkFromHome.
Tabs3 remains committed to providing top rated customer support, and are available to help. As usual, Technical Support can be reached at (402) 419-2210, 8:00 a.m. to 5:00 p.m. (Central Time) Monday through Friday.
We’ve added the ability to open the Three-Way Reconciliation Report via the TAS Dashboard! When you update to Version 20.1.7 or later, you can quickly run this report for the bank account’s last reconciliation by clicking the 3-Way Rec link.
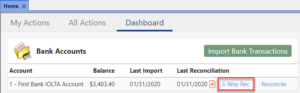
Note: The text “No reconciliation history” will be displayed if no reconciliation records exist for the account.
Want to be able to quickly tell if the software is up to date? Beginning in Version 2020, when an update to the software is available, a badge  is shown on the Check for Updates icon in the Quick Launch pane. This option is available for users who have rights to check for software updates.
Additionally, a notification banner is displayed on the Home Page when an update has been available for 15 or more days. For additional information about updates, see Knowledge Base Article R11804, “Keeping Tabs3 Software Up To Date.”
Although we strive to provide superior documentation in our Help files, Knowledge Base, and Guides, we know that sometimes you want direct guidance with a human touch. Technical Support can be reached by phone or email! We are here to help, so reach out to us. Here are some examples of items we regularly assist our clients with:
- Are you new to the software and need guidance? We can help!
- Want to update to the most recent version of the software? We can help!
- Not sure how to do a procedure? We can help!
- Receiving a message you’re not sure of? We can help!
- Want to start using a new feature in the software, such as keeping track of client communications within PracticeMaster? We can help!
Phone and email support are available Monday through Friday, 8:00 a.m. to 5:00 p.m. (Central Time). We can be reached by phone at (402) 419-2210 or by email via Tabs3.com/support. And don’t forget! Technical Support is included with your maintenance or subscription plan at no additional cost – so give us a call!
In most data entry files, like the Journal, Document Management, and Calendar files, you can easily change the Client ID by opening a record and changing it or via the Change Client ID feature. However, before now, there wasn’t a way to change the Client ID for a fee or cost in PracticeMaster without deleting the record and starting over. We recently enhanced Version 19 so that you can now use the Change Client ID feature in the PracticeMaster Fee and Cost files!
The Change Client ID feature can be used for one record, or multiple selected records. Additionally, you have the option to update the rate based on the selected client, which will automatically recalculate the amount of the transaction(s). The Change Client ID features can be accessed via the following:
- In the Take Action group of the Quick Clicks pane, select Change Client ID
- From the Edit menu, point to Action and select Change Client ID
- Right-click the record(s), point to Action and select Change Client ID
When you change the Client ID of a record that has been processed into a fee, the linked fee’s Client ID will also be changed.
We added a couple of new features to the Print Checks process in Version 19!
When using the Print Checks program (Checks | Print Checks), if the Select Invoices to Print check box is selected on the Options tab, the number of invoices selected and the total amount to pay for all selected invoices are now displayed at the bottom of the Select Invoices window. Additionally, a Tabs3 column has been added that shows the Tabs3 cost status of Paid, Unpaid, or a dash, which indicates no linked cost transaction.
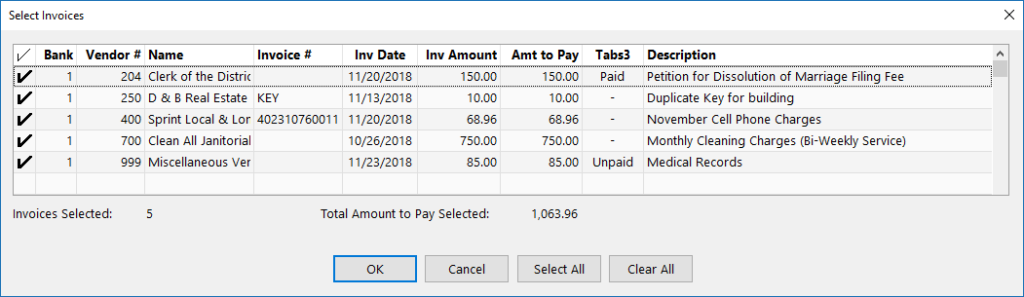
In the print checks program, you can also now select to Exclude Invoices with Unpaid Tabs3 Cost Transactions from the Options tab. When this option is selected, only invoices with the entire cost amount paid will be printed. This allows firms to opt not to pay invoices until a client pays them for the associated cost.
Did you know that you can set a timekeeper’s rate to change as of a specific date? This means that the software will automatically apply the correct rate based on the fee’s date, allowing you to continue entering time like normal. For example, let’s say you want to change a timekeeper’s rate from $250 to $275, effective on March 1st. In this scenario, any time entered with a date prior to March 1st will automatically use the $250 rate, and any time entered with a date of March 1st or later will automatically use the $275 rate. This helps make it easy to change rates and have them billed correctly.
To set the effective date for new timekeeper rates
- From the File menu, point to Open and select Miscellaneous.
- From the Timekeeper tab, select the Timekeeper whose rate will be changing.
- In the Effective Date of New Rates field, enter the date on which the new rate will take effect.
- In the New Rate fields, enter the desired rates.
- Press Ctrl+S.
Note: New rates can also be configured in Rate Tables by editing each table.
Did you know that you can press Ctrl+Shift+F to open the Fee file and Ctrl+M to open the Matter Manager or Client Manager? Most people are aware of standard keystrokes, such as Ctrl+S to Save, Ctrl+C to Copy, Ctrl+V to Paste, etc. However, there are many more shortcuts to help save time in Tabs3 and PracticeMaster without your hands leaving the keyboard!
Tabs3 and PracticeMaster provide two lists of keyboard shortcuts and keystrokes to help speed up your data entry. These can each be found via Help in any of our software by pressing F1 and then entering “keyboard shortcuts” and “keystrokes” on the Index tab. We recommend printing these lists out as a reference until you get used to the ones you need most.
Going between keyboard and mouse to access everyday tasks may not seem very time consuming, but the time it takes for those extra clicks can add up. Check out which keyboard shortcuts and keystrokes will save you time today!
Did you know that you can easily access several resources, besides Help files, from the Help menu in the software?
From the Help | Internet Resources menu, you can select the following: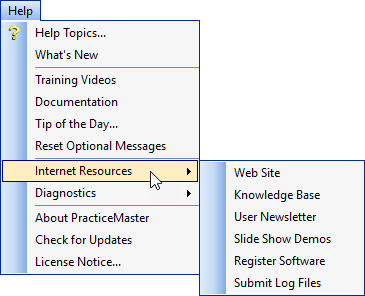
- Web Site – Access the Tabs3 website and find basic information about our products and the various support options, learn more about our company, find a consultant, and get pricing.
- Knowledge Base – Access over 700 articles that provide feature overviews, best practices, “how to” articles, frequently asked questions, troubleshooting information, and more.
- User Newsletter – Access our User Newsletter, which you are reading right now!
- Slide Show Demos – Enter your contact information to attend a live demo of the software, or receive a recording of a past demo.
- Register Software – When you first purchase a license for the software, make sure to register the software. Registering your software ensures that we can contact you when there are software updates and new version available.
- Submit Log Files – Enter an Incident ID provided by Technical Support in order to send us log file information to help better troubleshoot certain situations.
Did you know that you can easily copy records in PracticeMaster using the Replicate feature? Replicating a record adds a new record that uses most, if not all, of the information from an existing record as a basis for the new record.
When replicating a record, all fields will be copied to the new record with the following exceptions:
- Fee File – The Rate, Bill Code, Hours to Bill, and Amount fields will not be copied to the new record.
- Cost File – The Rate and Amount fields are not copied to the new record.
- Contact File – All fields are copied. The new record only needs to be given a new Contact ID.
- Document Management – The Created By field will default to the current user ID instead of the user ID from the old record.
- Area of Practice Files – The new record only needs to be given a new key value.
- Journal File – The new record only needs to be assigned a record type.
- Calendar File – All fields are copied to the new record. However, whenever a group or more than one user is specified for the User/Group field, only the user whose record is being replicated will be included in the new record.
Note: If you are integrating with Tabs3 Billing, you will not be able to use the Replicate feature in the Billing System Lookup Files (i.e., Timekeeper, Category, Tcode, Task Code, and Location files).
To Replicate a record
- From an Editor window, select the record you want to replicate.
- From the File menu, select Replicate.
….or….
Press Ctrl+R. - The replicated record will be displayed, allowing you to make any changes or additions if desired.
For more information on the Replicate feature, as well as limitations, open the PracticeMaster Help (F1 or Help | Help Topics) and enter “Replicate” on the Index tab.
When you need to send a statement to two different parties, what do you do? With Tabs3 Billing, you can automatically generate a duplicate statement by adding an Additional Bill To Address. This option makes it easy to send an additional statement to a third party, such as an insurance company. When adding an Additional Bill To Address, you can select who it goes to and whether they receive a mailed statement, an e-mail statement, or both.
To create an Additional Bill To Address
- From the File menu, point to Open and select Client.
- Select the desired Client ID.
- From the Billing Preferences tab, in the Statement Delivery Options section, click the Add button.
- In the Bill To Record window, enter the desired information and select the desired options.
- Click OK.
- Press Ctrl+S.
Keep in mind that only one Additional Bill To Address can be added.
Tip: If you need to send a statement to more parties and you are e-mailing statements, consider adding additional recipients to the Cc or Bcc fields.
You have a special font you downloaded for your firm to use for statements and reports. Although you print some statements and reports, you also e-mail PDFs of statements and reports to certain clients and third parties. However, did you know that if the e-mail recipient doesn’t have that font installed, the font will be replaced by a different one? When a designated font in a PDF file is not installed on the reader’s computer, the closest substitution font is found and used, but sometimes this can make the PDF more difficult to read.
The solution? You can specify that the font be embedded into the PDF, so that it reaches your recipients as expected.
To embed fonts in PDF files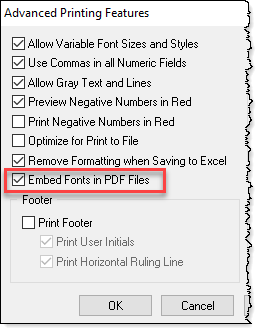
- From the File menu, select Print Setup.
- Select the Printer you use to print statements.
- Click the Advanced Printing Features button.
- Select the Embed Fonts in PDF Files check box.
- Click OK on the Advanced Printing Features window.
- Click OK on the Printer Setup window.
Note: PDF files with embedded fonts have a larger file size, which may lengthen the processing time when e-mailing statements. Additionally, some fonts cannot be embedded due to copyright laws.
You don’t need to skip the specialty font for your firm; embed the font so that others can view the file as intended!
Did you know that you can set up your General Ledger Software (GLS) accounts in an alternate order for reporting purposes? This can be particularly useful when you need to subtotal accounts in more than one way.
In the example below, you can see how the alternate account order can be used for profit centers. The chart of accounts on the left represents accounts broken down by type (i.e., fee income, expense income, etc.), whereas the chart of accounts on the right represents accounts broken down by profit centers (i.e., Lincoln, Omaha, Grand Island, etc.).
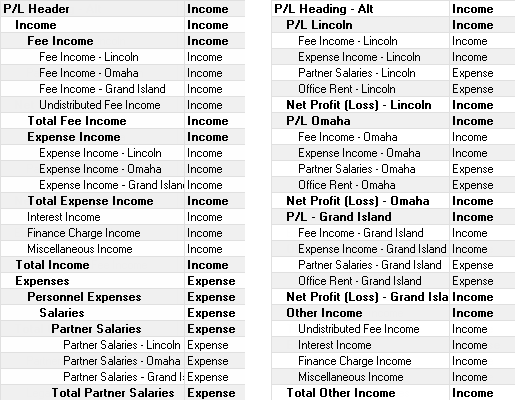
To print reports using an alternate account order, you must enable the use of an alternate account order, and then specify the order in the Chart of Accounts.
To enable the use of an alternate account order
- From the Utilities menu, select Edit GLS Client.
- Select the desired Client Number.
- In the Options section, select the Allow an alternate account order to be defined in the Chart of Accounts check box.
- Press Ctrl+S.
To set up an alternate account order, right-click in the Chart of Accounts (File | Open | Chart of Accounts) and select View Alternate Account Order. You can now drag and drop accounts to their desired position. Once defined, reports can be run using the alternate account order by selecting the Use Alternate Account Order check box on the Account tab of any report that has an Account tab.
Did you know that envelopes can automatically be printed for each statement generated using the client’s Bill To address? When selecting to print envelopes, they will be printed for final statements, but will not be printed when running draft statements. Printing envelopes can be configured via Print Setup.
To print envelopes with final statements
- From the File menu, select Print Setup.
- Select the desired Printer.
- Click the Statement Setup button.
- Select the Print Envelopes check box.
- In the Envelopes section, select the desired settings.
- Click OK on the Statement Setup window.
- Click OK on the Printer Setup window.
Note: This feature will print one statement followed by one envelope. This works best on a printer with a separate envelope tray.
Did you know that you can print a check directly from the Invoice/Manual Check window in Accounts Payable Software (APS) and the Trust Transactions window in Trust Accounting Software (TAS)?
You don’t have to use the Print Checks program to print a single check. Instead, you can use the quick print option in either program.
To quick print a single check in APS
- From the File menu, point to Open and select Invoice/Manual Checks.
- Select the desired Vendor.
- Select the desired invoice or create a new one.
- Click the
 icon or press Ctrl+Shift+P.
To quick print a single check in TAS
- From the File menu, point to Open and select Transaction.
- Select the Trust ID.
- Select the desired transaction or create a new one.
- Click the
 icon or press Ctrl+Shift+P.
The quick print feature in APS and TAS is a quick and easy way to print a check that you need now. Try it out the next time you don’t need or want to run an entire batch of checks.
System Configuration isn’t a program you work in everyday like Tabs3 Billing, but is geared toward setting up certain features of the software. So what settings are controlled in System Configuration, and how do you access it?
Many settings in the software can be set up once and you’re done, but others may need to be updated such as when employees come and go, your server equipment changes, or your firm changes and grows. Although each individual program (Tabs3 Billing, PracticeMaster, etc.) has program-specific customization settings, many System Configuration settings affect more than just a single program.
Note: Manager Access Rights are required to access many of the settings in System Configuration.
System Configuration is used to set up the following features:
- Users and Groups, including Calendar Rights and Tabs3 Connect settings
- Access Rights
- Firm Info
- Outgoing E-mail Configuration
- Microsoft Exchange Integration
- Platinum settings
- …and more!
How to access System Configuration
You can open System Configuration via your desktop shortcut, if present, or via the ![]() Application Toolbar from any of the Tabs3 software. The Application Toolbar is typically located on the right-hand side of the main window and includes buttons for all Tabs3 software for which you have access rights. For more information about accessing System Configuration, press F1 while in the Tabs3 software and enter “System Configuration” on the Index tab.
Application Toolbar from any of the Tabs3 software. The Application Toolbar is typically located on the right-hand side of the main window and includes buttons for all Tabs3 software for which you have access rights. For more information about accessing System Configuration, press F1 while in the Tabs3 software and enter “System Configuration” on the Index tab.
When entering fees and costs for task based billing clients, do you have to scroll through all of the Phase/Task or Activity Codes for other categories to get to the set of task codes applicable for your client? If you use Billing Categories for your clients, you can assign Task Code Sets to your categories so that when entering fees and costs, only the task codes that are associated with that client’s Billing Category are displayed.
To assign a Task Code Set to a Category
- From the File menu, point to Open and select Miscellaneous.
- From the Category tab, select the desired Category.
- Select the Task Based Billing Code Set you want to be assigned to the selected Category.
- Press Ctrl+S.
The next time you enter fees and costs for a client assigned to the Category selected, you will only see the Task Code Set assigned to the Category. This can greatly reduce the number of Task Codes to choose from.
If you accept credit cards, do you have a credit card form on the statements you send to your clients? Many clients prefer to pay by credit card, and if there isn’t an easy way to do so, you may not be getting paid as quickly as you could be.
So how can you include a credit card form on the statements you send to your clients?
Statement Designer (Statements | Statement Setup | Statement Designer) provides two layouts that have a place at the bottom of the page to fill out credit card information: CC Payment Remittance and Remittance Page. Simply edit one of these layouts as desired for your firm’s needs, and then include it on the statement templates (Statements | Statement Setup | Statement Templates) you use for your clients.
For more information on editing Statement Designer Layouts, refer to Knowledge Base Article R10901, “Customizing the Sample Page Layouts Provided with the Tabs3 Statement Designer.”
The next time you send out statements, clients can send the credit card form back with their information and you may very well get paid sooner!
If you mark clients as Inactive, you likely do not want to see them most of the time. In both Tabs3 Billing and PracticeMaster, you can use filters to include or exclude inactive clients.
Tabs3 Billing
In Tabs3 Billing, you can include or exclude inactive clients from the Client Lookup window, reports, and statements.
- Client Lookup window – Select or clear the Show Inactive check box in the lookup window.
- Reports and Statements – On the Client tab of reports and statements, select a Status of Specific, and then click the Select Status button. Select Active or Inactive.
PracticeMaster
In PracticeMaster, you can include or exclude inactive clients from the List tab of any file, the Client Lookup window, the Client Inactivity Report, and Report Writer Reports.
- List tab and lookup windows:
- Client file and Client Lookup windows – To show only active clients, click Active Only in the Client List section of the Quick Clicks pane. To show only inactive clients, you can add a filter using an expression of “Inactive = 1”.
- All other files – Filters to show only active or inactive clients can be added to any file that includes the Client ID field. To show only records with active clients, you can add a filter using an expression of “Client_ID:Inactive = 0”. To show only inactive clients, you can add a filter using an expression of “Client_ID:Inactive = 1”.
- Reports:
- Client Inactivity Report – On the Client tab of the Client Inactivity Report, select a Status of Specific, and then click the Select Status button. Select Active or Inactive.
- Report Writer Reports – An expression can be added to the Filter tab of any Report Writer Report. To show only records with active clients, you can add a filter using an expression of “Client_ID:Inactive = 0”. To show only inactive clients, you can add a filter using an expression of “Client_ID:Inactive = 1”.
Did you know that you can print a Memo line on Accounts Payable Software (APS) checks? Although you can enter text in the Memo field of your invoices, you must be using Check Layout L1572 with the option to print the Memo field selected in order for memos to be printed on your checks.
To specify the check layout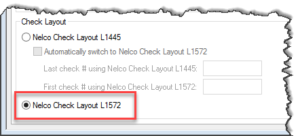
- From the File menu, point to Open and select Miscellaneous.
- From the Bank Account tab:
- Select the Bank Account.
- In the Check Layout section, select Nelco Check Layout L1572.
- Press Ctrl+S.
To specify that the Memo field be printed
- From the File menu, select Print Setup.
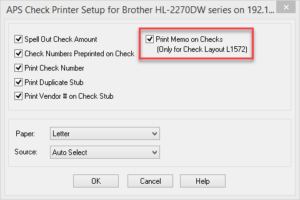
- Click the Check Setup button.
- Select the Print Memo on Checks (Only for Check Layout L1572) check box.
- Click OK on the APS Check Printer Setup window.
- Click OK on the Printer Setup window.
Every so often we debut new features to help improve how you use this online newsletter format. We’re excited to debut our new ratings system!
Our new rating system will appear at the bottom of each article. This will allow for quick feedback on whether you think the article was helpful or not. There are five options: Extremely helpful, somewhat helpful, helpful, somewhat unhelpful, and extremely unhelpful. If you would like to explain your rating, please do so in the comments so we know what types of articles are most helpful to you!
Have any suggestions on articles or how to improve the newsletter? Submit a comment below or send us an e-mail at newsletter@tabs3.com.
Are you using groups for calendaring, or do you enter each user individually in the record? A group is composed of various users, and can be a great shortcut when adding calendar records for teams, managers, or any set of users. For example, if you have regular partner meetings, create a group that includes each of the partners. When creating the calendar record, simply select the group and all of the users in the group will automatically be added to the record.
To create a new group
- Open System Configuration.
- From the File menu, point to Open and select Group.
- Click the
 (New) button.
 - Enter the desired Group ID and Group Name.
- In the Users in Group section, select the users you want to have included in this group.
- Press Ctrl+S.
By adding users to groups, you can help streamline calendar entries and save time!
As you know, one of the greatest features of our online newsletter format is that you can search our entire newsletter archive for quick tips, Q&As, and other helpful articles.
If your results are not what you expected, then try our top five tips for getting the most out of your search:
- Use quotation marks for exact phrases
- If you want more specific results for a certain phrase, then enter that phrase in quotes so the results will only include articles with the same words in the same order. For example, searching for practice management could return 19 results, while searching for “practice management” could return 2 results.
- Do not use common words and punctuation
- Try not to use common words (e.g., a, and) and contractions (e.g., do not instead of don’t, cannot instead of can’t) as they can limit your search results.
- Do not worry about capitalization
- Search engines disregard capitalization, so whether you search for print, Print, or PRINT, they will all return the same results.
- Drop the suffixes
- It’s best to enter the base word so that you don’t exclude relative pages. For example, client and not clients, vendor and not vendors.
- Use keywords strategically
- Search engines do not read sentences the way people do. Asking questions in the search, such as “How do I print statements,” will not receive great results, whereas searching for “print statements” will provide better and more relevant hits.
If you can’t find what you’re searching for, send us an e-mail at newsletter@tabs3.com to submit your idea for a future article!
Did you know that when adding, changing, or deleting a calendar record, PracticeMaster can be set up to generate an e-mail with the record’s details in the body and the applicable users in the To field? This makes it easy to notify users of calendar additions and changes.
To enable the Auto E-mail Notification feature, from the Calendar menu, select Auto E-mail Notification. A ![]() to the left of the menu option indicates that this feature is enabled. Keep in mind that each user who wants to have an e-mail auto-generated must enable this feature.
to the left of the menu option indicates that this feature is enabled. Keep in mind that each user who wants to have an e-mail auto-generated must enable this feature.
Once the e-mail has been generated, make any additional changes as desired and click Send. It’s that easy!
Over the next few months, we will go through some of the best features of our new online newsletter format. This month, we’re going to talk about our newest feature – printing the full newsletter.
You can now print the current month’s full newsletter right from newsletter.Tabs3.com! Simply click the View / Print Full Newsletter link above the Feature Article to view the full newsletter,
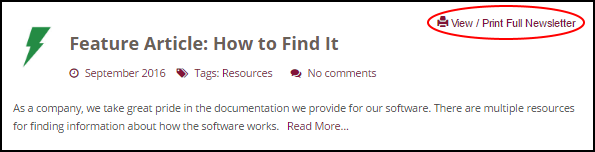
and then click Print Full Newsletter.
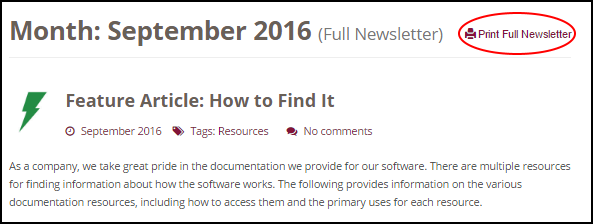
You can also print the full newsletter for past months. Simply open the month you want to print via the Archive section, then follow the same links.
You can opt to print the full newsletter directly from the Print Preview page or you can save it as a PDF to view offline later.
Have an idea for a future newsletter article? Send us an e-mail at newsletter@tabs3.com!
Over the next few months, we will go through some of the best features of our new online newsletter format. This month, we’re going to talk about our newest feature – finding related articles.
You’ll notice this month that when you view an individual article, a new section appears titled “Other Articles That May Interest You”, with three different links to related or similar articles. These three articles are selected based on a powerful algorithm that finds related content from our archive based on similar categories, tags, and content. This new feature can help you find other relevant content on our site and help you learn more about Tabs3 software.
Have an idea for a future newsletter article? Send us an e-mail at newsletter@tabs3.com!
Over the next few months, we will go through some of the best features of our new online newsletter format. This month, we’re going to walk you through how to search for topics.
To search for articles
- On the rightmost side of any page on the Newsletter site, enter your search term in the “Search the site” box.
- Click
 , or press Enter.
The results of your search will be shown with an indicator of how many articles include that word or phrase.
If you want more specific results for a certain phrase, then enter that phrase in quotes so the results will only include articles with the same words in the same order. For example, searching for practice management could return 19 results, while searching for “practice management” could return 1 result.
If you can’t find what you’re searching for, send us an e-mail at newsletter@tabs3.com to submit your idea for a future article!
Over the next few months we will go through some of the best features of our new online newsletter format. This month, we’re going to walk you through how to print and share individual newsletter articles. There currently is no way to print or download the entire newsletter, but we are looking into that feature for the future.
To print articles
- Open up the article you’d like to print.
- Scroll to the bottom of the article.
- Click on the
 button.
 - Select your desired printer and printer settings.
- Click “Print”.
To save articles as PDFs
- Open up the article you’d like to save as a PDF.
- Scroll to the bottom of the article.
- Click on the button.
- Click “Save as a PDF”.
- Click “Save”.
To email articles directly to your coworkers
- Open up the article you’d like to email.
- Scroll to the bottom of the article.
- Click on the
 button.
 - Add the recipients and a message.
- Click “Send”.
Note: When printing newsletter articles via Firefox, the right edge of text and graphics may be cut off. If this is the case, changing the print margins can correct the issue. We have seen this as an issue using the default margins in Firefox, but not Chrome or Internet Explorer.
Do you have any other features you’d like to see in the online newsletter? Let us know in the comment section below!
Did you know that you can change the font size in rich text fields using your keyboard and mouse? When reading data in multi-line rich text fields, you can quickly zoom in or out to make the text more readable using the following commands:
To enlarge the font size
- Press Ctrl while scrolling up
- Press Ctrl + “=”
- Press Ctrl + “+”
To reduce the font size
- Press Ctrl while scrolling down
- Press Ctrl + “–”
To reset the font size to 100 percent
- Press Ctrl + “0” (zero)
Keep in mind that changing the font size for one rich text field will change the font size for all rich text fields in each program for that user.
Did you know that you can change your Tabs3 and PracticeMaster workspace by specifying whether toolbars are shown or not, and where they are positioned if they are shown? These options can increase the available workspace horizontally, vertically, or both.
Showing or hiding toolbars
From the View menu, a ![]() indicates that the Status Bar, Application Toolbar, and in PracticeMaster, the PracticeMaster Task Bar is shown. To change which toolbars are shown or hidden, simply click the menu option to change the status of the toolbar.
indicates that the Status Bar, Application Toolbar, and in PracticeMaster, the PracticeMaster Task Bar is shown. To change which toolbars are shown or hidden, simply click the menu option to change the status of the toolbar.
Changing the toolbar position![]()
The Menu toolbar, Application Toolbar, and in PracticeMaster, the PracticeMaster Task Bar, can all be moved to  the top, bottom, right, or left of the Tabs3 or PracticeMaster program window. Simply click the toolbar gripper, and drag it to the desired location.
Alternatively, you can drag a toolbar away from any 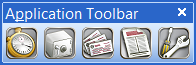 side of the program to make it a floating toolbar. When the toolbar is floating, you can optionally move it outside of the Tabs3 or PracticeMaster program window. This allows for maximum workspace, while still having access to all of the available tools.
Did you know that you can drag files other than those generated via Tabs3 and PracticeMaster software into the DropBox? This can really come in handy when you are e-mailing multiple files of mixed origins to clients, co-workers, or other third parties; when you want to save related items together in a mutual location; and more.
Once all of the desired files are in DropBox, simply select the files and choose the desired option. If you want to e-mail a group of files in the DropBox, click the e-mail icon to attach all of the files to a new e-mail message. Alternatively, you can drag the icons into the new e-mail message. If you want to save all of the files to a mutual location, click the save icon; you will be prompted to save each file individually.
Note: Files that have been dragged into DropBox are not removed from their original location.
Did you know that you can try out the Tabs3 software you don’t have a license for, without downloading anything new? Maybe you currently use Tabs3 Billing and you want to try Trust Accounting Software (TAS), or you use both Tabs3 Billing and General Ledger Software (GLS) and want to try PracticeMaster, or any other combination. When you install your licenses, a trial version of each program is also installed. This means that you can try out each program before you commit to purchasing a license.
- In Windows 10, Trial Software is accessible via Start | All apps | Tabs3 & PracticeMaster with Sample Data.
- In Windows 8, Trial Software is accessible via the Apps window in the Tabs3 & PracticeMaster with Sample Data group.
- In Windows 7 or earlier, Trial Software is accessible via Start | Programs | Tabs3 & PracticeMaster | Trial Software with Sample Data.
When accessing Trial Software, sample data is included so that you do not have to create your own set of data in order to try out all of the features and includes clients, contacts, transactions, and much more. This lets you jump right in to seeing what the software does, instead of spending time setting up and entering data.
So if you’ve been thinking about other Tabs3 software, try it out at your convenience and see what it can do for your firm!
When you have a client with multiple matters, what do you do when the client sends in a single check to cover all matters? You could get out the calculator to determine how much should go to each matter, and then enter multiple payment records, or you could let Tabs3 Billing do this for you.
When entering a payment for multiple matters, simply enter the payment for one of the matters and then click the ![]() (Apply Payment to Multiple Matters) button to open the Payment Amounts for Multiple Matters window. Here, you can either enter each Client ID and the corresponding amount of the matter’s Payment, or you can click the Apply Proportionately button to divide the payment amount between all matters shown proportionately based on the amount due.
(Apply Payment to Multiple Matters) button to open the Payment Amounts for Multiple Matters window. Here, you can either enter each Client ID and the corresponding amount of the matter’s Payment, or you can click the Apply Proportionately button to divide the payment amount between all matters shown proportionately based on the amount due.
Did you know that you can add the PracticeMaster Toolbar icons to the Quick Access Toolbar in Microsoft Office 2007 and later? To add any of the PM Open, PM Save, PM Journal, PM Calendar, and/or PM Fee buttons to the Quick Access Toolbar, simply right-click the icon on the PracticeMaster ribbon and select Add to Quick Access Toolbar.
Did you know that you can find accessibility information about program features in the Help?  The primary topic for each program feature contains an Accessibility section that includes how to access the program feature from both the Task Folders and the program menus, as well as the keystroke if applicable; access rights required to access the feature; and what the exclusivity level is in both Platinum and non-Platinum. The Accessibility section is collapsed by default. To expand the Accessibility section, simply click the icon to the left of Accessibility.
For more information on making the Help work for you, visit Knowledge Base Article R11290, “All About Help.”
You may work with multiple matters throughout the day, so how can you ensure that you are keeping an accurate account of how much time is spent on each task? The PracticeMaster Timer window (File | Timer) can be used to track Time Tasks, Phone Tasks, and Research Tasks. Each record is saved to the Journal  file and can include the Client, Work Description, Contact, a Description of the task, and more. Start and stop the timer for tasks throughout the day from the Timer window as needed.
Once you’re ready to bill a client for your time, you can easily turn timer records into fees using the Process Fee Records program (File | Process Timer Records). When processed, a record is created in the Fee file for the designated client, and a timer record is maintained in the Journal file. This makes it easy to keep track of your time, and to accurately bill clients for work. Using the PracticeMaster Timer means you will never again have to guess at how much time you spent on tasks.
Do you know how to restore from an incremental backup? Make sure you are familiar with the process of restoring before you need to do it. Incremental backups work by backing up the full dataset, and then only backing up those files that have changed from then on. This means that if you need to restore, you cannot just restore to yesterday’s incremental backup because that is only one piece of the picture. The files in Tabs3 and PracticeMaster are all connected. If only some of the files are restored, then information is missing from other files and errors can occur in the software. Instead, if a restore is necessary, you must first restore the last full backup and then restore every incremental backup in order. For more information on how your backup system works, and if it is the right system for you, talk to your IT professional.
Did you know that you can quickly and easily locate your serial number and version from within the software? When calling technical support, have your serial number and version ready to help expedite the call. To determine your serial number and version, from the Help menu, select the About menu option. Both the version and the serial number are shown in the top and middle portions of the window. For more information on what is included in the Help | About window, see Knowledge Base Article R11570, “Information in the Help | About Window.”
Did you know that you can quickly add an image to the top of your statements, such as your firm’s letterhead? You can always use Statement Designer to customize your statements, but if you simply want to use an existing bitmap image, this can easily be added to your statements by selecting the desired bitmap via Print Setup.
To add a bitmap to statements
- From the File menu, select Print Setup.
- Click the Statement Setup button.
- In the Page One section, select the Bitmap check box.
- Click the Select button to browse out to where your bitmap image is located.
- Click OK.
Don’t have a bitmap image of your firm’s letterhead? We offer professional bitmap scanning. For more information, see Knowledge Base Article R10168, “Bitmap Scanning Service.
There are many keyboard shortcuts that help save time while working. These favorite shortcuts quickly get you to commonly used places.
- Ctrl+T opens the Task Folders in each program. This keystroke is handy when the Task Folders have accidentally been closed, or there are other windows on top of it.
- Ctrl+M opens the Client Manager in Tabs3 and the Matter Manager in PracticeMaster. This keystroke quickly opens a summary of your client’s activities.
- Windows Key+D minimizes all open windows. When you have a lot of windows open, this keystroke is the quickest way to get back to your Desktop icons.
For a list of keystrokes in the software, enter “Keyboard Shortcuts” or “Keystrokes” on the Index tab of Help.


